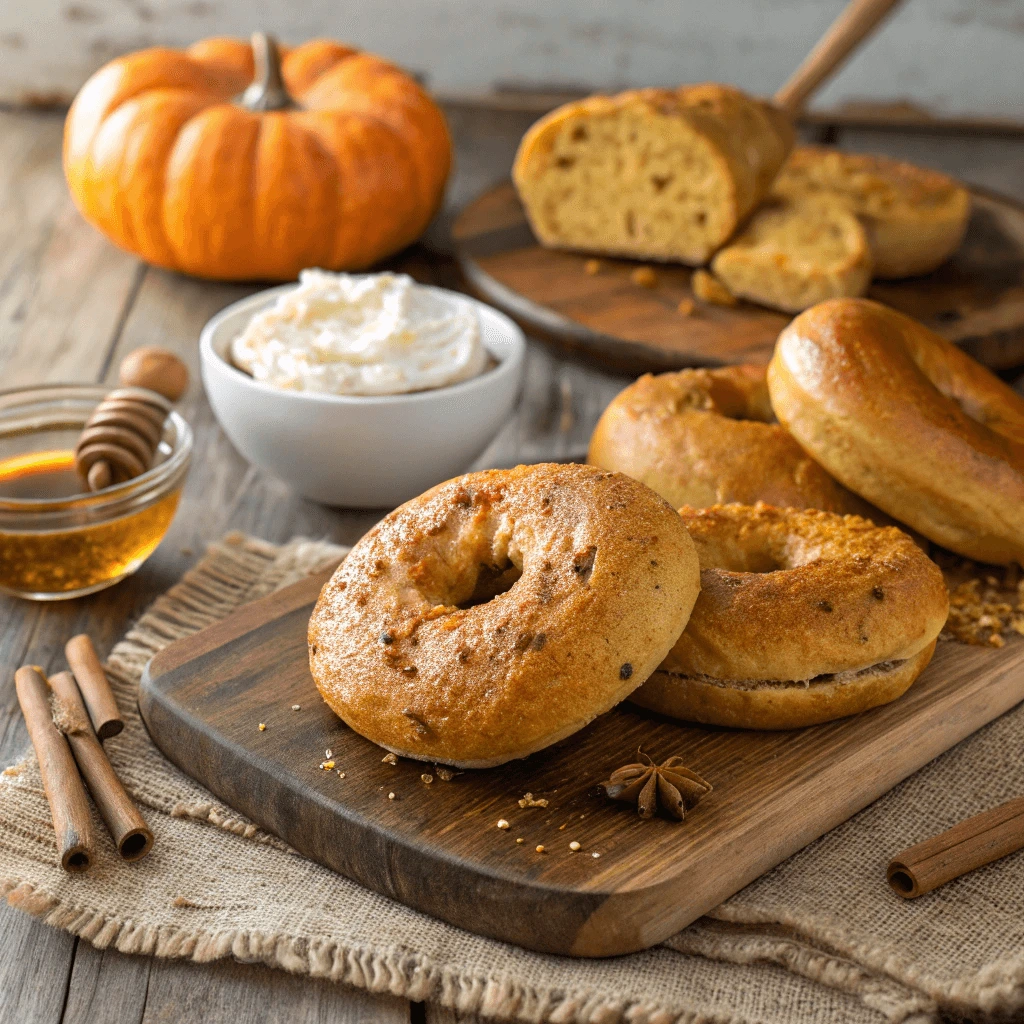
Nothing beats the warm, comforting flavors of fall—especially in homemade pumpkin bagels! These soft and chewy bagels blend real pumpkin puree with cinnamon, nutmeg, and cloves for a cozy, spiced flavor. A touch of sweetness makes them perfect for breakfast or a snack. Enjoy them with cream cheese, maple syrup glaze, or cinnamon butter.
Making pumpkin bagels from scratch is easier than you think. This step-by-step recipe will guide you through mixing the dough, shaping, boiling, and baking. You’ll also find tips for the best toppings and storage methods.
Ready to bake? Let’s get started! 🍂🥯
Why You’ll Love These Homemade Pumpkin Bagels

Soft and Chewy Texture
A great bagel needs the perfect balance between a crispy crust and a chewy interior. Pumpkin bagels achieve this texture through the right combination of ingredients and techniques. Let’s break down what makes them so deliciously soft and chewy.
The Role of Yeast and Fermentation
Yeast plays a key role in creating the bagel’s texture. When mixed with warm water and sugar, it activates and starts producing carbon dioxide. This process helps the dough rise, making the bagels light yet dense enough to hold their signature chew. A longer fermentation time allows the flavors to develop and enhances the final texture.
Why Boiling Matters
Boiling bagels before baking gives them their iconic chewiness. This step gelatinizes the outer layer of the dough, preventing it from expanding too much in the oven. A quick boil—about 30–60 seconds per side—creates the slightly dense texture that makes bagels unique. Adding a bit of honey or baking soda to the water enhances the crust’s color and flavor.
Baking for the Perfect Finish
After boiling, the bagels need high heat to develop a crisp, golden crust. Baking at 425°F (220°C) ensures they cook evenly while maintaining their soft interior. A baking stone or preheated baking sheet helps distribute heat, preventing soggy bottoms and ensuring a firm, chewy bite.
By following these steps, you’ll create pumpkin bagels with the perfect texture—crispy on the outside, soft and chewy on the inside. Ready to move on? Let’s talk about the best ingredients to use!
Delicious Pumpkin Spice Flavor
Pumpkin bagels stand out for their warm, spiced flavor that makes every bite taste like fall. The combination of pumpkin puree and a rich blend of spices creates a comforting aroma and a slightly sweet, earthy taste. Let’s explore the key elements that give these bagels their delicious pumpkin spice flavor.
The Power of Real Pumpkin Puree
Using real pumpkin puree adds natural sweetness, moisture, and a rich, earthy flavor to the dough. Unlike artificial pumpkin flavoring, real pumpkin puree enhances the texture while providing a subtle nuttiness. Canned pumpkin works well, but homemade pumpkin puree can make the flavor even fresher.
The Perfect Pumpkin Spice Blend
The key to capturing the essence of pumpkin spice lies in the right mix of spices. These ingredients work together to enhance the bagel’s warmth and depth of flavor:
- Cinnamon – Adds warmth and a hint of sweetness.
- Nutmeg – Provides a slightly nutty, spicy undertone.
- Cloves – Delivers a bold, aromatic depth.
- Ginger – Introduces a mild heat that balances the sweetness.
- Allspice – Brings a mix of clove, cinnamon, and nutmeg flavors.
A teaspoon of vanilla extract or a drizzle of maple syrup can further enhance the overall taste, giving the bagels a bakery-style richness.
Balancing Sweetness and Spice
Pumpkin bagels should have a perfect balance between sweetness and spice. Too much sugar can overpower the natural pumpkin taste, while too little spice can make them bland. A small amount of brown sugar or honey complements the spices without making the bagels overly sweet.
By using real pumpkin, the perfect spice blend, and just the right amount of sweetness, you’ll create pumpkin bagels bursting with fall flavors. Next, let’s explore the step-by-step process to make these delicious bagels at home!
Perfect for Fall Breakfasts
Pumpkin bagels bring the cozy flavors of autumn to your breakfast table. Their warm spices, soft texture, and slight sweetness make them an ideal choice for a crisp fall morning. Whether paired with a hot drink, a creamy spread, or a hearty side, these bagels create a satisfying and seasonal breakfast. Let’s explore some of the best ways to enjoy them.
Pairing Pumpkin Bagels with Fall Beverages
A warm beverage enhances the flavors of pumpkin bagels, making breakfast even more enjoyable. Some delicious options include:
- Pumpkin Spice Latte – This classic fall drink complements the cinnamon and nutmeg in the bagels.
- Chai Tea – The rich, spiced flavors of chai blend well with pumpkin’s earthy sweetness.
- Hot Apple Cider – A mug of cider adds extra warmth and a touch of autumn nostalgia.
- Black Coffee – A strong, bold coffee balances the bagels’ sweetness without overpowering the flavors.
Toppings That Elevate the Flavor
The right toppings can take your pumpkin bagels to the next level. Try these delicious spreads and add-ons:
- Cream Cheese – Classic and creamy, it balances the spices and adds richness. Try a cinnamon or maple-flavored version for extra flavor.
- Pumpkin Butter – Double the pumpkin goodness with a spread made from sweetened pumpkin puree and spices.
- Honey or Maple Syrup – A drizzle adds natural sweetness without overwhelming the bagel’s flavor.
- Nut Butter – Almond or pecan butter enhances the warm, nutty notes in the bagel.
- Greek Yogurt with Cinnamon – A healthy and tangy option that complements the spice blend.
Make-Ahead Breakfast for Busy Mornings
Pumpkin bagels are a great option for meal prepping during the fall season. You can make a batch in advance and store them for quick breakfasts throughout the week. Here’s how to keep them fresh:
- Room Temperature – Store in an airtight container for up to 2 days.
- Refrigeration – Keeps them fresh for up to 5 days. Toast before serving for the best texture.
- Freezing – Slice the bagels before freezing. When ready to eat, pop them in the toaster straight from the freezer.
Pumpkin bagels bring the essence of fall to your breakfast, whether enjoyed fresh out of the oven or toasted with your favorite toppings. Ready to bake your own? Let’s move on to the step-by-step recipe! 🍂🥯
Ingredients You’ll Need for Pumpkin Bagels
Essential Ingredients
The secret to making soft, chewy, and flavorful pumpkin bagels lies in using the right ingredients. Each component plays a crucial role in the taste, texture, and structure of the bagels. Let’s break down the essential ingredients and how they contribute to the perfect homemade pumpkin bagels.
Flour: The Foundation of the Dough
Flour provides the structure for bagels, ensuring they have the right density and chewiness. The best options include:
- Bread Flour – This is the best choice for bagels because of its high protein content, which helps develop gluten. More gluten means a chewier texture.
- All-Purpose Flour – If bread flour isn’t available, all-purpose flour can work, though the bagels will be slightly softer.
- Whole Wheat Flour (Optional) – Adding a small portion of whole wheat flour can enhance the nutty flavor and boost fiber content. However, too much can make the bagels dense.
Pumpkin Puree: The Star Ingredient
Pumpkin puree gives the bagels their signature flavor, moisture, and vibrant orange color. Some important notes about using pumpkin puree:
- Canned Pumpkin Puree – Convenient and consistent, canned pumpkin works best for baking. Choose 100% pure pumpkin, not pumpkin pie filling, which contains added sugar and spices.
- Homemade Pumpkin Puree – If you prefer fresh pumpkin, roast and blend it into a smooth puree. Strain excess moisture to prevent the dough from becoming too wet.
Yeast: The Rising Agent
Yeast is essential for making the bagels rise and develop their soft, airy texture. You can use:
- Active Dry Yeast – Needs to be dissolved in warm water before adding to the dough.
- Instant Yeast – Can be mixed directly with the dry ingredients, making the process faster.
- Fresh Yeast – Less common but provides a rich, bakery-style flavor if available.
To activate yeast properly, mix it with warm water (110°F/43°C) and a teaspoon of sugar. Let it sit for a few minutes until foamy before adding it to the dough.
Sweeteners: Enhancing the Flavor
A touch of sweetness balances the warm spices and enhances the pumpkin’s natural flavor. The best options include:
- Brown Sugar – Adds a deeper, molasses-like sweetness.
- Honey – A natural sweetener that keeps the dough moist.
- Maple Syrup – Complements the fall flavors perfectly.
Pumpkin Spice Blend: The Key to Warm, Cozy Flavor
Pumpkin spice is what makes these bagels taste like autumn in every bite. The perfect blend includes:
- Cinnamon – The dominant spice, adding warmth and sweetness.
- Nutmeg – Provides a slightly nutty, earthy depth.
- Cloves – Adds bold, aromatic richness.
- Ginger – Gives a mild, spicy kick.
- Allspice – A blend of cinnamon, nutmeg, and clove-like flavors.
Adjust the spice levels based on your preference. For a more pronounced flavor, increase the cinnamon and nutmeg.
Salt: Enhancing the Taste
Salt balances the sweetness and enhances the other flavors. Without it, the bagels would taste flat. Use fine sea salt or kosher salt for the best results.
Water: The Secret to a Chewy Crust
Boiling the bagels in water before baking creates their distinct chewy crust. Adding honey, brown sugar, or baking soda to the boiling water deepens the color and flavor.
Final Touch: Egg Wash or Dairy-Free Alternative
An egg wash (beaten egg brushed on the bagels before baking) gives them a shiny, golden crust. If you prefer a vegan alternative, use:
- Coconut Milk – Adds a slight sweetness and golden color.
- Almond Milk – A neutral-flavored option.
- Maple Syrup and Water – For a touch of extra caramelization.
With these essential ingredients, your pumpkin bagels will turn out flavorful, chewy, and perfect for fall mornings. Next, let’s dive into the step-by-step process of making them! 🍂🥯
Optional Additions
While classic pumpkin bagels taste delicious on their own, adding extra ingredients can enhance their flavor, texture, and appearance. Whether you want extra sweetness, crunch, or a festive touch, these optional additions can take your homemade pumpkin bagels to the next level.
Sweet Additions for Extra Flavor
If you prefer a sweeter bagel, consider mixing in or topping your dough with these ingredients:
- Chocolate Chips – Semi-sweet or dark chocolate chips add a rich, indulgent contrast to the warm spices.
- White Chocolate Chips – These add a creamy sweetness that pairs well with pumpkin.
- Cinnamon Sugar Topping – Sprinkling a mixture of cinnamon and sugar on top before baking gives a crisp, caramelized crust.
- Maple Glaze – Drizzling a light maple glaze over baked bagels adds extra fall flavor.
- Brown Sugar Swirl – Mixing brown sugar and cinnamon into the dough creates a marbled, sweet interior.
Nutty and Crunchy Enhancements
For added texture, try incorporating nuts or seeds into the dough or as toppings:
- Pecans – Their rich, buttery crunch pairs perfectly with pumpkin. Chop them finely and fold them into the dough or sprinkle them on top.
- Walnuts – Slightly bitter and earthy, walnuts balance the sweetness of the bagel.
- Pumpkin Seeds (Pepitas) – Toasted pepitas add a festive, crunchy topping while enhancing the pumpkin theme.
- Almond Slices – These provide a light, nutty texture without overpowering the bagel’s flavor.
- Sesame Seeds – Though more common on savory bagels, sesame seeds add a mild, nutty taste that complements the spices.
Dried Fruits for a Chewy Texture
Dried fruits bring a chewy texture and natural sweetness to the bagels. Some excellent options include:
- Raisins – Classic and subtly sweet, raisins blend well with the pumpkin spice flavors.
- Cranberries – Their tartness contrasts beautifully with the sweetness of the bagel.
- Chopped Dates – These add deep, caramel-like sweetness.
- Dried Apples – Small pieces of dried apple add a subtle fruity note that enhances the fall flavors.
Savory Twists for a Unique Flavor
If you prefer a more savory take on pumpkin bagels, consider these additions:
- Cheddar Cheese – A sprinkle of sharp cheddar before baking creates a slightly salty contrast.
- Goat Cheese Crumbles – This tangy cheese pairs well with pumpkin’s sweetness.
- Rosemary or Thyme – Fresh herbs add an aromatic depth to balance the spices.
- Garlic and Onion Powder – A pinch of these adds a slight umami taste, perfect for those who enjoy savory bagels.
Final Touch: Toppings and Coatings
Before baking, you can coat your bagels with different toppings to enhance their look and texture:
- Coarse Sugar – Adds a slight crunch and a decorative sparkle.
- Oats – Rolled oats create a rustic, wholesome look.
- Coconut Flakes – Lightly toasted coconut gives a tropical twist to the bagels.
- Chia or Flaxseeds – These add extra fiber and a slight crunch.
By incorporating some of these optional additions, you can customize your pumpkin bagels to suit your taste preferences. Whether you go for sweet, crunchy, chewy, or savory, each variation adds a unique touch to this fall favorite. Now, let’s move on to the step-by-step process of making them! 🍂🥯
Substitutions
Making homemade pumpkin bagels allows for flexibility in ingredients, making it easy to adjust the recipe based on dietary needs, preferences, or ingredient availability. Whether you need a gluten-free, dairy-free, vegan, or lower-sugar option, there are plenty of effective substitutions that still result in delicious, soft, and flavorful bagels.
Flour Substitutions
Flour is the base of any bagel, but different types can change the texture, chewiness, and nutritional profile of your pumpkin bagels.
- Gluten-Free Flour Blend – If you need a gluten-free option, use a 1:1 all-purpose gluten-free flour mix. Choose one that contains xanthan gum to help maintain elasticity.
- Whole Wheat Flour – Replacing half (or all) of the all-purpose flour with whole wheat flour adds fiber and a slightly nutty taste. Keep in mind that whole wheat flour absorbs more moisture, so you may need to add extra liquid.
- Almond Flour – While almond flour cannot fully replace wheat flour in bagels, you can substitute up to ¼ of the total flour for a softer, slightly denser texture.
- Spelt Flour – A great alternative to all-purpose flour, spelt flour adds a mild, nutty flavor while keeping the bagels tender.
Pumpkin Puree Alternatives
Pumpkin puree gives bagels their signature flavor, moisture, and color, but if you don’t have it on hand, you can try these alternatives:
- Sweet Potato Puree – Offers a similar creamy texture and slightly sweeter taste.
- Butternut Squash Puree – Has a mild, buttery flavor that complements warm spices well.
- Carrot Puree – A lighter alternative that still provides natural sweetness and moisture.
- Mashed Banana – While not the same as pumpkin, banana adds natural sweetness and a soft texture.
Dairy-Free and Vegan Substitutions
For those avoiding dairy or following a vegan diet, these swaps ensure the bagels stay fluffy and flavorful:
- Milk Alternatives – Swap regular milk with almond, oat, soy, or coconut milk in a 1:1 ratio.
- Butter Substitutes – Use coconut oil, vegan butter, or olive oil instead of regular butter.
- Egg Replacements – If the recipe calls for eggs, try these vegan alternatives:
- Flax Egg – Mix 1 tablespoon of ground flaxseed with 3 tablespoons of water and let it sit for 5 minutes.
- Applesauce – Use ¼ cup of unsweetened applesauce per egg for added moisture.
- Mashed Banana – ¼ cup mashed banana can replace an egg, but it will add a slight banana flavor.
Sweetener Substitutions
If you want to adjust the sweetness of your pumpkin bagels, try these alternatives:
- Coconut Sugar – A natural alternative to brown sugar that adds a slight caramel-like flavor.
- Maple Syrup – A great liquid sweetener that pairs well with pumpkin spice. Reduce other liquids slightly when using this.
- Honey – A natural option that provides a light floral sweetness.
- Monk Fruit Sweetener or Stevia – For a sugar-free option, use monk fruit or stevia. Adjust based on sweetness levels, as they can be more concentrated than sugar.
Yeast Alternatives
If you don’t have yeast or want a quicker, yeast-free version, try these options:
- Baking Powder & Baking Soda – For a no-yeast pumpkin bagel, replace yeast with 2 teaspoons baking powder and ½ teaspoon baking soda. This results in a more biscuit-like texture rather than a chewy bagel.
- Self-Rising Flour – This contains a mix of flour, baking powder, and salt, making it a convenient alternative for yeast-based dough.
Spice and Flavor Adjustments
If you want to tweak the spice level or overall flavor of your pumpkin bagels, try these:
- Extra Cinnamon – For a stronger cinnamon flavor, add an additional ½ teaspoon.
- Pumpkin Pie Spice Substitute – If you don’t have store-bought pumpkin spice, mix:
- 1 teaspoon cinnamon
- ¼ teaspoon nutmeg
- ¼ teaspoon ginger
- ⅛ teaspoon cloves
- Vanilla Extract – Adds depth and enhances the overall warmth of the spices.
By using these substitutions, you can customize your pumpkin bagels to suit different dietary needs or ingredient availability—without sacrificing taste or texture. Now, let’s move on to the step-by-step guide to making your perfect pumpkin bagels! 🍂🥯
Step-by-Step Guide to Making Pumpkin Bagels
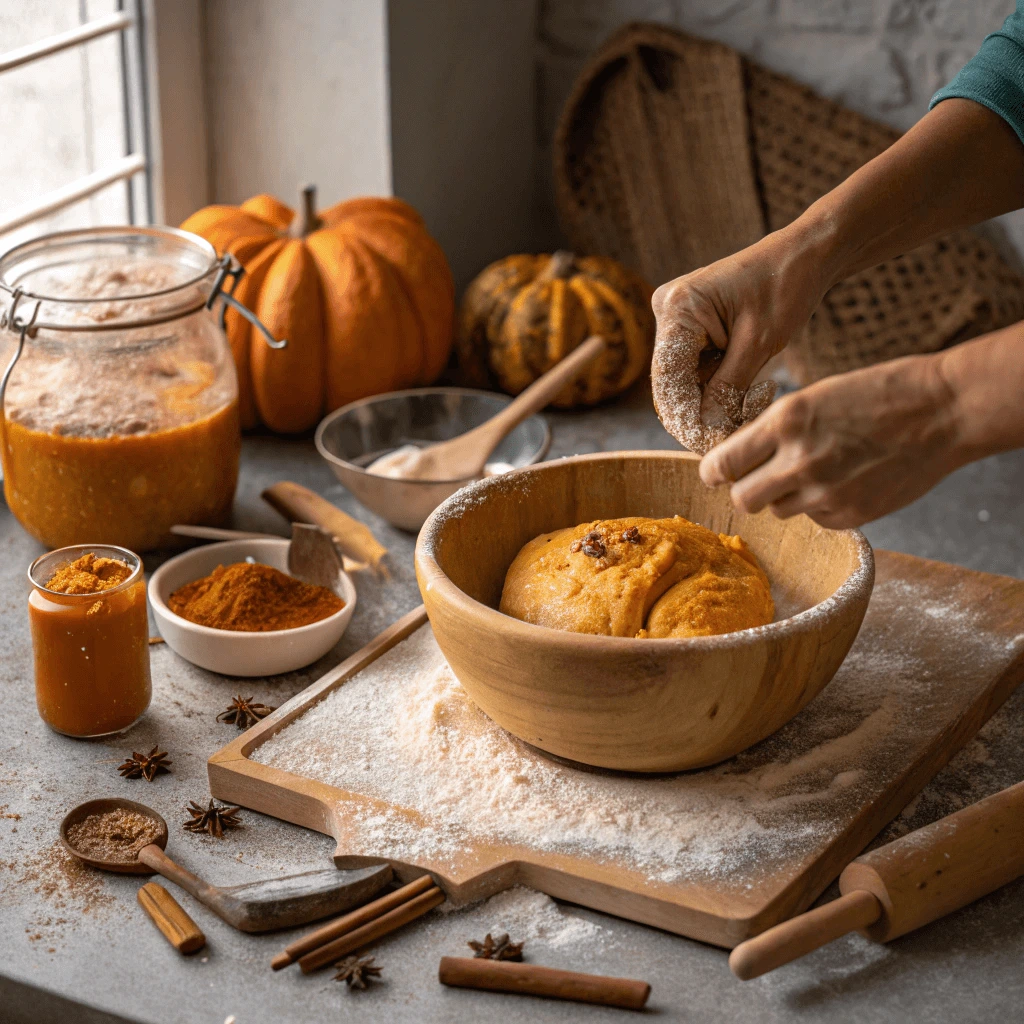
Making the Dough
The dough is the heart and soul of a pumpkin bagel, as it forms the base for their soft, chewy texture. This step is crucial to ensuring your bagels come out perfect every time. Follow these detailed steps to make a smooth, elastic dough that will be easy to shape and bake.
Step 1: Combine the Dry Ingredients
Start by measuring and mixing your dry ingredients. Accurate measurements are key for the best results.
- In a large mixing bowl, combine all-purpose flour, sugar, salt, and your chosen spices (cinnamon, nutmeg, ginger, and cloves).
- Mix the dry ingredients thoroughly to ensure the spices and sugar are evenly distributed. If you’re using whole wheat flour or another flour substitution, make sure to adjust the amount to maintain the right consistency.
Step 2: Prepare the Wet Ingredients
Now, move on to the wet ingredients. These are responsible for giving your dough its moisture and elasticity.
- In a separate bowl, combine warm water (about 110°F) and active dry yeast. Let the yeast sit for 5 to 10 minutes to activate. You’ll know it’s ready when the mixture starts to bubble and foam.
- Add pumpkin puree and any additional liquid like milk (or its plant-based alternative) to the yeast mixture. Stir in melted butter or oil for added richness.
- Mix until you have a smooth and even mixture. If you want to enhance the flavor further, you can also add a teaspoon of vanilla extract at this stage.
Step 3: Mix Wet and Dry Ingredients
With the dry and wet ingredients ready, it’s time to combine them:
- Gradually add the wet mixture into the dry ingredients, stirring with a wooden spoon or dough hook until the dough begins to come together.
- Once the dough starts to form, switch to your hands or a stand mixer with a dough hook attachment to knead the dough.
- Knead the dough for about 8–10 minutes until it becomes smooth and elastic. If using a stand mixer, knead it on medium speed. If the dough is too sticky, add small amounts of flour (about 1 tablespoon at a time) until it reaches the right consistency.
- The dough should be soft, slightly tacky but not sticky. It should pull away from the sides of the bowl easily.
Step 4: Let the Dough Rise
Once your dough is kneaded, it needs time to rise and develop flavor.
- Shape the dough into a ball and place it in a lightly oiled bowl. Turn the dough around so that it gets coated with oil on all sides, which will prevent it from drying out.
- Cover the bowl with a clean kitchen towel or plastic wrap and place it in a warm, draft-free area. Let it rise for about 1 to 1.5 hours or until it doubles in size. The rising time may vary depending on the room temperature, so make sure to check regularly.
Step 5: Punch Down and Shape the Dough
After the dough has risen, it’s time to punch it down and shape it into bagels.
- Gently punch down the dough to release the air bubbles. This step is important for creating the chewy texture in the bagels.
- Divide the dough into equal portions, usually about 8 to 10 pieces depending on your desired bagel size. Roll each portion into a ball.
- Use your fingers to poke a hole in the center of each dough ball, then gently stretch it to form the classic bagel shape. Make sure the hole is large enough, as it may shrink slightly during baking.
Step 6: Second Rise
Once your bagels are shaped, they need a second rise. This final rise gives them their final texture.
- Place the shaped bagels on a parchment-lined baking sheet, leaving space between each one.
- Cover them with a clean kitchen towel and let them rise for about 30 minutes or until they puff up slightly.
By following these steps, you’ll have a smooth, elastic dough ready to be boiled and baked into delicious pumpkin bagels. Remember that the key to great bagels is not rushing the process. Allow the dough enough time to rise and develop its unique texture. After this step, you’ll be well on your way to enjoying your homemade pumpkin bagels!
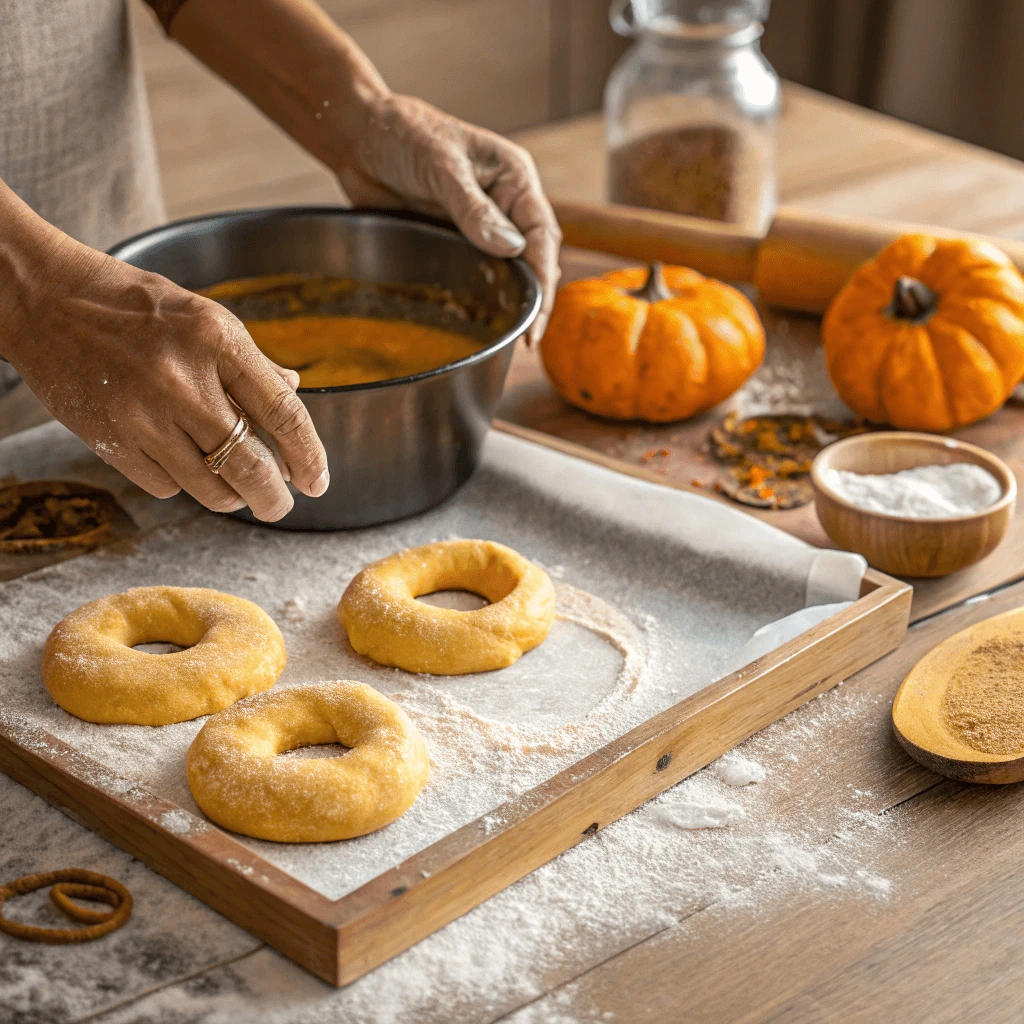
Shaping and Boiling the Bagels
Shaping and boiling the bagels is a crucial step in making perfect pumpkin bagels. These two stages impact the bagel’s structure, texture, and appearance. Shaping ensures that your bagels hold their shape during the boiling process, while boiling gives them that signature chewy texture. Follow these steps carefully for perfectly shaped, soft, and chewy pumpkin bagels.
Step 1: Shape the Dough Into Bagels
Once your dough has finished the first rise, it’s time to shape it into bagels. Proper shaping is essential for the bagels to bake evenly and look attractive. Here’s how to shape your dough:
- Take each piece of dough (about 8 to 10 pieces depending on size) and roll it into a smooth ball.
- Gently poke your finger through the center of the ball to create a hole.
- Carefully work your fingers around the hole, gently stretching it out to form the classic bagel shape. Be sure the hole is large enough to remain open after boiling. The hole will shrink slightly as the bagels rise and cook, so a wider hole ensures a better final shape.
- If the dough is sticky, dust your hands and the surface with flour to prevent it from sticking. Try not to overwork the dough during this step, as it could lead to a denser texture.
Step 2: Prepare the Boiling Water
Boiling the bagels before baking is essential for achieving their signature chewy texture and shiny crust. The boiling water also helps to set the shape of the bagels. Here’s how to prepare the water:
- Fill a large pot with water, ensuring there’s enough room for the bagels to float freely. You’ll want the water to be at least 3 to 4 inches deep.
- Add 1–2 tablespoons of honey or brown sugar to the water. This helps the bagels achieve a slight sweetness and a rich golden color on the crust. The sugar also encourages the crust to become more shiny and caramelized.
- Bring the water to a boil over medium-high heat. Once the water is boiling, reduce the heat slightly to maintain a gentle boil. This ensures the bagels don’t collapse or lose their shape.
Step 3: Boil the Bagels
Boiling the bagels for a short period of time is key to getting the perfect texture. Here’s how to do it:
- Gently place one or two bagels at a time into the boiling water. Don’t overcrowd the pot, as the bagels need space to float and cook evenly.
- Boil each bagel for 1 to 2 minutes on each side. The bagels should puff up slightly as they cook. You’ll notice that the dough becomes firmer and more stable as the bagels cook.
- Use a slotted spoon to carefully remove each bagel from the water and place it back on the parchment-lined baking sheet. Be careful not to tear the bagels or let them lose their shape while removing them.
Step 4: Boiling Tips for the Perfect Texture
Boiling the bagels is the secret to achieving that chewy, soft texture, and shiny crust. Here are a few additional tips to help you perfect the process:
- Add flavor: For added flavor, you can add a little cinnamon or nutmeg to the boiling water. This will infuse the bagels with extra pumpkin spice aroma before baking.
- Don’t skip the honey or sugar: Honey or sugar in the boiling water creates the golden, glossy crust that you’ll find on store-bought bagels. This step is essential for a bakery-quality finish.
- Don’t overcook: Boiling the bagels for too long can make them too dense or cause them to lose their shape. Make sure you boil each side for only 1 to 2 minutes.
Step 5: Preheat the Oven and Prepare for Baking
Once your bagels have been boiled, you’re almost ready to bake them to perfection. Before placing the bagels in the oven, take these steps to prepare:
- Preheat your oven to 425°F (220°C). A hot oven is essential to ensuring that the bagels bake properly and achieve the right texture.
- Lightly grease a baking sheet or line it with parchment paper. This will help prevent the bagels from sticking to the surface as they bake.
By following these detailed steps for shaping and boiling your pumpkin bagels, you’ll be well on your way to enjoying homemade bagels with that classic chewy texture and golden crust. The next step is baking, where the magic happens!
Baking to Perfection
Baking your pumpkin bagels is the final step to achieving the perfect texture, color, and flavor. This process transforms the dough from a boiled, soft bagel to a golden, chewy delight. By following the right temperature and time, you can ensure that your pumpkin bagels come out just as you like them—crispy on the outside and soft on the inside.
Step 1: Preheat the Oven
Before you even think about placing your bagels in the oven, it’s important to get the temperature just right. Preheating your oven ensures that the bagels start baking immediately once placed inside, helping them to rise evenly and bake properly.
- Preheat to 425°F (220°C): The high temperature is necessary to create that chewy, crisp crust while preserving the softness of the bagel interior. The hot oven also allows the bagels to puff up and form that desired round shape.
- Allow the oven to fully reach the desired temperature before placing the bagels inside. This ensures consistent heat distribution throughout the baking process.
Step 2: Place Bagels on the Baking Sheet
Once your bagels have been boiled, it’s time to place them on a prepared baking sheet. Proper placement ensures that each bagel bakes evenly and doesn’t stick to the sheet.
- Use parchment paper or a greased sheet: Lining your baking sheet with parchment paper makes cleanup a breeze and prevents sticking. Alternatively, you can lightly grease the baking sheet with butter or oil.
- Space them out: Leave about 1 to 2 inches of space between each bagel to allow room for the bagels to expand while baking. If the bagels are too close together, they may merge during the baking process.
Step 3: Optional Toppings and Egg Wash
Before placing the bagels in the oven, you can add some extra flavor and color. Toppings and an egg wash enhance both the appearance and taste of your bagels.
- Egg wash: To achieve a beautiful, golden-brown crust, brush each bagel with an egg wash. Simply beat an egg with a tablespoon of water, then gently brush the mixture over the top of each bagel using a pastry brush. This gives the bagels a shiny finish once baked.
- Add toppings: You can also sprinkle your bagels with additional toppings for extra flavor. Consider adding pumpkin seeds, cinnamon sugar, or a pinch of salt to the tops of your bagels for added crunch and sweetness. These toppings will toast and caramelize slightly in the oven, creating a delicious texture and flavor contrast.
Step 4: Bake the Bagels
Now that your oven is preheated, the bagels are shaped, and the toppings are added, it’s time to bake them to perfection. Baking the bagels at the right temperature for the correct amount of time ensures they become golden and chewy.
- Bake for 20-25 minutes: Place your bagels in the oven and bake them for 20-25 minutes or until they develop a golden brown color. The exact time will depend on your oven, but you want the bagels to be evenly browned and firm to the touch.
- Rotate halfway through: To ensure even baking, rotate the bagels halfway through the baking process. This helps the bagels brown evenly and prevents one side from becoming darker than the other.
- Check for doneness: The bagels are done when they sound hollow when tapped on the bottom. If you want them extra crispy, bake them for an additional few minutes, but be careful not to overdo it.
Step 5: Let the Bagels Cool
Once the bagels have baked to a perfect golden-brown, it’s time to remove them from the oven. But don’t dive in just yet—let them cool down before slicing. Cooling allows the bagels to set and prevents them from becoming too soft or losing their shape.
- Cool on a wire rack: Place the bagels on a wire cooling rack to allow air to circulate around them, helping them cool evenly. Avoid letting them sit on the baking sheet, as this can cause the bottoms to become soggy.
- Let them rest: Allow the bagels to cool for at least 15-20 minutes before slicing into them. This helps preserve their shape and texture while also making sure the interior remains soft and fluffy.
Step 6: Enjoy Your Perfect Pumpkin Bagels
Once your bagels have cooled and reached their ideal texture, they’re ready to be enjoyed. You can serve your pumpkin bagels with a variety of spreads, such as cream cheese, butter, or even a drizzle of honey.
- Serve immediately: Pumpkin bagels are best when enjoyed fresh out of the oven. The flavor and texture are at their peak right after baking.
- Storage: If you have any leftover bagels, store them in an airtight container or plastic bag for up to 2-3 days. You can also freeze them for later enjoyment—simply place them in a freezer-safe bag and thaw as needed.
By following these steps, you can bake your pumpkin bagels to perfection, with a golden-brown crust, a chewy interior, and an irresistible aroma. Whether you’re enjoying them for breakfast or as a snack, these homemade bagels are a delicious treat that will satisfy all your pumpkin cravings.
Best Ways to Serve and Store Pumpkin Bagels
Toppings & Spreads
After baking your pumpkin bagels to perfection, it’s time to take them to the next level with delicious toppings and spreads. The right topping can elevate the flavor of your bagel, adding an extra layer of taste and texture. Whether you prefer something sweet or savory, there’s no shortage of options to complement your homemade pumpkin bagels.
Sweet Spreads
For those who enjoy a sweeter breakfast or snack, there are a variety of spreads and toppings that pair wonderfully with pumpkin bagels.
- Cream Cheese: A classic choice, cream cheese adds a rich, tangy flavor that contrasts beautifully with the sweetness of pumpkin bagels. You can opt for plain cream cheese or go for flavored varieties like honey, cinnamon, or pumpkin spice cream cheese.
- Nut Butters: Peanut butter, almond butter, or cashew butter are all excellent options for spreading on pumpkin bagels. Their creamy texture and slightly nutty flavor pair well with the rich pumpkin taste. You can even drizzle a bit of honey on top for added sweetness.
- Maple Syrup: If you want to add a hint of natural sweetness, maple syrup is a perfect choice. It complements the pumpkin flavor, creating a comforting and indulgent experience. Pour a little over your bagel or spread it thinly for a lighter touch.
- Cinnamon Sugar: Cinnamon sugar can add a delightful sweetness and spice to your bagels. It’s a simple, yet effective topping that enhances the flavors of pumpkin without overpowering them. Simply mix cinnamon with sugar, then sprinkle generously on your bagel for a sweet, spiced finish.
Savory Toppings
If you prefer savory flavors, there are plenty of savory spreads and toppings to enhance the flavor of your pumpkin bagels.
- Cream Cheese with Herbs: Instead of sweetened cream cheese, try mixing herbs such as chives, dill, or parsley into your cream cheese. This creates a savory spread that pairs well with the slight sweetness of the pumpkin bagel.
- Avocado: For a creamy, savory topping, spread some mashed avocado onto your bagel. The buttery texture and mild flavor of avocado complement the pumpkin bagel’s hearty base, creating a satisfying and delicious meal. You can also add a pinch of salt and pepper, or a drizzle of olive oil for extra flavor.
- Cheese: Soft cheeses like goat cheese, ricotta, or even sharp cheddar can bring a savory richness to pumpkin bagels. These cheeses add depth and balance to the sweetness of the pumpkin. For extra indulgence, try toasting your bagel with cheese to melt it slightly before adding other toppings.
- Tomatoes & Fresh Herbs: Freshly sliced tomatoes, along with a sprinkle of salt, pepper, and herbs like basil or thyme, create a vibrant topping for your bagel. The combination of fresh vegetables with the soft bagel offers a light and fresh contrast to the pumpkin’s warmth.
Additional Toppings for Variety
You can also experiment with a variety of other toppings to further personalize your pumpkin bagels. These additions offer unique flavors and textures, adding complexity to your dish.
- Pumpkin Seeds: For a crunchy and nutty element, sprinkle some roasted pumpkin seeds on top of your bagel. The slight saltiness and texture of the seeds pair beautifully with the softness of the bagel and the pumpkin flavor.
- Chopped Nuts: Walnuts, pecans, or almonds bring an extra crunch to your pumpkin bagels. They add a satisfying texture and slightly sweet or nutty taste that enhances the overall experience. Toast the nuts for extra flavor, and sprinkle them on top of your spread for a delightful bite.
- Fresh Fruit: Adding fresh fruit like berries, sliced bananas, or apple slices can bring a refreshing contrast to the richness of the pumpkin bagel. A drizzle of honey or a dusting of cinnamon on top of the fruit can add a touch of sweetness to balance the flavor.
- Greek Yogurt: For a creamy and slightly tangy spread, opt for Greek yogurt. Its thick, rich texture and mildly tart flavor complement both sweet and savory pumpkin bagel combinations. You can add a drizzle of honey or top it with fresh fruit for a breakfast that’s both nutritious and indulgent.
The Importance of Pairing
The key to choosing the right toppings for your pumpkin bagels is balance. Because pumpkin bagels already have a naturally sweet, earthy flavor, you’ll want to pair them with toppings that either enhance that flavor or provide contrast. Sweet toppings like cinnamon sugar or honey complement the bagel’s inherent warmth, while savory options like cream cheese with herbs or avocado balance the sweetness and add a satisfying richness.
Experimenting with different combinations can lead to exciting flavor profiles that suit any mood or occasion. Whether you enjoy your pumpkin bagel with a simple spread of cream cheese or prefer to load it up with savory ingredients, there’s no wrong way to enjoy this seasonal treat. Add your favorite toppings and enjoy your pumpkin bagel in a way that makes you smile!
Storage Tips
Once you’ve baked your pumpkin bagels, you’ll want to make sure they stay fresh for as long as possible. Proper storage not only helps preserve their texture and flavor but also ensures that you can enjoy them at your convenience. Whether you plan to eat your pumpkin bagels within a few days or want to keep them for a longer period, these storage tips will keep them in great shape.
Short-Term Storage (For Freshness)
If you plan to eat your pumpkin bagels within a few days, you can store them at room temperature. However, there are a few things to keep in mind to prevent them from becoming stale or drying out.
- Store in an Airtight Container: The best way to store pumpkin bagels at room temperature is by placing them in an airtight container or resealable bag. This will lock in moisture and prevent them from becoming dry. Make sure the bag or container is sealed tightly to keep air out.
- Use a Bread Box: If you have a bread box, it is an ideal place to store your pumpkin bagels. Bread boxes are designed to maintain the right balance of humidity, which helps prevent your bagels from drying out while still allowing some airflow to prevent mold. Keep the bread box in a cool, dry place, away from heat sources like stoves or direct sunlight.
- Paper Towels for Moisture Control: If you don’t have an airtight container, you can wrap your pumpkin bagels in paper towels to help absorb any excess moisture. This can help prevent sogginess, especially in more humid environments. Once wrapped, place them in a paper bag or a plastic bag, leaving the opening slightly open to allow for ventilation.
Long-Term Storage (For Future Use)
If you have made a large batch of pumpkin bagels or want to store them for later, freezing is your best option. Freezing preserves the flavor and texture of your bagels, allowing you to enjoy them whenever you want, even weeks after baking them.
- Freeze Individually: To avoid having to thaw all your bagels at once, it’s a good idea to freeze them individually. To do this, place each bagel on a baking sheet lined with parchment paper, making sure the bagels are not touching. Freeze them for about 2 hours or until they are solid. Once frozen, transfer the bagels to a resealable plastic freezer bag or an airtight container. This method prevents the bagels from sticking together and allows you to pull out just one or two when needed.
- Wrap for Extra Protection: For added protection against freezer burn, wrap each pumpkin bagel tightly in plastic wrap or aluminum foil before placing them in the freezer bag. This creates an extra barrier that locks in moisture and keeps your bagels fresh for longer periods. You can also add a label with the date so you know when you froze them.
- Avoid Storing for Too Long: While pumpkin bagels can last in the freezer for up to 3 months, it’s best to enjoy them within the first month for optimal flavor and texture. Over time, frozen bagels may lose some of their freshness or become freezer burned.
Thawing and Reheating Tips
When you’re ready to enjoy your pumpkin bagels, proper thawing and reheating will bring them back to life and restore their fresh-baked taste and texture.
- Room Temperature Thawing: For the best results, take your frozen pumpkin bagels out of the freezer and let them thaw at room temperature for a few hours. Simply remove them from their packaging and allow them to sit on a cooling rack until fully thawed. This will help them retain their moisture and prevent them from becoming too dry.
- Microwave Option: If you’re short on time, you can also microwave your frozen pumpkin bagels. Wrap them in a damp paper towel and microwave for about 20-30 seconds. The steam from the damp towel helps keep the bagels moist as they heat up. However, note that the microwave may make the bagels slightly softer than when they are freshly baked.
- Oven Method: To restore the crispiness of your pumpkin bagels, consider reheating them in the oven. Preheat your oven to 375°F (190°C). Place the bagels directly on the oven rack or a baking sheet for about 5-10 minutes. This will give them a nice crisp texture on the outside while warming them up inside.
- Toasting for Added Crunch: After thawing, you can toast your pumpkin bagels for an extra crunch. This is especially great if you enjoy a bit of extra texture on your bagels. Toasting can also help revive the flavor, giving it that fresh-baked taste even after freezing.
Signs That Your Pumpkin Bagels Have Gone Bad
Though pumpkin bagels are easy to store, they can spoil over time. Here are some signs that your bagels may no longer be safe to eat:
- Mold or Discoloration: If you notice any mold spots or discoloration on the bagels, they should be discarded immediately. Mold can develop if they were not stored properly or if they’ve been sitting around for too long.
- Stale or Dry Texture: While freezing can help preserve the bagels’ texture, prolonged storage can still lead to a dry or overly stale bagel. If they feel too tough or overly dry, it may be time to toss them.
- Off or Sour Smell: If your bagels have an unpleasant or sour smell, that’s a sign that they’ve gone bad. Fresh bagels should have a sweet, slightly spiced aroma, especially if you’ve added pumpkin and pumpkin spice. Any off smells indicate spoilage.
By following these storage tips, you can keep your pumpkin bagels fresh for as long as possible, whether you’re planning to enjoy them in the next few days or save them for later. Proper storage ensures that every bite of your pumpkin bagel remains delicious, moist, and full of flavor.
Reheating for Best Texture
Reheating pumpkin bagels properly ensures that they retain their delicious, freshly baked texture. No one likes a soggy or overly dry bagel, so it’s important to reheat them the right way. Whether you’re reheating frozen bagels or those stored at room temperature, these methods will restore their softness, chewiness, and crispy exterior. Let’s look at some of the best techniques for reheating your pumpkin bagels to perfection.
1. Oven Method (For Crispy Exterior)
The oven is the best option for reheating pumpkin bagels if you want to restore their crispy texture while keeping the interior soft. This method works especially well for frozen bagels, but it’s also great for bagels stored at room temperature.
Steps for reheating with an oven:
- Preheat your oven to 375°F (190°C).
- Place the bagels directly on the oven rack or on a baking sheet lined with parchment paper. This allows the heat to circulate evenly around the bagels, giving them a uniform reheating.
- If your bagels are frozen, bake them for 5-10 minutes until heated through. For bagels stored at room temperature, check after 3-5 minutes.
- If you like your bagels extra crispy, leave them in the oven for an additional 2-3 minutes. Keep an eye on them to avoid over-baking.
- Remove from the oven and let them cool slightly on a wire rack to maintain their crisp texture.
This method is ideal for when you have several bagels to reheat or want to restore that perfect bakery-like texture.
2. Toaster Method (For Quick Reheating)
If you’re in a hurry or only reheating one or two pumpkin bagels, the toaster is an excellent choice. This method crisps up the exterior, while also maintaining the moist, soft center.
Steps for reheating with a toaster:
- Slice the pumpkin bagel in half if it’s not already sliced.
- Place the bagel halves into the toaster and toast to your desired level of crispness.
- If your bagel is frozen, it may take slightly longer to toast, so be sure to keep an eye on it.
- Toasted bagels will have a crunchy outer layer, which contrasts beautifully with the soft and chewy inside.
If you want to avoid a dry bagel, consider wrapping the bagel in a slightly damp paper towel and microwaving it for 20-30 seconds first. Then, toast it to perfection in the toaster. This method helps balance moisture with crispness.
3. Microwave Method (For Soft and Quick Reheating)
The microwave is the fastest way to reheat pumpkin bagels, but it can sometimes lead to a soggy texture if not done carefully. To maintain softness without losing texture, follow these simple steps:
Steps for reheating with a microwave:
- Wrap the pumpkin bagel in a damp paper towel. This helps retain moisture and prevents the bagel from becoming too dry.
- Microwave the bagel for 20-30 seconds, checking to ensure it’s heated through but not overheated.
- If the bagel is frozen, you may need to microwave it for 45 seconds to a minute, depending on its size and thickness. Start with shorter intervals and check regularly to avoid overheating.
- Once heated, you can place the bagel on a cooling rack for a few minutes to let excess moisture evaporate, ensuring a less soggy bagel.
The microwave method is best when you’re in a hurry and don’t mind sacrificing a bit of crispness for convenience.
4. Stovetop Method (For a Crispy, Golden Bottom)
For those who want a combination of a crisp exterior and a soft interior, the stovetop is an excellent alternative. This method gives you control over the heat and allows you to get the perfect balance of crunchiness and softness.
Steps for reheating with a stovetop:
- Preheat a skillet or nonstick frying pan over medium heat.
- Slice the pumpkin bagel in half and place it cut-side down on the pan.
- Heat for about 2-3 minutes, or until the bottom develops a golden brown, crispy texture.
- Flip the bagel over and cook the other side for 1-2 minutes, or until the top is warm and slightly toasted.
- For frozen bagels, you may want to cover the skillet with a lid to trap heat and ensure the bagel is warmed all the way through without over-browning.
The stovetop method works well when you’re looking for a quick but delicious way to get that perfect bagel crunch.
Tips for Maintaining the Best Texture
While the above methods will help you reheat your pumpkin bagels to perfection, there are a few additional tips to keep in mind:
- Avoid Overheating: No matter which method you choose, try to avoid overheating your bagels. Overheating can lead to a dry, tough texture. If you’re unsure, always start with a lower heating time and check for doneness.
- Moisture Control: If you want to keep your bagel soft inside and crispy outside, try placing a damp paper towel in the microwave or on the bagel when reheating it in the oven. This will lock in moisture, which helps prevent the bagel from becoming too dry.
- Store Properly for Better Reheating: The way you store your pumpkin bagels plays a significant role in how they reheat. Bagels that are stored in an airtight container or properly frozen will retain their moisture better than those left exposed to air.
By using these methods and tips, you can reheat your pumpkin bagels to enjoy their perfect texture any time you like, making sure they taste as delicious as the day they were baked.
Conclusion
Making homemade pumpkin bagels is a simple, enjoyable process that brings the flavors of fall right into your kitchen. With just a few essential ingredients and some basic techniques, you can create soft, chewy, and flavorful bagels that are perfect for breakfast, brunch, or even a snack. Not only do you have complete control over the texture and flavor, but you also get to enjoy the satisfaction of baking something from scratch.
The beauty of pumpkin bagels is that they’re versatile. You can experiment with various toppings and spreads to suit your tastes—whether you love cream cheese, cinnamon butter, or something a little more adventurous. The options are endless!
We’d love to hear how your pumpkin bagels turn out. Feel free to share your results or any unique variations you try in the comments below. Happy baking!