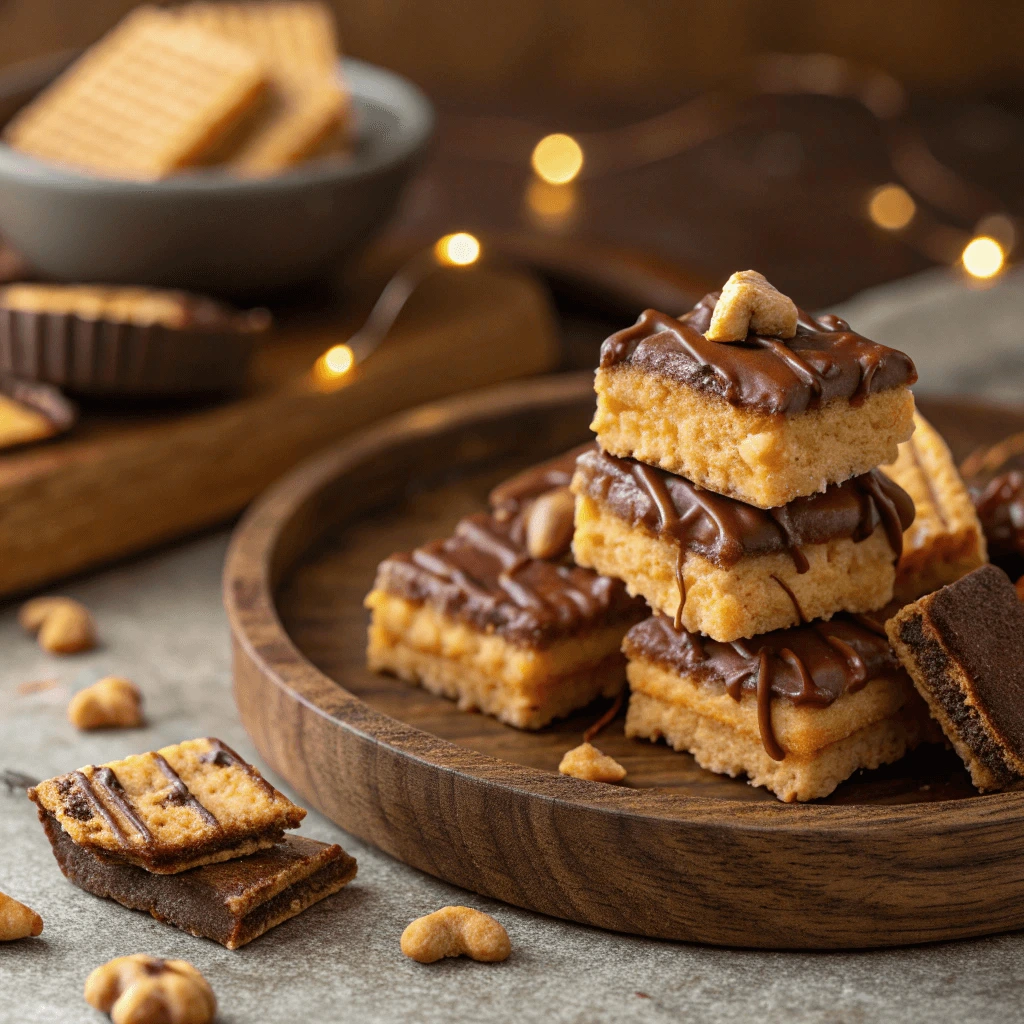
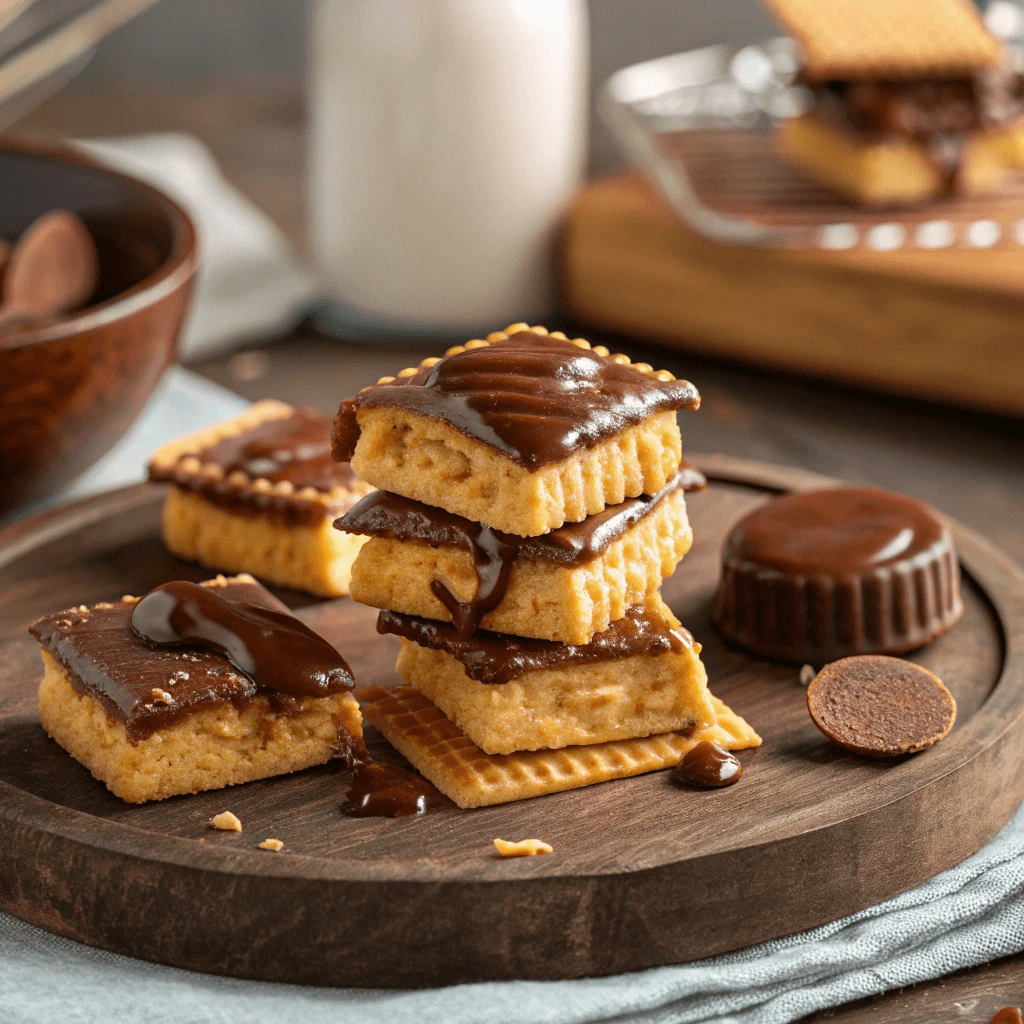
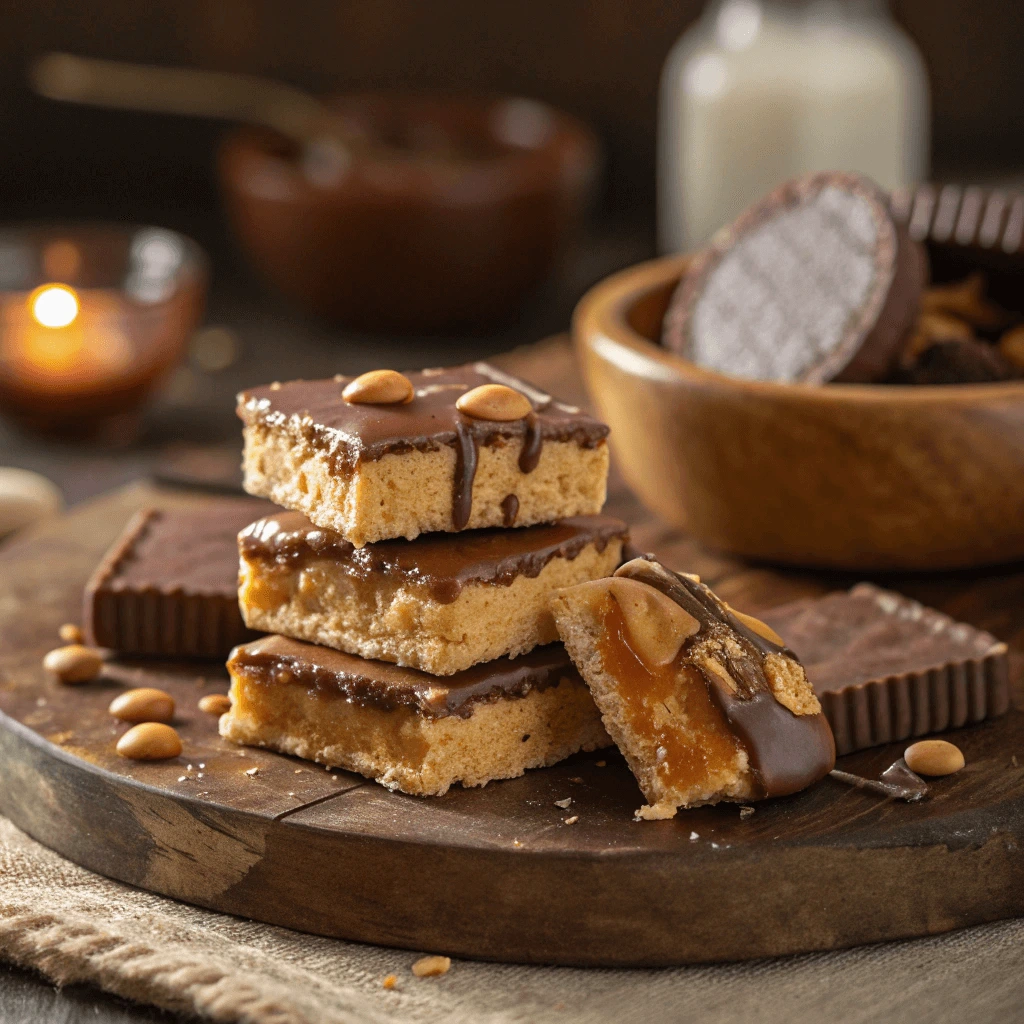
If you love sweet and salty snacks, try these Easy Cheez-It Peanut Butter and Chocolate Bites! Each bite combines crispy Cheez-Its, creamy peanut butter, and rich chocolate for a delicious treat.
This no-bake recipe takes just minutes to make. It’s perfect for quick desserts, kid-friendly snacks, or party treats. The mix of crunchy, creamy, and chocolatey flavors makes them irresistible.
Ready to make a batch? Let’s get started! 🎉🍫🥜
Why You’ll Love These Cheez-It Peanut Butter and Chocolate Bites
The Perfect Sweet and Salty Snack
Sweet and salty flavors create an irresistible combination, and these Cheez-It Peanut Butter and Chocolate Bites bring both together in the best way. The crunchy, cheesy base of Cheez-Its pairs perfectly with smooth peanut butter and rich chocolate, making every bite a satisfying treat.
Why Sweet and Salty Work So Well
The contrast between salty and sweet enhances flavors and keeps your taste buds engaged. The saltiness of Cheez-Its balances the sweetness of chocolate, while the creamy peanut butter adds richness. This combination makes these bites hard to resist.
A Snack for Any Occasion
These treats are great for snacking, parties, or even a quick dessert. They are easy to make and store, so you can prepare them in advance. Whether you need an afternoon pick-me-up or a last-minute party snack, these bites are a perfect choice.
Customizing Your Sweet and Salty Bites
Want to add variety? Try using different chocolates, like white or dark chocolate, for a unique twist. Sprinkle a little sea salt, crushed nuts, or caramel drizzle for extra flavor. The possibilities are endless!
This sweet and salty snack is easy, delicious, and fun to make. Once you try it, you’ll keep coming back for more! 🍫🥜
Quick and No-Bake Recipe
This Cheez-It Peanut Butter and Chocolate Bites Recipe is perfect when you need a fast and easy treat. Since it’s a no-bake recipe, you don’t need an oven, making it ideal for hot days or quick preparation. You can make these bites in just a few minutes with minimal effort.
Why No-Bake Recipes Are the Best
No-bake recipes save time and reduce hassle. Instead of waiting for something to bake, you can prepare, assemble, and enjoy these treats almost instantly. They’re also great for beginners since they require no special baking skills.
Fast Preparation with Simple Steps
This recipe involves three simple steps:
- Spread peanut butter on a Cheez-It cracker and top it with another cracker to create a sandwich.
- Dip the sandwich in melted chocolate, ensuring it’s evenly coated.
- Let the bites set until the chocolate hardens, then enjoy!
Perfect for Busy Schedules
If you’re short on time, these no-bake bites are a lifesaver. Whether you need a last-minute party treat, a quick snack for kids, or a late-night dessert, this recipe fits the bill. You can also make a batch in advance and store them for later.
With no baking, minimal ingredients, and quick preparation, this recipe is as convenient as it is delicious! 🍫🥜
Kid-Friendly and Fun to Make
Making these Cheez-It Peanut Butter and Chocolate Bites is not only easy but also a fun activity for kids. Since this is a no-bake recipe, children can safely help with assembling, dipping, and decorating their snacks. The process is simple, and they’ll love getting creative in the kitchen.
Why Kids Will Love This Recipe
Kids enjoy hands-on activities, and this recipe lets them spread, dip, and drizzle while creating delicious treats. The sweet and salty flavor combination also makes these bites extra appealing to young taste buds. Plus, they’ll feel a sense of accomplishment after making their own snacks.
Fun Ways for Kids to Get Involved
Here are some fun tasks that kids can do while making these bites:
- Spreading peanut butter – Let them use a small spoon or butter knife to spread peanut butter onto the crackers.
- Dipping in chocolate – Kids can carefully dip each cracker sandwich into melted chocolate, making sure it’s fully coated.
- Adding toppings – Let them sprinkle on crushed nuts, sprinkles, shredded coconut, or a drizzle of white chocolate for extra fun.
A Great Family Activity
Cooking together strengthens family bonds, and this recipe is a great way to spend quality time with your kids. It also helps them develop basic kitchen skills while having fun. Plus, since the recipe is quick, kids won’t lose interest before the treats are ready to eat.
This easy and engaging activity lets children enjoy both the process and the final product. Once they try these bites, they’ll want to make them again and again! 🍫🥜
Ingredients You Need for This Recipe
Key Ingredients Breakdown
Understanding the ingredients in these Cheez-It Peanut Butter and Chocolate Bites helps you appreciate their perfect balance of flavors and textures. Each ingredient plays an important role, creating a sweet, salty, crunchy, and creamy snack.
Cheez-It Crackers: The Crunchy Base
Cheez-Its add the signature crunch that makes these bites irresistible. Their light, crispy texture pairs well with the creamy peanut butter and rich chocolate. The cheesy, slightly salty flavor enhances the sweetness of the chocolate, making each bite even more satisfying.
Peanut Butter: The Creamy Filling
Peanut butter acts as the glue that holds the crackers together while adding a smooth, nutty richness. Its slight saltiness and natural sweetness create a perfect contrast with both the Cheez-Its and the chocolate. Using creamy peanut butter ensures a smooth texture, while chunky peanut butter adds a bit of crunch if you prefer more texture.
Chocolate: The Sweet Coating
Melted chocolate brings everything together, covering the Cheez-It and peanut butter sandwich with a sweet, velvety layer. You can use milk, dark, or white chocolate depending on your preference.
- Milk chocolate creates a classic sweet and salty flavor.
- Dark chocolate adds a rich, slightly bitter taste that pairs well with the salty crackers.
- White chocolate offers a sweeter, creamier option for those who love extra sweetness.
Optional Toppings: Extra Flavor and Fun
Adding toppings makes these bites even more delicious and visually appealing. Try:
- Crushed nuts for extra crunch and nuttiness.
- Sea salt for a stronger sweet-salty contrast.
- Drizzled white or dark chocolate for a decorative touch.
- Sprinkles or shredded coconut to make them festive and fun.
Each ingredient contributes to the unique taste and texture of these no-bake treats. When combined, they create a snack that is easy to make, fun to eat, and completely addictive! 🍫🥜
Best Peanut Butter and Chocolate to Use
Choosing the best peanut butter and chocolate is essential for making Cheez-It Peanut Butter and Chocolate Bites truly stand out. These ingredients have a significant role in achieving the perfect balance between sweet, salty, creamy, and crunchy flavors. With the right combinations, you’ll elevate the taste and texture of the snack in every bite.
Best Peanut Butter Options
Peanut butter serves as the nutty, creamy core of this snack, binding the Cheez-Its together while adding rich flavor. Here are some great options to consider for the perfect bite.
1. Creamy Peanut Butter
- Smooth peanut butter provides a silky, even texture, making it easy to spread over the Cheez-Its.
- It blends seamlessly with the chocolate coating, creating a consistent, creamy feel in each bite.
- For those who prefer a classic, effortless texture, creamy peanut butter is a top choice.
2. Crunchy Peanut Butter
- If you enjoy extra texture, crunchy peanut butter adds a satisfying crunch with every bite.
- The pieces of peanuts create a delightful contrast to the crisp Cheez-Its, enhancing the overall snack.
- Choose this option if you prefer a combination of smooth and crunchy elements in your snacks.
3. Natural Peanut Butter
- Opting for natural peanut butter gives you a healthier alternative that contains fewer additives, delivering a clean, nutty flavor.
- This option is less sweet, allowing the chocolate and crackers to shine through more clearly.
- For those seeking a more wholesome, pure taste, natural peanut butter pairs beautifully with darker chocolates.
Best Chocolate Options
Chocolate is the finishing touch that brings everything together. It provides a sweet and satisfying finish, balancing the salty Cheez-Its and creamy peanut butter. The choice of chocolate influences the overall sweetness and richness of the snack.
1. Milk Chocolate
- Milk chocolate is a popular choice for its sweet, smooth taste.
- Its creamy texture coats the peanut butter and Cheez-Its evenly, delivering a familiar and comforting experience.
- For those who enjoy a classic, sweet-and-salty flavor combination, milk chocolate is the perfect choice.
2. Dark Chocolate
- Dark chocolate adds a slightly bitter, rich taste, creating a beautiful contrast with the sweetness of the peanut butter.
- It highlights the nutty peanut butter flavor and balances out the saltiness of the crackers.
- If you prefer a more intense, less sugary chocolate, dark chocolate is the ideal option.
3. White Chocolate
- White chocolate offers a creamy, buttery flavor, providing a rich and indulgent pairing with peanut butter.
- Its sweetness is ideal for those who enjoy a decadent, dessert-like treat.
- This type of chocolate adds a creamy and luxurious touch to the bites.
The Best Combinations for the Ultimate Snack
Experimenting with different combinations can help you discover your perfect match. Here are some excellent pairings:
✔ Creamy peanut butter + milk chocolate → A classic and well-balanced option.
✔ Crunchy peanut butter + dark chocolate → A bold, textured treat with a slightly bitter flavor.
✔ Natural peanut butter + white chocolate → A healthier yet indulgent combination.
By selecting the right peanut butter and chocolate, you’ll be able to create Cheez-It Peanut Butter and Chocolate Bites that are perfectly balanced, full of flavor, and a joy to eat. Enjoy every bite! 🍫🥜
Optional Add-Ons for Extra Flavor
If you’re looking to elevate your Cheez-It Peanut Butter and Chocolate Bites, you can add extra ingredients to give your snack a unique twist. Whether you’re craving something crunchy, spicy, or even more decadent, the possibilities are endless. These optional add-ons will enhance the flavor profile and make your bites even more exciting. Below are a few fantastic ideas to get you started.
1. Sea Salt for a Salty Kick
A light sprinkle of sea salt on top of the chocolate layer can take your snack to the next level. The slight saltiness creates a perfect contrast to the sweetness of the chocolate and peanut butter. This addition will highlight the natural flavors of both the peanut butter and Cheez-Its, making each bite a delightful balance of salty and sweet.
- Why Sea Salt Works: Salt intensifies the sweetness of chocolate while bringing out the nuttiness of peanut butter.
- How to Use: Just a pinch on top of the chocolate before it sets will add that extra zing.
2. Crushed Nuts for Extra Crunch
For a more textured snack, consider adding some crushed nuts like almonds, pecans, or hazelnuts. The nuts will add a satisfying crunch that contrasts nicely with the creamy peanut butter and smooth chocolate. Not only will you get a delightful texture, but you’ll also get added flavor from the rich, roasted taste of the nuts.
- Best Nuts to Use: Almonds, pecans, and walnuts all work well. Choose roasted nuts for added flavor.
- How to Use: Gently press the crushed nuts into the chocolate before it hardens for maximum crunch.
3. Coconut Flakes for a Tropical Twist
Coconut flakes provide a sweet, chewy texture that pairs perfectly with the rich chocolate and creamy peanut butter. If you’re a fan of tropical flavors, this is a great way to add some exotic flair to your bites. The coconut adds a natural sweetness and complements the peanut butter’s richness in a way that feels indulgent yet refreshing.
- Why Coconut Works: Coconut adds a chewy texture and pairs beautifully with chocolate, making it a great balance of sweet flavors.
- How to Use: Sprinkle the coconut flakes on top of the chocolate or mix them into the peanut butter layer for a more integrated flavor.
4. Drizzle of Caramel for an Indulgent Treat
For those who love extra decadence, a drizzle of caramel sauce can elevate your Cheez-It Peanut Butter and Chocolate Bites to dessert-level indulgence. The rich, buttery sweetness of the caramel adds complexity and makes each bite even more satisfying.
- Why Caramel Works: The richness of caramel pairs perfectly with both the salty Cheez-Its and the creamy peanut butter.
- How to Use: Simply drizzle warm caramel sauce over the chocolate before it sets, letting it harden along with the rest of the layers.
5. Spicy Kick with Chili Powder or Cayenne Pepper
For those who enjoy a bit of heat, adding a touch of chili powder or cayenne pepper to the chocolate or peanut butter can create a surprising and exciting flavor profile. The heat from the spice adds a contrast to the sweetness and creates a bold fusion of flavors that will keep you coming back for more.
- Why Spicy Works: The heat from chili or cayenne pepper balances the sweetness and provides a unique, exciting flavor combination.
- How to Use: A small pinch of chili powder or cayenne pepper in the chocolate or peanut butter mixture is enough to add just the right amount of spice.
6. Mini Chocolate Chips for Extra Chocolatey Goodness
For chocolate lovers, mini chocolate chips can provide an added burst of chocolate in every bite. These tiny morsels melt into the chocolate coating, offering an extra layer of decadence. They also provide additional texture, making each bite even more enjoyable.
- Why Chocolate Chips Work: The mini chips melt into the chocolate, creating extra bursts of chocolate flavor in every bite.
- How to Use: Sprinkle them on top of the chocolate layer while it’s still soft, and gently press them in.
7. Chopped Dried Fruit for a Sweet Surprise
Dried fruit like raisins, cranberries, or apricots can bring a naturally sweet and chewy element to your bites. Chopped into small pieces, dried fruit adds both flavor and texture contrast to the otherwise crunchy Cheez-Its and smooth peanut butter.
- Best Dried Fruits: Cranberries, raisins, apricots, and cherries all work wonderfully.
- How to Use: Simply sprinkle small bits of dried fruit on top of the chocolate or mix them into the peanut butter layer for added sweetness.
8. A Dash of Cinnamon for Warmth
If you’re craving a warm, cozy flavor, a dash of cinnamon can add a subtle spiciness that blends well with the other ingredients. Cinnamon has the ability to enhance the flavor profile of both chocolate and peanut butter while adding complexity to the snack.
- Why Cinnamon Works: Cinnamon provides a warm spice that pairs perfectly with both chocolate and peanut butter, making the snack more aromatic.
- How to Use: Sprinkle a small amount of ground cinnamon into the peanut butter or chocolate mixture, or use it as a topping once the bites are set.
Step-by-Step Instructions to Make These Delicious Bites
Preparing Your Ingredients
Before you start making your Cheez-It Peanut Butter and Chocolate Bites, it’s essential to have everything ready. Preparing your ingredients ahead of time ensures that the process goes smoothly and that the bites come out perfectly every time. Here’s a step-by-step guide to get your ingredients prepped and ready for action.
1. Gather Your Ingredients
First, gather all the ingredients you need. Having everything on hand will help you stay organized and speed up the preparation process. These ingredients include:
- Cheez-Its
- Peanut Butter (creamy or chunky, depending on your preference)
- Chocolate (either chocolate chips or chopped chocolate bars)
- Optional Add-Ons (sea salt, chopped nuts, coconut flakes, etc.)
Pro Tip: Measure out each ingredient before you start so you don’t have to search for them mid-recipe.
2. Crush the Cheez-Its
To get that perfect crunch in your Cheez-It Peanut Butter and Chocolate Bites, you’ll need to crush the Cheez-Its into smaller pieces. There are a few ways to do this:
- By Hand: Place the Cheez-Its in a large ziplock bag and crush them gently with a rolling pin or your hands. This method allows you to control the size of the pieces.
- Using a Food Processor: For a more uniform crush, pulse the Cheez-Its in a food processor. Be careful not to turn them into powder—aim for small, bite-sized pieces.
Once crushed, transfer the pieces into a large bowl. You’ll want the Cheez-Its to be small enough to easily mix with the peanut butter and chocolate but large enough to still maintain their crunch when you bite into them.
3. Prepare the Peanut Butter
Next, it’s time to work with the peanut butter. If you’re using natural peanut butter, stir it well to ensure the oil is fully integrated with the solid peanut butter. You can warm the peanut butter slightly in the microwave for 15-20 seconds if it’s too thick, making it easier to mix.
- Tip for Smooth Mixing: If the peanut butter feels too sticky, add a small drizzle of honey or a spoonful of coconut oil. This will help loosen it up and make it blend more easily with the Cheez-Its.
4. Melt the Chocolate
Melting the chocolate properly is key to achieving a smooth, shiny coating for your Cheez-It Peanut Butter and Chocolate Bites. You can melt the chocolate using two common methods:
- Microwave Method: Place the chocolate in a microwave-safe bowl. Heat in 20-30 second intervals, stirring between each interval to prevent burning. Continue until fully melted and smooth.
- Double Boiler Method: Place a heatproof bowl over a pot of simmering water, ensuring the bowl doesn’t touch the water. Stir the chocolate constantly until melted and smooth.
Once melted, remove the chocolate from the heat source and let it cool slightly before using it in the next step. This helps prevent the chocolate from hardening too quickly once applied to the Cheez-Its.
5. Mix the Cheez-Its and Peanut Butter
Now that the Cheez-Its and peanut butter are ready, it’s time to combine them. In a large mixing bowl, pour the crushed Cheez-Its and add the peanut butter. Use a spatula or wooden spoon to gently stir the ingredients together until the Cheez-Its are evenly coated with peanut butter. The consistency should be thick, but not too sticky. If needed, add a little more peanut butter until you reach the right texture.
- Pro Tip: You can add a tablespoon of powdered sugar or honey to this mixture if you want it to be a little sweeter.
6. Prepare Your Optional Add-Ons
Before you dip your Cheez-It Peanut Butter and Chocolate Bites in melted chocolate, get your optional add-ons ready. Whether you’re using sea salt, chopped nuts, or coconut flakes, have them set aside in small bowls for easy access.
If you’re using any additional spices or flavorings like cinnamon or chili powder, ensure that they are ready to be sprinkled on top of the chocolate before it sets.
7. Set Up Your Work Station
Prepare your work area by covering a baking sheet with parchment paper or wax paper. This will prevent the bites from sticking as they cool. If you want to add a sprinkle of additional toppings after dipping, keep them within easy reach. A clean, organized space will make the assembly much more efficient.
Assembling the Cheez-It Bites
Assembling your Cheez-It Peanut Butter and Chocolate Bites is the fun and rewarding part of the recipe. With all your ingredients prepped and ready, this step is quick, but the results are incredibly delicious. Below is a step-by-step guide to help you assemble the bites efficiently, ensuring they’re perfectly coated and irresistible.
1. Create the Peanut Butter and Cheez-It Mixture
Begin by adding the peanut butter to the crushed Cheez-Its. Use a spatula or a wooden spoon to mix everything thoroughly. Make sure the Cheez-Its are evenly coated with the peanut butter, creating a sticky yet crumbly texture. This mixture will form the base of your bites, so it’s important to ensure each piece of Cheez-It is coated well.
If the mixture feels too dry or crumbly, you can add a bit more peanut butter to make it smoother. On the other hand, if it’s too sticky, add a few more crushed Cheez-Its to balance it out.
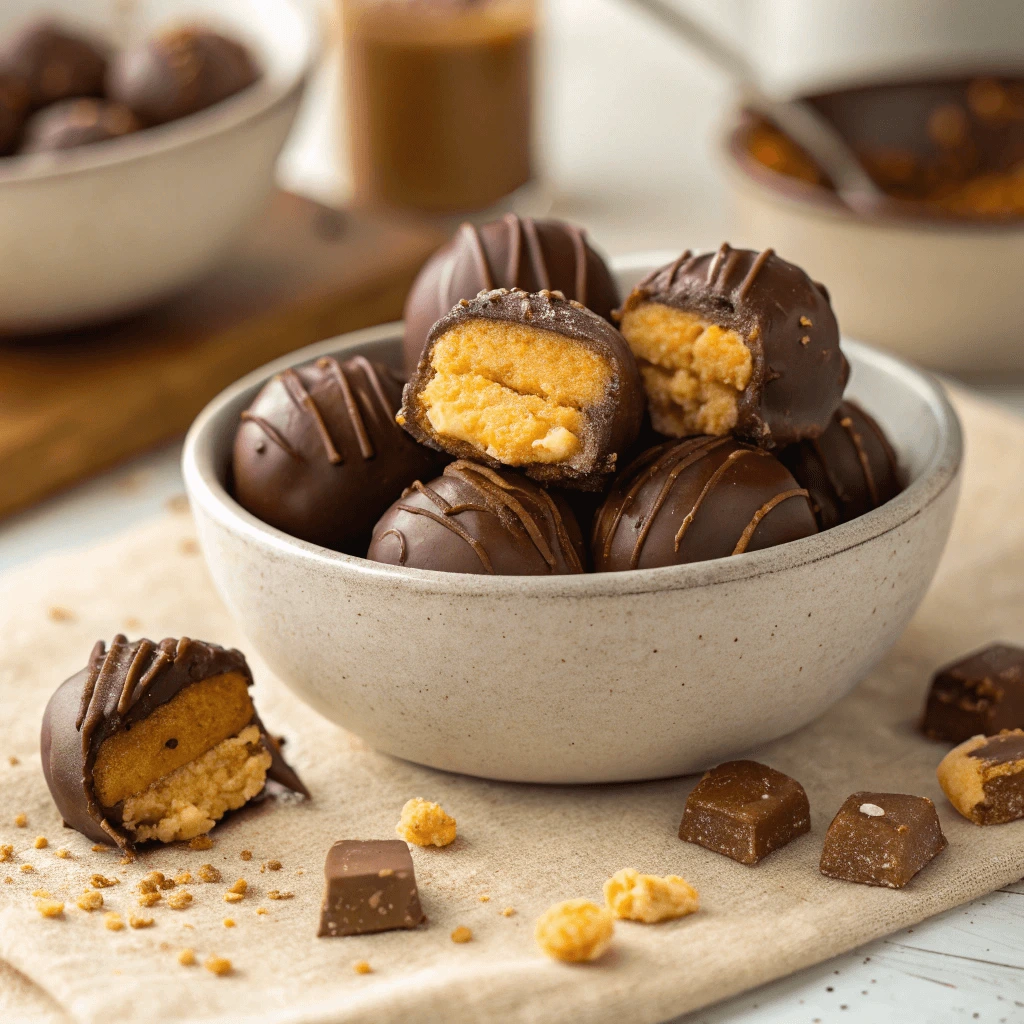
2. Shape the Mixture into Bites
Once the Cheez-It and peanut butter mixture is well-combined, it’s time to shape the bites. Start by taking small amounts of the mixture and rolling them into small balls, about the size of a walnut. You can also press the mixture into small bite-sized squares if you prefer a different shape.
Use your hands to roll the bites gently into smooth, even balls. Don’t worry about making them perfect—imperfections add to the charm and homemade feel of these bites. If you find that the mixture is sticking to your hands too much, you can lightly coat your hands with a bit of powdered sugar or cooking spray to make the process easier.
3. Prepare the Chocolate Coating
While shaping the bites, keep an eye on your melted chocolate. Make sure it remains smooth and melted. If the chocolate begins to harden, heat it for another 10-15 seconds in the microwave to keep it liquid. You’ll be using the chocolate to coat the Cheez-It peanut butter balls, so you want the chocolate to be runny but not too hot.
For a smooth, glossy finish, dip each shaped Cheez-It bite one by one into the melted chocolate. Use a fork or spoon to hold the bites while you coat them. Ensure the entire bite is coated with a layer of chocolate. The chocolate will harden quickly once you dip the bites, so work efficiently but carefully.
4. Drizzle Extra Chocolate for Decoration (Optional)
For an extra touch, consider drizzling a little more melted chocolate over the dipped bites. This adds a beautiful and decorative touch to the bites, making them more visually appealing. Use a spoon to drizzle the chocolate over the bites in a zigzag motion. This step is optional but adds a fun and fancy finish.
5. Add Optional Toppings
While the chocolate is still warm and slightly sticky, sprinkle on any optional toppings you prefer. This could include:
- Crushed nuts: Add a crunchy texture that complements the peanut butter and Cheez-Its.
- Sea salt: A light sprinkle of salt can enhance the flavors and provide a delightful contrast to the sweetness of the chocolate.
- Coconut flakes: If you enjoy coconut, shredded coconut flakes will add a tropical flavor to your bites.
- Mini chocolate chips: Add an extra layer of chocolatey goodness for chocolate lovers.
These optional toppings not only make your bites more flavorful but also add texture and visual appeal. Choose the toppings that best suit your taste or mix and match for a unique twist.
6. Place the Bites on a Cooling Tray
After coating your Cheez-It Peanut Butter Bites with chocolate and adding any toppings, carefully place them on a baking sheet or tray lined with parchment paper. The parchment paper helps prevent the bites from sticking as the chocolate cools and hardens.
Allow the bites to cool at room temperature for 10-15 minutes, or place them in the fridge for a faster set. The chocolate will firm up, and the bites will become easy to pick up without making a mess. Once the chocolate is completely hardened, your Cheez-It Peanut Butter and Chocolate Bites will be ready to enjoy!
7. Serve and Enjoy!
Once all your bites have cooled and the chocolate has set, they are ready to be served. You can arrange them on a serving platter for a beautiful presentation or store them in an airtight container for later enjoyment. These bites are perfect for parties, snack time, or even as a homemade gift.
Setting and Storing the Bites
After assembling and coating your Cheez-It Peanut Butter and Chocolate Bites, the next important step is ensuring they set properly and are stored in a way that preserves their deliciousness. Proper setting and storing not only help your bites maintain their shape and texture but also keep them fresh for longer. Here’s a detailed guide to help you through the process.
1. Let the Bites Set at Room Temperature
Once your bites are coated in chocolate and garnished with any optional toppings, it’s time to let them cool and set. Place them on a parchment-lined baking sheet or tray. Make sure the bites have enough space to rest without touching each other so that they don’t stick together as the chocolate hardens.
Allow them to set at room temperature for about 15-20 minutes. During this time, the chocolate will firm up, and the peanut butter and Cheez-It mixture will settle into its final form. The bites will become solid, making them easy to handle without the risk of the chocolate smearing or melting.
2. Speeding Up the Setting Process: Refrigerate if Needed
If you’re in a hurry or want to speed up the setting process, place the tray in the refrigerator. The cooler temperature helps the chocolate set quickly and keeps the bites firm. You’ll need about 10-15 minutes in the fridge to achieve the desired firmness, but be sure to check them after 10 minutes to ensure the chocolate has fully hardened.
Remember, refrigeration also helps the peanut butter and Cheez-It mixture stay together without becoming too soft. This step is especially useful if you’re planning to store the bites for a longer period.
3. Store the Bites in an Airtight Container
Once your Cheez-It Peanut Butter and Chocolate Bites have cooled and set, the next step is to store them. To keep them fresh, place them in an airtight container. This will help prevent them from becoming stale or absorbing any unwanted odors from your fridge or pantry.
For best results, layer the bites between sheets of wax paper or parchment paper inside the container. This will prevent them from sticking together. If you are making a large batch, consider using a container that’s large enough to hold the bites without crowding them, so they maintain their shape.
4. Refrigerate for Longer Freshness
If you plan to store the bites for more than a few days, it’s best to keep them in the fridge. Refrigerating the bites will keep the chocolate coating firm and the peanut butter mixture fresh. The cold environment helps maintain their texture and prevents them from melting or getting too soft.
Your bites will stay fresh in the refrigerator for up to 1-2 weeks, so feel free to make a batch in advance. Just be sure to keep them sealed tightly to prevent air from getting in.
5. Freezing for Extended Storage
For longer storage, you can freeze the Cheez-It Peanut Butter and Chocolate Bites. Freezing works well if you plan to save them for special occasions or simply want to keep them for later. To freeze, place the bites in a single layer on a baking sheet and freeze for 1-2 hours until they’re solid.
Once frozen, transfer the bites to an airtight container or a freezer-safe bag. Be sure to layer them with parchment paper to keep them from sticking together. Frozen bites can last for up to 3 months, allowing you to enjoy them whenever you like.
When you’re ready to eat, you can thaw them at room temperature for about 10 minutes or place them in the fridge for a slower defrost.
6. How to Serve After Storing
When serving the bites after they’ve been stored, you can enjoy them straight from the fridge for a cooler, firmer texture, or let them sit at room temperature for a softer bite. The choice depends on your preference and how you like your chocolate and peanut butter treats.
If serving them for a special occasion, you can even arrange them on a nice platter, making them more appealing for guests to grab and enjoy.
Fun Ways to Enjoy and Customize Your Snack
Serving Suggestions
Once your Cheez-It Peanut Butter and Chocolate Bites are ready and stored, the next step is deciding how to serve them. This sweet and salty snack can fit perfectly into a variety of occasions, whether you’re hosting a party, packing a snack for later, or simply indulging in a treat at home. Below are some fun and creative ways to serve these delightful bites.
1. Perfect for Snack Platters
Cheez-It Peanut Butter and Chocolate Bites make an excellent addition to any snack platter or charcuterie board. Their unique combination of crunchy Cheez-Its, creamy peanut butter, and rich chocolate can balance other savory snacks, offering your guests a sweet contrast to meats, cheeses, and fruits.
Arrange the bites in a neat circle or a line on your platter. You can also mix them with other treats such as chocolate-covered pretzels, nuts, or fruit for added variety. This ensures that every bite offers a fun, unexpected flavor pairing.
If you want to impress your guests, consider adding some small bowls of other dips on the side. A bit of caramel, chocolate sauce, or even peanut butter can enhance the experience, giving everyone options to dip and enjoy!
2. A Sweet Snack on the Go
These bites are incredibly portable, making them the ideal snack for taking on the go. Pack them in a small container or resealable bag and toss them in your purse, lunchbox, or gym bag. Whether you’re running errands, traveling, or need a quick energy boost during the day, these bites will give you the perfect balance of sweet and salty flavors without any mess.
They’re also a great option for school lunches, as kids will love the fun flavors and easy-to-eat size. Just make sure to pack them in an airtight container so they don’t get squished, ensuring that they stay fresh and intact.
3. Serve as a Party Favor
Looking for a unique party favor idea? Pack these bites into small gift bags or mason jars and hand them out to guests as a thank-you gesture. The combination of peanut butter, chocolate, and Cheez-Its will definitely be a crowd-pleaser and leave everyone with a memorable treat to take home.
You can personalize the packaging by adding colorful ribbons or tags with a custom message, making these bites a thoughtful and fun addition to any celebration. Whether you’re hosting a birthday, a holiday gathering, or a casual get-together, these homemade treats will impress your guests and make your party extra special.
4. Pair with Beverages for a Perfect Match
While these bites are delicious on their own, pairing them with the right beverages can elevate the experience even further. Consider these drink pairings for a delightful snack combo:
- Coffee or Hot Chocolate: The rich flavors of chocolate and peanut butter complement a hot drink, creating a cozy snack for chilly days.
- Milk: A classic pairing, the creamy milk balances the saltiness of the Cheez-Its and enhances the sweetness of the chocolate and peanut butter.
- Iced Coffee or Iced Tea: On a warm day, a cold beverage like iced coffee or iced tea provides a refreshing contrast to the richness of the bites.
If you’re hosting a gathering, you can set up a small beverage station with options for both hot and cold drinks, giving your guests plenty of choices to enjoy alongside the bites.
5. Try Them for Dessert
These Cheez-It Peanut Butter and Chocolate Bites aren’t just for snacking—they make a perfect dessert too. After dinner or as a sweet treat in the afternoon, serve these bites to satisfy your cravings for something sweet and salty. You can even serve them in small bowls for a more sophisticated presentation, perfect for a dinner party.
For an extra touch, drizzle some melted chocolate or caramel sauce over the top of the bites to add another layer of flavor. You can also dust them with powdered sugar for a sweet finishing touch. The contrast of the rich chocolate coating and the crunchy Cheez-It base makes for a satisfying dessert that will wow your guests.
6. Serve as a Fun Movie Night Snack
Movie nights just got better with Cheez-It Peanut Butter and Chocolate Bites. Instead of reaching for the usual popcorn, serve these delightful bites for a change of pace. Their bite-sized form makes them easy to snack on while watching your favorite movie, and the mix of chocolate, peanut butter, and salty Cheez-Its will keep everyone coming back for more.
To add some variety, consider pairing them with a bowl of popcorn or other snack foods. Mixing savory and sweet snacks on a movie night is a great way to satisfy all tastes and keep everyone happy.
Flavor Variations to Try
While the classic Cheez-It Peanut Butter and Chocolate Bites recipe is a crowd-pleaser on its own, you can easily customize the flavors to suit your preferences or to give it a new twist. Whether you’re craving something spicier, fruitier, or even more indulgent, here are some fun and tasty variations you can experiment with.
1. Spicy Cheez-It Peanut Butter and Chocolate Bites
If you enjoy a bit of heat with your snacks, consider adding some spice to the mix. By incorporating chili powder, cayenne pepper, or a dash of hot sauce into the peanut butter layer, you can create a sweet and spicy combo that tantalizes the taste buds. This spicy twist is especially great for those who love the contrast of sweet and savory flavors.
For an even bolder flavor, sprinkle some crushed red pepper flakes on top of the chocolate coating before it hardens. The spicy heat will complement the creamy peanut butter and crunchy Cheez-Its, creating a unique flavor profile that will surprise and delight your guests.
2. Nutty Variations with Chopped Nuts
If you’re a fan of extra crunch and nutty flavors, try adding chopped nuts to the mix. Roasted peanuts, almonds, cashews, or even pistachios are great options. Simply stir in a handful of your favorite chopped nuts into the peanut butter before spreading it on the Cheez-Its. You can also roll the finished bites in crushed nuts for a fun textured coating.
This nutty variation enhances the overall crunch of the Cheez-Its and adds layers of flavor that complement the peanut butter and chocolate combination. You can also use nut butters like almond butter or cashew butter for a slightly different twist.
3. Coconut Chocolate Peanut Butter Bites
For a tropical flair, you can add shredded coconut to the mix. Coconut’s sweet and nutty flavor pairs wonderfully with both peanut butter and chocolate. You can either mix the shredded coconut into the peanut butter layer or roll the finished bites in coconut flakes once they are coated in chocolate. This adds both texture and flavor, making your Cheez-It Peanut Butter and Chocolate Bites extra special.
Coconut also brings a slightly chewy texture that balances the crunchiness of the Cheez-Its, offering a fun twist on the traditional recipe. If you’re a fan of coconut, this variation will quickly become your go-to!
4. Fruit-Infused Cheez-It Bites
Fruit and chocolate are always a great pairing, and adding fruit to your Cheez-It Peanut Butter and Chocolate Bites creates an exciting new flavor combination. One simple way to do this is by adding a bit of freeze-dried fruit powder to the chocolate coating. For example, freeze-dried strawberry or raspberry powder can give your bites a fruity tang that pairs perfectly with the rich chocolate and creamy peanut butter.
Alternatively, consider mixing small pieces of dried fruit like cranberries, raisins, or chopped dried apricots into the peanut butter before applying it to the Cheez-Its. This variation not only introduces a fruity element but also adds a chewy texture to the bites, creating a delightful contrast with the crunchy Cheez-Its.
5. Minty Chocolate Peanut Butter Bites
Mint and chocolate are a classic pairing that never goes out of style. If you’re craving a refreshing twist on the original recipe, add a bit of peppermint extract or mint chocolate chips into the chocolate coating. This minty version of Cheez-It Peanut Butter and Chocolate Bites will bring a cool and refreshing flavor that balances well with the rich peanut butter and salty Cheez-Its.
You can even roll the bites in crushed peppermint candies after they’ve been coated in chocolate for an added burst of mint flavor and a festive touch. This variation is especially great for holiday gatherings or when you’re in the mood for something refreshing.
6. Caramel Drizzle for Extra Sweetness
If you have a serious sweet tooth, why not add a drizzle of caramel over your Cheez-It Peanut Butter and Chocolate Bites? The rich, buttery flavor of caramel complements the chocolate and peanut butter beautifully, creating an indulgent treat that is sure to satisfy your cravings. To make the caramel drizzle, simply melt some caramel candy or use store-bought caramel sauce.
You can drizzle the caramel over the chocolate layer before it sets or use it as a finishing touch once the bites are completely prepared. For an extra layer of decadence, sprinkle a pinch of sea salt over the caramel to enhance the sweet-and-salty flavor balance.
7. White Chocolate Peanut Butter Bites
If you prefer white chocolate to regular chocolate, you can easily make a variation using white chocolate chips. Melt the white chocolate and dip the peanut butter-covered Cheez-Its into the chocolate for a rich and creamy coating. This twist will give your bites a lighter, sweeter flavor that still maintains the crunchy, salty base from the Cheez-Its.
White chocolate is a great choice for those who want a more subtle sweetness that contrasts well with the saltiness of the Cheez-Its and the richness of the peanut butter. You can even combine white chocolate and dark chocolate for a layered effect to make the bites even more visually appealing.
8. S’mores-Inspired Cheez-It Bites
S’mores are a beloved dessert, so why not bring that classic flavor combination to your Cheez-It Peanut Butter and Chocolate Bites? After dipping the bites in chocolate, roll them in mini marshmallows and crushed graham cracker crumbs for an added crunch and sweetness. The marshmallows will add a soft, chewy texture, while the graham crackers will enhance the nostalgic s’mores flavor.
These s’mores-inspired bites are perfect for summer parties, bonfires, or any time you’re craving the flavors of a campfire treat without the need for roasting marshmallows.
Storing for Later
If you have extra Cheez-It Peanut Butter and Chocolate Bites or simply want to make a big batch to enjoy over time, storing them properly is key to maintaining their freshness and flavor. Here are some tips and best practices for storing these bites for later use, ensuring they stay as delicious as the day you made them.
1. How to Store for Short-Term Use
If you plan on enjoying your Cheez-It Peanut Butter and Chocolate Bites within a few days, the process is simple. Store them in an airtight container at room temperature. This will keep the bites fresh while maintaining their crispy texture and rich flavor. Be sure to place the container in a cool, dry place away from direct sunlight or heat sources, as exposure to high temperatures could cause the chocolate to melt and the peanut butter to soften.
To prevent the bites from sticking together, consider layering them with parchment paper. This will keep each bite separate and prevent any mess or clumping. Additionally, make sure the container is sealed tightly to avoid exposure to air, which could cause the bites to become stale.
2. Storing for Longer Shelf Life
If you want to store your Cheez-It Peanut Butter and Chocolate Bites for a longer period, refrigeration or freezing is your best option. To store them in the refrigerator, place the bites in an airtight container or resealable plastic bag. The cooler temperature will help preserve the texture and flavor, keeping them fresh for up to one to two weeks.
For even longer storage, freezing your bites is a great option. Simply place the bites on a baking sheet in a single layer, making sure they don’t touch each other, and freeze them for about 1-2 hours. Once frozen, transfer the bites to a freezer-safe bag or airtight container. Be sure to label the container with the date so you can keep track of how long they’ve been stored. Frozen Cheez-It Peanut Butter and Chocolate Bites can last for up to 2-3 months without losing their flavor or texture.
3. Thawing and Refreshing Your Cheez-It Bites
When you’re ready to enjoy your frozen Cheez-It Peanut Butter and Chocolate Bites, simply remove the container from the freezer and let them thaw at room temperature for about 20-30 minutes. This will restore the bites to their original texture and flavor.
If you prefer a slightly warmer snack, you can place the bites in a preheated oven at a low temperature (around 250°F) for 5-10 minutes. This will help re-crisp the chocolate coating without melting it, giving you a fresh-tasting treat. However, make sure not to heat them too long, as this could cause the chocolate to melt or lose its glossy texture.
4. Portioning for Easy Access
To make it easier to grab a few bites whenever you want them, consider pre-portioning your Cheez-It Peanut Butter and Chocolate Bites before storing. This method is particularly useful if you’re storing them in the freezer, as it will allow you to take out only the amount you need without having to thaw the entire batch. You can use small resealable plastic bags or container compartments to separate the portions.
Pre-portioning also helps prevent over-snacking since you can control the amount you have on hand at one time. This approach is especially great for meal prep or when you need quick snacks for busy days.
5. Maintaining Freshness with Proper Sealing
The key to keeping your Cheez-It Peanut Butter and Chocolate Bites fresh for as long as possible lies in sealing them properly. Airtight containers or resealable bags are your best bet to prevent exposure to air, which can cause them to lose their crunch and flavor. Make sure the container you use has a good seal and is not cracked or damaged.
When using plastic bags, remove as much air as possible before sealing them. Vacuum-sealed bags are a great option if you’re looking to store the bites for an extended period, as they remove almost all of the air, preserving the freshness and flavor.
6. Signs That Your Cheez-It Bites Have Gone Bad
Although Cheez-It Peanut Butter and Chocolate Bites have a relatively long shelf life, it’s still important to be aware of the signs that they may have gone bad. If the bites become overly soft or chewy, this could indicate that the chocolate has melted and the texture has changed. Additionally, if you notice an off or rancid smell, it’s best to discard the bites, as this could be a sign that the ingredients, especially the peanut butter, have spoiled.
If the bites appear discolored or the chocolate has developed a white, chalky film (known as “bloom”), this may be a result of temperature fluctuations. While this doesn’t necessarily mean the bites are unsafe to eat, it can affect the taste and texture, so it’s best to consume them sooner rather than later.
Common Questions About Cheez-It Peanut Butter and Chocolate Bites
Can I Use a Different Type of Cracker?
Yes! While Cheez-Its are ideal for their bold flavor and crunch, you can easily swap them with other crackers based on your preferences.
Flavor Impact
- Salty Crackers: Saltines or Ritz add a mild saltiness but lack the cheesy taste of Cheez-Its.
- Plain Crackers: Neutral options, like plain or whole wheat crackers, allow the peanut butter and chocolate to shine.
- Flavored Crackers: Try garlic, onion, or dill crackers for a unique twist, though they might overpower the other flavors.
Texture Considerations
- Thin Crackers: Thin crackers, like Saltines, may become soggy, so use more to maintain structure.
- Thicker Crackers: Sturdier crackers, such as graham or whole wheat, hold up better when coated.
- Soft Crackers: Avoid soft crackers or cookies, as they won’t provide the needed crunch.
Dietary Alternatives
- Gluten-Free: Gluten-free crackers like Rice Thins or Mary’s Gone Crackers are great alternatives.
- Vegan-Friendly: Choose plant-based crackers, ensuring no dairy or animal-based ingredients.
- Low-Sodium or Low-Carb: Look for low-sodium or keto-friendly crackers to meet dietary needs.
Sweet Variations
For a different flavor, try graham crackers for a touch of sweetness or cinnamon-sugar crackers for added spice.
Recipe Adjustments
- Peanut Butter: You may need more peanut butter if your chosen cracker absorbs it differently.
- Chocolate: Adjust the chocolate coating for softer crackers to ensure it sets properly.
What’s the Best Way to Melt Chocolate for Dipping?
Melting chocolate properly is crucial for achieving a smooth, glossy coating that will set well on your Cheez-It Peanut Butter and Chocolate Bites. Here are the best methods to melt chocolate for dipping, each with its own advantages.
1. Double Boiler Method: The Most Reliable
The double boiler method is the best way to melt chocolate evenly and gently. This method involves using two pans – a large one with simmering water, and a smaller one where you place your chocolate. The gentle steam heats the chocolate, preventing it from burning or seizing.
How to Do It:
- Fill a larger saucepan with water, ensuring it doesn’t touch the smaller pan or bowl.
- Bring the water to a simmer, then place your chopped chocolate or chocolate chips in the smaller pan.
- Stir occasionally until the chocolate has melted smoothly. Remove from heat immediately to avoid overheating.
2. Microwave Method: Quick and Convenient
If you’re short on time, using a microwave is the fastest method. However, it’s important to melt the chocolate in short intervals to prevent overheating and scorching.
How to Do It:
- Place your chocolate in a microwave-safe bowl.
- Microwave in 15-20 second intervals, stirring in between each interval until the chocolate is fully melted and smooth.
- Be cautious as the chocolate retains heat and can continue to melt even after being taken out of the microwave.
3. Slow Cooker Method: Ideal for Large Batches
If you’re making a large batch of Cheez-It Peanut Butter and Chocolate Bites or want to keep your chocolate melted and warm for dipping, a slow cooker works well. It provides an even, low heat that prevents burning.
How to Do It:
- Place your chocolate in the slow cooker.
- Set the heat to low and stir occasionally until melted. Keep the lid on to help the chocolate melt evenly.
4. Stovetop Method: Direct Heat, but Be Careful
The stovetop method involves melting chocolate directly over low heat in a saucepan. It’s fast, but it requires constant attention to prevent the chocolate from burning.
How to Do It:
- Break your chocolate into smaller pieces and place it in a saucepan.
- Set the heat to low, and stir continuously until smooth and melted.
- Be careful to avoid high heat, as it can quickly ruin the texture of your chocolate.
Tips for Perfect Chocolate Dipping:
- Add a Little Fat: To achieve a silky smooth finish, consider adding a teaspoon of vegetable oil, butter, or coconut oil to your chocolate. This will help it flow better and create a shiny finish.
- Avoid Water: Make sure no water comes into contact with the chocolate. Even a small amount of moisture can cause the chocolate to seize and turn lumpy.
- Stir Often: Whether using a microwave or double boiler, stir the chocolate regularly to ensure it melts evenly and remains smooth.
- Test Temperature: Let the chocolate cool slightly before dipping. Hot chocolate may melt your peanut butter or cause the crackers to become too soft.
What to Do if the Chocolate Seizes:
If your chocolate becomes thick, lumpy, or seizes while melting, don’t panic. You can usually rescue it by adding a little more fat (like vegetable oil or butter) and gently stirring until it smooths out.
How Long Do These Snacks Last?
When you make Cheez-It Peanut Butter and Chocolate Bites, you’ll want to know how long they stay fresh and delicious. Proper storage ensures your snacks last as long as possible while maintaining their flavor and texture. Let’s break down how long these treats last and the best ways to store them.
1. Room Temperature: Ideal for Short-Term Storage
If you’re planning to eat your Cheez-It Peanut Butter and Chocolate Bites within a few days, storing them at room temperature works well. Keep them in an airtight container to preserve their freshness and prevent them from absorbing moisture or odors from other foods.
How Long They Last:
- At room temperature, these snacks will stay fresh for about 3-4 days.
- Make sure to keep them in a cool, dry place, away from direct sunlight or heat sources, which could cause the chocolate to melt or soften.
2. Refrigerator Storage: Longer Freshness
For longer storage, the refrigerator is a great option. The cool environment helps maintain the firmness of the chocolate and peanut butter while extending the shelf life.
How Long They Last:
- In the fridge, your snacks can last for up to 1-2 weeks.
- To store them, place the bites in an airtight container or a resealable bag to prevent them from absorbing any moisture, which could affect their texture.
3. Freezer Storage: For Extended Freshness
If you want to keep your Cheez-It Peanut Butter and Chocolate Bites for a longer period, freezing them is the best option. Freezing helps preserve both the chocolate and peanut butter without compromising flavor.
How Long They Last:
- In the freezer, these snacks can last for up to 3 months.
- Wrap the bites individually in plastic wrap or store them in a freezer-safe airtight container to prevent freezer burn. When ready to eat, let them thaw at room temperature for about 10-15 minutes before enjoying.
4. Signs That Your Snacks May Have Gone Bad
While these treats can last for several days to weeks, it’s important to watch for any signs that they’ve gone bad. If you notice any of the following, it’s time to toss them:
- Change in texture: If the chocolate becomes overly soft or the Cheez-It crackers lose their crunch, they may not be as enjoyable.
- Off smell: If the snacks begin to smell stale or sour, it’s a sign they’re no longer fresh.
- Discoloration: Chocolate that has turned white (due to fat bloom) or the peanut butter becoming too oily may indicate that the snacks have been stored too long.
5. Best Practices for Storing and Extending Shelf Life
To ensure your Cheez-It Peanut Butter and Chocolate Bites last as long as possible:
- Store them in airtight containers to lock in freshness.
- Use desiccant packets (silica gel) if possible to absorb moisture, especially when storing in humid environments.
- Avoid stacking the bites on top of one another, as this can cause them to lose their shape or break.
In Summary:
- Room temperature: 3-4 days.
- Refrigerator: 1-2 weeks.
- Freezer: Up to 3 months.
By following these tips, you can keep your Cheez-It Peanut Butter and Chocolate Bites fresh and ready to snack on whenever you’re craving a sweet and salty treat.
Conclusion
Cheez-It Peanut Butter and Chocolate Bites are the ultimate combination of simplicity, flavor, and fun. With just a few ingredients, you can easily create these delicious treats that satisfy both your sweet and salty cravings. The no-bake recipe makes it perfect for busy days, and kids will love getting involved in the process.
These bites are versatile, so feel free to get creative with different variations. Add your favorite toppings, experiment with flavors, or even switch up the type of crackers you use for a fresh twist! The possibilities are endless, and every batch can be unique.
We’d love to hear your thoughts and see how you make this recipe your own. Try it today, and don’t forget to leave a comment or share the recipe with friends and family. Happy snacking!