Sushi-grade tuna is a prized ingredient in many dishes, from the delicate slices of sashimi to the vibrant and flavorful poke bowls. Whether you’re a seasoned chef or a home cook looking to experiment with raw fish, learning how to properly prepare sushi-grade tuna is essential to achieving the best results. In this guide, we’ll walk you through the steps to prepare sushi-grade tuna for a variety of dishes, including sashimi, poke bowls, and more. From selecting the freshest tuna to slicing it with precision, we’ll cover all the essential techniques and tips to help you enjoy these raw tuna dishes at their finest. Whether you’re creating a luxurious sushi spread or a fresh poke bowl, mastering the preparation of sushi-grade tuna will elevate your culinary skills and delight your taste buds. Let’s dive
What Is Sushi Grade Tuna?
What Makes Tuna “Sushi Grade”?
When looking for tuna for sushi or sashimi, you’ll often see the term “sushi-grade.” But what does it mean? Sushi-grade tuna is fish that meets specific standards of freshness, quality, and safety for raw consumption. Here’s a closer look at the factors that make tuna sushi-grade.
1. Freshness and Quality
Sushi-grade tuna must be incredibly fresh. Since it’s served raw, it should have vibrant red or pink flesh. This color indicates freshness. If the tuna looks dull or discolored, it may not be as fresh and could be unsafe to eat raw. The fresher the tuna, the better its flavor and texture.
2. Freezing Process
The freezing process is essential for sushi-grade tuna. The FDA recommends freezing fish at -4°F (-20°C) or lower for at least seven days. This kills harmful parasites and ensures the fish is safe to eat raw. The freezing also helps preserve the tuna’s flavor and texture.
3. Handling and Storage
Proper handling and storage are crucial. After the tuna is caught, it must be kept cold, ideally just above freezing, until it’s processed and shipped. Once it arrives at a store or restaurant, it should be stored at a low temperature to maintain freshness. Always buy from reputable sources that follow these strict protocols.
4. Sourcing and Sustainability
Sushi-grade tuna often comes from sustainable sources. Bluefin, yellowfin, and bigeye tuna are common varieties. Sustainable fisheries ensure the fish are caught responsibly, helping protect marine life. Look for labels or certifications that verify the tuna’s responsible sourcing.
Sushi-grade tuna meets high standards of freshness, quality, and safety, ensuring it’s safe to eat raw.
Tuna Varieties Suitable for Sushi
When preparing sushi, the type of tuna you select plays a key role in achieving both great flavor and texture. Not all tuna varieties are ideal for sushi. Some are better suited for certain dishes, while others may be less than ideal. In this section, we’ll explore the most popular tuna varieties used in sushi preparation, highlighting their unique qualities.
1. Bluefin Tuna (Maguro)
Bluefin tuna is widely regarded as the most prized variety for sushi and sashimi. This tuna’s rich, fatty meat gives it a luxurious flavor that makes it a top choice in sushi bars around the world. The three species of Bluefin—Pacific, Atlantic, and Southern—offer slight variations in taste and texture, with Atlantic Bluefin being particularly favored for its deep red flesh and abundant fat. This fat gives the tuna a melt-in-your-mouth quality that is unmatched.
Though it’s the most expensive option, Bluefin’s high quality justifies the cost. Sushi chefs often focus on the fatty belly section, known as otoro, which provides the highest grade of meat.
2. Yellowfin Tuna (Ahi)
Yellowfin tuna, also called Ahi, is another common choice for sushi and sashimi. It’s a leaner variety compared to Bluefin, with a firmer texture and a lighter, milder flavor. Yellowfin’s flesh ranges from pink to deep red, depending on freshness. Because it’s less fatty, Ahi offers a more delicate sushi experience without being too rich.
This variety is widely available and more affordable than Bluefin, making it a great option for poke bowls, sushi rolls, and sashimi. The firm texture of Ahi holds up well in sushi preparation, and it’s a favorite for both newcomers and experienced sushi lovers.
3. Bigeye Tuna
Bigeye tuna is often considered a close relative to Bluefin, providing a similarly rich and fatty texture at a lower price point. It has a deep red color and a buttery texture that melts in your mouth, similar to Bluefin, but with slightly less fat content. As a result, Bigeye provides a great balance between cost and quality.
Bigeye tuna is perfect for nigiri or sashimi, where its smooth texture and rich flavor shine. Sushi chefs love its luxurious mouthfeel, making it a top choice in high-end sushi establishments.
4. Albacore Tuna
Albacore tuna, often referred to as “white tuna,” has a lighter color and a more mild flavor compared to other tuna varieties. It is also much leaner, offering a softer texture. While not as commonly used for sushi, it is still a suitable choice for those looking for a milder taste.
Albacore works well in sushi rolls, particularly non-traditional creations. Its tender texture and subtle flavor provide a nice contrast to the more robust flavors found in other tuna varieties.
Choosing the Right Tuna for Sushi
Consider your personal preferences when selecting tuna for sushi. If you’re after richness, Bluefin provides the ultimate indulgence. Yellowfin and Bigeye offer a great balance of flavor, texture, and cost, while Albacore is perfect for those who prefer a lighter, milder option. Understanding the characteristics of each tuna variety will ensure that your sushi experience is delicious and authentic.
Where to Buy Sushi Grade Tuna
If you’re eager to prepare sushi-grade tuna at home, finding a reliable and trustworthy source is essential. Sushi-grade tuna isn’t just about the quality; it also involves ensuring that the fish is fresh, safe to consume raw, and handled properly. Below, we explore the best places to purchase sushi-grade tuna and offer tips on how to choose the right fish.
1. Specialty Seafood Markets
Specialty seafood markets are often the best place to find sushi-grade tuna. These markets typically carry high-quality, fresh fish and have a reputation for providing tuna that is specifically labeled as sushi-grade. Many specialty markets source their tuna from reputable suppliers who ensure that the fish has been frozen at the correct temperatures to kill any parasites, a crucial step when preparing raw fish.
When shopping at a specialty seafood market, ask the staff about the origin and handling of the tuna. They can provide detailed information about the freshness and whether it’s safe to eat raw. If you’re uncertain, don’t hesitate to ask for recommendations on which tuna to buy for sushi and sashimi.
2. Online Seafood Retailers
If you don’t have access to a nearby specialty market, online seafood retailers are a great option. Several well-known online stores specialize in delivering sushi-grade fish directly to your door. These retailers often offer a wide variety of tuna, including Bluefin, Yellowfin, and Bigeye, allowing you to choose the perfect cut for your needs.
Before purchasing, ensure that the retailer has proper freezing and shipping protocols in place. Look for companies that ship their products in insulated packaging with dry ice or gel packs to maintain the appropriate temperature during transit. Reading customer reviews can also help gauge the reliability of the service.
3. High-End Grocery Stores
Many high-end grocery stores, particularly those with extensive seafood sections, offer sushi-grade tuna. These stores often prioritize quality and freshness, making them a good alternative for those who don’t have access to a specialty market or prefer to shop at a well-known grocery chain.
When purchasing sushi-grade tuna from a grocery store, check the labeling to confirm that the fish is indeed sushi-grade. Some stores may also provide additional information about the fish’s origin, whether it’s wild-caught or farm-raised, and the handling process.
4. Farmers’ Markets (When Available)
Depending on your location, you may also find sushi-grade tuna at certain farmers’ markets that feature local or regional seafood vendors. These markets can offer a great opportunity to connect directly with local fishermen and seafood distributors who can provide fresh and high-quality fish. Although this option might not be available in all areas, it’s worth checking if any local markets offer fresh tuna or even special events dedicated to seafood.
5. Restaurants and Sushi Bars
Some high-end restaurants or sushi bars sell sushi-grade tuna directly to consumers, especially if they are known for their fish quality. It’s worth asking your favorite sushi chef if they offer this service. Often, they can provide guidance on what to buy and may even offer the opportunity to purchase fish at a reasonable price.
Tips for Choosing the Best Tuna
- Look for Freshness: Always check the color of the tuna. It should be deep red for Bluefin and Yellowfin varieties, with a bright and vibrant look. The flesh should be firm and moist, not slimy.
- Inquire About Freezing: Ensure the fish has been frozen properly. Sushi-grade tuna should have been frozen at -4°F (-20°C) or lower for at least 7 days to kill parasites.
- Check the Source: Know where the tuna comes from and how it’s handled. Reputable sources will provide transparency about the origin and processing of the tuna.
Essential Tools for Preparing Sushi Grade Tuna
Using the Right Knife for Slicing Tuna
When preparing sushi or sashimi, the knife you use plays a crucial role in achieving the perfect texture and presentation. A sharp, high-quality knife ensures that you slice the tuna cleanly, preserving its freshness and tenderness. Below, we’ll explore the best knives to use for slicing tuna and offer tips on how to get the best results.
1. The Importance of a Sharp Knife
The most important factor when slicing tuna is the sharpness of the blade. A dull knife will crush or tear the delicate fish, leading to an uneven cut and a less than desirable texture. A sharp knife allows for smooth, clean cuts that preserve the tuna’s natural structure.
Using a dull knife can also cause the fish to lose moisture, affecting both its flavor and presentation. For sushi and sashimi, a clean cut enhances the aesthetic, creating thin, uniform slices that are pleasing to the eye.
2. Recommended Knives for Tuna
There are several types of knives that work best for slicing tuna, each designed to cater to different needs. Here are a few recommended knives to consider:
- Yanagiba Knife:
This traditional Japanese knife is the gold standard for slicing raw fish, including tuna. The Yanagiba features a long, single-beveled blade that allows for precise, clean cuts. Its sharpness and length make it perfect for cutting through tuna with minimal effort, preserving the delicate texture of the fish. - Sashimi Knife:
Similar to the Yanagiba, the sashimi knife is specifically designed for slicing fish into thin, even pieces. It often has a longer, thinner blade, making it ideal for creating the perfect sashimi slices. The sashimi knife offers the precision needed to handle the delicate tuna, ensuring smooth, effortless cuts. - Chef’s Knife:
While a Yanagiba or sashimi knife is ideal for raw fish, a high-quality chef’s knife can work well for tuna if you don’t have access to a traditional Japanese knife. A chef’s knife with a sharp, thin blade will allow you to make smooth, precise cuts through the tuna, though it may require a bit more effort compared to the specialized knives.
3. Proper Slicing Technique
Once you have the right knife, the next step is ensuring that you use the proper technique when slicing the tuna. Follow these tips to achieve the best results:
- Chill the Tuna:
Cold tuna is easier to slice, as it firms up and holds together better. Before slicing, place the tuna in the fridge for about 15 minutes. This helps the fish maintain its structure and makes it easier to work with. - Use a Smooth, Single Motion:
When slicing the tuna, always aim to cut in one smooth motion. Avoid sawing back and forth, as this can cause the tuna to lose moisture and texture. A single, fluid motion will create a cleaner cut and preserve the integrity of the fish. - Slice Against the Grain:
For the best texture, always slice the tuna against the grain. This means cutting perpendicular to the lines of muscle fibers in the tuna. Slicing against the grain helps ensure that each piece of tuna is tender and easy to chew. - Maintain Even Pressure:
Apply even pressure when slicing the tuna to avoid crushing the fish. A sharp knife should glide through the fish with minimal force. This technique ensures that the slices remain clean and uniform in thickness.
4. Cleaning and Caring for Your Knife
After each use, it’s important to properly clean and care for your knife to maintain its sharpness and longevity. Always hand-wash your knife with warm water and mild soap, avoiding harsh detergents or abrasive scrubbers that could damage the blade. Dry the knife thoroughly after washing to prevent rusting.
It’s also recommended to regularly hone your knife to maintain its edge. Honing the blade realigns any minor misalignments in the edge, keeping it sharp between sharpening sessions. For a sharper edge, consider having the knife professionally sharpened every 6 to 12 months, depending on how often you use it.
Cutting Board Considerations
When preparing sushi-grade tuna, the cutting board you choose plays an essential role in maintaining the freshness of the fish and the quality of your cuts. The wrong cutting board can damage the delicate tuna and affect the texture and flavor. Let’s explore the types of cutting boards that work best for slicing tuna and how to take care of them to ensure optimal results.
1. Choosing the Right Cutting Board Material
Not all cutting boards are created equal, and the material of the board can have a significant impact on how well you slice your tuna. Here are the most common materials used for cutting boards and how each affects your tuna preparation:
- Wooden Cutting Boards:
Wooden boards are a popular choice for many chefs and home cooks because they are gentle on knives and help keep the blade sharp. They also offer a sturdy, stable surface for slicing tuna. Wood naturally resists bacteria, making it a safe option for raw fish preparation. However, it’s important to ensure that the wood is treated properly and kept dry to prevent bacteria growth. - Plastic Cutting Boards:
Plastic boards are more affordable and easier to maintain than wooden ones. They are lightweight and easy to clean, which makes them an attractive option for preparing sushi-grade tuna. However, plastic boards can be prone to knife marks, which may create grooves where bacteria can grow. It’s crucial to clean plastic boards thoroughly and replace them once they become too worn. - Bamboo Cutting Boards:
Bamboo is an eco-friendly alternative to both wood and plastic. It is durable, lightweight, and gentle on knives, making it an excellent option for slicing tuna. Bamboo boards also tend to resist moisture, reducing the risk of bacteria buildup. However, bamboo can sometimes be more prone to cracking over time if not properly cared for.
2. Size of the Cutting Board
When selecting a cutting board for slicing tuna, size matters. A board that is too small can make it difficult to work with large pieces of tuna, while a board that is too large may make it harder to control your cuts.
Aim for a cutting board that provides enough space to handle the whole tuna loin or at least a few large fillets comfortably. Ideally, your board should be at least 18 inches long and 12 inches wide. This size gives you enough room to slice the tuna into sashimi, poke, or sushi pieces without feeling cramped.
Additionally, ensure that the board is thick enough to withstand heavy cutting without warping. A thicker cutting board will also help absorb the force of your knife without dulling it too quickly.
3. Non-Slip Surface
Safety is a priority when working with raw fish, and having a non-slip cutting board is essential. A slipping board can lead to accidents, especially when using a sharp knife like a Yanagiba or sashimi knife. Many cutting boards come with non-slip feet or a textured surface that prevents them from sliding around while you slice the tuna.
If your cutting board doesn’t have a non-slip feature, consider placing a damp cloth or towel underneath it to keep it stable. This simple addition will help ensure that the board stays in place as you make your cuts.
4. Board Maintenance and Care
Once you’ve chosen the right cutting board, proper maintenance is key to ensuring its longevity and keeping your tuna prep safe and hygienic. Here’s how to care for your cutting board:
- Wooden Boards:
Regularly oil your wooden cutting board with food-safe mineral oil to keep it from drying out and cracking. After each use, wash it with mild soap and warm water, then dry it immediately to prevent warping. Periodically, sanitize the board with a vinegar-water solution to kill bacteria. - Plastic and Bamboo Boards:
Clean plastic and bamboo boards immediately after use to prevent the buildup of bacteria. Plastic boards can be washed in the dishwasher for an extra layer of sanitation. Bamboo boards should be washed by hand with warm water and a mild detergent. Like wooden boards, bamboo boards should be dried thoroughly after each use. - Preventing Knife Marks:
Regardless of the material, be mindful of knife marks. Over time, deep grooves in your cutting board can become breeding grounds for bacteria. To prevent this, use a sharp knife and avoid using excessive force when slicing the tuna. Regularly check the board for deep grooves and replace it when necessary.
5. How to Maintain a Hygienic Workspace
When handling raw tuna, cleanliness is paramount. Here are a few tips to ensure that your cutting board stays hygienic and safe for food preparation:
- Wash Hands and Tools Frequently:
Always wash your hands before and after handling raw tuna. Additionally, regularly clean your knives, cutting board, and any other tools you use to prepare the fish. This will help reduce the risk of cross-contamination. - Separate Raw Fish from Other Ingredients:
To avoid the spread of bacteria, consider using a separate cutting board for raw fish and other ingredients like vegetables or cooked meats. This helps prevent cross-contamination and ensures the tuna remains fresh and safe to eat. - Use a Clean Towel for Drying:
After cleaning your cutting board, use a clean, dry towel to wipe off any moisture. This will help prevent bacteria growth and keep your board in top condition for your next tuna prep.
Fish Handling Tools
When preparing sushi-grade tuna for sashimi, poke, or other raw dishes, using the right fish handling tools can make all the difference. Proper tools ensure that the fish remains fresh, safe, and easy to handle. Let’s break down the essential tools you’ll need for handling fish, as well as tips on how to use them effectively for tuna prep.
1. Sashimi Knife (Yanagiba Knife)
A high-quality sashimi knife, also known as a Yanagiba, is essential for slicing sushi-grade tuna. This Japanese knife is long, thin, and designed to make smooth, precise cuts that preserve the delicate texture of the fish.
Key Features:
- Long Blade: A longer blade allows you to cut through the tuna in a single motion, minimizing bruising and preserving its delicate flesh.
- Single Bevel Edge: Yanagiba knives typically have a single bevel edge, which ensures sharpness and clean cuts.
- Sharpness: The sharpness of a sashimi knife allows for effortless slicing, reducing friction against the fish and maintaining its pristine appearance.
When using the Yanagiba knife, always cut in one smooth motion, applying gentle pressure to avoid tearing the tuna. This type of knife is ideal for making clean, thin slices of sashimi or poke cubes.
2. Fillet Knife
A fillet knife is another key tool for preparing sushi-grade tuna. While the sashimi knife is great for slicing, a fillet knife is used for breaking down larger pieces of tuna into fillets. It is flexible, allowing for precise cuts along the bones, and is designed to handle the texture and firmness of fresh fish.
Key Features:
- Flexibility: Fillet knives have a flexible blade that adapts to the contours of the fish, making it easier to remove bones and skin.
- Sharpness: A sharp fillet knife ensures a clean cut without damaging the fish’s flesh.
The fillet knife is perfect for those who want to break down a whole tuna loin into manageable portions before slicing it further into sashimi or poke. It helps create the ideal portions needed for various recipes.
3. Tongs or Fish Tweezers
When working with raw fish, it’s essential to handle the tuna delicately to avoid bruising or contaminating the flesh. Tongs or fish tweezers are perfect tools for this purpose. These tools help you pick up and manipulate fish without direct contact, maintaining hygiene and the integrity of the fish.
Key Features:
- Gentle Grip: The design of tongs or tweezers ensures that you handle the fish gently, preventing damage while transferring or placing it on the cutting board or plate.
- Hygiene: These tools reduce direct hand contact with raw fish, which is especially important when working with sushi-grade tuna.
Tongs or tweezers are useful when you need to transfer tuna to a plate, or for arranging it neatly in a poke bowl or sushi roll. They allow for hygienic, delicate handling to maintain the tuna’s freshness.
4. Fish Scaler
If you’re preparing whole tuna or working with a fillet that still has its skin, a fish scaler can come in handy. It allows you to remove the skin and scales without damaging the fish underneath. Tuna skin can have a strong taste that some people prefer to remove before preparing their dish.
Key Features:
- Scalability: The fish scaler features a set of small, sharp teeth that remove scales efficiently.
- Ease of Use: It’s easy to use and helps make the process of skinning tuna fillets quick and simple.
Use a fish scaler if you’re preparing tuna in its whole form, or when skinning smaller cuts that you plan to use for sashimi or poke. After scaling, you can continue to slice and prep the tuna as needed.
5. Cutting Board
As previously mentioned, a suitable cutting board is a crucial tool for handling tuna. It provides a stable surface for your fish prep and prevents contamination or damage. Look for a non-slip board that is large enough to accommodate your tuna, and preferably one made of wood or bamboo to reduce the risk of dulling your knives.
Key Features:
- Non-Slip: Ensures the board stays in place during slicing, which improves safety.
- Size: A large, wide surface allows you to break down and slice the fish comfortably.
Using a dedicated cutting board for fish ensures hygiene and helps keep your kitchen area organized and free from cross-contamination.
6. Fish Scissors
Fish scissors are designed specifically to cut through fish skin and bone. While not as commonly used as other tools, they can be handy for more detailed tasks, such as trimming skin or removing certain parts of the fish. These scissors are often designed with sharp, curved blades that allow for precise cutting.
Key Features:
- Curved Blade: The curved design of fish scissors helps you navigate around bones and skin easily.
- Precision: They are perfect for detailed cuts, especially when preparing a whole fish or removing excess skin.
Fish scissors come in handy when you need to make small adjustments to your tuna fillets, such as cutting away skin that isn’t easily removed with a knife.
7. Fish Bone Tweezer
While not always necessary, a fish bone tweezer can be a useful tool to remove small, stray bones that might remain in the tuna after filleting. Tuna, especially the larger varieties, can have small bones that are easy to miss with a fillet knife.
Key Features:
- Precision Tips: The fine tips of the tweezers allow for precise removal of bones.
- Comfortable Grip: Fish bone tweezers are designed to give you a comfortable and steady grip while working with delicate fish.
By using fish bone tweezers, you can ensure that every piece of your sushi-grade tuna is free of bones before serving it raw.
8. Thermometer for Tuna Temperature
To ensure your tuna is at the right temperature for sushi preparation, consider using a food thermometer. Tuna should be stored and prepared at optimal temperatures to maintain freshness and prevent foodborne illness.
Key Features:
- Quick and Accurate Readings: A thermometer provides an accurate reading of the fish’s internal temperature, ensuring it’s kept within safe limits.
- Versatility: Use the thermometer to monitor the temperature when thawing frozen tuna or checking for freshness.
Maintaining the right temperature ensures that your sushi-grade tuna remains safe to eat and retains its optimal texture and flavor.
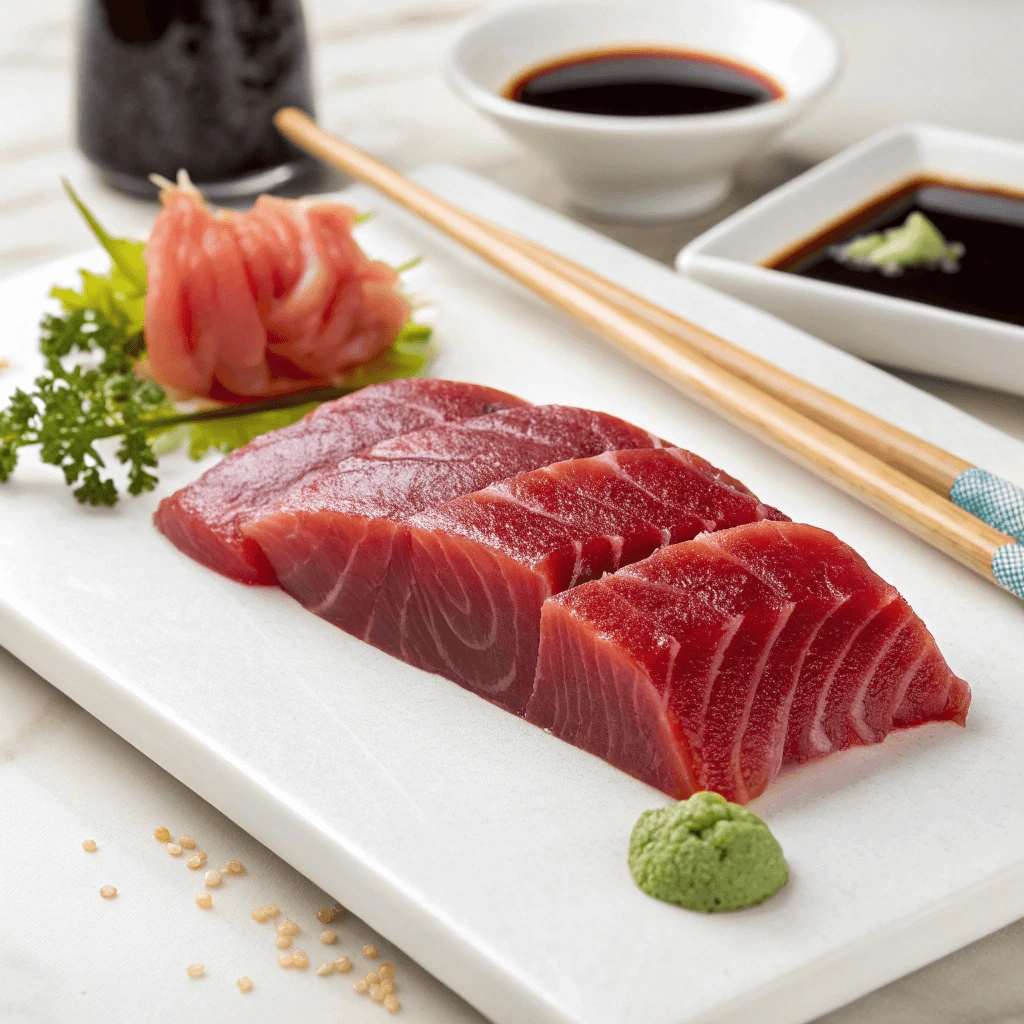
How to Prepare Tuna for Sashimi

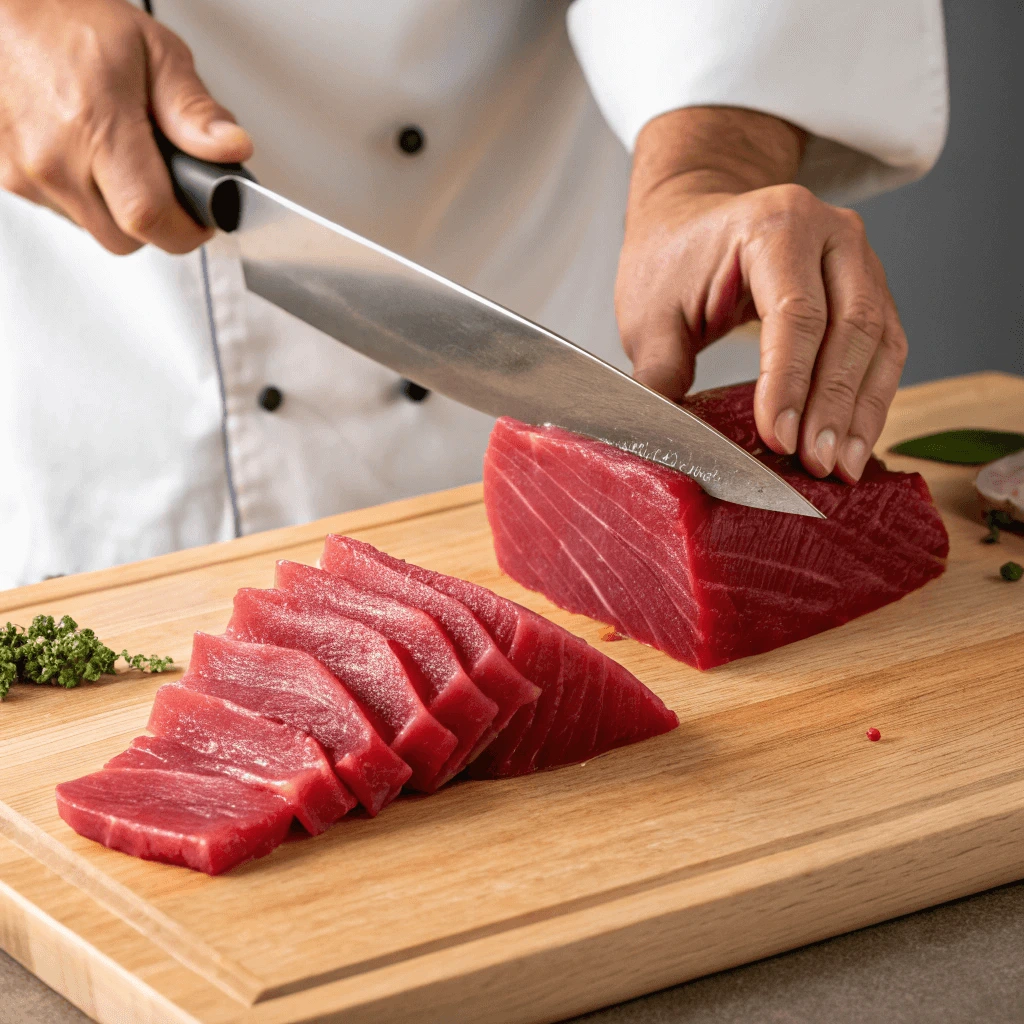
Slicing Techniques for Sashimi
Slicing sushi-grade tuna for sashimi requires precision, attention to detail, and a steady hand. The goal is to preserve the tuna’s delicate texture and create clean, thin slices that showcase the fish’s natural beauty. Using the right slicing techniques will ensure your sashimi looks professional and retains its best flavor and texture.
1. Choose the Right Knife
The first step in preparing sashimi is choosing the appropriate knife. Yanagiba knives are the traditional choice for slicing sashimi. These knives are long, single-beveled, and razor-sharp, perfect for creating smooth, clean slices of fish. A sharp knife will allow you to slice the tuna with minimal pressure, preserving the fish’s texture and preventing bruising.
When selecting a knife, ensure that it’s long enough to make one continuous cut through the tuna without sawing back and forth. This technique minimizes damage to the flesh and results in clean, uniform slices.
2. Position the Tuna Correctly
Before you start slicing, ensure that the tuna is positioned correctly on your cutting board. Place the tuna fillet with the grain running perpendicular to your knife’s cutting edge. This positioning allows you to cut against the grain, which produces more tender slices. Cutting with the grain would result in tougher, stringy slices.
If you’re working with a tuna loin, the grain can be a bit harder to see, but you can feel the direction of the muscle fibers by gently running your fingers along the fish. Align the tuna so that the knife can move across the grain smoothly.
3. Slice in One Motion
To achieve the best slices for sashimi, always cut in a single motion. Avoid a sawing motion, as this can tear the tuna and create ragged edges. With the Yanagiba knife, apply gentle pressure and let the sharp blade do the work.
For each slice, make sure you’re using the full length of the blade. Starting from one end of the fillet, slide the knife through the tuna in a smooth, uninterrupted motion, maintaining a steady hand. Each slice should be thin, typically between 1/4 inch to 1/2 inch thick, depending on your preference and the specific dish you’re preparing.
4. Maintain Even Thickness
Consistency is key when slicing sashimi. Aim to keep each slice even in thickness to ensure uniform presentation and an even texture when eating. This is especially important when preparing sashimi for a group, as diners will expect each piece to be of equal size and shape.
If you’re new to slicing sashimi, take your time to adjust the thickness of each cut as needed. Practice makes perfect, so don’t worry if your first few slices aren’t perfect.
5. Avoid Pressing Too Hard
When slicing, don’t press down too hard on the knife. A sharp knife requires minimal force, and pressing down too hard can cause the tuna to compress, affecting the texture and flavor. Let the knife glide through the tuna with ease, following the natural contours of the fish.
If you feel any resistance, it’s a sign that you need to apply a bit more focus on your angle or motion, rather than pressing harder. The goal is to maintain a light, fluid motion to preserve the freshness and integrity of the fish.
6. Angle of the Knife
The angle at which you hold the knife can also influence the texture of the sashimi. Ideally, you should slice the tuna at a slight angle, around 45 degrees, to create wider, flatter slices. This angle helps to enhance the presentation, as the slices will appear more elegant and refined.
Adjust the angle based on the type of tuna and the dish you’re preparing. For instance, a slightly steeper angle can create thicker cuts if desired. For a more delicate presentation, use a shallower angle for thinner, more transparent slices.
7. Handling the Sliced Tuna
Once your tuna is sliced, handle it with care. Gently lift each slice and place it on your plate or serving dish. Avoid using your hands directly to prevent bruising the delicate flesh of the fish. Instead, use a pair of tongs or fish tweezers to place each piece neatly on the dish.
For sashimi, it’s important to serve the tuna immediately to maintain its freshness. Sliced tuna should be chilled but not frozen, as freezing can affect the texture of the fish.
8. Presentation of Sashimi
The way you arrange your sashimi is just as important as how you slice the tuna. To present sashimi like a professional, fan the slices out in a circular pattern or line them up in a neat row. Garnish with small portions of wasabi, pickled ginger, or even finely sliced vegetables for added color and flavor.
Good presentation not only enhances the dining experience but also allows the vibrant colors and texture of the tuna to shine.
Preserving Freshness While Preparing
When preparing sushi-grade tuna, maintaining the freshness of the fish is paramount. Any misstep in handling or storage can compromise the delicate flavor and texture of the tuna. Whether you’re making sashimi, poke bowls, or any other dish, here are some important tips to preserve the freshness of your tuna while preparing it.
1. Keep Tuna Cold at All Times
The most important factor in preserving the freshness of tuna is keeping it cold. After purchasing sushi-grade tuna, immediately refrigerate it or place it on ice to maintain the cold temperature. Sushi-grade tuna is typically stored at very low temperatures to slow down the growth of bacteria and preserve its texture.
When preparing the tuna, it’s essential to work quickly. Avoid leaving the fish out at room temperature for more than a few minutes, as this will accelerate the breakdown of its delicate proteins and affect its taste.
Make sure your kitchen is well-equipped with a clean, cold surface to work on, such as a chilled cutting board. This will help maintain the tuna’s freshness as you slice or prepare it for your recipe.
2. Use Clean Utensils and Surfaces
Before you start preparing the tuna, ensure all your utensils and surfaces are clean. This includes your knives, cutting boards, and even your hands. Any contaminants or bacteria could affect the quality and safety of the tuna.
Using a clean, sanitized cutting board ensures that the fish doesn’t come into contact with any residue from previous meals, which could compromise its freshness. You should also use a sharp knife that’s been thoroughly cleaned before each use. A dull knife can tear the tuna, causing uneven cuts that might spoil its texture.
3. Avoid Overhandling the Tuna
Handling sushi-grade tuna too much can cause it to lose its freshness. The more you touch and manipulate the fish, the more its texture deteriorates. This is especially true for sashimi or poke bowls, where the tuna’s natural texture is meant to shine.
Use utensils like tweezers or tongs to move the fish instead of your hands. This minimizes the risk of contaminating the tuna and keeps it from becoming mushy or discolored. It’s also a good practice to slice the tuna immediately before serving rather than letting it sit exposed for too long. This helps maintain its firmness and bright color.
4. Prepare Tuna Just Before Serving
If you want the tuna to remain as fresh as possible, slice it just before serving. Cutting the tuna ahead of time increases the exposure of the fish to air, which can cause oxidation and degrade its quality.
For sashimi, the goal is to serve the tuna immediately after slicing, preserving its texture and flavor. Similarly, if you are making poke bowls, cut the tuna only when you are ready to assemble the dish. This ensures that the tuna stays firm and juicy, giving your dish the best possible outcome.
5. Store Leftover Tuna Properly
If you have leftover sushi-grade tuna, store it correctly to prevent spoilage. Place the remaining tuna in an airtight container and refrigerate it immediately. If you plan to store it for a longer period, you can freeze the tuna, but be sure to use it within a few days to maintain its quality.
When thawing frozen tuna, always do so in the refrigerator, never at room temperature. Slow thawing helps retain the tuna’s texture and flavor.
6. Monitor the Tuna’s Condition
Before preparing sushi-grade tuna, always check its condition. Fresh tuna should have a clean, bright red color with a moist, shiny surface. If the tuna appears discolored, slimy, or has an off-putting odor, it’s a sign that the fish is no longer fresh and should not be used.
Sensory checks are essential to ensuring that your tuna remains at its best. Trust your eyes and nose to assess the quality, and when in doubt, discard it to avoid any health risks.
7. Use Ice When Serving
For extra assurance that your tuna remains fresh during meal preparation, consider serving it on ice, especially for dishes like sashimi or poke bowls. A chilled serving dish or ice bowl will keep the tuna at the ideal temperature for consumption, preserving its freshness throughout the meal. This step is particularly useful if you’re serving a large group or preparing multiple servings.
Ice will help maintain the texture of the fish without causing it to freeze or become mushy. Just be careful not to let the ice water mix directly with the fish to avoid compromising its quality.
Serving Sashimi: Presentation Tips
Sashimi is not just a delicious dish but also a work of art. When serving sashimi, presentation is just as important as the flavor. The way you arrange the tuna can elevate the dining experience and show your attention to detail. Whether you’re serving sashimi for a casual meal or a special occasion, these tips will help you present it in the most beautiful and appetizing way possible.
1. Use a Chilled Plate
To maintain the freshness of sashimi, serve it on a chilled plate. A cold plate helps keep the fish at the ideal temperature, ensuring that it stays firm and fresh. Before serving, place the plate in the fridge or freezer for about 10-15 minutes. This quick chill ensures that the sashimi remains at its best, even if the meal takes some time to enjoy.
A chilled plate also adds to the visual appeal, especially when paired with the delicate colors of the tuna. The vibrant red hues of the fish will pop against the cold surface, creating a stunning presentation.
2. Create a Decorative Base with Garnishes
To enhance the look of your sashimi, start by creating a decorative base using garnishes. Shredded daikon radish is a popular choice for this purpose. It adds a touch of freshness while providing a visually appealing contrast to the tuna. You can also use thinly sliced cucumber or a few fresh herbs like cilantro or shiso leaves to bring color and texture to the dish.
Garnishes should complement the sashimi without overpowering it. Keep the base simple yet elegant, allowing the tuna to be the star of the plate. The goal is to add subtle flair, not clutter.
3. Arrange the Tuna Neatly
The arrangement of your sashimi is crucial for presentation. Start by laying the tuna slices neatly on the plate, ensuring they are not overlapping. The slices should be cut evenly and at a slight angle to showcase the fish’s delicate texture.
You can arrange the slices in a fan shape, a straight line, or even in a circular pattern, depending on your aesthetic preferences. The key is to create a sense of order and balance. For an extra touch, leave a small gap between each slice to give the tuna room to breathe and show off its beautiful color.
4. Add a Touch of Soy Sauce or Wasabi on the Side
While sashimi is often served without condiments, you can still add a small dish of soy sauce or wasabi to enhance the flavor profile. Instead of drizzling soy sauce directly onto the fish, serve it in a small dipping bowl on the side. This allows guests to dip the sashimi to their liking, preventing the fish from becoming too salty.
Place a small dab of wasabi beside the sashimi for those who enjoy a bit of spice. You can even use a decorative spoon or small dish to serve the condiments, ensuring that they don’t detract from the main presentation.
5. Use the Right Serving Dish
Choose a serving dish that complements the colors and texture of the tuna. Simple white porcelain or black ceramic plates work well, as they allow the vibrant colors of the fish to stand out. Avoid overly decorative or busy patterns that could distract from the elegance of the sashimi.
For a more traditional presentation, consider using a wooden sushi board (called a sushi-oke), which adds authenticity to the dish and enhances the overall experience. The natural material contrasts beautifully with the bright red tuna and creates a rustic, charming look.
6. Add Fresh Citrus for a Pop of Flavor and Color
For a bit of zing and an extra touch of color, garnish your sashimi with a slice of fresh citrus, such as lemon, lime, or orange. The citrus adds a refreshing contrast to the richness of the tuna and can be used to lightly squeeze over the sashimi for additional flavor. The vibrant yellow or orange of the citrus slices provides a pleasant contrast to the deep red tones of the fish.
You can also add a few thin slices of yuzu or lime zest for a more exotic touch, which not only enhances the flavor but also adds visual interest.
7. Ensure Portion Control
While sashimi is typically served as small slices, it’s important to be mindful of portion control. Each slice should be no thicker than 1/4 inch to maintain the tuna’s delicate texture. The goal is to offer enough fish for a satisfying bite while preserving its flavor and presentation. Keep each piece bite-sized to ensure that guests can enjoy the sashimi without overwhelming their palate.
For an extra touch of elegance, consider serving sashimi in small, individual portions. This allows each person to enjoy a beautiful presentation, and the smaller plates ensure a more refined dining experience.
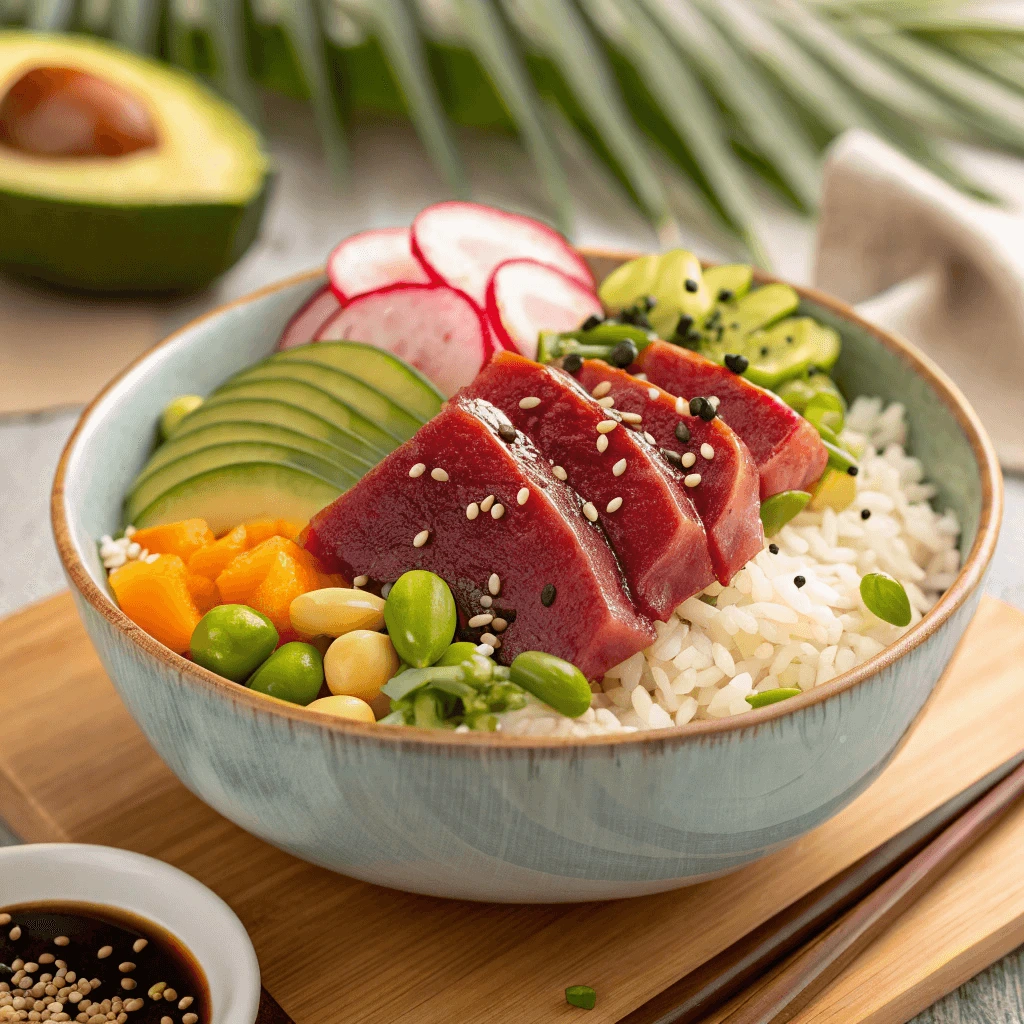
How to Make a Tuna Poke Bowl
Choosing the Right Cuts for Poke
Poke is a flavorful, versatile dish that allows the natural taste of sushi-grade tuna to shine. Whether you’re preparing poke at home or ordering it at a restaurant, the choice of cuts is crucial in determining the dish’s texture and overall experience. With a variety of cuts available, it’s important to know which ones work best for poke. Here’s how you can choose the perfect cuts for your next poke bowl.
1. Understanding the Types of Cuts
When selecting tuna for poke, it’s important to understand the different cuts and how they impact the texture and flavor of the dish.
- Cubed Cuts: The most common and traditional cut for poke is a small cube, typically around 1/2-inch in size. This cut is perfect for absorbing the flavors of the marinade while maintaining the fish’s natural texture. Cubing the tuna helps the poke to have that classic chunky, satisfying bite.
- Sashimi-Style Cuts: For a more delicate poke bowl, you can use sashimi-style cuts, which are thinner slices, often about 1/8 to 1/4 inch thick. These slices melt in your mouth and provide a smoother, less chewy texture. Sashimi-style cuts are ideal for those who prefer a more refined eating experience and want the tuna’s flavor to stand out more prominently.
- Toro Cuts: Toro is the fatty belly portion of the tuna, and it offers a rich, buttery texture that’s perfect for a luxury poke bowl. If you want your poke to have a melt-in-your-mouth experience, toro is the cut to go for. It is especially popular in high-end poke bowls, where the focus is on flavor and texture richness.
2. Consider the Texture and Marbling
When selecting tuna for poke, it’s essential to consider both the texture and marbling of the fish. Marbling refers to the small veins of fat within the tuna, which can greatly affect the flavor and mouthfeel.
- Lean Cuts: For a lighter, more refreshing poke bowl, choose cuts from the loin or back area of the tuna. These cuts are leaner and have less fat, giving a clean, pure tuna flavor. Lean cuts are typically firmer in texture, making them ideal for cubed poke.
- Fatty Cuts: For a richer, more decadent poke bowl, opt for cuts that have higher fat content, such as toro or cuts closer to the belly of the tuna. These cuts have a melt-in-your-mouth quality that adds luxurious richness to the dish. If you’re using fatty cuts, consider balancing them with fresher vegetables and pickled ingredients to add contrast to the dish.
3. Freshness is Key
Regardless of the cut you choose, freshness is the most important factor when selecting tuna for poke. Sushi-grade tuna should be vibrant in color, firm to the touch, and free from any off smells. Tuna that has been frozen to sushi-grade standards ensures the safety of the fish while preserving its quality. Always buy from reputable fishmongers or grocery stores that specialize in high-quality seafood.
Look for tuna that has a deep, rich red color. A dull or brownish hue indicates that the fish is not as fresh. Firmness is also a key indicator; the tuna should spring back when pressed gently. Soft or mushy areas indicate that the fish has been improperly stored or is past its prime.
4. Customizing Your Poke Cuts
Poke is an incredibly versatile dish, and you can easily adjust the cuts of tuna to suit your personal preferences or dietary needs. Some people may enjoy a more chunky poke with cubes of tuna, while others may prefer delicate slices of sashimi-style fish. If you’re making poke at home, experiment with different cuts to find what works best for you and your guests.
Additionally, you can mix different cuts of tuna in your poke bowl for added texture and complexity. Combining a fatty toro cut with leaner cuts from the loin or belly can create an interesting contrast in mouthfeel and flavor.
5. What to Avoid
When choosing cuts for poke, avoid purchasing pieces with visible sinew, bruising, or discoloration. These imperfections can negatively affect the texture and flavor of the tuna. Also, while fresh tuna is ideal, some people might not prefer the flavor of more oily cuts, so always consider your guests’ preferences when selecting the fish.
Marinating Your Tuna for Poke
Marinating tuna for poke is an essential step to infuse the fish with flavor and enhance the overall dish. The right marinade not only adds complexity to the tuna but also complements the fresh ingredients in your poke bowl. The marination process is simple, but it’s important to get the balance of flavors just right to ensure your poke is both vibrant and delicious.
1. Choosing the Right Marinade Base
The first step in marinating tuna for poke is selecting the base of your marinade. While traditional poke marinades focus on a few key ingredients, you can experiment with various combinations to suit your tastes. Common ingredients for a poke marinade include:
- Soy Sauce: Soy sauce is the cornerstone of a traditional poke marinade. It provides the saltiness and umami that perfectly complements the tuna. You can choose from regular soy sauce or a lower-sodium option if you want to control the salt levels. Tamari, a gluten-free alternative, also works well for those with dietary restrictions.
- Sesame Oil: A splash of sesame oil adds a rich, nutty flavor to the marinade. It helps balance out the saltiness of the soy sauce and contributes to the overall depth of flavor. Be cautious with the amount of sesame oil, as it has a strong flavor and can overpower the dish if used excessively.
- Rice Vinegar: Rice vinegar adds a touch of acidity to the marinade. This helps cut through the richness of the tuna and adds a nice balance to the dish. You can adjust the amount depending on how tangy you want your poke to be.
- Citrus Juice: Lemon or lime juice is often added to the marinade to provide a refreshing, zesty kick. The acidity from citrus juices works in tandem with rice vinegar to brighten the dish and accentuate the flavors of the tuna.
2. Additions for Extra Flavor
In addition to the core ingredients, there are plenty of options to enhance the flavor profile of your poke marinade. The following ingredients can add complexity, sweetness, or heat to the mix:
- Garlic: Freshly minced garlic or garlic powder can provide a savory, aromatic element to the marinade. Garlic pairs wonderfully with tuna and brings a pleasant sharpness to the dish.
- Ginger: Grated fresh ginger adds a mild spiciness and warmth to the marinade. It helps enhance the freshness of the tuna and adds a subtle zing. If you prefer a stronger ginger flavor, feel free to increase the amount.
- Green Onions: Finely chopped green onions add a mild, fresh flavor to the marinade. They also provide a bit of crunch, which is a nice contrast to the tender tuna.
- Honey or Sugar: If you prefer a touch of sweetness in your marinade, honey or a small amount of sugar can balance out the saltiness and acidity. This can create a harmonious flavor profile, especially if you’re pairing your poke with spicy ingredients.
- Chili Flakes or Sriracha: For those who enjoy a little heat, adding chili flakes or a drizzle of sriracha can give the poke an exciting kick. Be careful not to go overboard—just a small amount is usually enough to add a subtle heat without overpowering the dish.
3. Marination Time
Once you’ve mixed the marinade, it’s time to coat your tuna in it. You can either marinate the tuna for a short time or longer, depending on how strong you want the flavors to be.
- Quick Marinate (15-30 minutes): If you prefer a lighter, fresher flavor where the tuna remains the star of the dish, a quick marinate of 15-30 minutes is sufficient. This allows the tuna to absorb the marinade while still retaining its natural texture and flavor.
- Long Marinate (1-2 hours): For a more robust flavor, you can marinate the tuna for 1-2 hours. This will give the fish more time to soak in the flavors of the marinade, resulting in a more pronounced taste. However, be mindful not to marinate for too long, as the acid in the marinade can begin to break down the fish and make it mushy.
4. How to Marinate Tuna for Poke
To marinate your tuna properly, follow these simple steps:
- Step 1: Cut the tuna into bite-sized cubes (or slices if you prefer sashimi-style poke).
- Step 2: In a mixing bowl, combine your marinade ingredients. Use a ratio of about 2 parts soy sauce to 1 part sesame oil and rice vinegar, and adjust the other ingredients to taste.
- Step 3: Add the tuna to the marinade and gently toss to coat. Be careful not to overmix or break apart the tuna cubes.
- Step 4: Cover the bowl with plastic wrap and refrigerate. Let the tuna marinate for 15-30 minutes for a lighter flavor, or up to 2 hours for a more intense taste.
- Step 5: Once the tuna has marinated, remove it from the refrigerator and use it immediately for your poke bowl. Don’t leave it in the marinade for too long, as it may lose its texture.
5. Tasting and Adjusting the Marinade
Before you serve your marinated tuna, it’s important to taste the marinade and adjust it if necessary. You can add a little more citrus juice for brightness, a dash of soy sauce for saltiness, or a touch of honey for sweetness. Don’t be afraid to tweak the balance of flavors to suit your taste. After all, poke is all about creating a harmonious blend of fresh ingredients that work together.
Building the Perfect Poke Bowl
Building the perfect poke bowl is an art that combines fresh, vibrant ingredients with balance and creativity. The goal is to create a harmonious blend of flavors and textures that complement the sushi-grade tuna (or other protein) while providing a satisfying and well-rounded meal. Whether you’re making a traditional poke bowl or experimenting with unique twists, the following steps will guide you in creating a poke bowl that’s both delicious and visually appealing.
1. Start with the Base: Rice or Greens?
Every great poke bowl begins with a solid base. Traditionally, poke bowls use white rice or brown rice as the foundation, but you can also choose cauliflower rice or greens like spinach or arugula for a lighter, low-carb option. Your choice of base will affect the overall flavor and texture of the bowl, so pick one that complements the tuna and other ingredients.
- White Rice: White rice is the most popular option for poke bowls. Its mild flavor and sticky texture make it an excellent vehicle for absorbing the flavors of the marinade and toppings. Sushi rice or short-grain rice works best because it sticks together nicely and provides the right texture for a poke bowl.
- Brown Rice: For a healthier option, brown rice adds extra fiber and a nutty flavor that pairs well with the tuna and other ingredients. It has a chewier texture and is slightly heartier than white rice.
- Cauliflower Rice: A great alternative for those following low-carb or keto diets, cauliflower rice offers a neutral base while still providing some volume and crunch.
- Greens: If you want a lighter, fresher poke bowl, consider using greens as your base. A bed of spinach, mixed greens, or arugula adds a peppery taste and leafy texture, perfect for pairing with a variety of vegetables and proteins.
2. Choose Your Protein
While sushi-grade tuna is the most common protein used for poke, you can get creative and add different proteins for variety. The key is ensuring that the protein is fresh, properly handled, and of the highest quality to create a delicious poke bowl. Here are some options:
- Tuna: Opt for sushi-grade tuna for the classic poke experience. Whether you choose ahi tuna, yellowfin, or bluefin, make sure the tuna is cut into bite-sized cubes for easy consumption.
- Salmon: If you’re a fan of salmon, it’s another excellent protein for poke bowls. Like tuna, it should be fresh and of high quality to ensure the best flavor and texture.
- Shrimp: Cooked shrimp offers a nice contrast to the raw fish and adds a bit of sweetness to the bowl.
- Octopus: For a more adventurous poke bowl, consider adding octopus. It provides a unique texture and pairs well with bold marinades.
- Tofu: For a vegan or vegetarian version, tofu is a great substitute for seafood. It absorbs the flavors of the marinade and adds a soft, creamy texture to the bowl.
3. Add Color and Texture with Vegetables
Vegetables are essential to building a balanced poke bowl. They bring color, freshness, crunch, and texture that help elevate the dish. Some vegetables are traditional for poke, while others can add a fun twist to your creation. Here are some popular vegetable additions:
- Cucumber: Thinly sliced cucumber adds a refreshing crunch and a light, crisp texture that balances the richness of the tuna.
- Edamame: These young soybeans are rich in protein and fiber, adding a soft, slightly nutty flavor and an extra layer of texture.
- Carrots: Shredded or thinly sliced carrots add vibrant color, sweetness, and a bit of crunch to the poke bowl.
- Avocado: Creamy avocado slices provide a smooth texture and subtle flavor that pairs beautifully with the tuna. They also help balance the acidity of the marinade.
- Radishes: For a peppery bite, add sliced radishes. Their crunch and mild heat complement the tuna and other ingredients in the bowl.
- Seaweed Salad: Seaweed salad adds a tangy, umami flavor and chewy texture, which pairs perfectly with sushi-grade tuna.
4. Top it Off with Flavorful Sauces
The sauce you choose for your poke bowl will bring everything together. It adds depth and richness to the dish while tying together all the ingredients. Here are some popular sauce options:
- Soy Sauce-based Sauces: A simple soy sauce or tamari mixed with a touch of sesame oil is a classic. Add a bit of honey or sugar for sweetness and balance the saltiness. For extra umami, try incorporating oyster sauce or fish sauce.
- Spicy Mayo: This creamy, spicy sauce is made by mixing mayonnaise with sriracha sauce and a dash of lemon or lime juice. It adds a creamy texture and a touch of heat to the bowl.
- Ponzu Sauce: Ponzu is a citrus-based soy sauce with a slightly tart flavor. It provides a refreshing contrast to the richness of the fish.
- Wasabi Sauce: If you like heat, adding a wasabi-based sauce can kick up the flavor profile. Just be cautious, as wasabi has a powerful bite that can easily overwhelm the dish.
- Miso-based Sauce: For a savory and umami-packed sauce, mix miso paste with a bit of vinegar, sesame oil, and a touch of sweetener. This sauce has a rich, salty flavor that complements tuna and other proteins.
5. Garnishes and Extras
Finally, adding garnishes and extra toppings can elevate the flavor and presentation of your poke bowl. Consider these additions to complete your creation:
- Sesame Seeds: Toasted sesame seeds are a traditional garnish for poke bowls. They add a mild nutty flavor and a crunchy texture.
- Fried Onions: Crispy fried onions add crunch and a savory, slightly sweet flavor to the bowl.
- Chili Flakes or Jalapeños: For some heat, sprinkle chili flakes or add thin slices of jalapeños to your poke bowl.
- Nori or Seaweed: Crumbled nori or strips of seaweed add a salty, umami flavor and an interesting texture to your poke bowl.
- Pickled Vegetables: Pickled ginger or pickled cucumbers add a tangy and slightly sweet flavor that cuts through the richness of the fish.
Storing and Freezing Sushi Grade Tuna for Future Use
Short-Term Storage: Refrigeration
Proper refrigeration is essential when storing sushi-grade tuna for short-term use. Whether you plan to use it for sashimi, poke, or other dishes, storing it correctly ensures that the tuna stays fresh and safe to eat.
1. Store Immediately
After purchasing sushi-grade tuna, refrigerate it as soon as possible. This minimizes bacterial growth and maintains its freshness. Place the tuna in the coldest section of your refrigerator, ideally on a shelf at the back. Make sure the fridge temperature is set between 32°F to 38°F (0°C to 3°C) to keep the fish fresh.
2. Use an Airtight Container
To prevent exposure to air and moisture, store the tuna in an airtight container or wrap it tightly in plastic wrap or aluminum foil. This will help retain the tuna’s natural flavor and texture. Additionally, this prevents contamination from other foods in the fridge.
3. Use Within 24 to 48 Hours
While sushi-grade tuna is more resilient than regular fish, it’s still a good idea to consume it as soon as possible for the best taste and safety. Use the tuna within 24 to 48 hours of purchase. The longer it stays in the fridge, the more the texture and flavor will degrade. Always check for signs of spoilage, such as off smells, discoloration, or a slimy texture before using it.
4. Place on Ice for Extra Freshness
If you’re looking to extend the freshness of sushi-grade tuna during storage, consider placing the container on a bed of ice in your fridge. This will help maintain a consistently low temperature, slowing down any degradation of the tuna.
Refrigeration is a simple and effective way to store sushi-grade tuna for short-term use. By following these tips, you’ll ensure that your tuna stays as fresh as possible until you’re ready to enjoy it.
Long-Term Storage: Freezing for Raw Consumption
Freezing sushi-grade tuna is an effective way to store it for long-term use, preserving its quality for later preparation. Follow these key tips to maintain freshness:
1. Flash Freezing for Best Results
To preserve quality, freeze tuna quickly at temperatures below -4°F (-20°C). This rapid freezing minimizes ice crystal formation, protecting the texture.
2. Proper Packaging
Wrap tuna tightly in plastic wrap or freezer paper, then seal it in a vacuum-seal or resealable freezer bag to prevent freezer burn and retain freshness.
3. Freezing Duration
Tuna can be frozen for up to 2-3 months. Label packages with the date to ensure proper rotation and optimal freshness.
4. Thawing Safely
Thaw tuna overnight in the refrigerator for best results. Avoid room temperature thawing to prevent bacterial growth. Alternatively, use cold water for a quicker thaw.
By freezing tuna properly, you can enjoy fresh sushi-grade tuna even after extended storage
Thawing and Reusing Frozen Sushi-Grade Tuna
Thawing sushi-grade tuna properly is crucial to maintaining its texture and flavor. If you plan to reuse the tuna, follow these steps to ensure safety and quality:
1. Thawing Methods
- Refrigerator Thawing: For the best results, place the tuna in the fridge overnight. This slow thawing method ensures that the fish stays at a safe temperature, preserving its texture and flavor.
- Cold Water Thawing: If you need to thaw the tuna quickly, place it in a sealed plastic bag and submerge it in cold water. Change the water every 30 minutes to keep it at a safe temperature.
Avoid thawing tuna at room temperature, as this can promote bacterial growth and affect the tuna’s safety.
2. Inspecting the Tuna
Before using thawed tuna, check for any signs of spoilage. Look for:
- An off or sour smell, which indicates it may have gone bad.
- Changes in color or texture, as tuna should maintain its firm, red flesh. If the tuna shows signs of spoilage, discard it.
3. Reusing Thawed Tuna
While it’s best to use thawed tuna immediately after thawing, you can reuse it in various dishes. Keep in mind that the texture may change slightly after freezing and thawing, but you can still use it in recipes like poke bowls, sushi rolls, or sashimi. It’s essential not to refreeze thawed tuna since this can impact both safety and quality.
4. Refrigerating Leftover Tuna
If you have leftover tuna after thawing and using it, store it properly. Refrigerate the remaining fish in an airtight container and consume it within 24-48 hours to ensure freshness and prevent spoilage.
We’ve covered everything from selecting the best sushi-grade tuna to preparing it for sashimi, poke bowls, and more. With proper handling and storage, you can enjoy fresh, high-quality tuna in your homemade dishes.
Why not try making sushi or poke bowls at home? It’s easier than you think, and sushi-grade tuna makes it even better.
Call to Action: Have you tried making sushi at home? Share your experience in the comments below!