Craving soft, sweet, and buttery rolls but need a gluten-free option? These Easy Gluten-Free Hawaiian Rolls are the perfect solution. Made with simple ingredients, they deliver the tropical sweetness of traditional Hawaiian rolls without the gluten. Whether you’re baking for a special occasion or just because, this easy recipe guarantees soft, fluffy rolls with every batch. Ready to bake? Let’s get started!
What Makes Gluten-Free Hawaiian Rolls Special?
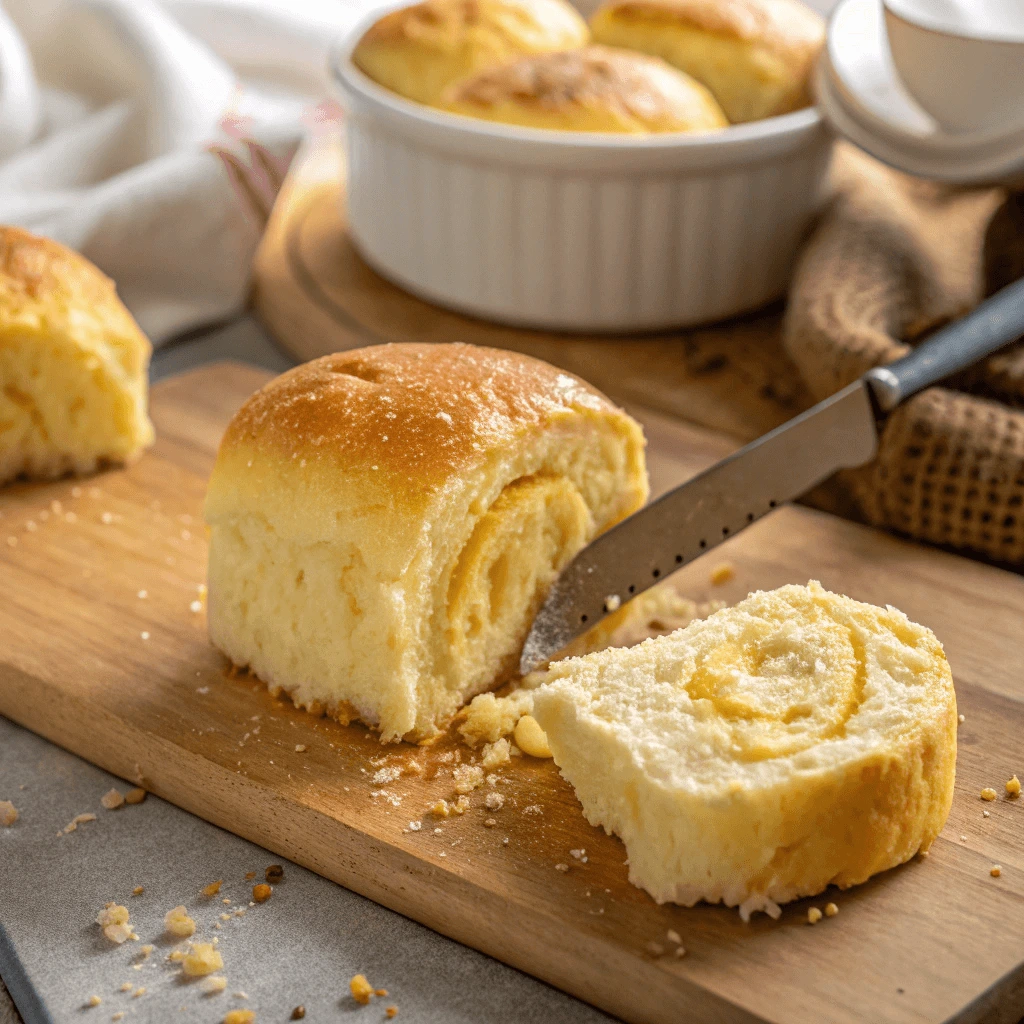
Sweet, Soft, and Buttery Texture
The texture of these gluten-free Hawaiian rolls is what truly makes them stand out. The first bite offers a soft, pillowy consistency that melts in your mouth, while the rich buttery flavor lingers, giving a comforting, indulgent experience. But how do we achieve this texture, especially in gluten-free baking where doughs can sometimes turn dense or dry?
Key Ingredients for Softness
A key to achieving that soft texture is using a combination of gluten-free flours that mimic the structure of wheat flour. Common ingredients like rice flour and tapioca starch help create a light, airy dough. Adding a bit of coconut flour to the mix also helps with moisture retention, ensuring the rolls stay tender after baking.
Buttery Flavor and Texture
To enhance the rolls’ signature buttery flavor, you can add melted dairy-free butter or coconut oil. These fats not only help with moisture but also impart a richness that complements the sweetness of the rolls. You’ll notice a slight crispness on the outside, but the inside stays soft and tender—just the way you want it.
Achieving the Right Consistency
One of the best parts of this recipe is its ability to maintain a soft, tender crumb despite being gluten-free. By following the right technique, you can ensure that your dough is never too dry or too sticky. After mixing the wet and dry ingredients, give the dough time to rest. This resting period allows the gluten-free flour to hydrate, which results in a smoother dough that will bake into the perfect roll with a soft texture.
With these techniques, you can achieve the perfect balance between softness and butteriness, making these rolls irresistible. Each bite delivers that melt-in-your-mouth feeling that traditional Hawaiian rolls are known for, without the gluten!
Gluten-Free vs. Traditional Hawaiian Rolls
When comparing gluten-free Hawaiian rolls to traditional ones, the key differences lie in ingredients and texture. Both are sweet and soft, but gluten-free rolls require specific adjustments to mimic the traditional flavor and consistency.
Ingredient Differences
Traditional Hawaiian rolls use wheat flour, which contains gluten, to create a soft and airy texture. Gluten-free versions rely on flours like rice flour and tapioca starch, which need extra binders like xanthan gum to provide structure and elasticity.
Texture and Rise
Traditional rolls rise well thanks to gluten’s ability to trap air. Gluten-free dough lacks this, so it requires longer rising times and special techniques to ensure a light, fluffy texture.
Flavor Profile
While traditional rolls use ingredients like honey and brown sugar for sweetness, gluten-free versions can use alternatives like maple syrup and coconut sugar. These substitutions maintain the signature sweetness of Hawaiian rolls while accommodating gluten-free diets.
Why Gluten-Free Is the Perfect Choice
Choosing gluten-free for your Hawaiian rolls offers several benefits, especially for those with dietary restrictions or preferences. Whether for health reasons, lifestyle choices, or a desire to enjoy bread without the gluten, this option has gained popularity. Here’s why gluten-free Hawaiian rolls are the perfect choice:
Health Benefits for Gluten Sensitivities
Gluten intolerance or sensitivity affects many people, causing digestive issues, headaches, or fatigue after consuming gluten. By choosing gluten-free rolls, you can enjoy bread without worrying about these side effects. For individuals with celiac disease, it’s crucial to avoid gluten altogether. Gluten-free Hawaiian rolls offer a safe, delicious alternative to traditional wheat bread.
Dietary Control and Flexibility
A gluten-free diet doesn’t have to be restrictive. In fact, it can open up a variety of food options. Many gluten-free recipes allow you to control not just the absence of gluten, but also the use of other ingredients, such as sugar, dairy, and preservatives. When making your own gluten-free Hawaiian rolls, you have the flexibility to create a recipe that fits your dietary needs. Whether you’re avoiding dairy, sugar, or are following a vegan lifestyle, you can tailor the recipe to suit your preferences.
Great Taste Without Compromise
There’s often a misconception that gluten-free products are dry, dense, or lack flavor. However, with the right ingredients and techniques, gluten-free Hawaiian rolls can be just as soft, fluffy, and flavorful as their gluten-packed counterparts. The use of tapioca flour, honey, and butter (or dairy-free alternatives) ensures that these rolls are rich, moist, and delicious, without sacrificing taste or texture.
In conclusion, gluten-free Hawaiian rolls offer an excellent choice for those seeking to enjoy tasty bread without compromising their health. With benefits like dietary flexibility, great taste, and suitability for gluten-sensitive individuals, these rolls prove that you don’t need gluten to have a perfect roll.
Essential Gluten-Free Ingredients You’ll Need
Choosing the Right Gluten-Free Flour Blend
One of the most important aspects of making gluten-free Hawaiian rolls is selecting the right gluten-free flour blend. The right combination of flours ensures that your rolls have the perfect texture, flavor, and structure. There are many gluten-free flour options available, and each brings something different to the table. Here’s how to choose the best flour blend for your rolls:
The Importance of a Well-Balanced Flour Blend
When making gluten-free bread, you can’t rely on just one type of flour. Most gluten-free flour blends are a mix of various flours and starches that work together to create a balanced dough. For example, rice flour provides structure, while tapioca starch contributes to the chewiness and moisture retention. A good gluten-free flour blend mimics the properties of traditional wheat flour, allowing for a soft, airy texture in your rolls.
A pre-made gluten-free flour blend can simplify the process, but if you prefer to make your own blend, you can combine different flours based on the role they play in the recipe. The key is to use a combination that balances texture, moisture, and elasticity, which is essential for successful gluten-free baking.
Popular Gluten-Free Flours to Consider
Some of the most common gluten-free flours to consider for your Hawaiian rolls include:
- Rice Flour: This is the base of many gluten-free flour blends. It has a neutral flavor and a fine texture, making it an ideal starting point for your dough.
- Tapioca Flour: Also known as tapioca starch, this flour helps add moisture and gives the dough a chewy consistency. It helps create that soft and tender texture that makes Hawaiian rolls so beloved.
- Almond Flour: Almond flour adds a slightly nutty flavor and helps improve the moisture and texture of the rolls. It also provides a rich, dense crumb.
- Coconut Flour: This flour is high in fiber and absorbs a lot of liquid, so it’s important to use it in smaller amounts or in combination with other flours.
For best results, choose a gluten-free flour blend that incorporates a variety of these ingredients, ensuring that your rolls have a fluffy, soft texture.
Tips for Getting the Right Texture
Choosing the right gluten-free flour blend isn’t just about picking the most popular flours; it’s about experimenting to find the best mix that works for your taste and desired texture. For soft and fluffy Hawaiian rolls, look for blends with a mix of starches like tapioca, potato, or cornstarch, as well as rice flour. Some people also add a bit of xanthan gum or guar gum to the mix to help bind the dough and give it structure, especially if the blend doesn’t contain binding agents.
When you mix your flour blend, always check the dough’s consistency. If it feels too dry, you can add a little more liquid. If it’s too wet or sticky, add more flour until you get a smooth, elastic dough.
Sweeteners That Mimic Traditional Flavor
When it comes to making gluten-free Hawaiian rolls, one key ingredient that plays a significant role is sweetener. Traditional Hawaiian rolls have a distinct sweetness, which comes from ingredients like sugar, honey, or pineapple juice. To replicate this flavor in a gluten-free version, you need to carefully select the right sweeteners. The right sweetener can maintain the rolls’ signature sweetness and complement the other flavors without overpowering them. Here’s how to choose the best sweeteners for gluten-free Hawaiian rolls:
Choosing the Right Sweetener for Authentic Flavor
Hawaiian rolls are known for their delicate balance of sweetness and richness. When choosing sweeteners for gluten-free rolls, you want to pick ingredients that will mimic this sweetness while remaining suitable for those with dietary restrictions. You’ll need sweeteners that bring both depth and authenticity, without changing the characteristic flavor of Hawaiian rolls.
Sugar: In traditional Hawaiian rolls, sugar is often used to provide the base sweetness. For gluten-free versions, you can use regular granulated sugar. However, if you prefer a healthier option, you may opt for coconut sugar or maple sugar, both of which provide a mild sweetness with a slightly different flavor profile. These sugars work well in gluten-free baking and can give the rolls a more complex taste.
Honey and Maple Syrup: If you’re aiming for a slightly more natural sweetness, honey and maple syrup are great alternatives. Both sweeteners bring a rich flavor and moisture to the dough. Honey, in particular, is a classic choice in Hawaiian rolls, adding that signature soft sweetness. Use raw honey for the most authentic taste and a touch of floral complexity. Maple syrup adds a light, earthy flavor and can also enhance the moisture content in your dough, ensuring soft and tender rolls.
Fruit-Based Sweeteners: Pineapple Juice and Other Fruit Juices
Traditional Hawaiian rolls often include pineapple juice, which lends both sweetness and a fruity tang. In gluten-free versions, you can use pineapple juice or even pineapple concentrate to recreate the original flavor profile. Pineapple juice offers not just sweetness but also a bit of acidity, which helps balance the richness of the rolls.
Additionally, other fruit juices like apple juice or orange juice can also serve as excellent alternatives. These fruit-based sweeteners bring a natural sweetness and are typically less processed than refined sugars, making them a popular choice for health-conscious bakers. The fruit juices also contribute moisture to the dough, which is important for achieving the soft texture you expect from Hawaiian rolls.
Sugar Substitutes for Health-Conscious Bakers
If you’re looking for sugar substitutes to make your rolls even healthier, consider using stevia or monk fruit sweetener. These alternatives are calorie-free and have a negligible effect on blood sugar levels. While they are much sweeter than sugar, they can be used in small quantities to provide the necessary sweetness in the dough without the added calories.
However, when using sugar substitutes like stevia or monk fruit, it’s important to remember that they might not provide the same level of moisture or texture as traditional sugars. In these cases, pairing them with a small amount of honey or fruit juice can help you maintain the texture and flavor.
The Role of Sweeteners in Texture and Color
Sweeteners not only impact the flavor but also contribute to the texture and color of the rolls. For example, sugars help create a golden, slightly crisp exterior on the rolls during baking. When you use honey or maple syrup, they not only sweeten the dough but also help the rolls brown nicely in the oven.
Pineapple juice, in particular, adds a subtle depth to the flavor and helps with browning, ensuring that your gluten-free rolls look just as appealing as they taste. By combining these sweeteners in your gluten-free Hawaiian rolls, you can achieve that perfect balance of sweetness, moisture, and texture that makes them so irresistible.
Binders and Rising Agents: Essential Ingredients for Gluten-Free Hawaiian Rolls
When baking gluten-free Hawaiian rolls, achieving the perfect texture and rise can be more challenging compared to traditional recipes. Without gluten, which provides structure and elasticity in conventional bread, gluten-free bakers rely on alternative ingredients—binders and rising agents—to create light, fluffy rolls that hold together and rise beautifully. These essential ingredients help mimic the effects of gluten, ensuring that your rolls have the perfect texture and rise.
Binders: Keeping the Dough Together
In traditional bread recipes, gluten plays a crucial role in binding the ingredients together and providing structure. Since gluten is absent in gluten-free baking, we need to use alternative binders to achieve a cohesive dough. The right binders will help the dough stay together during the mixing and rising process, preventing it from becoming too crumbly or dry.
Xanthan Gum: One of the most commonly used binders in gluten-free baking, xanthan gum is a natural thickening agent made by fermenting sugar. It acts as a stabilizer, helping to retain moisture and giving the dough structure. Xanthan gum also prevents the dough from spreading too much, making it a perfect choice for rolls like gluten-free Hawaiian rolls. You only need a small amount—typically around 1 teaspoon per cup of gluten-free flour—to see significant results. However, overuse of xanthan gum can result in a gummy texture, so it’s best to start with small amounts and adjust based on your dough’s consistency.
Guar Gum: Another common alternative to xanthan gum is guar gum, derived from guar beans. Guar gum works similarly to xanthan gum, providing structure and helping retain moisture in gluten-free dough. It’s often preferred by some bakers due to its ability to create a lighter texture. You can use guar gum interchangeably with xanthan gum in most recipes, typically in the same quantities, though some bakers prefer a combination of the two for optimal results.
Psyllium Husk: If you’re looking for a more natural binder, psyllium husk is an excellent option. Derived from the seeds of the Plantago plant, psyllium husk absorbs water and helps provide structure to gluten-free dough. It also improves the elasticity of the dough, making it easier to work with. Psyllium husk also helps mimic the texture of gluten, resulting in a lighter and more airy bread. It’s particularly beneficial in yeast-based recipes, like gluten-free rolls, and can help your dough rise more effectively.
Rising Agents: Helping Your Dough Rise and Expand
While binders are essential for providing structure to your dough, rising agents play a critical role in ensuring your gluten-free Hawaiian rolls rise to perfection. In traditional baking, yeast causes the dough to expand and rise, creating a soft, airy texture. In gluten-free baking, yeast still serves its primary function, but additional rising agents can help the dough achieve the proper height and texture.
Yeast: Active dry yeast or instant yeast is a crucial ingredient in gluten-free rolls. It’s responsible for leavening the dough, creating bubbles that help the dough rise and expand. When using yeast in gluten-free baking, make sure the water you mix it with is warm (about 110°F or 43°C) to activate the yeast without killing it. Let the yeast bloom by allowing it to sit in the warm water with sugar for a few minutes. If the mixture becomes frothy, you know the yeast is working. This is essential for creating a soft, airy texture in your rolls.
Baking Powder: Alongside yeast, baking powder is another rising agent that helps with the rise of gluten-free dough. Unlike yeast, baking powder works immediately, causing the dough to expand as soon as it’s mixed. It’s especially helpful in recipes where you want a quick rise without waiting for the yeast to take effect. In gluten-free baking, baking powder is often used in combination with yeast to provide an extra boost and ensure the dough rises evenly. Baking powder is also key in preventing the dough from becoming too dense.
Baking Soda: In some gluten-free recipes, baking soda may be used as a leavening agent in place of or in combination with baking powder. When combined with an acid, like vinegar or lemon juice, baking soda produces carbon dioxide, causing the dough to rise. While baking soda isn’t commonly used in Hawaiian rolls, it may play a role in specific variations, such as when adding ingredients like citrus juice to enhance flavor.
Combining Binders and Rising Agents for Optimal Results
The perfect balance of binders and rising agents ensures that your gluten-free Hawaiian rolls have the ideal texture and rise. Binders like xanthan gum or psyllium husk work in tandem with yeast to help the dough hold its shape while it rises. Using both yeast and baking powder in your recipe will give the dough the lightness and fluffiness you want in your rolls, while binders ensure they remain cohesive and don’t fall apart.
When working with gluten-free dough, it’s essential to follow the right measurements and experiment to get the texture you prefer. Too much binder can make the rolls too dense, while too little yeast or rising agent can prevent the dough from rising properly. Take the time to fine-tune your ingredients for the best results, ensuring that your gluten-free Hawaiian rolls come out soft, fluffy, and perfectly shaped.
Step-by-Step Instructions to Make the Dough
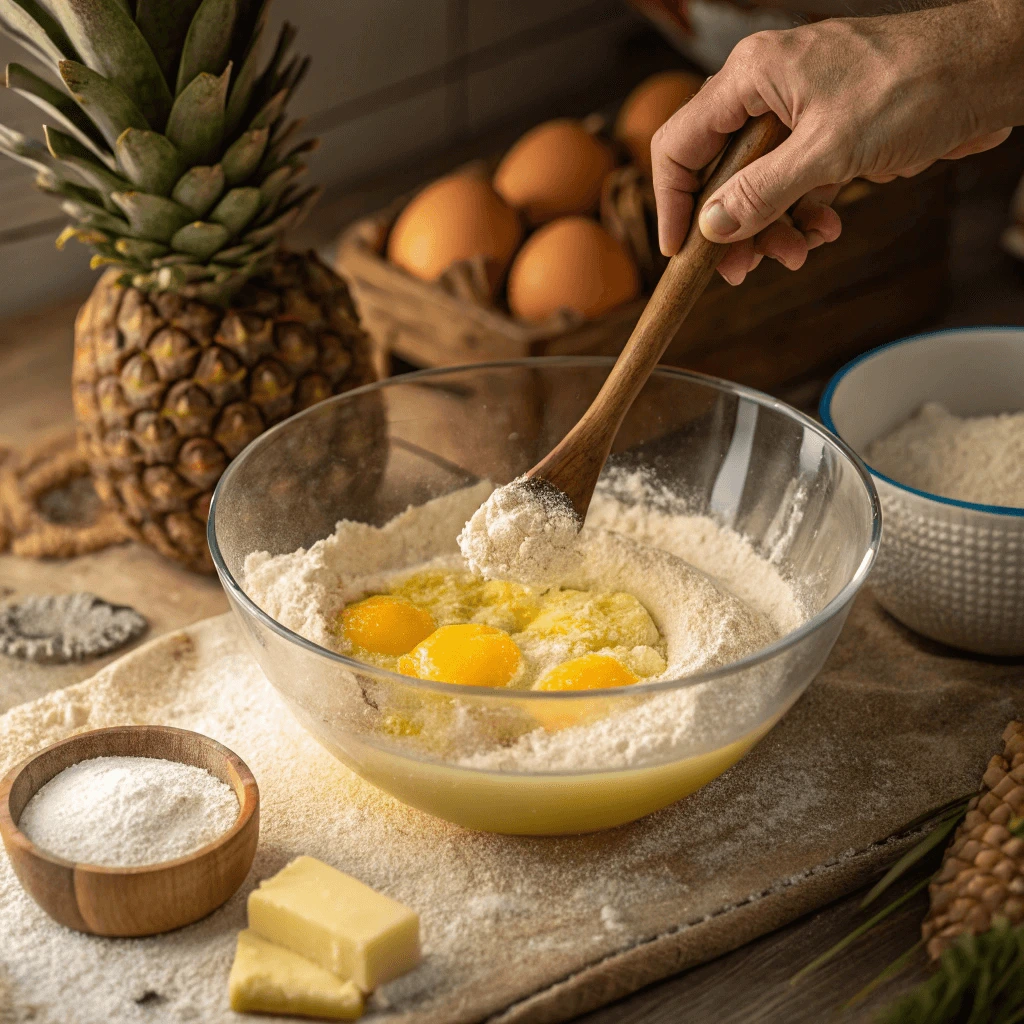
Mixing the Ingredients Properly: Essential for Consistency
Proper mixing is key to getting the right dough consistency, especially when making gluten-free rolls. Without gluten, the dough lacks the elasticity of traditional bread, so it’s important to mix the ingredients thoroughly to create a smooth, uniform dough. Mixing also ensures that all ingredients are evenly incorporated, which helps in achieving a consistent texture and rise.
Why Mixing Matters in Gluten-Free Baking
Unlike traditional dough, gluten-free dough relies on the even distribution of ingredients to form a cohesive structure. Without proper mixing, the dough can develop dry patches, which affect the rise and texture. Mixing the ingredients correctly also ensures that the leavening agents, like yeast and baking powder, are evenly spread throughout the dough. This results in a more even rise and a lighter, fluffier texture.
Step-by-Step Guide to Mixing the Dough
1. Combine Dry Ingredients First
In a large bowl, whisk together the dry ingredients, including the gluten-free flour blend, xanthan gum, salt, and sugar. Whisking ensures that everything is evenly distributed. This step helps prevent clumps and ensures your dough rises uniformly.
2. Mix Wet Ingredients Thoroughly
In a separate bowl, mix the wet ingredients, such as milk, eggs (or egg alternatives), and butter (or oil). Whisk until smooth, ensuring there are no lumps. If you’re using yeast, dissolve it in warm water to activate it before adding it to the mixture.
3. Gradually Add Wet Ingredients to Dry Ingredients
Slowly combine the wet ingredients into the dry ingredients. Stir constantly to avoid clumps. The dough should be sticky but manageable. If it feels too dry, add a tablespoon of liquid at a time until the right consistency is achieved.
Kneading and Resting the Dough
4. Lightly Knead (Optional)
Knead the dough gently for 1-2 minutes until it becomes smooth. Over-kneading can result in dense rolls. If using a stand mixer, use the dough hook to knead on low speed.
5. Let the Dough Rest
Cover the dough with a clean towel and let it rest for about 10-15 minutes. This resting period allows the ingredients to fully absorb moisture and the yeast to activate, leading to better texture.
Tips for Properly Mixing Gluten-Free Dough
- Use the Right Tools: A stand mixer with a paddle attachment can make mixing easier and more consistent. A hand mixer or wooden spoon will work, but it requires more effort.
- Avoid Overmixing: Overmixing can lead to a dense, heavy dough. Mix just enough until the dough is consistent.
- Check the Consistency: Gluten-free dough should be sticky but not overly wet. If it feels too dry, add a bit more liquid, but don’t overdo it to avoid affecting texture.
Activating the Yeast: Key to a Successful Rise
Activating the yeast properly is crucial to making gluten-free Hawaiian rolls. Yeast is the leavening agent that causes the dough to rise, resulting in soft, airy rolls. If the yeast is not activated correctly, the dough won’t rise, and the rolls may end up dense and heavy. This process might seem simple, but it requires attention to detail to ensure success.
Understanding Yeast Activation
Before using yeast in any recipe, it must be activated to ensure it works properly. Dry yeast, the most common type used in bread baking, needs to dissolve and “wake up” in a warm environment before it can start producing carbon dioxide, which makes the dough rise. Without this activation step, the yeast remains dormant, and your dough won’t rise as expected.
Steps for Activating Yeast
1. Choose the Right Yeast
Start by selecting active dry yeast or instant yeast. While both types work well, instant yeast can be added directly to the dry ingredients without proofing, whereas active dry yeast requires activation.
2. Heat the Liquid
To activate yeast, you’ll need warm liquid—usually water or milk. The ideal temperature for activating yeast is between 100°F and 110°F (37°C and 43°C). Too hot, and you’ll kill the yeast; too cold, and it won’t activate. To ensure you’re in the right range, use a kitchen thermometer.
3. Add Sweetener
Adding a pinch of sugar or honey to the warm liquid provides food for the yeast, helping it to activate. Yeast feeds on sugar, and this small amount of sweetness gives it the energy needed to start working. Stir the sugar or honey into the warm liquid before adding the yeast.
4. Sprinkle Yeast Over Liquid
Once the liquid is the right temperature and sweetened, sprinkle the yeast over the surface of the liquid. Let it sit for about 5–10 minutes. You should see small bubbles or foam forming on the surface of the liquid. This indicates that the yeast is working and has begun to multiply. If you don’t see any activity, your yeast may be expired or the water too hot or cold. It’s best to start over if the yeast doesn’t activate.
Why Activating Yeast Matters
Activating the yeast ensures that it is alive and ready to do its job in the dough. When yeast is properly activated, it produces carbon dioxide gas, which gets trapped in the dough. This trapped gas makes the dough expand and rise, giving the rolls their fluffy texture.
Using yeast that hasn’t been activated, or adding it directly to the dry ingredients, can result in flat rolls because the yeast won’t have the opportunity to work properly. As a result, the rolls may lack the airy texture and softness typically associated with fresh-baked bread.
Tips for Activating Yeast Successfully
- Freshness Matters: Always check the expiration date on your yeast. Yeast that is past its prime may not activate properly, leading to disappointing results.
- Use a Thermometer: Water that is too hot or too cold can kill or fail to activate the yeast. A thermometer helps you get the perfect temperature.
- Don’t Rush: Allow the yeast to activate for at least 5 minutes. If you’re in a hurry, resist the temptation to skip this step, as it’s crucial for a good rise.
Common Mistakes When Activating Yeast
- Too Hot or Too Cold Water: Hot water (over 120°F/49°C) will kill the yeast, while water that’s too cold won’t activate it. Ensure your water temperature is just right.
- Not Enough Sugar: While yeast doesn’t need a lot of sugar, a small amount helps the yeast to feed and activate. If you forget to add it, the yeast may struggle to start.
Letting the Dough Rise: The Key to Fluffy, Soft Rolls
Allowing the dough to rise is one of the most important steps in baking gluten-free Hawaiian rolls. This process, known as “proofing,” enables the yeast to do its job: fermenting and releasing gases that cause the dough to expand and develop a light, airy texture. If the dough doesn’t rise properly, your rolls will end up dense and heavy, so it’s crucial to give this step the time and attention it needs.
What Does “Letting the Dough Rise” Mean?
When we talk about letting the dough rise, we refer to the period when the yeast ferments and produces gas. The dough will slowly expand as the yeast eats the sugars in the flour, creating tiny bubbles. These bubbles get trapped in the dough, causing it to puff up and become light and fluffy. This process takes time, but it’s essential for developing the soft texture that makes Hawaiian rolls so special.
The Right Environment for Rising Dough
To encourage proper fermentation, the dough needs to rise in a warm, draft-free environment. Ideally, the temperature should be between 75°F and 80°F (24°C – 27°C). If the environment is too cold, the yeast will be slow to act, leading to a longer rising time. If it’s too hot, the yeast may become overly active, causing the dough to rise too quickly and resulting in uneven texture.
Warm and Cozy: The Ideal Conditions
If you don’t have a warm spot in your kitchen, you can create one. A simple trick is to preheat your oven to 200°F (93°C), turn it off once it’s warmed up, and place the dough inside, loosely covered with a cloth. The oven will act like a mini incubator, providing the perfect temperature for the dough to rise.
Another option is to place the dough in a warm spot near a heater or on top of a fridge. Just make sure it’s not exposed to direct heat, as that can dry out the dough and hinder its rise.
How Long Should the Dough Rise?
The time needed for the dough to rise can vary depending on the recipe and environmental conditions. On average, gluten-free dough takes about 1 to 1.5 hours to double in size. This can vary, so it’s essential to monitor the dough rather than just going by the clock.
The dough is ready for the next step when it has visibly expanded and is soft and airy to the touch. You can gently press your finger into the dough—if it leaves an indentation that slowly fills back in, the dough has risen sufficiently.
Signs the Dough is Ready
- Doubling in Size: The dough should have visibly expanded, typically doubling in size.
- Puffy and Soft: When you touch the dough, it should feel soft and slightly sticky but not too wet or runny.
- Indentation Test: Press your finger gently into the dough. If it springs back slowly, it’s ready for the next step.
What Happens if the Dough Doesn’t Rise?
If the dough doesn’t rise, the yeast may not have been activated correctly, or the dough may not have been placed in a warm enough environment. In such cases, try placing the dough in a warmer spot and allowing extra time for the yeast to work.
If the dough still doesn’t rise, check the yeast’s expiration date and try activating it again. Additionally, ensure your gluten-free flour blend contains the necessary starches and gums to hold the structure and provide a good rise.
How to Speed Up the Rising Process
While patience is key when allowing dough to rise, there are a few techniques you can use to speed things up if needed:
- Create a Warm Environment: Place the dough in a warm, humid environment to encourage quicker fermentation.
- Use a Proofing Box: If you have one, a proofing box maintains optimal temperature and humidity, speeding up the rise.
- Cover the Dough: Cover the dough with a damp cloth or plastic wrap to prevent it from drying out while it rises.
What to Do After the First Rise
Once the dough has risen, it’s time to move on to shaping the rolls. Punch down the dough gently to release some of the air bubbles—this helps to ensure an even rise when baking. Divide the dough into individual rolls, shape them, and let them rise once more before baking.
Shaping, Baking, and Getting That Golden Finish
Shaping the Rolls with Consistency: The Secret to Perfect Gluten-Free Hawaiian Rolls
Once your gluten-free dough has risen, it’s time to shape the rolls. Proper shaping ensures that the rolls bake evenly and maintain their soft, airy texture. Whether you prefer round rolls or want them slightly oval, consistent shaping is essential for the perfect batch of homemade gluten-free Hawaiian rolls. Here’s how to do it.
Why Consistency Matters in Shaping
Shaping your dough evenly is crucial to ensure that all the rolls bake at the same rate. If some rolls are too large and others too small, they may cook unevenly, leading to some being undercooked and others overcooked. Ensuring uniform size and shape also helps the rolls rise uniformly in the oven, so you get that beautiful, soft, golden finish.
How to Shape Gluten-Free Dough: A Step-by-Step Guide
- Divide the Dough Evenly
Start by gently punching down your risen dough to release any air bubbles. This also helps to prevent the rolls from being too dense. Once this is done, divide the dough into equal portions. You can use a kitchen scale to measure the dough portions, aiming for roughly 2.5 to 3 ounces per roll. For most recipes, you’ll need about 12 rolls for a typical batch. - Roll into Balls
To shape each portion, start by flattening it slightly into a disc with your hands. Then, fold the edges of the dough towards the center, creating a small ball. Gently pinch the dough together to seal it, forming a smooth top. Roll the dough between your palms to form a tight ball. This technique helps trap the air inside, allowing the rolls to rise properly during baking. - Ensure Even Pressure
When rolling, apply gentle pressure to maintain the dough’s structure while ensuring it doesn’t get overworked. Overworking the dough can lead to tough rolls. The key is to handle the dough gently, maintaining a balance between shaping and avoiding excess kneading. - Spacing for Rising
After shaping the dough into balls, arrange the rolls on your baking tray. To get that classic Hawaiian roll look, place the rolls close together so that they are just touching each other. This encourages them to rise together, forming soft, pull-apart rolls. Be sure to leave enough space for the dough to expand during the second rise.
Tips for Perfect Shaping
- Work with Damp Hands: Gluten-free dough can be sticky, so lightly wetting your hands with water or oil can make the shaping process much easier. This prevents the dough from sticking to your fingers.
- Use a Bench Scraper: If you’re struggling to divide the dough evenly, a bench scraper is an excellent tool. It helps to cut through the dough smoothly and evenly, ensuring portions are uniform in size.
- Gentle Handling: Be patient and handle the dough with care. Rough handling can cause the dough to lose air and result in a dense texture. Always work in a calm, controlled manner to preserve the dough’s lightness.
The Right Size for Gluten-Free Hawaiian Rolls
For the best results, aim for uniform-sized rolls that are about 2 to 2.5 inches in diameter before baking. They will expand and rise as they bake, so starting with an even size ensures they bake consistently and evenly.
If you prefer slightly larger rolls, you can adjust the size to 3 inches in diameter, but remember that they will need a slightly longer baking time. Larger rolls may also spread out more rather than rise evenly, so keep an eye on their shape as they bake.
Avoid Over-Shaping: Keep it Simple
It’s easy to get caught up in perfectly shaping each roll, but simplicity is key. Over-shaping or trying to create too many fancy designs can interfere with the dough’s natural rise. Focus on creating uniform balls of dough that are lightly smooth and well-sealed at the bottom. The simplicity of the shape will allow the dough to rise and bake naturally.
Spacing and Final Touches Before Baking
Once your rolls are shaped, give them one final rest. This is the second rise, and it’s crucial for making the rolls light and fluffy. Leave the rolls to rise for about 30 minutes in a warm place. During this time, the dough will puff up, and the rolls will become slightly larger.
If you’d like, you can brush the tops of the rolls with a bit of melted dairy-free butter or coconut oil for a golden, glossy finish. This step is optional but adds a nice touch for flavor and color.
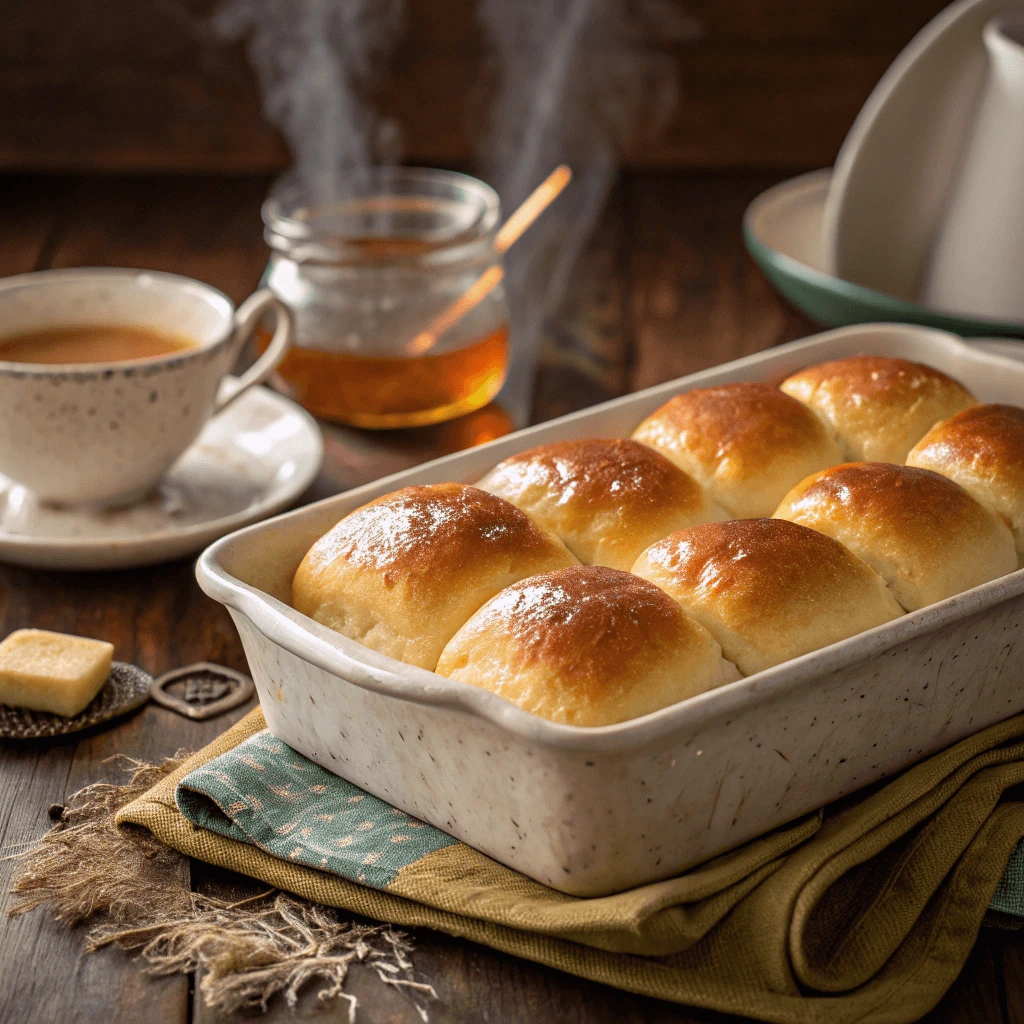
Baking Time and Temperature: How to Get the Perfect Golden-Brown Gluten-Free Hawaiian Rolls
After shaping your gluten-free Hawaiian rolls and allowing them to rise, the next critical step is baking them to perfection. Baking time and temperature are key to achieving that soft, buttery interior and golden, slightly crispy exterior that defines the perfect Hawaiian roll. Let’s dive into the optimal conditions for baking gluten-free rolls and how to adjust the time and temperature to get the best results.
Preheat Your Oven
Before you begin baking, always make sure your oven is preheated. Preheating allows the rolls to start cooking immediately once you place them inside, ensuring they rise properly and bake evenly. Set your oven to 350°F (175°C) for standard gluten-free Hawaiian rolls. This temperature strikes a balance between baking the rolls through without over-drying or burning the top.
Tip: Always check that your oven is at the right temperature using an oven thermometer. Oven temperatures can vary, and baking at an incorrect temperature can affect your rolls’ texture and taste.
How Long Should You Bake Gluten-Free Hawaiian Rolls?
Baking time for gluten-free Hawaiian rolls is typically around 20-25 minutes, but this can vary depending on your oven and the size of the rolls. Start by setting your timer for 20 minutes and then check the rolls. They should have a golden-brown color on top and a slightly firm texture when gently pressed.
If the rolls are still pale or soft after 20 minutes, add an additional 5 minutes. Keep an eye on them, as you don’t want them to get too dark. You can also do the toothpick test: Insert a toothpick into the center of one of the rolls, and if it comes out clean, the rolls are done.
How to Achieve the Perfect Golden Finish
The key to achieving that gorgeous golden top without drying out your rolls is to watch the baking process closely. As your rolls bake, they will begin to develop a beautiful golden crust. If the top starts to get too dark before the rolls are fully baked through, cover them loosely with aluminum foil. This will help prevent further browning while allowing the inside of the rolls to continue cooking.
Tip: For extra color and flavor, you can brush the tops of the rolls with melted butter or dairy-free alternatives about 5 minutes before the end of the baking time. This will give them a shiny, appetizing finish.
Using Convection or Conventional Heat
If you have a convection oven, consider reducing the temperature by about 25°F (15°C). Convection ovens circulate hot air, which can cook food faster and more evenly. Using this method can result in a slightly quicker bake time, but the texture will still be just as soft and fluffy as with conventional heat.
If you’re using a conventional oven, don’t worry—you can still get the same great results, but you might need to adjust the baking time slightly. Keep an eye on the rolls, especially if your oven tends to have hot spots.
Signs Your Rolls Are Done
The most important indicator that your rolls are done baking is their color. Gluten-free Hawaiian rolls should have a golden-brown top and slightly firm sides. Here are a few additional signs to watch for:
- The rolls should be slightly firm to the touch but not too hard.
- The edges should be lightly crisp, while the center stays soft.
- When you remove them from the oven, the bottom of the rolls should sound hollow when tapped lightly.
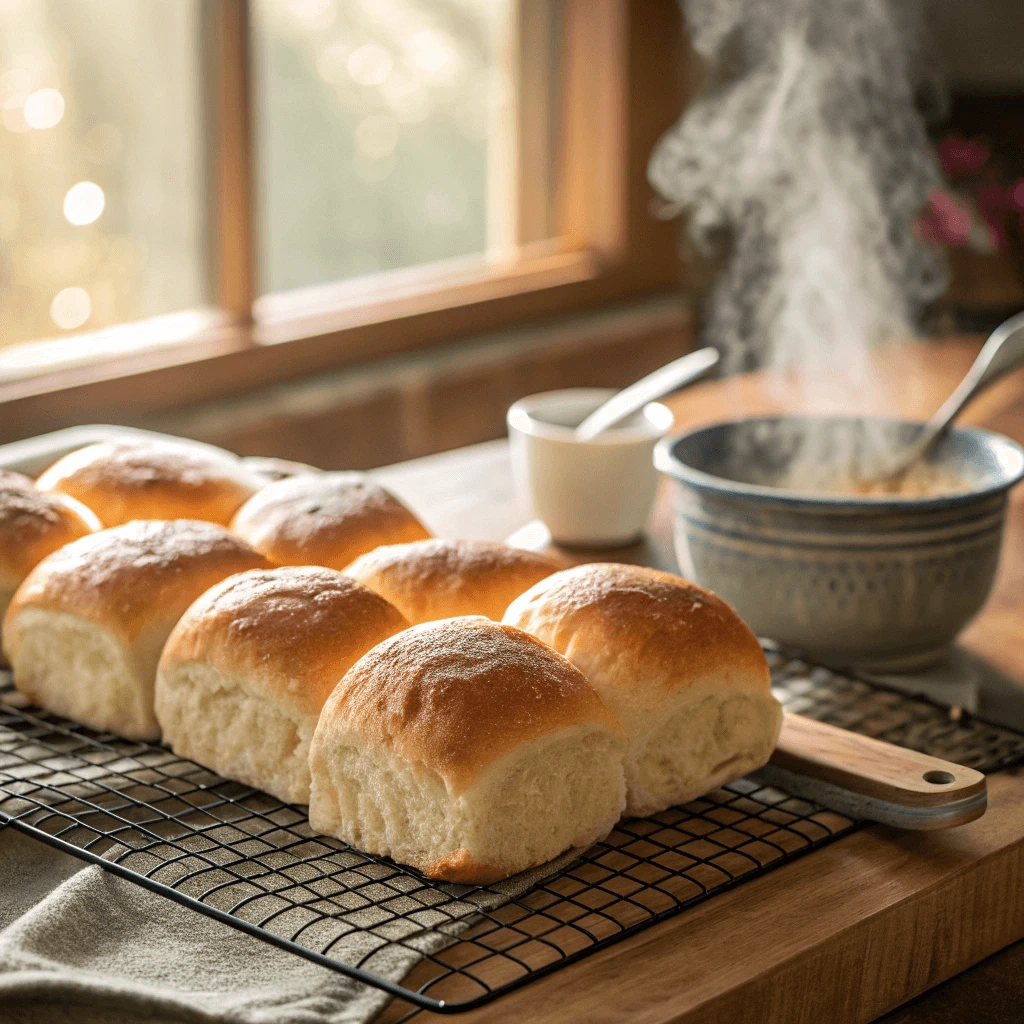
Letting the Rolls Cool
Once you’ve achieved that beautiful golden finish, remove the rolls from the oven and allow them to cool on a wire rack. Cooling them helps the rolls set and prevents them from becoming too soggy from trapped steam. While you may be tempted to dig in right away, waiting for about 10-15 minutes ensures the rolls don’t lose their shape or become too sticky.
Tip: If you’re in a hurry, you can gently cover the rolls with a clean towel as they cool to retain moisture while still allowing some airflow. This helps maintain their softness.
Adjusting for Larger or Smaller Rolls
If you’re making smaller or larger rolls, remember that the baking time might change slightly. Smaller rolls will bake faster, while larger rolls may need a few extra minutes in the oven. Always start checking your rolls around the 20-minute mark and adjust accordingly.
For mini rolls, check for doneness at around 15-18 minutes. For larger rolls, bake for an extra 5-10 minutes, checking for the golden-brown color and the hollow sound when tapping the bottom.
Optional Tools: Bread Machine or Oven-Only
When it comes to making gluten-free Hawaiian rolls, you can use a bread machine, an oven, or both. Each method has its own set of advantages. Let’s take a look at how both options can impact your baking process.
Using a Bread Machine
A bread machine can simplify the process, especially if you’re short on time or don’t want to knead the dough by hand. Most bread machines have a dedicated dough cycle that will mix, knead, and rise your dough for you.
Benefits:
- Convenience: The bread machine handles most of the work for you, from mixing to proofing.
- Consistent Results: It ensures the dough is mixed and kneaded evenly.
- Less Effort: It saves time and effort, making it ideal for beginners or busy cooks.
However, keep in mind that bread machines work best with certain gluten-free flour blends. Experimenting with different combinations will help you find what works best.
Using Only the Oven
If you don’t have a bread machine, don’t worry! You can still make delicious gluten-free Hawaiian rolls using only the oven.
Benefits:
- Control: You have complete control over every stage of the process, from mixing to shaping and baking.
- Customization: It’s easier to adjust the dough’s consistency, texture, and shape by hand.
- Less Equipment Needed: You don’t need a bread machine or any fancy gadgets to bake. Just your hands and a bowl will do.
While this method requires more effort and time, it’s rewarding and allows you to be hands-on with the dough.
Choosing Between the Two
Ultimately, the choice between using a bread machine or relying solely on the oven depends on your preferences and available tools. If you prefer convenience and a hands-off approach, a bread machine is an excellent choice. On the other hand, if you enjoy the process of kneading and shaping your dough, the oven-only method will give you more control and satisfaction.
Customizing, Storing, and Serving Your Gluten-Free Hawaiian Rolls
Dairy-Free and Vegan Variations
Making your gluten-free Hawaiian rolls vegan or dairy-free can be just as easy as sticking to the traditional recipe. By swapping out a few ingredients, you can create a version that fits various dietary needs without compromising on taste. Let’s dive into how you can make these adjustments.
Substituting Dairy Ingredients
Traditional Hawaiian rolls often call for milk and butter, which give the rolls their rich, buttery flavor. However, there are simple dairy-free alternatives that work just as well.
- Milk Substitutes: Almond milk, coconut milk, and oat milk are all great dairy-free options that add a subtle sweetness to your rolls. Use whichever plant-based milk you prefer, keeping in mind that each will impart a slightly different flavor.
- Butter Alternatives: For butter, consider using coconut oil, vegetable oil, or a dairy-free butter spread. These alternatives will help maintain the soft texture of the rolls, while still keeping them free from dairy. If you opt for coconut oil, it will lend a mild coconut flavor, which can complement the sweetness of the rolls.
Egg Substitutes for Vegan Rolls
Traditional recipes for Hawaiian rolls call for eggs, which help bind the dough together and contribute to its structure. For vegan variations, it’s important to replace the eggs with suitable alternatives that will not only bind but also maintain moisture in the dough.
- Flax Eggs: One of the most popular vegan egg substitutes is flax eggs. Mix 1 tablespoon of ground flaxseed with 2.5 tablespoons of water and let it sit for 5 minutes. This will form a gelatinous texture similar to that of eggs.
- Chia Eggs: Chia seeds work similarly to flaxseed. Simply mix 1 tablespoon of ground chia seeds with 2.5 tablespoons of water and allow it to gel. This chia egg provides the same binding properties and can even enhance the texture.
- Other Egg Replacers: If you don’t have flax or chia seeds, other options include commercial egg replacers like Bob’s Red Mill Egg Replacer or aquafaba (the liquid from canned chickpeas). Both can help achieve similar results without the use of eggs.
Ensuring a Soft, Light Texture
When making dairy-free or vegan versions of your rolls, it’s essential to maintain the soft and fluffy texture that Hawaiian rolls are known for. The key to achieving this texture lies in the correct use of oils, milks, and egg substitutes. Using the right combination of ingredients, along with gentle mixing and kneading, will help the rolls rise beautifully while staying light and airy.
- Be Mindful of Ingredients: Vegan and dairy-free substitutions can affect how the dough rises or how it reacts to heat, so be sure to measure accurately and give your dough plenty of time to rise in a warm environment. You may need to adjust the flour blend or add a bit more moisture for the perfect dough consistency.
- Monitor the Baking Time: Dairy-free and vegan versions may require slightly different baking times. Keep an eye on your rolls as they bake to ensure they turn golden brown on the top and are soft in the center. The temperature should be consistent, and if the tops brown too quickly, you can cover the rolls with foil to prevent over-baking.
Flavor Variations for Vegan and Dairy-Free Rolls
Adding unique flavors to your vegan and dairy-free Hawaiian rolls can elevate the overall experience and make them even more enjoyable. For instance:
- Coconut Flavors: If you enjoy a tropical twist, use coconut milk instead of other plant-based milks. You can also add shredded coconut to the dough for an added texture and flavor.
- Herbal Additions: Add some herbs like rosemary or thyme to create a more savory take on Hawaiian rolls. These herbs can complement the sweetness and enhance the flavor profile.
By making a few simple swaps, you can enjoy vegan and dairy-free Hawaiian rolls that are just as delicious and satisfying as the original recipe. The key is to experiment with your ingredients, maintain proper ratios, and ensure that the texture and flavor are on point.
Creative Add-ins for More Flavor
Adding exciting ingredients to your gluten-free Hawaiian rolls is a great way to enhance their flavor and make them stand out. Whether you’re looking for a savory twist or a touch of sweetness, there are plenty of options to try.
Herbs for Savory Depth
Herbs can elevate your rolls with fragrant, savory notes. Consider adding:
- Rosemary: Fresh rosemary adds an earthy, slightly piney flavor.
- Thyme: This herb gives a subtle, lemony aroma that pairs perfectly with sweet rolls.
- Basil: Adds a fresh, vibrant flavor for a unique twist on your rolls.
Mix these herbs into the dough or sprinkle them on top before baking to enjoy a savory, aromatic loaf.
Garlic for a Bold Kick
If you’re a garlic lover, this is a must-try. Incorporating garlic into your dough can give the rolls a delicious, fragrant kick. You can use:
- Garlic powder: Easy to mix into the dough for an even distribution of flavor.
- Minced fresh garlic: Adds a more pungent, bold flavor to the rolls.
This option pairs wonderfully with vegan or dairy-free butter for a savory experience.
Pineapple Juice for an Extra Sweet Touch
To bring out the signature sweetness of Hawaiian rolls, adding pineapple juice to your dough is a game-changer. The natural sweetness of the juice can enhance the rolls without overpowering the delicate flavor.
You can use a little pineapple juice in place of some of the liquid ingredients, or drizzle it on top before baking for a light tropical sweetness.
Coconut Flakes for a Tropical Twist
For a true Hawaiian vibe, add shredded coconut to the dough. The coconut will infuse the rolls with a subtle, nutty sweetness that complements the other flavors. It also gives a slight crunch when used on top of the rolls, adding texture.
Cinnamon or Nutmeg for Warmth
For a hint of warmth and spice, sprinkle cinnamon or nutmeg into the dough. This adds a cozy, comforting aroma that complements both the soft texture of the rolls and their sweetness.
These spices are especially nice during the colder months or as a treat for the holidays.
Citrus Zest for a Bright Flavor
Add a little lemon or orange zest to give your rolls a fresh, zesty twist. The citrusy flavor will brighten the dough, balancing out its sweetness with a hint of tartness. You can also try mixing the zest into a glaze for a finishing touch.
Chopped Nuts for Texture and Flavor
For those who enjoy a bit of crunch, chopped nuts like almonds, cashews, or macadamia nuts are an excellent addition. Nuts provide texture and a savory-sweet contrast to the soft, fluffy rolls. Plus, they make for a great topping once baked.
How to Store and Reheat Gluten-Free Hawaiian Rolls
Proper storage and reheating will keep your rolls fresh and soft for longer. Here’s how:
Storing Fresh Rolls
- Cool Completely: Allow your rolls to cool on a wire rack for 15-20 minutes to avoid moisture buildup.
- Room Temperature Storage: Wrap the rolls in a kitchen towel or wax paper and store them in a breadbox or paper bag for up to 2 days.
- Use Airtight Containers for Longer Storage: Store in an airtight container for longer freshness, avoiding the fridge to prevent dryness.
Freezing Rolls for Later
- Wrap Individually: Wrap each roll in plastic wrap or foil, then place in a freezer bag. Label and freeze for up to 3 months.
- Freeze Unbaked Dough: Shape the dough and freeze it on a baking sheet. Once solid, store in a freezer bag to bake later.
Reheating Your Rolls
- In the Oven: Wrap rolls in foil and heat at 350°F (175°C) for 10-15 minutes.
- In the Microwave: Cover with a damp paper towel and microwave for 15-30 seconds.
- Reheat from Frozen: Bake frozen rolls at 350°F for 15-20 minutes or microwave with extra time.
With these tips, you can enjoy fresh, soft gluten-free rolls anytime!
Conclusion
Making these delicious gluten-free Hawaiian rolls is simple and rewarding. By following the key steps—choosing the right ingredients, activating the yeast, and carefully shaping and baking—you’ll create soft, sweet, and buttery rolls everyone will love. Don’t forget to store extras for later or experiment with creative flavor additions!
Give this recipe a try and share your results with us. Whether you enjoy them fresh, store them for future meals, or customize them with different flavors, these rolls are sure to be a hit. Happy baking!