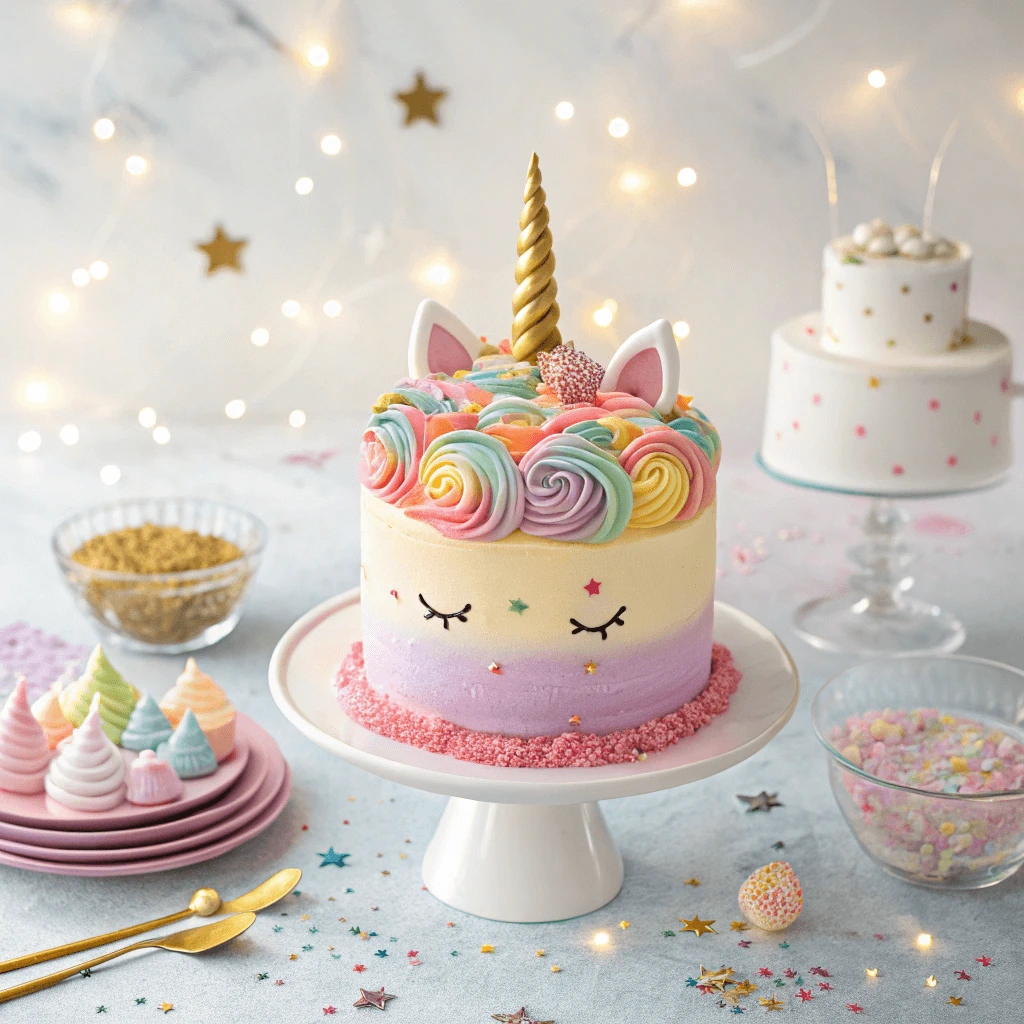
Creating a DIY Unicorn Cake is a fun and creative way to celebrate any special occasion. Whether you’re a beginner or a seasoned baker, this step-by-step guide will help you design a whimsical, colorful unicorn cake that’s sure to impress. With easy-to-follow instructions, you’ll learn everything from preparing the cake layers to decorating with beautiful unicorn details. Let’s dive into the exciting world of cake decoration and bring your unicorn vision to life!
Getting Started with Your DIY Unicorn Cake
Essential Tools and Supplies for a DIY Unicorn Cake
Creating a unicorn cake becomes much easier when you have the right tools at hand. Here’s a breakdown of the essential items you’ll need to make the process smooth and enjoyable.
Baking Essentials
Start with the basics:
- Cake pans: Use two or three round pans (6- or 8-inch) for even cake layers.
- Mixing bowls: Have at least two large bowls—one for dry ingredients and one for wet.
- Measuring cups and spoons: Accurate measurements are key to a perfect bake.
Frosting and Decorating Tools
To get that magical unicorn look, you’ll need a few decorating must-haves:
- Piping bags and tips: Choose star and round tips for different frosting textures.
- Offset spatula: This helps spread frosting smoothly on your cake layers.
- Food coloring gels: Use vibrant gel colors to tint your buttercream—liquid food coloring can thin the frosting too much.
Creative Decorations
These fun elements bring your unicorn cake to life:
- Unicorn horn and ears: You can make these with fondant, modeling chocolate, or buy pre-made toppers.
- Sprinkles and edible glitter: Add sparkle and a fun, magical touch to your cake.
- Gold dust or shimmer spray: Use these to give the horn or mane some extra shine.
With these tools ready, you’ll feel more confident and organized as you move through each step of the cake-making process. Having everything on hand saves time and helps your cake come together without stress.
Choosing the Best Cake Base for Your DIY Unicorn Cake
The cake base serves as the foundation of your unicorn cake, so choosing the right flavor and texture is important for both taste and design success.
Pick a Flavor That Everyone Will Love
Vanilla, chocolate, and funfetti are popular choices for unicorn cakes.
- Vanilla is a classic that pairs well with any frosting and adds a light, sweet base.
- Chocolate gives a rich, indulgent flavor for guests who prefer something more decadent.
- Funfetti (vanilla cake with rainbow sprinkles) adds a playful, colorful surprise when sliced—perfect for a unicorn theme.
If you’re baking for kids or a party, funfetti is often a crowd favorite. Adults might lean toward the more sophisticated taste of chocolate or a flavor blend like vanilla-almond.
Choose the Right Cake Type for Decorating
Some cakes hold up better under frosting and decoration than others.
- Butter cakes are sturdy and dense enough to support layers of frosting and decorations.
- Sponge cakes are light and fluffy but can be tricky if you plan to stack layers.
- Boxed mixes offer convenience and consistent results—great for beginners.
Make sure the cake has cooled completely before you begin frosting; warm layers can melt your buttercream and cause slipping.
Bake or Buy: What’s Best for You?
If you love baking from scratch, go for it! You’ll have full control over the ingredients and flavor. However, there’s no shame in using a boxed mix or buying pre-baked layers—especially if you’re focusing your energy on decorating. The goal is a beautiful, delicious cake, and both paths can lead there.
Preparing Your Cake Layers for a DIY Unicorn Cake
Well-prepared cake layers set the stage for a smooth decorating experience. Whether you’re using a homemade recipe or store-bought cakes, getting the layers right ensures your unicorn cake looks polished and stays stable.
Trim for an Even Surface
Start by leveling each cake layer. Use a serrated knife or a cake leveler to remove any domed tops.
Flat layers are essential because they allow the frosting to spread evenly and prevent the cake from leaning or collapsing. Take your time with this step—it makes a big difference in the final presentation.
Add Filling for Flavor and Stability
Spread a generous layer of buttercream or your chosen filling between each cake layer.
You can use a piping bag to create a frosting dam around the edge to hold the filling inside. Then, gently press the next layer on top and repeat.
Adding filling not only enhances flavor but also helps bind the layers together for better stability.
Stack with Precision
Place each layer carefully, aligning the edges as closely as possible. Use a turntable if you have one to help with even stacking.
After you stack all the layers, gently press down to ensure they stick together and settle evenly. If the cake feels wobbly, insert a skewer or dowel through the center for extra support, especially for taller cakes.
Designing Your DIY Unicorn Cake
Coloring Buttercream Frosting for Your DIY Unicorn Cake
Coloring buttercream is a fun and creative step that gives your unicorn cake its signature magical look. With the right tools and techniques, you can achieve vibrant, smooth colors that make your design pop.
Choose the Right Food Coloring
Use gel or paste food coloring for the best results. These options offer concentrated pigment without watering down your buttercream, which helps maintain the perfect consistency for piping and spreading.
Avoid liquid food dyes, as they tend to thin the frosting and make it harder to work with.
Divide and Tint Your Frosting
Separate your buttercream into different bowls—one for each color you want to use.
Start by adding a small amount of coloring to each bowl using a toothpick or the tip of a knife. Mix thoroughly and gradually add more color until you reach the desired shade.
If you’re going for pastel tones, use just a tiny amount. For bolder hues, let the color sit for a few minutes to develop more richness before adjusting.
Maintain Consistency for Decorating
Check the consistency of your buttercream after adding color. If it’s too stiff, add a splash of milk or cream and mix again.
For piping flowers, rosettes, or unicorn manes, you’ll want a slightly firmer consistency. For crumb coats and smooth finishes, a softer frosting works best.
Once you’ve got the colors and textures just right, load your piping bags with each color using separate bags or a multi-color swirl technique.
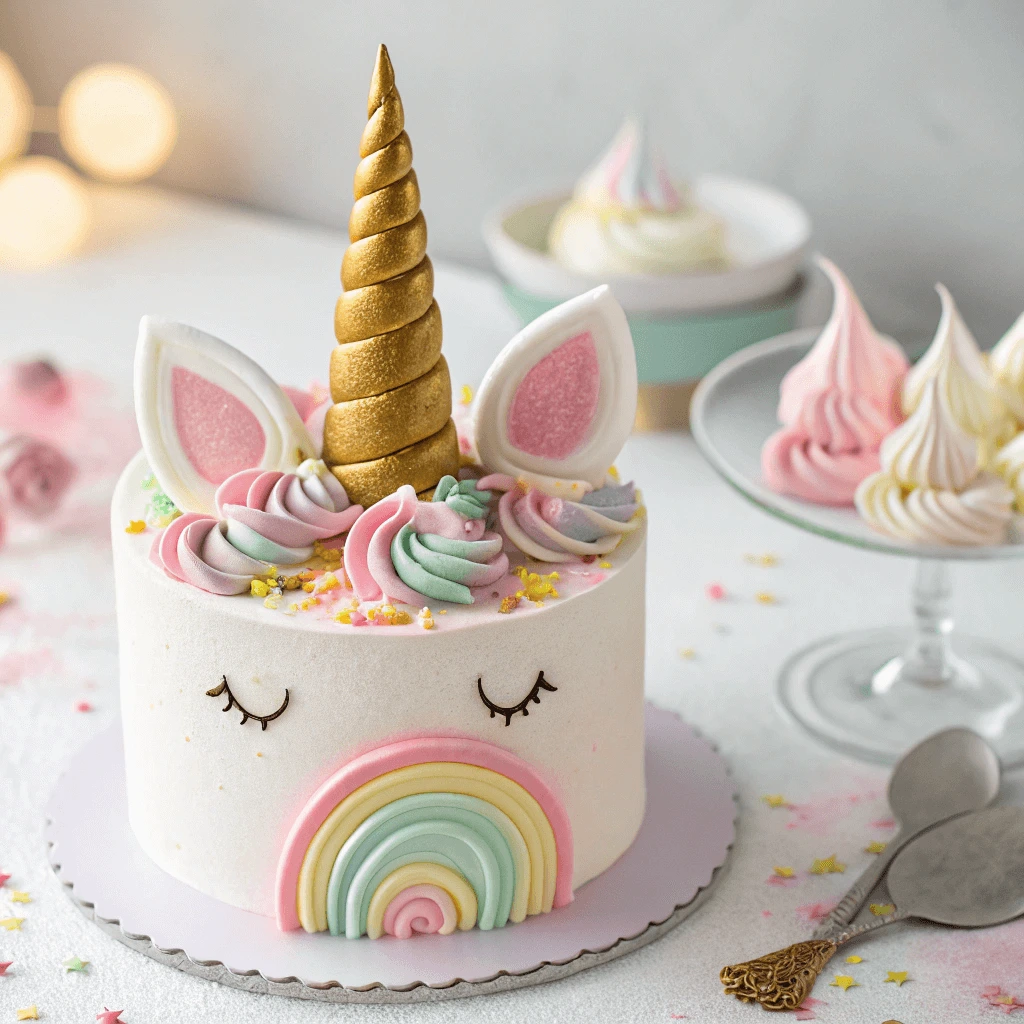
Making the Unicorn Horn and Ears
The unicorn horn and ears are the standout features that instantly transform your cake into a magical centerpiece. With just a few materials and a little creativity, you can craft these elements at home.
Sculpt the Horn with Fondant or Modeling Chocolate
Start by taking a piece of white fondant or modeling chocolate and rolling it into a long cone shape—tapering one end to form the tip of the horn.
Then, twist the cone gently to create that classic spiral unicorn horn effect. If you want extra shimmer, brush the horn with edible gold dust or spray it with edible gold paint. Let it dry fully, preferably overnight, so it stays firm when added to the cake.
Pro Tip: Insert a toothpick or skewer into the base before drying so it’s easier to anchor into the cake later.
Shape the Ears for a Cute, Balanced Look
To create ears, roll out white fondant and cut out two ear-shaped pieces. Then, shape two smaller inner pieces using pink fondant and attach them to the center of the white ones.
Gently pinch the bottom of each ear to create a more realistic 3D look and help them stand upright. Let the ears dry for at least an hour so they hold their shape on the cake.
Attach the Horn and Ears Securely
Once the horn and ears are dry, position them on top of the cake. Press the horn into the center gently but firmly—use the skewer to anchor it.
Next, place the ears slightly behind or beside the horn to give it that iconic unicorn face silhouette. Add a bit of buttercream behind the ears if you need extra support to keep them upright.
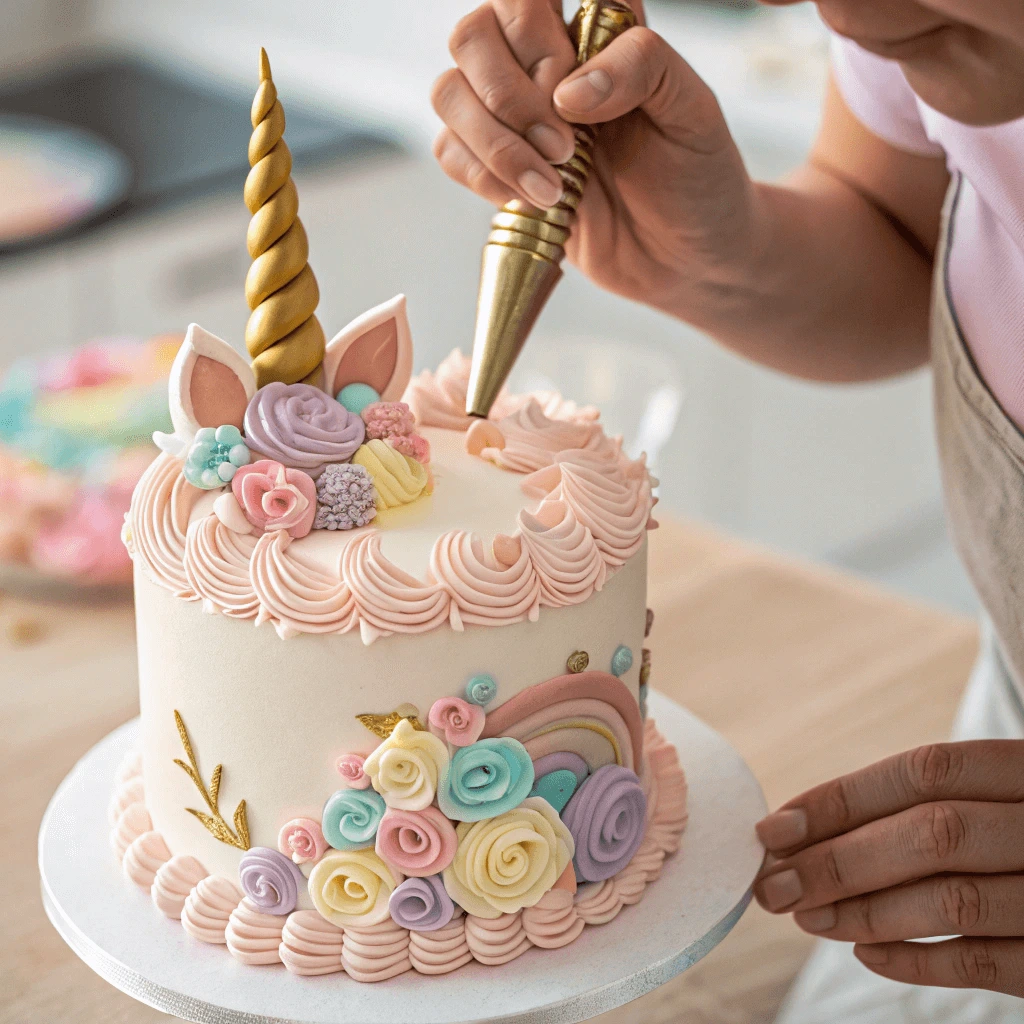
Decorating with Piping Techniques
Piping is where your unicorn cake truly comes to life. From colorful swirls to dainty rosettes, your piping skills will add charm, texture, and personality to the cake.
Choose the Right Piping Tips
Start with a set of basic piping tips. For unicorn cakes, the most commonly used ones are:
- Star tip (e.g., Wilton 1M or 2D) – ideal for rosettes and swirls.
- Round tip – perfect for simple dots and outlining.
- Leaf tip – used to create foliage or additional texture in the mane.
Make sure to fit each piping tip securely into a piping bag and fill it with your choice of colored buttercream.
Practice Before Piping
Before decorating the actual cake, practice your piping on a piece of parchment paper. This gives you a feel for the pressure and movement needed for different shapes. Once you’re confident, move on to the cake with smooth, controlled motions.
Create a Flowing Unicorn Mane
Use your colored frostings to pipe a flowing mane along the top and side of the cake. Mix and match pastel shades—like pink, lavender, mint, and baby blue—for a dreamy, magical look. Alternate between rosettes, stars, and ruffles to add dimension and playfulness.
Layer your piping in different directions and heights to mimic the flow of hair. Leave room between swirls for sprinkles or edible pearls if you want extra sparkle.
Step-by-Step Cake Assembly
Layering and Filling the Cake
Properly layering and filling your unicorn cake is crucial for a sturdy, professional-looking result. The right technique ensures your cake layers stay intact while also giving you a perfect base for decorating.
Preparing the Cake Layers
Before you start assembling, ensure your cake layers are completely cooled. If they are still warm, the filling could melt and cause the layers to shift. Use a serrated knife or cake leveler to trim the tops of the cake layers, creating a flat, even surface. This helps the cake layers stack neatly and prevents them from tilting.
Adding a Layer of Filling
Once your cake layers are trimmed and leveled, it’s time to add the filling. You can choose from a variety of fillings, including buttercream, cream cheese frosting, or even fruit preserves. If you’re aiming for a more colorful cake, consider using a brightly colored filling that complements the theme. Use an offset spatula to spread a generous amount of filling over the first layer, ensuring it’s evenly distributed from edge to edge.
If you’re using a liquid filling (such as fruit jam), consider spreading a thin layer of buttercream on the cake first. This will act as a barrier to prevent the filling from soaking into the cake layers.
Stacking the Layers
Carefully place the second cake layer on top of the first. To ensure the cake doesn’t shift, you can insert a few dowels into the bottom layer before stacking. This creates extra support, especially if you’re making a multi-tiered unicorn cake.
As you stack, gently press down on each layer to make sure it’s even and level. Take your time to align the layers carefully for a neat and professional look.
Crumb Coat the Cake
Once all layers are stacked, apply a thin crumb coat of buttercream to the entire cake. The crumb coat seals in any loose crumbs and helps the final layer of frosting go on smoothly. After applying the crumb coat, chill the cake in the fridge for at least 30 minutes. This ensures the crumb coat firms up and provides a perfect base for your final decorative layer.
Applying the Crumb Coat and Final Frosting
The crumb coat is a critical step in cake decorating. It helps to lock in crumbs, creating a smooth surface for the final layer of frosting. This section will guide you through how to apply both the crumb coat and the final frosting, ensuring a beautiful and professional finish for your unicorn cake.
Why You Need a Crumb Coat
The purpose of the crumb coat is simple: to prevent loose crumbs from mixing with the frosting, giving you a smooth, clean surface. Without a crumb coat, crumbs can get trapped in the final layer, resulting in an uneven and messy finish. Think of the crumb coat as a protective layer, sealing the cake so the frosting stays clean and smooth.
How to Apply the Crumb Coat
To apply the crumb coat, start by using a spatula to spread a thin, even layer of frosting over the entire cake. Begin with a small amount of frosting and gradually add more if necessary. The goal is to cover the cake lightly, just enough to hold everything in place without excess frosting. Spread the frosting evenly, covering the top and sides of the cake.
While applying, be sure to smooth out any uneven spots. You don’t need to worry about making the crumb coat perfect, as it will be covered by the final layer. After covering the entire cake, gently scrape off any excess frosting using a bench scraper or offset spatula. This helps create an even base for the final coat.
Let the Crumb Coat Set
Once the crumb coat is applied, it’s time to chill the cake. Place the cake in the fridge for at least 30 minutes. This allows the crumb coat to firm up, making it easier to apply the final layer of frosting without disrupting the base layer.
Applying the Final Frosting Layer
After the crumb coat has set, you can start applying the final layer of frosting. For a smooth finish, you can use a frosting smoother or an offset spatula. Start by adding a generous amount of frosting to the top of the cake. Work your way down the sides, applying frosting in a thin, even layer.
As you apply the frosting, smooth out any bumps or uneven areas. You can work in sections, moving around the cake slowly to ensure it’s evenly coated. Once you’ve covered the cake, use a bench scraper or frosting smoother to refine the edges and create a flawless finish. Be sure to smooth the top edges and around the bottom to remove any excess frosting.
Final Touches
Once you’re happy with the smoothness of the final frosting layer, you can add any decorative touches, such as sprinkles, edible glitter, or fondant. The final layer should serve as a perfect canvas for your unicorn cake decorations.
Adding Final Decorative Touches
After finishing the crumb coat and final frosting, it’s time to bring your unicorn cake to life with some fun and creative decorative touches. These final steps are where you can truly personalize the cake, making it a standout centerpiece for any occasion. Here are some tips and techniques for adding those magical final touches.
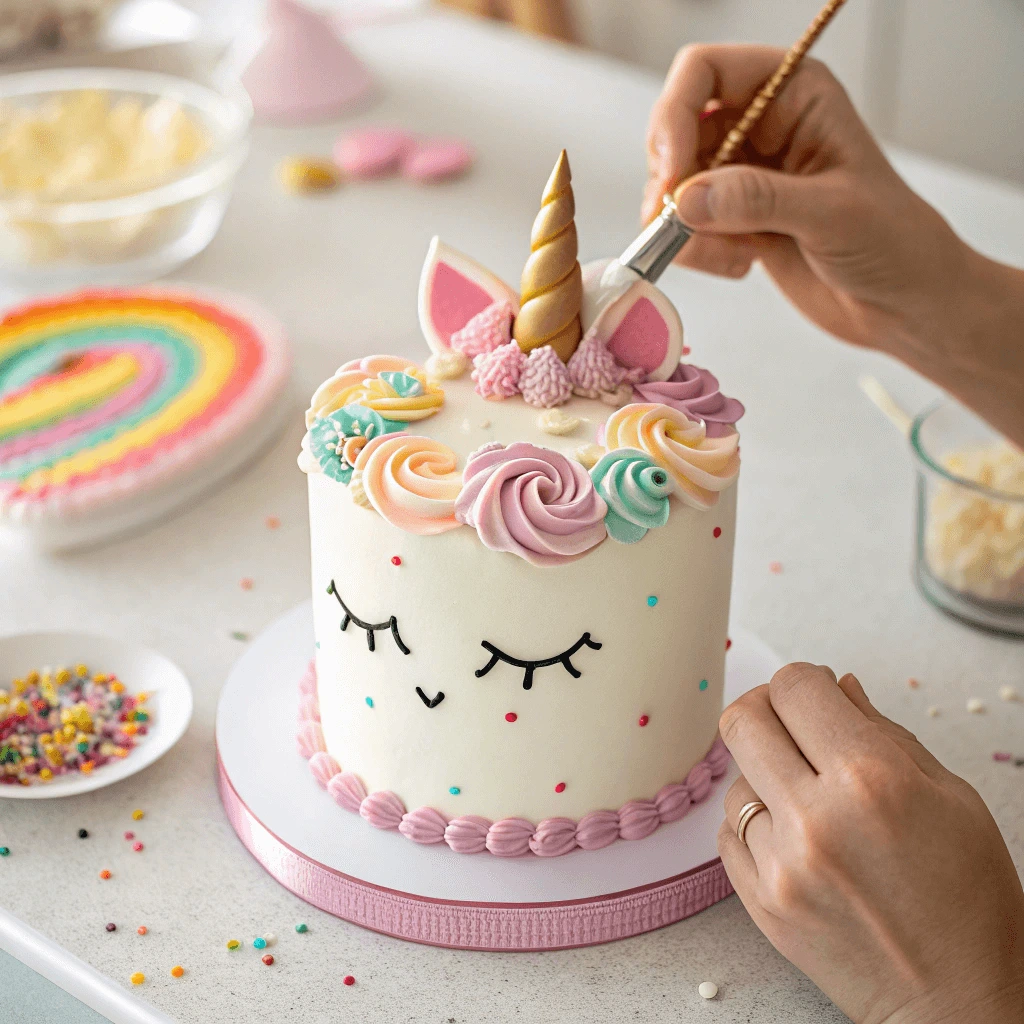
Start with the Unicorn Horn
The unicorn horn is the focal point of any unicorn cake. To make it stand out, choose a simple yet effective way to decorate it. You can either make the horn from fondant or use a pre-made horn, which is readily available in cake supply stores. If you’re making the horn, roll out yellow or gold fondant into a cone shape. For added texture, you can gently twist the fondant as you roll it into shape, giving it that signature spiral look. Once shaped, allow the horn to dry for a few hours before placing it on top of your cake.
Craft the Unicorn Ears
Next, you’ll want to add the unicorn ears, which will sit on either side of the horn. Use fondant or gum paste to create the ears. Roll out white fondant and cut two ear shapes with a cookie cutter or by hand. For the inner part of the ears, use pink fondant to make smaller shapes that contrast with the white. Attach the ears to the cake by gently pressing them into the frosting, making sure they align symmetrically.
Incorporate Rainbow Colors
Rainbow colors are an essential feature in unicorn cakes, adding vibrancy and whimsy. Using your frosting, divide it into different bowls and color each batch with gel food coloring. Popular colors for a unicorn cake include pastel shades of pink, purple, blue, yellow, and green. Once your frosting is ready, you can use a piping bag to create beautiful, colorful rosettes, stars, or swirls on the cake’s surface. Start at the base and work your way up, alternating the colors as you go. If you want a more uniform look, pipe the colors in horizontal stripes or random dollops to give the cake a fun, playful feel.
Add Edible Glitter and Sprinkles
To make your unicorn cake even more magical, consider adding edible glitter or sprinkles. These shiny touches will catch the light and add extra sparkle to the cake. You can sprinkle edible glitter along the top of the cake, particularly around the horn, to give it that extra shimmer. Similarly, colored sprinkles, pearls, or star-shaped confetti will enhance the overall effect and make your unicorn cake look festive and fun.
Final Layer of Decorative Flowers
For an elegant touch, you can add buttercream flowers or sugar flowers around the cake. Choose flower colors that complement the rainbow theme. Pipe delicate rosettes, daisies, or small flowers using your piping bags to create a dreamy, floral look. Arrange the flowers along the bottom of the cake or around the base of the unicorn horn. This will add a natural, magical feel to your cake and make it appear like a fairy-tale creation.
Optional Touch: Unicorn Eyes
If you want to take your cake design to the next level, add cute unicorn eyes to the front of your cake. You can either pipe the eyes using black buttercream or use edible markers to draw them on. This step will make your unicorn cake even more adorable and personal, bringing the cake to life with personality.
Helpful Tips and Tricks for Beginners
Common Mistakes to Avoid
Creating a DIY unicorn cake can be fun, but it’s easy to make some mistakes along the way. Here are common pitfalls and tips to avoid them:
1. Skipping the Crumb Coat
The crumb coat is essential to prevent crumbs from mixing with your frosting. Apply a thin layer of frosting, chill the cake, and then add your final coat.
2. Overworking Fondant
Fondant that is overworked becomes too soft and sticky. Knead it until pliable, roll it out to the right thickness, and work quickly to avoid drying out.
3. Not Using Enough Support
Without proper support, tall layers can collapse. Use dowels or straws between layers to ensure stability.
4. Using the Wrong Piping Tips
Choose the right piping tip for your design. Large tips work well for rosettes, while small tips are perfect for finer details.
5. Frosting a Warm Cake
Frosting a warm cake can melt the icing. Always let your layers cool completely before frosting to avoid a mess.
6. Too Much or Too Little Frosting
Use a balanced amount of frosting. Too much can be overwhelming, and too little makes the cake look dry. Aim for even coverage.
7. Not Planning Your Decoration
Without a clear design plan, your decorations may look uneven. Plan your decoration steps, from the horn to the frosting, for a balanced result.
8. Forgetting to Chill Between Layers
Chill the cake after applying frosting to allow it to set. This prevents frosting from sliding and helps maintain the cake’s structure.
Saving Time with Prep Shortcuts
Creating a DIY unicorn cake can be a fun and rewarding experience, but it can also be time-consuming. To make the process more manageable, here are some helpful shortcuts that will save you time while still allowing you to create a beautiful cake.
1. Pre-Bake Cake Layers Ahead of Time
One of the best time-saving strategies is to bake the cake layers in advance. Bake the layers a day or two before you plan to decorate the cake. Once the layers are completely cooled, wrap them tightly in plastic wrap and store them in the fridge or freezer. This will allow the cakes to remain fresh, and you can focus on the decoration when you’re ready.
2. Use Store-Bought Ingredients When Needed
To save time without sacrificing too much quality, consider using pre-made ingredients like store-bought frosting, fondant, or even cake mixes. If you’re in a rush, these shortcuts can still help you achieve a professional-looking cake without spending hours in the kitchen. You can always enhance store-bought frosting with food coloring and flavoring to personalize it.
3. Pre-Prepare and Organize Tools and Supplies
Before you start decorating, organize all the tools and supplies you’ll need. Have your piping bags, decorating tips, fondant tools, and color gels ready to go. This preparation ensures you won’t waste time searching for materials while you’re in the middle of the decorating process. Laying out everything in advance will streamline the entire process.
4. Make Decorations in Advance
You can also save time by preparing some decorations ahead of time. For example, you can create and shape the unicorn horn and ears a day before you assemble the cake. Store them in an airtight container to keep them fresh and avoid any last-minute stress.
5. Use a Cake Turntable for Efficient Decorating
A cake turntable can significantly speed up your decorating process. It allows you to easily rotate the cake while decorating, making it much easier to apply frosting evenly, pipe designs, and position fondant. Instead of manually turning the cake, this simple tool ensures smoother and faster decoration.
6. Skip Extra Layers and Decorations
If you’re short on time, consider simplifying your design. You don’t have to add every possible decoration; focus on the essential elements like the unicorn horn and ears, and use a few decorative touches like sprinkles or edible glitter. By keeping things simple, you can still achieve a stunning result without spending hours on intricate details.
7. Use a Ready-Made Cake Board
If you’re planning to transport your cake, a sturdy cake board is essential. Instead of spending time making one, purchase a ready-made cake board. These come in various sizes, are sturdy, and make it easier to lift and move the cake without damaging it.
8. Chill the Cake Between Steps
To save time and ensure the frosting and decorations stay in place, chill the cake between layers. After applying a crumb coat, place the cake in the fridge for 15-20 minutes to set the frosting before adding the final layer. This helps prevent the frosting from sliding off and ensures a smoother finish.
Customizing Your Unicorn Cake
A unicorn cake is the perfect canvas for your creativity. Whether you’re focusing on colors, flavors, or decorations, you can make it truly unique. Here are some ideas to customize your cake:
1. Choose Your Colors and Theme
Decide on a color scheme to set the tone of your cake. Pastels like pink, blue, and purple give a soft look, while bright colors like fuchsia and gold add energy. You can even tailor your cake’s colors to match a favorite unicorn character or a specific event.
2. Play with Cake Flavors
While vanilla and chocolate are classic choices, consider experimenting with unique flavors. Strawberry, lemon, or red velvet can add a fun twist. You can also layer different flavors to surprise your guests when they cut into the cake.
3. Customize the Cake Shape
The traditional round shape is a great option, but you can also try heart-shaped pans or even sculpt the cake into a 3D unicorn for a more creative design. Adjusting the size based on the number of guests will also help fit your needs.
4. Add Personalized Decorations
Personalize your cake with themed decorations such as edible glitter, fondant flowers, or candies. You can also mold fondant into unicorn figures, stars, and rainbows, or create a unique topper with the birthday person’s name.
5. Frosting Techniques and Toppings
Experiment with different frosting techniques, like piping or smooth finishes. Add toppings like a unicorn horn, piped mane, edible glitter, or sugar flowers for that magical touch.
6. Dietary Customization
If needed, you can modify your recipe to cater to dietary restrictions. Make the cake gluten-free, dairy-free, or vegan by substituting ingredients without sacrificing flavor or visual appeal.
Storing, Transporting, and Sharing Your Cake
How to Store Your Cake Properly
Storing your unicorn cake correctly helps maintain its freshness and appearance. Here’s how to keep it in top condition:
1. Room Temperature Storage
If you plan to serve the cake within 1-2 days, store it at room temperature.
- Cover it with a cake dome or airtight container to prevent it from drying out.
- Avoid refrigeration to keep the frosting’s texture intact.
2. Refrigerating the Cake
For cakes with perishable fillings, refrigeration is needed.
- Wrap the cake in plastic wrap or foil to keep it fresh.
- Store in an airtight container to protect it from odors.
3. Freezing the Cake
For long-term storage, freezing is ideal.
- Wrap cake layers individually and store in freezer-safe bags.
- Freeze decorated cakes uncovered for 30 minutes, then wrap securely.
- Thaw in the fridge overnight before serving.
4. Storing Decorations
Keep leftover decorations separate.
- Fondant decorations can be stored in an airtight container at room temperature.
- Piped buttercream or royal icing should be refrigerated in a sealed container.
By following these steps, your unicorn cake will remain fresh and delicious until you’re ready to enjoy it.
Tips for Safe Transportation
Transporting your unicorn cake without damaging its delicate decorations requires careful planning. Here are some essential tips to keep your cake in perfect condition during the journey.
1. Choose a Sturdy Cake Box or Carrier
Ensure your cake box is strong and appropriately sized. A well-constructed box prevents damage and provides support, especially for multi-layered cakes. If possible, use a cake carrier for easier handling.
2. Chill the Cake Before Transport
Chill your cake for at least 30 minutes before transporting it. This hardens the frosting, reducing the risk of smudging or shifting during transit.
3. Secure the Cake in the Vehicle
Place the cake on a flat, stable surface in your vehicle. Use non-slip mats to prevent the box from shifting and drive carefully to avoid sudden movements that could damage the cake.
4. Use a Cake Board or Cake Drum
A sturdy cake board or cake drum provides extra support and helps prevent the cake from sagging. Choose a board that is larger than the cake for easy handling.
5. Set Up Carefully at the Event
Once you arrive, place the cake on a stable surface and gently remove it from the box. Set it in a cool, safe spot to keep it looking fresh.
With these simple steps, you can transport your unicorn cake safely, ensuring it arrives at your event intact and beautiful.
Capture and Share Your Masterpiece
After putting in the effort to create your beautiful unicorn cake, it’s important to preserve the moment and share your creation with friends and family. Here’s how you can capture and share your masterpiece in a way that showcases all your hard work.
1. Take Stunning Photos
Set up a well-lit area to photograph your cake. Natural light works best, so try to take photos near a window. Use a white backdrop or a simple tablecloth to avoid distractions. Take a variety of shots, including close-ups to highlight the details like the unicorn horn, ears, and decorations. A few wide-angle shots will also capture the full beauty of your cake.
2. Focus on the Details
Don’t forget to capture the intricate details that make your cake special. Take close-up shots of the unicorn horn, the piping work, and any edible glitter or sprinkles. These details are often what make the cake so unique and will look great in your photos.
3. Use Editing Apps for Enhancement
Once you’ve taken the photos, you can use editing apps to brighten the image or adjust the contrast. However, don’t over-edit; the goal is to showcase the cake’s true beauty. Editing tools can help remove any shadows or glares that might have been caused by your lighting.
4. Share Your Cake on Social Media
Posting your cake on social media is a fun way to share your creation with a wider audience. Take some time to write a creative caption and tag your friends, family, and even cake-decorating communities. Use popular hashtags like #UnicornCake, #CakeDecorating, and #DIYCake to help your post gain visibility.
5. Involve Your Friends and Family
Don’t forget to share the fun with your loved ones. Take a group shot with people enjoying the cake or watching the cake cutting. Not only does this give you memories to look back on, but it also adds a personal touch to your creation.
Creating a DIY Unicorn Cake is a fun and rewarding experience that allows you to express your creativity. With the step-by-step instructions and helpful tips, you can easily craft a beautiful and delicious cake for any occasion. Whether you’re a beginner or an experienced baker, following these tips ensures your unicorn cake turns out as magical as you imagine. Don’t forget to capture your masterpiece and share it with others—because every great cake deserves to be celebrated!