Finding the best gluten free snacks recipe for every craving can be a game-changer, especially when you’re looking for easy and delicious options. Whether you’re craving something sweet or savory, homemade gluten-free snacks give you full control over ingredients, ensuring they’re not only tasty but healthy. In this guide, you’ll discover a variety of gluten-free snack recipes to satisfy any craving while keeping your diet gluten-free.
Understanding Gluten-Free Snacks
What Makes a Snack Gluten-Free?
To maintain a gluten-free lifestyle, it’s essential to understand what makes a snack safe to eat. Gluten is a protein found in wheat, barley, rye, and their derivatives. To be considered gluten-free, a snack must not contain these ingredients or any ingredient that could have been contaminated with gluten during processing.
Key Ingredients to Avoid in Snacks
Certain ingredients are common sources of gluten. If a snack contains any of these, it is not gluten-free:
- Wheat (including wheat flour, semolina, and durum)
- Barley (found in malts and some cereals)
- Rye (used in rye bread and some alcoholic beverages)
- Oats (while oats are naturally gluten-free, they can be contaminated during processing)
Understanding Gluten-Free Certifications
One simple way to confirm that a snack is gluten-free is to look for a gluten-free certification on the packaging. Certification labels, such as those from the Gluten-Free Certification Organization (GFCO), ensure that the product contains less than 20 parts per million (ppm) of gluten. This level is generally safe for individuals with celiac disease and gluten sensitivity.
Common Gluten-Free Ingredients in Snacks
Many gluten-free snacks rely on alternative ingredients to replace gluten-containing grains. These ingredients include:
- Rice flour
- Almond flour
- Coconut flour
- Tapioca flour
- Cornmeal
Naturally gluten-free ingredients like fruits, vegetables, legumes, seeds, and nuts are often used in snack recipes, adding variety and nutrition.
Preventing Cross-Contamination
Cross-contamination is a risk even when a snack uses gluten-free ingredients. If a snack is processed in a facility that also handles gluten, it could become contaminated. To avoid this risk, check for information on the packaging or opt for products made in certified gluten-free facilities.
In summary, a snack is gluten-free if it avoids gluten-containing grains, is free from cross-contamination, and ideally carries a gluten-free certification. By understanding these key points, you can make informed decisions and confidently select gluten-free snacks.
Benefits of Gluten-Free Snacks
Adopting a gluten-free diet can have numerous benefits, especially for those with specific health conditions or dietary preferences. The rise in popularity of gluten-free snacks has made it easier than ever to enjoy delicious treats without compromising on taste or health.
Health Benefits for Those with Celiac Disease
For individuals with celiac disease, consuming gluten is harmful and can cause severe health issues. Gluten-free snacks provide a safe alternative, ensuring that those with celiac disease can enjoy a variety of foods without triggering symptoms. Symptoms of celiac disease include digestive issues, joint pain, and skin rashes. By eliminating gluten, these symptoms can be controlled and overall health improved.
Reduced Risk of Digestive Issues
Many individuals with gluten sensitivity or intolerance experience digestive issues, such as bloating, gas, and discomfort after eating gluten. Choosing gluten-free snacks can help alleviate these problems by avoiding foods that trigger reactions. Gluten-free diets tend to be easier on the digestive system, which can result in better gut health and improved digestion over time.
Improved Energy Levels
When you eliminate gluten from your diet, you may notice an improvement in your energy levels. Gluten can cause inflammation in the body, leading to fatigue and sluggishness. By switching to gluten-free snacks, many individuals report feeling more energetic throughout the day, as their bodies no longer have to deal with the inflammatory effects of gluten.
Better Nutrient Absorption
Gluten can interfere with the body’s ability to absorb important nutrients from food. In people with gluten sensitivity or celiac disease, gluten can damage the small intestine lining, which is responsible for nutrient absorption. By consuming gluten-free snacks, individuals allow their digestive system to function more efficiently, leading to better absorption of vital nutrients such as vitamins, minerals, and protein.
Weight Management
Many people turn to gluten-free snacks as part of a weight management plan. While gluten-free does not automatically mean lower in calories or fat, many gluten-free options tend to be more natural and less processed than their gluten-containing counterparts. By choosing whole foods like fruits, vegetables, and nuts as gluten-free snacks, individuals may find it easier to control their weight.
Variety of Nutrient-Dense Options
Gluten-free snacks often include ingredients like almond flour, coconut flour, quinoa, seeds, and legumes, which offer a host of health benefits. These snacks can provide higher amounts of fiber, protein, and healthy fats compared to traditional snacks, making them a more nutrient-dense choice.
Support for Gluten-Free Lifestyles
For individuals who choose a gluten-free lifestyle but do not have celiac disease or gluten intolerance, gluten-free snacks can still be beneficial. A gluten-free diet can promote healthy eating habits, reduce intake of processed foods, and encourage the consumption of whole, nutrient-rich foods.
Common Gluten-Free Ingredients You’ll Need
Stocking your kitchen with gluten-free essentials is key to creating delicious snacks without gluten. Many gluten-free ingredients provide the same texture and flavor as their gluten-containing counterparts, allowing you to bake and cook with ease. Let’s take a look at the most common gluten-free ingredients you’ll need for your pantry.
Gluten-Free Flours
Flours are the base of many gluten-free snacks. Some popular options include:
- Almond Flour: This flour is made from ground almonds and adds richness to baked goods like cookies and cakes.
- Coconut Flour: Made from dried coconut meat, coconut flour is highly absorbent and works well for light, fluffy baked treats.
- Rice Flour: Often used in gluten-free flour blends, rice flour provides a delicate texture and works in cookies, pastries, and breads.
- Tapioca Flour: A thickening agent made from cassava root, tapioca flour helps create a chewy texture in baked goods.
Binders and Thickeners
Since gluten helps hold dough together, binders are crucial in gluten-free baking. Some common binders include:
- Xanthan Gum: Adds elasticity to baked goods, mimicking the properties of gluten.
- Guar Gum: Another binder that helps create a smooth, cohesive texture.
- Psyllium Husk: Used for its fiber content, psyllium husk helps provide structure and elasticity.
Leavening Agents
Leavening agents like baking soda and baking powder help gluten-free recipes rise and become light and airy. They’re necessary for making fluffy cakes, muffins, and pancakes.
Sweeteners
Natural sweeteners such as honey, maple syrup, and agave syrup are great alternatives to refined sugar. These options add moisture and sweetness to gluten-free treats like granola bars and muffins.
Other Essentials
Other pantry staples, such as cocoa powder, coconut oil, and chia seeds, help improve texture and flavor in gluten-free recipes. Having these ingredients on hand will ensure your gluten-free snacks turn out delicious every time.
Easy and Quick Gluten-Free Snacks
No-Bake Peanut Butter Energy Bites
No-bake peanut butter energy bites are the perfect gluten-free snack that’s quick, easy, and packed with nutrients. These bite-sized snacks combine the creamy richness of peanut butter with the natural sweetness of honey and the crunch of oats. Ideal for a pre-workout boost, a midday snack, or even a quick breakfast on the go, they’re a must-try for anyone craving a healthy, gluten-free treat.
Why Choose No-Bake Peanut Butter Energy Bites?
- Quick and Easy: These energy bites come together in just 10 minutes—no oven required!
- Healthy: They’re packed with protein, healthy fats, and fiber, which help keep you satisfied.
- Customizable: You can add chocolate chips, seeds, or dried fruit for extra flavor.
Ingredients Needed for No-Bake Peanut Butter Energy Bites
To make these energy bites, you’ll need peanut butter, rolled oats, honey, chia seeds (or flax seeds), and vanilla extract. Optional ingredients include chocolate chips or dried fruit for added flavor.
How to Make No-Bake Peanut Butter Energy Bites
- Mix all the ingredients in a large bowl.
- Roll the mixture into 1-inch balls.
- Refrigerate for 30 minutes to an hour until firm.
- Store in an airtight container in the fridge.
These bites are easy to make, require minimal ingredients, and are a great gluten-free snack option that provides both energy and satisfaction.
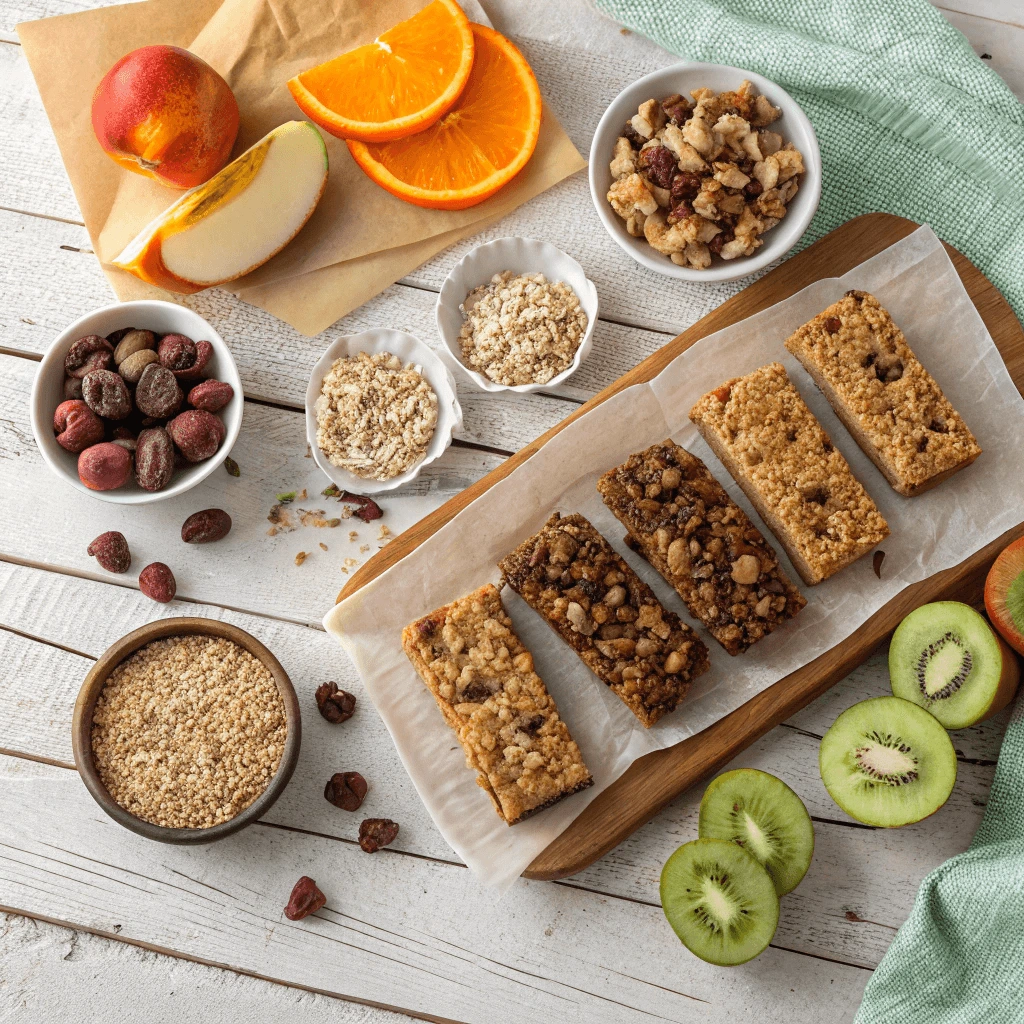
Gluten-Free Granola Bars
Gluten-free granola bars are a fantastic on-the-go snack for anyone with a gluten intolerance or anyone looking to enjoy a healthy, convenient snack. These bars are versatile, customizable, and full of wholesome ingredients like oats, nuts, seeds, and natural sweeteners. You can enjoy them for breakfast, pack them for lunch, or eat them as an afternoon snack. Plus, they’re a healthier alternative to many store-bought granola bars that may contain added sugars or artificial ingredients.
Why Make Your Own Gluten-Free Granola Bars?
Homemade granola bars offer several benefits:
- Control Over Ingredients: You can avoid unnecessary preservatives, artificial flavors, and added sugars often found in pre-packaged options.
- Customization: You can adjust the ingredients based on your taste preferences or dietary needs, adding nuts, dried fruit, or even chocolate chips for an extra touch.
- Cost-Effective: Making your own granola bars is more budget-friendly than buying gluten-free bars from the store.
Key Ingredients in Gluten-Free Granola Bars
To make delicious and nutritious gluten-free granola bars, you will need:
- Gluten-Free Oats: A key base ingredient that provides fiber and texture.
- Nuts and Seeds: Walnuts, almonds, chia seeds, or sunflower seeds add healthy fats and protein.
- Natural Sweeteners: Honey, maple syrup, or agave nectar work well to bind the ingredients and provide natural sweetness.
- Binding Agents: Nut butter (like peanut or almond butter) or coconut oil helps hold the bars together.
- Add-Ins: Feel free to experiment with dried fruit, chocolate chips, or coconut flakes to add extra flavor and texture.
How to Make Gluten-Free Granola Bars
- Prepare the Dry Ingredients: In a large bowl, combine gluten-free oats, nuts, and seeds.
- Mix the Wet Ingredients: In a separate bowl, blend honey or maple syrup, nut butter, and vanilla extract. Heat the mixture if necessary to help combine the ingredients.
- Combine and Press: Pour the wet mixture into the dry ingredients and mix well. Press the mixture into a baking dish or pan, ensuring it’s tightly packed.
- Chill and Slice: Refrigerate the mixture for 2 hours or until firm. Once set, slice into bars.
Storage Tips for Gluten-Free Granola Bars
To keep your homemade granola bars fresh:
- Store them in an airtight container at room temperature for up to a week.
- For longer storage, refrigerate them for up to two weeks.
- If you want to keep them for even longer, consider freezing them for up to three months.
Making gluten-free granola bars at home ensures you get a snack that’s both healthy and tailored to your taste. Whether you need an energy boost during the day or a satisfying snack, these bars will hit the spot!
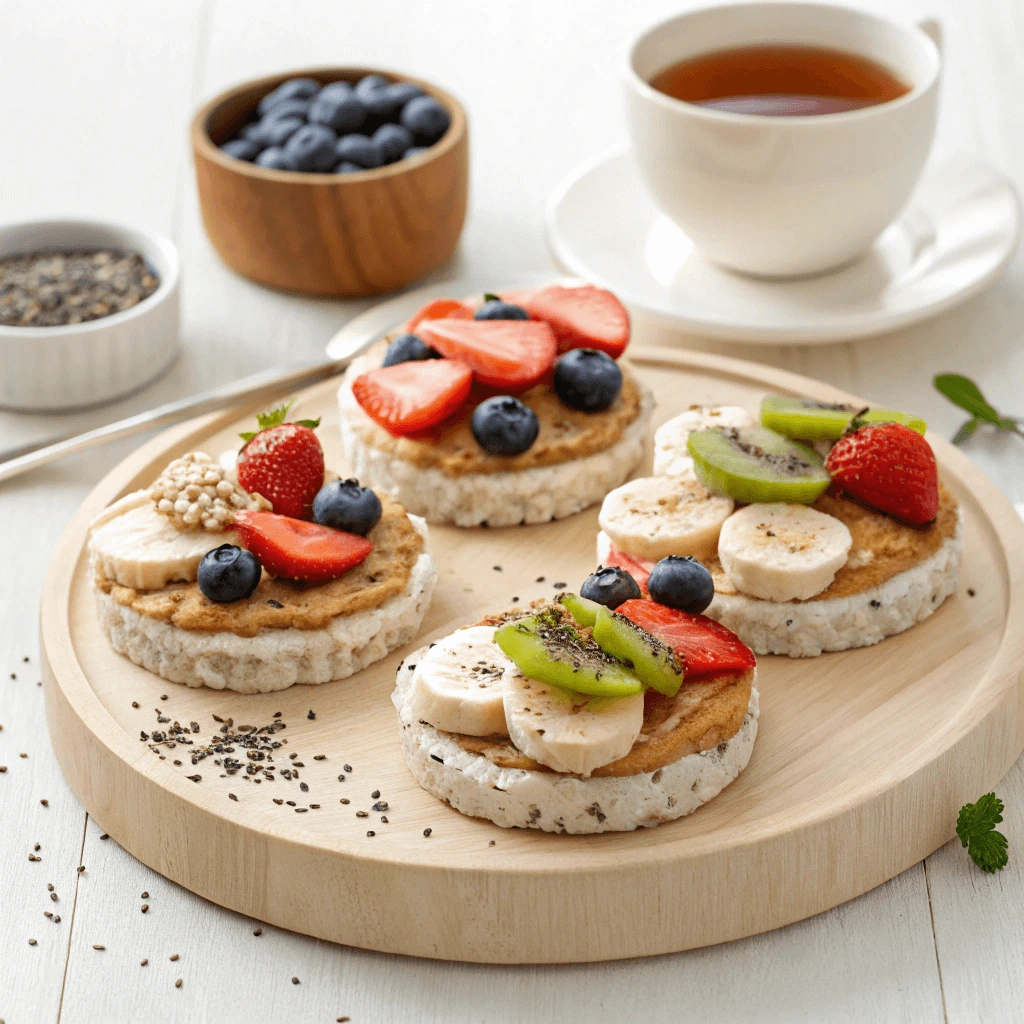
Rice Cakes with Nut Butter and Fruit
Rice cakes with nut butter and fruit are a simple yet satisfying snack that combines crunchy, creamy, and sweet elements into one delicious bite. They’re quick to make, easily customizable, and provide a good balance of healthy fats, protein, and carbohydrates. This snack is perfect for anyone following a gluten-free diet, as it’s made with rice cakes, which are naturally gluten-free, combined with nutrient-rich nut butter and fresh fruit for added flavor and nutritional benefits.
Why Rice Cakes with Nut Butter and Fruit Make a Perfect Snack
There are many reasons why rice cakes topped with nut butter and fruit are an excellent choice for a gluten-free snack:
- Quick and Easy: These rice cakes come together in minutes, making them a great option for busy mornings or as a post-workout snack.
- Customizable: You can swap out different nut butters, fruits, and toppings depending on your taste preferences or dietary restrictions.
- Balanced Nutrition: The combination of carbs from the rice cakes, protein and healthy fats from the nut butter, and vitamins and fiber from the fruit creates a well-rounded snack that keeps you satisfied longer.
Key Ingredients for Rice Cakes with Nut Butter and Fruit
To make this delicious snack, you’ll need a few simple ingredients:
- Rice Cakes: Choose plain or lightly salted rice cakes as your base. They provide a crunchy texture and are naturally gluten-free.
- Nut Butter: Almond butter, peanut butter, or cashew butter are all great choices. They provide protein, healthy fats, and a creamy texture that pairs perfectly with the rice cakes.
- Fresh Fruit: Sliced bananas, strawberries, apples, or blueberries add a natural sweetness and important vitamins.
- Optional Toppings: For extra flavor, you can add chia seeds, hemp seeds, a drizzle of honey, or a sprinkle of cinnamon.
How to Make Rice Cakes with Nut Butter and Fruit
Making rice cakes with nut butter and fruit is incredibly easy:
- Spread Nut Butter: Begin by spreading a generous layer of nut butter on top of a rice cake. Make sure the nut butter is evenly distributed for the perfect balance of flavor in every bite.
- Top with Fruit: Slice your favorite fruit and arrange it on top of the nut butter. For example, bananas and strawberries create a classic combination, while apples and blueberries offer a refreshing twist.
- Optional Add-Ins: If you want to add more flavor or nutrition, sprinkle some chia seeds or drizzle a little honey on top.
- Serve and Enjoy: Enjoy your rice cakes right away as a quick snack or take them on the go for a portable treat.
Variations to Try
While the classic combination of rice cakes, nut butter, and fruit is delicious, there are plenty of ways to mix things up:
- Nut Butter & Berries: Swap the fruit for a mix of fresh berries like raspberries, blackberries, and blueberries.
- Apple Cinnamon Delight: Spread almond butter on the rice cake, add apple slices, and top with a sprinkle of cinnamon for a warm, comforting flavor.
- Tropical Twist: Use coconut butter or cashew butter and top with tropical fruits like pineapple, mango, or kiwi for a refreshing snack with a tropical flair.
Storage Tips for Rice Cakes with Nut Butter and Fruit
Although rice cakes with nut butter and fruit are best enjoyed fresh, you can store them for a short time if needed:
- Rice Cakes and Nut Butter: If you want to prepare the rice cakes in advance, spread the nut butter and store them in an airtight container. Add the fruit just before serving to keep it fresh and prevent it from getting soggy.
- Leftovers: If you have leftover rice cakes with nut butter and fruit, store them in the fridge for up to one day. The fruit will soften, but it will still be tasty.
Rice cakes with nut butter and fruit are a perfect gluten-free snack that’s easy to make, satisfying, and packed with nutrients. Whether you need a quick snack between meals or something light for breakfast, this snack will hit the spot every time!
Sweet Gluten-Free Snacks for Every Craving
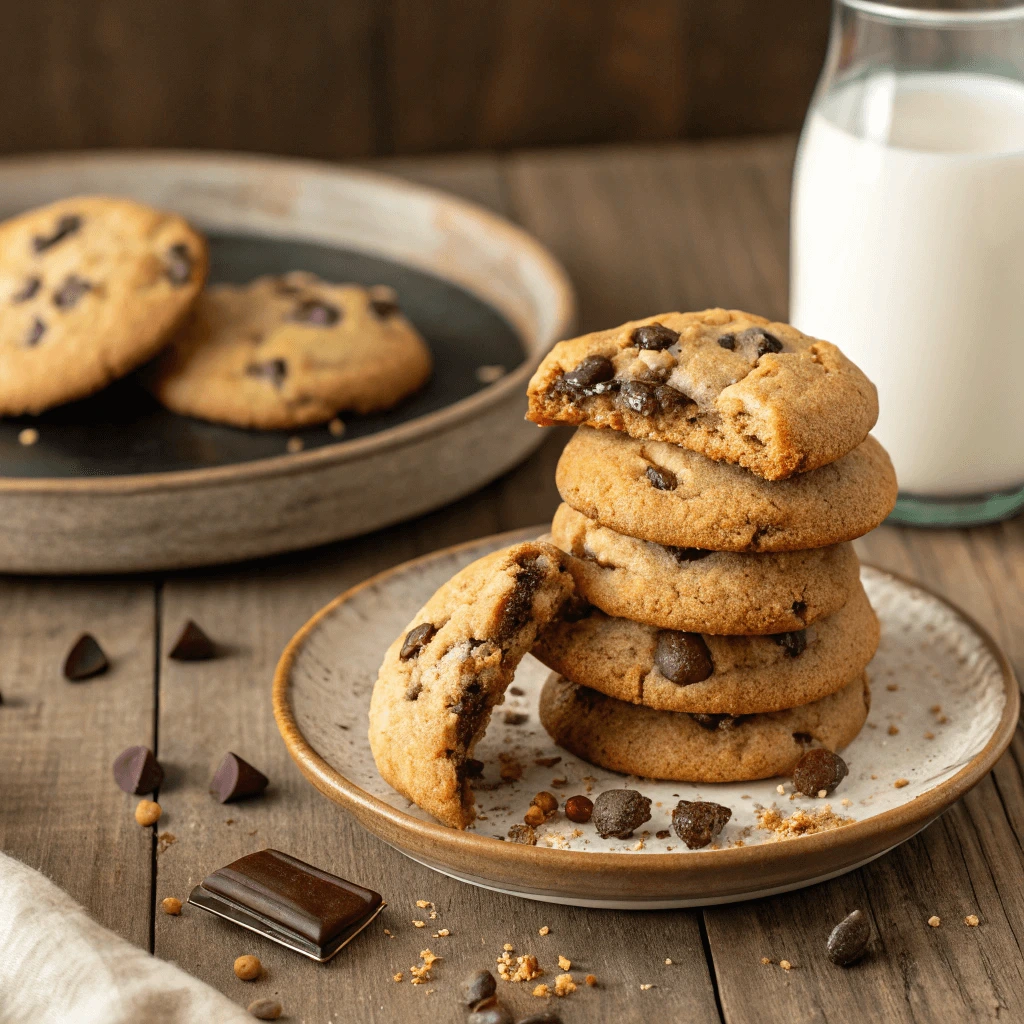
Coconut Flour Chocolate Chip Cookies
Coconut flour chocolate chip cookies are a delicious and healthy alternative to traditional cookies. These gluten-free treats are soft, chewy, and packed with rich chocolate chips. Whether you’re following a gluten-free diet or simply want to try something new, coconut flour cookies offer a unique flavor and texture that’s both satisfying and nutritious.
Why Choose Coconut Flour?
Coconut flour is a gluten-free flour made from dried coconut meat. It’s an excellent option for those with gluten sensitivities and offers several benefits, including:
- High Fiber Content: It’s rich in fiber, which helps with digestion and supports a healthy gut.
- Low in Carbs: Coconut flour is lower in carbohydrates compared to wheat flour, making it a good choice for low-carb diets.
- Naturally Gluten-Free: It’s perfect for gluten-free baking and doesn’t require any additional binders or flours.
Key Ingredients
To make these coconut flour chocolate chip cookies, you’ll need:
- Coconut Flour: The base for the recipe, giving the cookies their unique flavor.
- Eggs: These provide structure and help the dough come together.
- Butter or Coconut Oil: For a rich, creamy texture.
- Chocolate Chips: For that classic chocolatey goodness.
- Baking Soda & Sweetener: To help the cookies rise and provide sweetness.
How to Make Coconut Flour Chocolate Chip Cookies
- Preheat the Oven: Set your oven to 350°F (175°C). Line a baking sheet with parchment paper.
- Mix Wet Ingredients: Combine the eggs, butter, and sweetener in a bowl.
- Add Dry Ingredients: Whisk the coconut flour, baking soda, and salt, then add them to the wet ingredients.
- Stir in Chocolate Chips: Mix in your favorite chocolate chips.
- Scoop the Dough: Drop spoonfuls of dough onto the baking sheet and flatten slightly.
- Bake: Bake for 10-12 minutes until golden brown around the edges.
Storage Tips
Keep your cookies in an airtight container at room temperature for up to 3 days. They also freeze well for up to 3 months.
Coconut flour chocolate chip cookies are a perfect gluten-free snack, combining rich flavor with healthy ingredients!
Banana Oat Muffins
Banana oat muffins are a wholesome and satisfying gluten-free snack or breakfast option. These muffins combine the natural sweetness of ripe bananas with the hearty texture of oats, making them a nutritious choice. They’re perfect for anyone looking to enjoy a gluten-free treat without compromising on flavor or texture.
Why Banana Oat Muffins Are a Great Choice
Banana oat muffins are more than just delicious; they are packed with nutrients that support overall health. Some of the key benefits of these muffins include:
- High in Fiber: Oats are a great source of soluble fiber, which helps regulate digestion and supports heart health.
- Natural Sweetness: The ripe bananas provide natural sweetness, reducing the need for added sugars.
- Rich in Potassium: Bananas are a great source of potassium, which supports proper muscle function and helps regulate blood pressure.
These muffins are also easy to make and are perfect for meal prep. You can bake a batch and have a healthy snack or breakfast ready for the week.
Key Ingredients in Banana Oat Muffins
To make delicious banana oat muffins, you’ll need:
- Ripe Bananas: The key ingredient that adds natural sweetness and moisture.
- Rolled Oats: Choose gluten-free oats to ensure the muffins are entirely gluten-free. Oats provide a hearty texture.
- Eggs: Help bind the ingredients together and add structure.
- Baking Powder: To help the muffins rise and become fluffy.
- Honey or Maple Syrup: For a touch of extra sweetness.
- Cinnamon: Adds a warm, comforting flavor to complement the bananas.
How to Make Banana Oat Muffins
- Preheat Your Oven: Start by preheating your oven to 350°F (175°C). Line a muffin tin with paper liners or grease it.
- Mash the Bananas: In a large bowl, mash the ripe bananas until smooth.
- Mix Wet Ingredients: To the mashed bananas, add the eggs, honey or maple syrup, and vanilla extract. Mix well.
- Add Dry Ingredients: Stir in the rolled oats, baking powder, cinnamon, and salt. Mix until everything is well combined.
- Scoop the Batter: Use a spoon or ice cream scoop to fill each muffin cup about ¾ full with batter.
- Bake: Bake the muffins in the preheated oven for 18-22 minutes, or until a toothpick inserted into the center comes out clean.
- Cool and Enjoy: Allow the muffins to cool on a wire rack before enjoying.
Storage Tips for Banana Oat Muffins
These muffins can be stored in an airtight container at room temperature for up to 3 days. To keep them fresh for longer, you can freeze them for up to 3 months. Simply reheat them in the microwave or oven when you’re ready to enjoy them.
Banana oat muffins are an excellent gluten-free snack or breakfast option. They’re nutritious, easy to make, and will keep you satisfied throughout the day. Enjoy them with your morning coffee or as an afternoon pick-me-up!
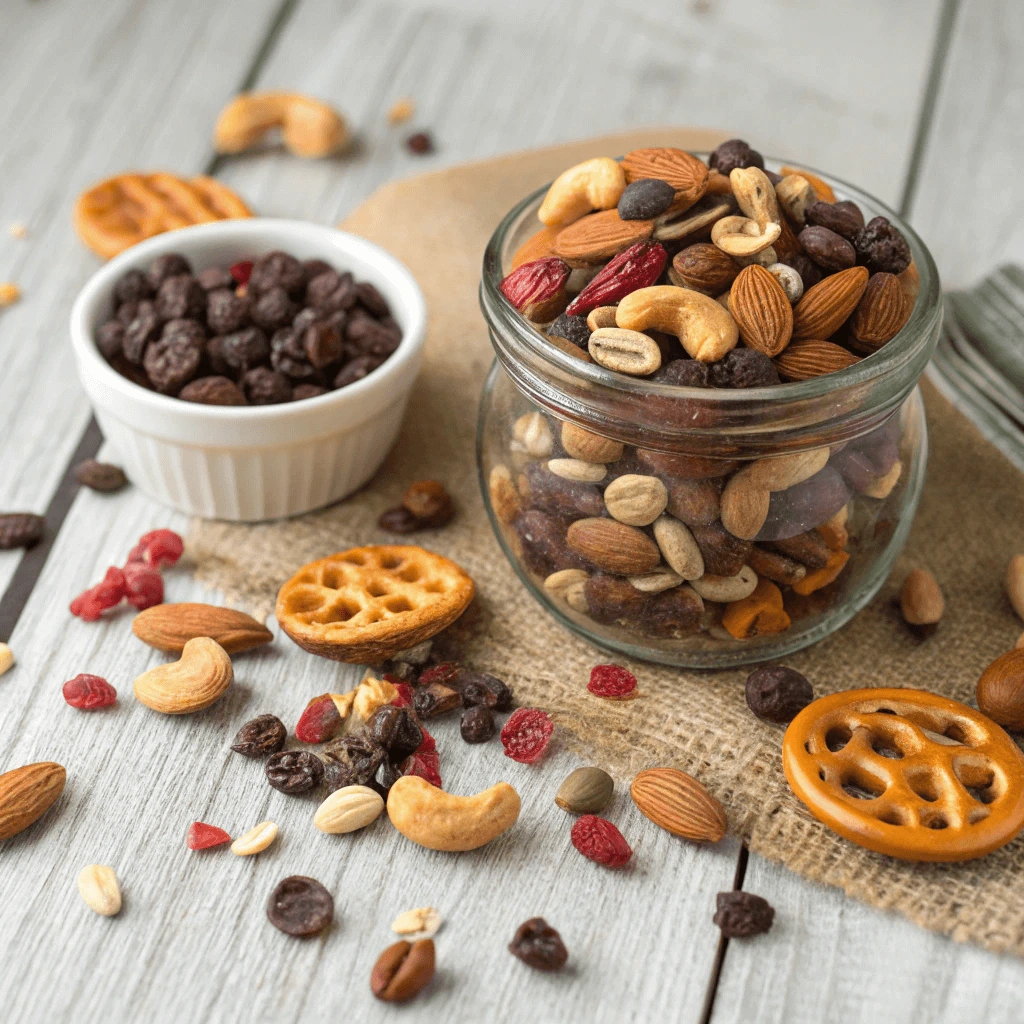
Trail Mix with Dried Fruit and Seeds
Trail mix with dried fruit and seeds is a convenient and healthy gluten-free snack that you can enjoy anywhere. Packed with essential nutrients, it provides a perfect balance of healthy fats, protein, and fiber. This snack is easy to make, customizable to your preferences, and ideal for satisfying hunger between meals or during physical activities.
Why Trail Mix is a Great Gluten-Free Snack
Trail mix with dried fruit and seeds is gluten-free and offers a variety of health benefits. It combines nuts, seeds, and dried fruit, providing an excellent source of energy. These ingredients are rich in healthy fats, fiber, and antioxidants, which are beneficial for digestion, heart health, and overall well-being.
Key Ingredients for Your Trail Mix
For a balanced and nutritious mix, consider using the following gluten-free ingredients:
- Nuts: Almonds, cashews, and walnuts offer healthy fats and protein.
- Seeds: Sunflower seeds, chia seeds, and flaxseeds are full of fiber and omega-3 fatty acids.
- Dried Fruit: Choose unsweetened dried fruit like cranberries, raisins, or apricots to add natural sweetness.
- Optional Add-ins: Dark chocolate chips, coconut flakes, or gluten-free oats can add extra flavor and texture.
How to Make Trail Mix with Dried Fruit and Seeds
Making trail mix at home is simple. Start with a 2:1 ratio of nuts to seeds, then add dried fruit to balance the mix. You can also include optional ingredients like chocolate chips or coconut flakes for a personalized touch. Once mixed, store your trail mix in an airtight container for a quick, grab-and-go snack.
Storage Tips
Trail mix can be stored at room temperature for up to two weeks in an airtight container. For longer shelf life, refrigerate it to keep the ingredients fresh.
Trail mix with dried fruit and seeds is a versatile, nutrient-dense snack that can be enjoyed anytime, anywhere. Whether you’re looking for a post-workout snack or something to take on the go, it’s an easy, customizable, and gluten-free option.
Savory Gluten-Free Snacks for a Satisfying Bite
Roasted Chickpeas with Spices
Roasted chickpeas with spices are a crunchy, flavorful, and satisfying gluten-free snack that is perfect for any time of the day. Packed with plant-based protein and fiber, they provide an excellent alternative to chips or other processed snacks. Their crispy texture and versatile flavor make them a great option for both snacking and as a topping for salads, soups, or bowls.
Why Choose Roasted Chickpeas for a Snack?
Roasted chickpeas offer several health benefits that make them a great gluten-free option. Chickpeas, also known as garbanzo beans, are naturally gluten-free and loaded with protein, fiber, and essential minerals like iron and magnesium. Roasting them creates a crunchy texture that is just as satisfying as other crunchy snacks, but with fewer calories and added nutritional value.
In addition to being gluten-free, roasted chickpeas are incredibly versatile. They can be seasoned to suit any flavor preference, whether you enjoy something spicy, savory, or even slightly sweet.
How to Make Roasted Chickpeas with Spices
Making roasted chickpeas at home is quick and simple. Here’s a basic guide to get you started:
Ingredients:
- 1 can of chickpeas (or 1 ½ cups cooked chickpeas)
- 1-2 tablespoons olive oil
- 1 teaspoon paprika (or your preferred spice)
- ½ teaspoon garlic powder
- ¼ teaspoon cayenne pepper (optional for spice)
- Salt and pepper to taste
Instructions:
- Preheat the oven: Start by preheating your oven to 400°F (200°C).
- Prepare the chickpeas: Drain and rinse the chickpeas thoroughly to remove any excess liquid. Pat them dry using a kitchen towel or paper towels. This step is crucial to ensure they get crispy while roasting.
- Season the chickpeas: In a bowl, toss the chickpeas with olive oil, paprika, garlic powder, cayenne pepper, salt, and pepper. Feel free to get creative by adding other spices like cumin, turmeric, or dried herbs for extra flavor.
- Roast: Spread the seasoned chickpeas in a single layer on a baking sheet lined with parchment paper. Bake for 25-35 minutes, stirring halfway through to ensure they cook evenly. The chickpeas should be golden brown and crispy when done.
- Cool and enjoy: Once roasted, allow the chickpeas to cool before snacking. The flavor will intensify as they cool, and they’ll become even crunchier.
Creative Seasoning Variations
While the basic seasoning blend is fantastic, you can customize the flavor of your roasted chickpeas to suit your taste preferences. Here are some seasoning ideas to get you started:
- Sweet and Spicy: Add cinnamon and a drizzle of honey or maple syrup for a sweet, spicy snack.
- Garlic Parmesan: Mix garlic powder with grated Parmesan cheese and a dash of Italian seasoning for a savory, cheesy bite.
- Smoky BBQ: Use smoked paprika, chili powder, and brown sugar for a smoky, BBQ-flavored treat.
- Curry Spice: Add curry powder, cumin, and turmeric for a warm and aromatic snack.
Storage Tips
Roasted chickpeas can be stored in an airtight container for up to a week. For the best texture, keep them at room temperature and avoid refrigerating them, as this can affect their crispness. If they lose their crunch, simply pop them back into the oven for a few minutes to revive their crispiness.
Stuffed Mini Bell Peppers: A Healthy Gluten-Free Snack
Stuffed mini bell peppers are a tasty and nutritious gluten-free snack perfect for any occasion. These little peppers are both flavorful and packed with vitamins, making them an excellent choice for a healthy, on-the-go snack. Their small size and vibrant color make them visually appealing, while their sweet, crisp texture offers a satisfying bite.
Why Mini Bell Peppers Make the Perfect Snack
Mini bell peppers are a great choice for a gluten-free snack because they are naturally free from gluten. Their sweetness and tender flesh make them ideal for stuffing with a variety of fillings. These peppers are high in vitamin C, fiber, and antioxidants, contributing to a healthy diet. With their small size, mini bell peppers are easy to snack on, and they’re full of flavor, making them a fun and guilt-free option.
How to Prepare Stuffed Mini Bell Peppers
Ingredients:
- 12 mini bell peppers
- 1 cup cooked quinoa (or rice for a different texture)
- ½ cup shredded cheese (or a dairy-free option)
- ¼ cup cream cheese (or a non-dairy substitute)
- Fresh herbs like parsley or cilantro
- Salt and pepper to taste
- 1 tablespoon olive oil
Instructions:
- Slice the tops off the peppers and remove the seeds.
- Mix quinoa, cheese, cream cheese, and fresh herbs in a bowl.
- Stuff each mini bell pepper with the mixture.
- Drizzle with olive oil, then bake at 375°F (190°C) for 15-20 minutes, or until tender.
Variation Ideas
For different flavors, consider these filling ideas:
- Mediterranean Style: Feta cheese, Kalamata olives, and diced tomatoes.
- Mexican-Inspired: Black beans, corn, and taco seasoning.
- Vegetarian Delight: Spinach, ricotta cheese, and pine nuts.
- Meat Lovers: Ground turkey or chicken with beans and cheese.
Stuffed mini bell peppers are an easy-to-make, gluten-free snack that’s perfect for any time of day. Whether you prefer them filled with cheese, veggies, or protein, they are a versatile and nutritious option for satisfying your cravings.
Homemade Gluten-Free Cheese Crackers: A Cheesy Snack Delight
Homemade gluten-free cheese crackers are a delicious and healthier alternative to store-bought options. Not only do they offer a cheesy, crispy crunch, but they also allow you to control the ingredients, ensuring they are both gluten-free and free from artificial additives.
Why Choose Homemade Cheese Crackers?
Making your own gluten-free cheese crackers provides several benefits. You avoid any hidden gluten that might be in processed snacks. Plus, you can customize the flavor to your liking, experimenting with different cheeses and seasonings to suit your taste.
Ingredients Needed
- 1 ½ cups gluten-free all-purpose flour
- 1 cup shredded cheese (such as cheddar)
- ½ cup cold butter
- 2 tablespoons water (or more as needed)
- ¼ teaspoon salt
- Optional seasonings: garlic powder, onion powder
Steps to Make Gluten-Free Cheese Crackers
- Preheat the Oven: Preheat your oven to 350°F (175°C) and line a baking sheet with parchment paper.
- Mix Dry Ingredients: Combine the gluten-free flour, salt, and optional seasonings in a bowl.
- Add Cheese and Butter: Stir in the shredded cheese and cold butter until the mixture forms coarse crumbs.
- Add Water: Gradually add water until the dough comes together.
- Roll and Cut: Roll out the dough between parchment paper and cut into desired shapes.
- Bake: Bake for 12–15 minutes, or until golden brown.
Customizing Your Crackers
Feel free to add herbs like rosemary, spices such as cayenne, or even different cheeses to make these crackers uniquely yours.
Storage Tips
Store your homemade crackers in an airtight container at room temperature for up to a week, or freeze them for longer storage.
These homemade gluten-free cheese crackers are an easy, delicious snack that will satisfy your cravings while keeping your diet on track.
How to Store and Pack Gluten-Free Snacks
Storing Gluten-Free Snacks for Freshness: Essential Tips and Best Practices
Storing gluten-free snacks properly is crucial to maintaining their freshness and ensuring they stay delicious for as long as possible. Whether you’ve made homemade snacks or purchased store-bought gluten-free options, the right storage methods will help preserve taste, texture, and quality. Let’s take a deeper dive into how to store your gluten-free snacks effectively.
1. Use Airtight Containers
The key to keeping your gluten-free snacks fresh is sealing them in airtight containers. This prevents exposure to air, which can cause your snacks to become stale or soggy. Whether you use plastic containers, glass jars, or resealable bags, ensure they are tightly sealed after each use. This will not only keep them fresher for longer but also protect them from moisture, which can negatively affect their texture.
2. Store in a Cool, Dry Place
Most gluten-free snacks, like crackers, chips, or granola, should be stored in a cool, dry place. The pantry or a kitchen cupboard is ideal. Keeping your snacks away from heat sources such as direct sunlight, stoves, or ovens is crucial, as excessive heat can cause the oils in the snacks to become rancid. Also, ensure the storage area is dry—humidity can lead to mold growth, especially for snacks containing grains, seeds, or nuts.
3. Refrigeration for Perishables
Some gluten-free snacks, like cheese or dips, may need refrigeration to prevent spoilage. If you’re storing snacks such as homemade granola bars, energy bites, or dairy-based dips, place them in the fridge in airtight containers to maintain their freshness. Refrigeration helps preserve moisture and texture, ensuring these snacks stay safe to eat for a longer time.
4. Freezing for Extended Storage
For snacks that you won’t eat right away or want to store for a longer period, freezing can be an excellent option. Many gluten-free snacks can be frozen, including cookies, granola bars, and even bread. To freeze your snacks properly, wrap them in plastic wrap or foil and place them in an airtight freezer bag or container. When you’re ready to eat them, simply thaw them at room temperature or heat them up in the oven for a fresh-baked taste.
5. Label and Date Your Snacks
It’s a good practice to label your stored gluten-free snacks with the date of preparation or purchase. This will help you keep track of how long they’ve been stored, ensuring you use them while they’re still fresh. It’s easy to forget when you made your snacks, but labeling them ensures you don’t leave them in storage too long.
6. Avoid Storing Snacks Near Strong Odors
Gluten-free snacks can be more sensitive to absorbing odors than traditional snacks, especially if they are stored improperly. Strong smells from spices, cleaning products, or foods like onions and garlic can affect the flavor of your snacks. Make sure your storage containers are sealed well and avoid storing them near anything with a potent aroma.
Packing Gluten-Free Snacks for Work or Travel
Packing gluten-free snacks for work or travel doesn’t have to be difficult. With a little planning, you can enjoy tasty and nutritious snacks while staying on track with your dietary needs. Here’s how to pack your gluten-free snacks efficiently:
1. Choose Easy-to-Pack Snacks
Opt for compact, portable snacks that don’t require refrigeration. Gluten-free granola bars, energy bites, or nuts fit easily in bags and are perfect for on-the-go.
2. Use Leak-Proof Containers
For snacks like dips or yogurt, use leak-proof containers. These prevent messes and ensure your snacks stay fresh throughout the day.
3. Keep Snacks Cool
If your snacks need to stay cool, use an insulated lunch bag or cooler pack with ice packs. This is ideal for perishable items like cheese or fresh fruit.
4. Portion Your Snacks
Pre-portion snacks into individual servings. This helps prevent overeating and keeps your snacks fresh. Single-serving bags or containers are also more convenient.
5. Mix Sweet and Savory
Pack a variety of snacks to keep your options interesting. Include a balance of sweet and savory options like fruit, nuts, or gluten-free crackers.
6. Pack Extra Snacks
Always bring extra snacks as a backup, especially when traveling. Non-perishable items like nuts or gluten-free jerky are great to keep in your bag just in case.
By following these simple tips, you can ensure your gluten-free snacks stay fresh and are ready to fuel your day, whether you’re at work or on the go!
How to Read Labels for Gluten-Free Certification
Reading labels for gluten-free certification is an essential skill for anyone following a gluten-free diet. Ensuring that the food you buy is truly gluten-free can prevent health issues and promote a positive dining experience. Here’s a detailed guide on how to read food labels effectively and confidently:
1. Look for Certified Gluten-Free Symbols
The first step in reading labels is looking for trusted gluten-free certification symbols. These symbols guarantee that the product has undergone testing and meets the gluten-free standards set by recognized organizations, such as the Gluten-Free Certification Organization (GFCO). These certifications are often found on the packaging of products and help consumers quickly identify safe options.
2. Examine the Ingredients List
The ingredients list is where you can find the primary components of the product. Always read the ingredients carefully, especially for potential hidden sources of gluten. Words like “wheat,” “barley,” “rye,” or “oats” (unless labeled gluten-free) are indicators that the product contains gluten. Some processed foods may also include additives that could contain gluten, such as certain flavorings or stabilizers, so be vigilant when reviewing the list.
3. Check for Gluten-Free Claims
Many food products make a gluten-free claim on the packaging. However, these claims can sometimes be misleading. To ensure accuracy, always verify that the product meets official gluten-free standards. If the product claims to be gluten-free, it should comply with the legal requirement of containing less than 20 parts per million (ppm) of gluten. If the product doesn’t bear a certification label, it’s essential to check if it’s made in a facility that processes gluten-containing ingredients, which may lead to cross-contamination.
4. Understand Cross-Contamination Risks
Even if a product is labeled as gluten-free, it’s important to consider the risk of cross-contamination. Cross-contamination can occur if the product is processed in a facility that also processes gluten-containing foods. Always look for statements like “manufactured in a facility that also processes wheat” on the packaging. This will give you insight into potential risks and whether the product is safe for your diet.
5. Be Aware of “Gluten-Free” Processed Foods
Processed gluten-free foods can sometimes be tricky. They may be labeled gluten-free but can still be packed with unhealthy additives and high amounts of sugar, fat, or salt. If you want to make healthier choices, focus on whole, naturally gluten-free foods like fruits, vegetables, and meats, and be cautious when purchasing heavily processed gluten-free options.
6. Learn the Regulations in Your Region
The regulations for gluten-free labeling can vary depending on where you live. In the United States, the Food and Drug Administration (FDA) has set a standard for gluten-free labeling, which means the product must contain fewer than 20 ppm of gluten. Other countries, such as the EU, have similar standards. Familiarize yourself with the regulations in your region to better understand what gluten-free labeling actually means.
Conclusion
This post has covered a variety of gluten-free snack options, from savory roasted chickpeas to sweet coconut flour chocolate chip cookies. Whether you’re craving something quick and healthy or a more indulgent treat, these recipes have you covered.
I encourage you to try out different snacks and find your favorites. Gluten-free snacking is all about exploring new flavors and customizing recipes to suit your taste.
Homemade gluten-free snacks give you control over the ingredients, making them a healthier alternative to store-bought versions. By making your snacks at home, you can avoid unnecessary additives and enjoy fresh, wholesome ingredients in every bite.
Very good https://is.gd/N1ikS2
thank you
Good https://is.gd/N1ikS2
thank you