
If you’re craving a crunchy, cheesy snack that’s both delicious and gluten-free, this Easy Gluten-Free Goldfish Recipe is the perfect solution. Not only is it simple to make, but it also delivers that satisfying crispy texture you love. Whether you’re looking for a treat for a gluten-sensitive family member or just want to enjoy a homemade snack, these goldfish-shaped crackers will hit the spot every time.
Why Make Your Own Gluten Free Goldfish Crackers?
Healthier Ingredients for a Guilt-Free Snack
Homemade gluten free Goldfish crackers give you full control over what goes into your snack. Unlike store-bought versions that often include preservatives, artificial colors, and additives, this recipe keeps it clean and simple. You can make a treat that’s both healthier and just as tasty.
Use Real Cheese for Authentic Flavor
Shredded sharp cheddar cheese gives these crackers their classic cheesy taste and golden color. Real cheese adds flavor without artificial ingredients. If you follow a dairy-free diet, try using dairy-free shredded cheese or nutritional yeast to keep the flavor bold and satisfying.
Choose Gluten Free Flour Wisely
The flour you choose affects the texture and flavor of the crackers. Almond flour adds a nutty richness, rice flour creates a light and crisp bite, and oat flour brings extra fiber. You can also use a 1:1 gluten free baking blend for ease and consistency. Always check for a certified gluten free label to ensure safety from cross-contamination.
Skip the Preservatives and Additives
When you bake from scratch, you avoid unnecessary ingredients like MSG, artificial flavors, and preservatives. You decide what goes in—nothing more, nothing less. That’s a big win for anyone trying to reduce processed foods or manage food sensitivities.
Perfect for Kids with Gluten Sensitivities or Celiac
Kids with gluten sensitivities or celiac disease often feel left out when it comes to fun snacks like Goldfish crackers. Most store-bought versions contain wheat, artificial additives, and gluten cross-contamination risks. That’s why making a homemade version is such a game-changer. You can create a tasty, safe snack that every child can enjoy without worry.
Create a Safe Snack for Celiac Kids
Children with celiac disease need to avoid even the smallest trace of gluten. By using certified gluten free ingredients at home, you can ensure their snack is completely safe. Store-bought snacks, even those labeled “gluten free,” may still carry risks due to shared equipment or unclear sourcing. Making crackers in your own kitchen eliminates those concerns.
Avoid Cross-Contamination at Home
Cross-contamination is a real concern for gluten-intolerant children. When you prepare homemade Goldfish crackers, you control your workspace, tools, and ingredients. Use dedicated baking sheets, mixing bowls, and utensils that haven’t touched gluten-containing foods. This extra step gives peace of mind and helps keep sensitive kids healthy and happy.
Make Snack Time More Inclusive and Fun
Kids don’t want to feel different or left out—especially during snack time. Shaping these crackers into the familiar fish form makes the experience playful and familiar. You can even involve your kids in the baking process. Let them help roll the dough, cut out shapes, or choose their favorite cheese. It turns a dietary need into a creative, fun-filled moment.
Fun and Customizable at Home
One of the best things about making your own gluten free Goldfish crackers is the ability to customize them. Whether you want to change up the flavor, make them in different shapes, or adjust the texture, you have complete control. This recipe isn’t just for people with dietary restrictions; it’s also for anyone who loves fun, creative cooking.
Shape Them Your Way
Traditional Goldfish crackers are, of course, shaped like fish, but who says you can’t have a little fun with it? You can use cookie cutters in all sorts of shapes. Try hearts, stars, or even holiday-themed designs to keep things fresh. If you’re making them for a special event, customizing the shapes will add a personal touch. Your kids will love choosing their favorite shapes or even helping you cut them out!
Add Flavor Variations
While classic cheddar cheese is the go-to for these crackers, you can experiment with different flavors to make them your own. Try adding herbs like rosemary or thyme for a savory twist. You could even play with spicy options by incorporating a bit of cayenne pepper or paprika for extra kick. If you want a dairy-free version, swap out the cheese for nutritional yeast, which still offers that cheesy flavor without the dairy.
Adjust the Texture
Not everyone likes their crackers the same way. Some prefer them extra crispy, while others like them a bit softer. You can easily adjust the texture by changing how thick you roll out the dough or how long you bake them. For a crispier crunch, roll the dough thinner and bake the crackers a little longer. If you want a chewier snack, keep the dough thicker and watch the bake time.
Making gluten free Goldfish crackers at home isn’t just about avoiding gluten. It’s about having fun and making something that fits your tastes, your style, and your dietary needs. The best part is that you can get your whole family involved in the process and enjoy the creative journey together.
Ingredients You’ll Need for the Best Gluten Free Goldfish Recipe
Choosing the Right Gluten Free Flour
Choosing the right gluten free flour is crucial to achieving the perfect texture and flavor in your homemade Goldfish crackers. Gluten free flours behave differently than wheat flour, so it’s important to pick one that complements your recipe. Fortunately, there are several excellent gluten free flour options that can help you create delicious crackers with the right crunch and consistency.
Explore Gluten Free Flour Options
Different gluten free flours provide varying textures and flavors. Here are a few common options to consider:
- Almond Flour: This flour adds a slightly nutty taste and a soft texture to your crackers. It’s perfect for a richer, more moist cracker, but keep in mind that it doesn’t offer the same crispness as some other options.
- Rice Flour: This flour is lighter and more neutral in flavor, making it a great choice if you want your crackers to have a crispy texture. Rice flour also blends well with other flours to balance texture.
- Oat Flour: If you’re looking for added fiber, oat flour is a great choice. It gives the crackers a slightly chewy texture while still providing some crispness. Make sure to use certified gluten free oats to avoid cross-contamination.
- Tapioca Flour: Often used as a binding agent, tapioca flour can help add chewiness and elasticity to the dough. It also contributes to a golden color when baked.
Gluten Free Flour Blends: Convenience and Consistency
If you’re unsure about experimenting with different flours, gluten free flour blends are a great option. These pre-mixed flours are designed to replicate the texture of wheat flour in gluten free baking. They typically combine various flours like rice, potato starch, and tapioca starch, giving you a balanced, easy-to-use option. These blends offer convenience without compromising on quality, making them an excellent choice for beginners or anyone looking for consistent results.
How to Mix Gluten Free Flours
If you choose to mix your own gluten free flours, you’ll have more control over the texture of your crackers. Start by combining a base flour, like rice flour or oat flour, with a starch, such as tapioca or potato starch, to add structure and lightness. You can experiment with different combinations to find the perfect mix for your preferred texture—whether you like them extra crispy or slightly chewy.
When working with gluten free flour, it’s essential to measure carefully and to ensure that your ingredients are properly mixed. Sometimes, you might need to adjust the amount of liquid in your dough since gluten free flours absorb moisture differently than wheat flour.
Choosing the right gluten free flour ensures your homemade Goldfish crackers turn out just the way you want them. Whether you stick to a simple blend or experiment with individual flours, finding the perfect mix will elevate your crackers from good to great.
Cheesy Flavor Boosters
To make your homemade gluten free Goldfish crackers burst with cheesy goodness, you can use a variety of flavor boosters. These simple ingredients add depth, enhance the cheesy taste, and elevate the overall flavor profile of your snack. Let’s explore some of the best ways to enhance your crackers with cheesy flavors!
Real Cheese for a Bold Taste
The foundation of any great Goldfish cracker is the cheese itself. Use sharp, shredded cheddar cheese for a bold, tangy flavor. The sharpness balances the richness of the crackers, making each bite deliciously satisfying. If you prefer a different cheese, you can also try gouda, mozzarella, or even parmesan for unique flavor combinations. For a dairy-free version, nutritional yeast is an excellent substitute that delivers a savory, cheesy taste without any dairy.
Cheese Powder: The Secret Ingredient
If you’re looking to replicate the classic Goldfish flavor, cheese powder can be a game-changer. Cheese powder provides that unmistakable, tangy cheese flavor without the mess of grating. Many homemade recipes call for a sprinkle of cheese powder to give crackers an authentic, cheesy edge. Simply mix it with your dry ingredients for an evenly distributed cheese flavor. You can find cheese powders made with real cheese or even vegan options that give you flexibility in catering to dietary needs.
Adding Spices and Herbs for Extra Depth
To take your cheesy crackers up a notch, consider adding a variety of spices and herbs. Garlic powder, onion powder, and smoked paprika bring a savory, aromatic quality that complements the cheese. A pinch of cayenne pepper can add a mild heat for those who like a little kick in their snacks. Fresh herbs like rosemary or thyme can also be added for an herby twist, enhancing the depth of flavor. These additions not only boost the cheesy flavor but also give your crackers a more complex, layered taste.
Nutritional Yeast for a Cheesy, Vegan Boost
For those following vegan or dairy-free diets, nutritional yeast is an essential ingredient to boost the cheesy flavor. Nutritional yeast has a naturally cheesy, nutty flavor that works well in gluten free Goldfish crackers. It’s also packed with B-vitamins, making it a nutritious option. Simply sprinkle it into your dough along with the other dry ingredients to give your crackers a creamy, cheesy taste without any dairy.
Enhance with a Touch of Mustard Powder or Lemon
If you want to add a little tang to your crackers, mustard powder can help. It enhances the sharpness of the cheese, giving your crackers a slight kick. A touch of lemon zest can also provide a bright, fresh contrast to the richness of the cheese, balancing the flavors beautifully.
Other Essential Ingredients
While the cheese is the star of the show, there are several other essential ingredients that help bring your gluten free Goldfish crackers together. These ingredients provide texture, binding, and structure to the dough, ensuring your crackers bake to perfection. Let’s dive into the key ingredients that are just as important as the cheese!
Gluten Free Flour Blends
As discussed earlier, gluten free flour is one of the most important ingredients in your Goldfish cracker recipe. It provides the necessary structure and texture, replacing the gluten in traditional flour. Using a good gluten free flour blend is crucial for achieving the desired crispness and texture. Look for blends that combine a variety of flours, such as rice flour, potato starch, and tapioca flour, as they work together to mimic the consistency of wheat flour.
If you prefer to mix your own flour blend, combining rice flour with a starch like tapioca or potato flour creates a light, crunchy texture. This balance helps your crackers hold their shape while still being tender.
A Binder: Eggs or Flaxseed Meal
To bind the dough together and provide structure, you’ll need a binder. In most traditional cracker recipes, eggs are used for this purpose. If you’re following a vegan diet or have egg allergies, flaxseed meal can be used as an excellent substitute. Flaxseed meal mixed with water forms a gel-like consistency that mimics the binding action of eggs.
Both eggs and flaxseed meal contribute to the dough’s elasticity and moisture, ensuring your crackers are neither too dry nor too crumbly. They help the dough come together, making it easier to roll out and cut into shapes.
Fat for Tenderness
A little fat goes a long way when it comes to texture. Butter is commonly used in Goldfish cracker recipes for its rich flavor and ability to help create a tender, flaky texture. If you need a dairy-free alternative, you can substitute butter with coconut oil or even olive oil, depending on your flavor preferences.
The fat content ensures that the crackers don’t become too hard during baking, creating a balance between crispness and tenderness. The added fat also helps achieve the perfect golden-brown color as they bake.
Salt for Flavor Enhancement
Salt is an essential ingredient in any cracker recipe. It helps balance the richness of the cheese and the fat, enhancing the overall flavor. A pinch of salt also brings out the savory notes in the dough and complements the tangy cheese flavor. Make sure to use a good quality salt, such as sea salt or Himalayan pink salt, for the best flavor.
Salt also plays a role in controlling the dough’s hydration. It helps draw moisture from the ingredients, ensuring your dough doesn’t become too wet or sticky to work with.
Baking Soda or Baking Powder
Baking soda or baking powder helps the dough rise slightly, contributing to the light and crispy texture. While the crackers don’t need to rise as much as bread, a small amount of leavening agent can help achieve the right amount of puff and crispness. It also ensures your crackers maintain their structure during baking, so they don’t become too dense.
If you’re using a flour blend with xanthan gum, it can help with the binding process, but the leavening agents still play an important role in achieving the desired texture.
Water for Binding the Dough
Water is another crucial ingredient that helps bring the dough together. It’s needed to hydrate the dry ingredients and activate the binding agents like flaxseed or eggs. Be careful not to add too much water, as you want the dough to remain thick enough to roll out easily. Add water gradually until you reach the right dough consistency—smooth, pliable, and not too sticky.
Step-by-Step Guide to Making Gluten Free Goldfish Crackers
Making the Dough: Tips for the Perfect Texture
Creating the perfect dough for your gluten free Goldfish crackers is essential for achieving the right balance of crispness and tenderness. The dough is the foundation of your crackers, so getting the right texture is key. Whether you’re a seasoned baker or a beginner, these tips will help you master the dough-making process and ensure your crackers turn out perfectly every time.
Measure Your Ingredients Correctly
The first step to perfect dough is accurate measurements. Gluten free flours absorb liquid differently than traditional wheat flour, so it’s important to measure both your dry and wet ingredients precisely. For best results, use a kitchen scale to weigh your ingredients, especially when working with gluten free flour blends. This ensures consistency in texture and prevents the dough from becoming too dry or too sticky.
Using a spoon to scoop flour into your measuring cup can cause inaccuracies, leading to too much flour in the dough. To avoid this, spoon the flour into the cup and level it off with a flat edge.
Achieving the Right Consistency
The consistency of your dough is crucial to the success of your crackers. After mixing the ingredients, your dough should feel smooth and slightly pliable, but not sticky. If it’s too wet or sticky, add a little more gluten free flour, one tablespoon at a time. If it’s too dry and crumbly, add a small amount of water to bring it together.
It’s important to remember that gluten free dough doesn’t behave the same as dough made with wheat flour. It won’t stretch or rise like traditional dough, so aim for a firm but workable texture that holds together when pressed or rolled.
Rest the Dough
Allowing the dough to rest before rolling it out is essential. Resting the dough gives the ingredients time to fully hydrate and helps the dough firm up. Cover your dough with plastic wrap or place it in an airtight container, and let it rest for about 15–30 minutes. This helps improve its elasticity and makes it easier to roll out without tearing or cracking.
If you’re in a rush, you can also place the dough in the fridge to speed up the resting process, but be sure to let it come to room temperature before rolling it out.
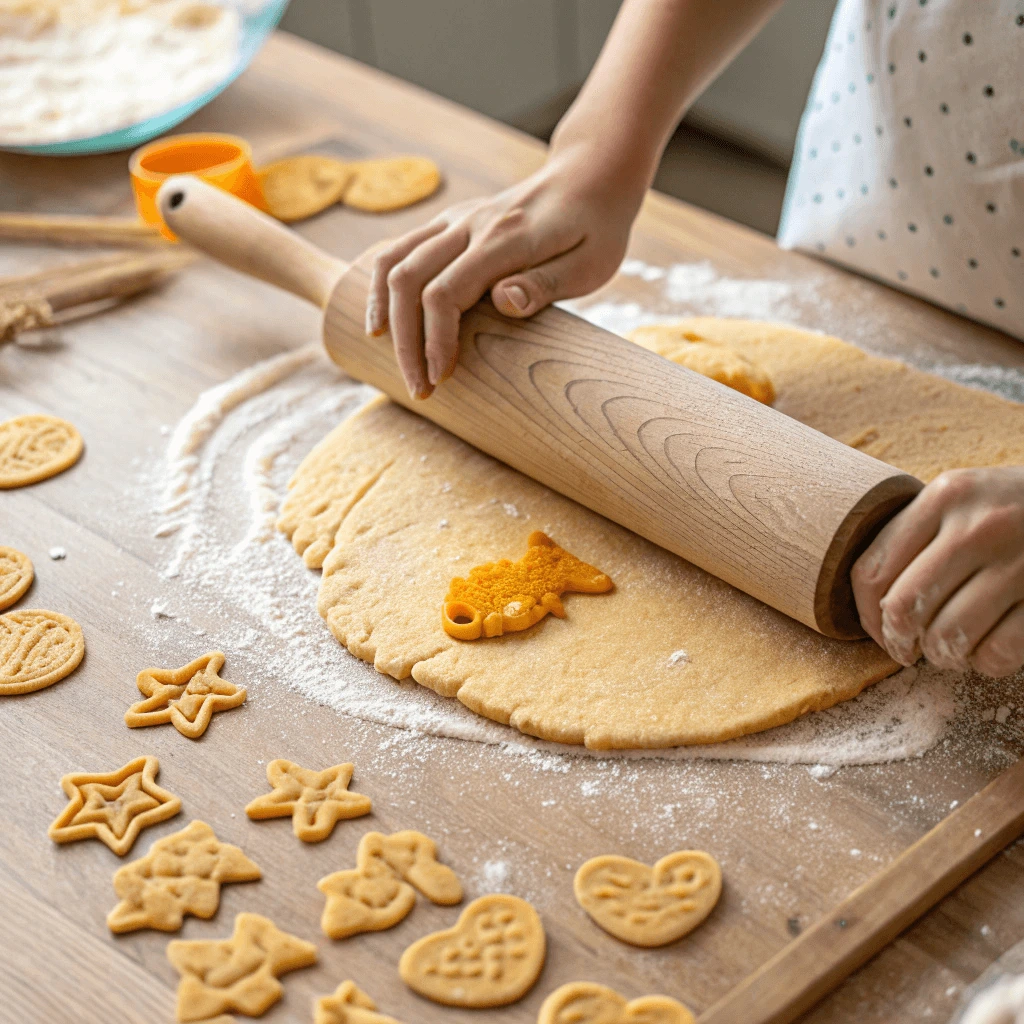
Roll the Dough Evenly
Once the dough has rested, it’s time to roll it out. To ensure your crackers have the perfect texture, roll the dough as evenly as possible. Use a rolling pin to flatten it to about 1/8-inch thickness. A consistent thickness ensures your crackers bake evenly, with a crunchy texture throughout.
If the dough is sticking to your rolling pin or countertop, lightly dust the surface with gluten free flour or use a piece of parchment paper to prevent sticking. Keep the dough slightly chilled as you work to make it easier to handle.
Use a Cookie Cutter or Goldfish-Shaped Mold
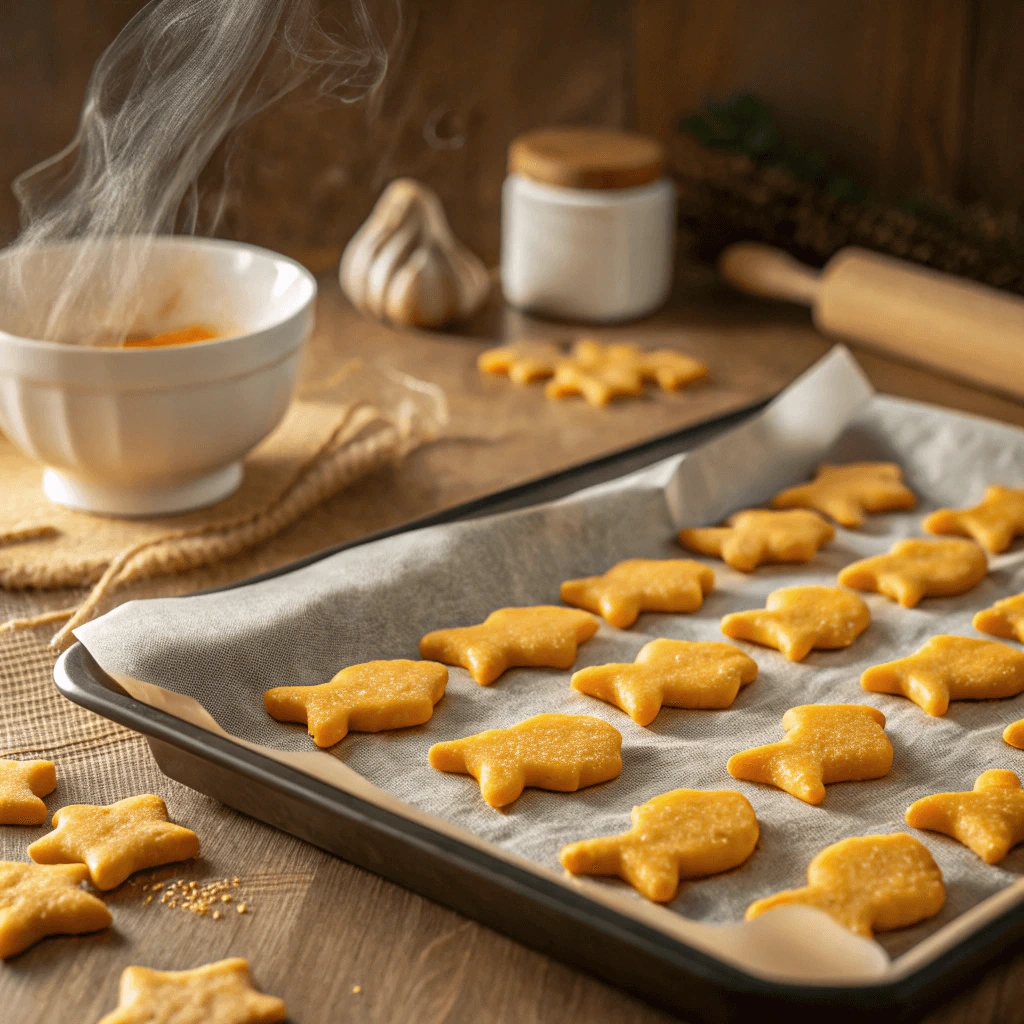
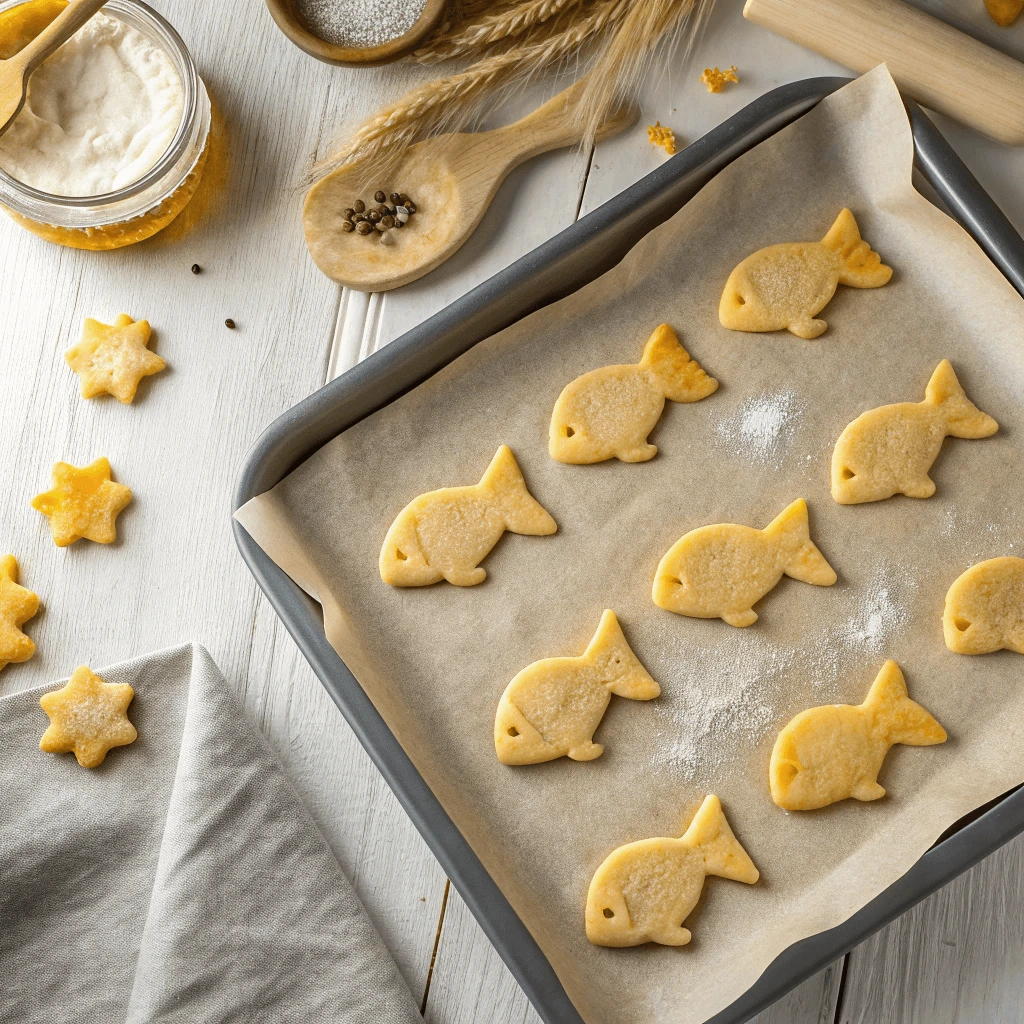
For the classic Goldfish cracker shape, you can use a fish-shaped cookie cutter or a silicone Goldfish mold. Gently press the cutter into the dough and transfer the cutouts to a baking sheet lined with parchment paper. If you’re not using a mold, you can cut the dough into small squares or fun shapes using a sharp knife or pizza cutter.
If you’re aiming for an even crispness, try to keep the shapes uniform in size. This helps ensure that all the crackers bake at the same rate, giving you a consistent crunch.
Don’t Overwork the Dough
While it’s tempting to keep kneading the dough until it’s perfect, overworking it can lead to tough crackers. Gluten free dough doesn’t contain gluten, so there’s less need to knead or work the dough excessively. Mix until the dough just comes together and then stop. Overworking the dough can cause the crackers to become too dense and chewy rather than crisp.
Chill the Dough for Extra Crispness
For an extra crispy texture, you can chill the dough once it’s rolled out and cut into shapes. Place the cut-out crackers in the fridge for about 10–15 minutes before baking. This extra step helps the crackers firm up, ensuring a crunchier texture once baked.
Baking Tips for Perfect Texture
Finally, when it’s time to bake, preheat your oven to the correct temperature. Bake the crackers until they are golden brown, usually around 12–15 minutes, depending on your oven and the size of your crackers. Keep an eye on them, as gluten free crackers can brown quickly. Let them cool on a wire rack to crisp up fully.
Shaping Your Crackers
Shaping your gluten free Goldfish crackers is an essential step to ensure they bake to perfection. The right shape not only makes them look fun and appealing but also ensures they cook evenly, with a crisp texture that everyone will love. Whether you’re aiming for the classic Goldfish shape or something more creative, these tips will help you get the perfect shape every time.
Using Cookie Cutters for Classic Shapes
The most iconic shape for these homemade crackers is the classic fish shape. To achieve this, you can use a fish-shaped cookie cutter or a silicone mold designed specifically for Goldfish crackers. These tools will give you consistent shapes, ensuring all your crackers bake evenly.
Start by gently pressing the cookie cutter into the dough. Be sure not to press too hard, as this could distort the shape. Once you’ve cut out the crackers, carefully lift them using a spatula and transfer them to a baking sheet lined with parchment paper.
If you don’t have a fish-shaped cutter, any fun shape will work! Consider using other animal-themed cutters, stars, or even squares, depending on what you have on hand. The key is to ensure that the shapes are all uniform in size so that they bake evenly.
Using a Rolling Pin and Knife for Custom Shapes
If you don’t have a cookie cutter or mold, you can still shape your crackers with just a rolling pin and a sharp knife. After rolling out your dough to the desired thickness, use a knife or pizza cutter to slice the dough into squares or rectangles, resembling crackers. For a fun twist, you can even create triangles, circles, or other shapes.
While it’s tempting to make intricate designs, keep in mind that the more uniform your shapes, the better they will bake. Consistency in size and thickness is key to achieving that perfect crunch.
Freehand Shaping with Molds
If you’re feeling creative or have a custom Goldfish-shaped silicone mold, freehand shaping can be a fun and effective method. These molds allow you to press dough directly into the shape, creating perfectly uniform crackers with a playful look. Once the dough is pressed into the mold, simply pop the molded dough out and transfer it to a parchment-lined baking sheet.
For freehand molds, it’s important to press the dough firmly into the shape to ensure that it holds during baking. Gently tapping the mold on the countertop can help remove any air bubbles and ensure the dough stays in the perfect shape.
Avoiding Stickiness While Shaping
One common issue when shaping dough is that it can become sticky, especially when using gluten free flours. To avoid this, lightly dust the surface of your dough and your rolling pin with gluten free flour as you work. If the dough sticks to your cutter or knife, it can be helpful to dip the blade into the flour to reduce friction.
Another trick is to place the dough between two sheets of parchment paper when rolling it out. This method prevents the dough from sticking to your rolling pin, and it keeps the dough intact while you work. Once you’ve rolled it to the desired thickness, simply peel away the top layer of parchment and proceed with cutting or molding the dough.
Ensuring Even Size and Thickness
Consistency is essential when shaping gluten free crackers. The thickness of your crackers directly affects their baking time and texture. For even baking and a consistent crunch, try to keep all the shapes the same thickness, ideally around 1/8-inch thick. Using a rolling pin with adjustable thickness guides can be a helpful tool to ensure your dough is evenly rolled.
If you’re working with a fish-shaped cookie cutter, it’s helpful to flatten out any dough scraps with your hands and re-roll them, cutting more shapes from the remaining dough. Avoid overworking the dough too much, as it can result in tough crackers.
Creative Customization with Shapes and Patterns
While the traditional Goldfish shape is undeniably cute, don’t be afraid to get creative with your shapes! You can make heart-shaped crackers for special occasions, or even use a small knife to carve unique patterns into your dough before baking. These patterns can add an extra touch of personalization and make the crackers even more fun to eat.
To create texture and additional flair, you can press light indentations into the dough using a fork or the edge of a knife. This not only gives your crackers a unique look but also helps them bake more evenly by allowing heat to penetrate the dough better.
Handling Leftover Dough
After cutting your first batch of crackers, you will likely have some leftover dough. Instead of discarding it, gather the scraps together, roll them out again, and shape them into more crackers. If you find that the dough has become too soft or sticky after being worked multiple times, you can pop it in the fridge for 10–15 minutes to firm it up before continuing.
This process helps you make the most of your dough and prevents waste, all while ensuring that the crackers have a consistent texture and flavor.
Baking and Cooling
Baking your gluten free Goldfish crackers is the final step in turning your dough into crispy, cheesy treats. However, achieving the perfect balance of crispiness and tenderness requires a little attention to detail during the baking process. In this section, we’ll walk you through how to bake your crackers to golden perfection and ensure they cool properly for the ideal texture.
Preheating the Oven for Even Baking
Before you begin baking, always preheat your oven to 350°F (175°C). This ensures that the oven reaches the desired temperature before you place the crackers inside, allowing for even baking. An oven that’s already heated will help your crackers cook evenly, preventing over-baking in some spots while leaving others too soft.
To avoid any surprises, check your oven’s accuracy with an oven thermometer, especially if you’re working with a new or unreliable appliance. Some ovens can run a little hot or cold, affecting the baking time and the final texture of your crackers.
Properly Spacing Your Crackers on the Baking Sheet
Once your crackers are shaped and ready to bake, arrange them on a parchment-lined baking sheet. Leave a little space between each cracker, about half an inch, to allow for air circulation and even cooking. If your crackers are too close together, they may not bake evenly and could stick together during the process.
If you’re baking multiple batches, use separate baking sheets for each to prevent overcrowding. Overcrowding can trap steam, leading to chewy crackers rather than crisp, crunchy ones.
Baking Time: Watching for the Perfect Golden Brown
Baking time for gluten free crackers can vary depending on their size, thickness, and your oven’s heat distribution. Generally, the crackers should bake for about 12 to 15 minutes. However, it’s important to start checking around the 10-minute mark, especially for smaller shapes or thinner dough.
As the crackers bake, keep an eye on them to ensure they don’t brown too quickly. The edges should turn golden, and you’ll notice the crackers become crisp as they bake. If you’re unsure, you can test one cracker by removing it and letting it cool slightly before tasting. If it’s perfectly crisp, your batch is done!
Checking for Doneness
Unlike some baked goods, gluten free crackers don’t rise or puff much, so they’re easy to overbake if you’re not careful. Once your crackers are golden brown and have a firm, dry texture, they are ready to come out of the oven. If you notice any areas that look slightly underdone, keep them in the oven for another 1–2 minutes, checking frequently to avoid burning.
You can also use a toothpick to poke a few of the crackers to check for crispness. The toothpick should come out clean, with no dough sticking to it. If it does, return the crackers to the oven for a little longer.
Cooling Your Crackers to Achieve Maximum Crunch
Once your crackers are done baking, remove the baking sheet from the oven and allow the crackers to cool completely on the sheet for a few minutes. While they are still hot, they will be a little softer. However, as they cool, they will crisp up and take on that perfect Goldfish texture.
For the best results, transfer your crackers to a wire rack to finish cooling. This allows air to circulate around the crackers, preventing them from becoming soggy. Don’t skip this step! Cooling them on the rack helps the crackers maintain their crunchiness and prevents any moisture from accumulating underneath.
Storing Your Baked Crackers
After your crackers have cooled, store them in an airtight container to keep them fresh. If you plan to store them for a longer period, consider placing them in a sealed jar or bag with a desiccant pack to absorb any excess moisture. Proper storage is crucial for preserving the crisp texture of your gluten free Goldfish crackers. They should stay fresh for up to a week if kept in a cool, dry place.
Troubleshooting: If Your Crackers Aren’t Crunchy Enough
If your crackers turned out softer than expected, there are a few things you can do. First, make sure your dough was rolled to an even thickness. Thicker dough may require additional baking time. Next, double-check the baking time and ensure that your oven was at the right temperature. Lastly, let your crackers cool completely before tasting. They will firm up as they cool, so don’t judge their texture while they’re still hot
Tips to Customize and Store Your Homemade Crackers
Flavor Variations to Try
One of the best things about homemade gluten free Goldfish crackers is the ability to customize them with different flavors. Whether you enjoy savory, sweet, or unique combinations, there are plenty of options to explore.
Savory Flavors
For those who love bold, savory snacks, try these variations:
Garlic and Herb: Add garlic powder, onion powder, and dried Italian herbs like basil or oregano to the dough. This gives your crackers a flavorful, aromatic profile.
Cheddar Jalapeño: Mix in finely chopped jalapeños or jalapeño powder for a spicy twist on the classic cheesy flavor.
Parmesan and Rosemary: Fresh rosemary and grated Parmesan offer a nutty, savory bite that’s perfect for sophisticated palates.
Sweet Flavors
Sweet variations bring a fun twist to your crackers:
Cinnamon Sugar: Mix in cinnamon and sugar for a sweet, crunchy treat. Once baked, lightly dust with more sugar for a perfect finish.
Honey and Sea Salt: A touch of honey adds sweetness, while a sprinkle of sea salt creates a delicious sweet-salty combo.
Maple and Pecan: Add maple syrup and chopped pecans for a warm, nutty flavor perfect for fall.
Unique Combinations
For something truly unique, try these exciting combos:
Smoked Paprika and Cheddar: The smokiness of paprika pairs wonderfully with sharp cheddar, creating a rich, flavorful cracker.
Lemon and Dill: Fresh lemon zest and dill give your crackers a fresh, citrusy, herbaceous flavor.
Chili Lime: Add chili powder and lime zest for a spicy and tangy twist that adds bold flavor to your crackers.
Customizing with Toppings
After baking, you can further enhance your crackers with toppings:
Cheese Crust: Sprinkle extra cheese on top of the dough before baking for a cheesy, crispy crust.
Seasoned Salt: A light dusting of seasoned salt can elevate the flavor.
Herb Sprinkle: Fresh herbs like parsley or thyme can add a fragrant finish to your crackers.
Kid-Friendly and Lunchbox-Ready Ideas
Gluten-free Goldfish crackers aren’t just a tasty snack; they’re also perfect for kids! Their crunchy texture and cheesy flavor make them a hit with little ones, and they’re an excellent option for school lunches or after-school snacks. Plus, they’re easy to pack and customize, so your child will never get bored. Let’s explore how you can incorporate these crackers into kid-friendly meals and lunches.
A Snack That Kids Will Love
Kids often crave snacks that are both delicious and fun, and gluten-free Goldfish crackers fit the bill perfectly. Their small, fish-shaped pieces are visually appealing and easy for little hands to grab. The cheesy, savory taste satisfies their snack cravings without the worries of gluten, making them a great option for children with sensitivities or allergies.
Tip: Make snack time even more fun by adding a small bowl of your homemade Goldfish crackers to a “snack station” where kids can pick and choose their favorites. You can even encourage them to help you shape the dough before baking!
Perfect for Lunchboxes
Packing lunch for school can be a challenge, especially when trying to find something both nutritious and appealing. Gluten-free Goldfish crackers are easy to store in a small container and add a satisfying crunch to any lunchbox. Pair them with fruits, veggies, and a protein-packed dip like hummus or guacamole, and your child will have a well-rounded meal.
Healthy Pairing Ideas:
- With Veggies: Pack some carrot sticks, cucumber slices, or bell pepper strips alongside your crackers. The crunchy texture of the crackers complements the crispness of the veggies.
- With Dips: Gluten-free Goldfish crackers are perfect for dipping! Offer a variety of dips such as guacamole, hummus, or a homemade ranch dressing for extra flavor.
Creative Ways to Include in Meals
You can get creative and incorporate gluten-free Goldfish crackers into more than just snack time. Here are some ideas to make them a part of your child’s meal rotation:
Goldfish Cracker Crusted Chicken: Crushed Goldfish crackers make a fantastic breading for chicken tenders or nuggets. Coat chicken pieces with a mixture of crushed crackers and your favorite seasonings, then bake them for a crunchy, kid-friendly meal.
Goldfish Mac and Cheese: Add a handful of crumbled Goldfish crackers on top of your mac and cheese to give it a fun, cheesy crunch. This simple twist will turn a classic comfort food into something exciting!
Goldfish Snack Mix: Create a simple, customized snack mix by combining homemade gluten-free Goldfish crackers with nuts, dried fruit, and a sprinkle of cinnamon or sugar. This mix is perfect for packing in lunchboxes or offering as an after-school treat.
Kid-Friendly Meal Prep Ideas
Preparing meals in advance can make your mornings run smoother, especially when it comes to packing school lunches. Gluten-free Goldfish crackers are a great addition to your meal prep because they store well and can be used in various combinations. Consider prepping small containers with crackers, fruits, veggies, and protein snacks for easy grab-and-go lunches.
You can also freeze batches of homemade crackers to keep them fresh. Just store them in an airtight container or freezer-safe bag, and pull out a serving whenever you need it.
How to Store Them for Maximum Crunch
To enjoy your homemade gluten-free Goldfish crackers at their crispiest, it’s important to store them properly. Proper storage helps maintain their delightful crunch and prevents them from becoming soft or stale. Below, you’ll find some tips and best practices for keeping your crackers fresh and crunchy for as long as possible.
Cool Them Completely
Before storing your crackers, make sure they have cooled completely. If you store them while they’re still warm, condensation can form inside the storage container, which will soften the crackers. Let your homemade Goldfish crackers cool on a wire rack for at least 30 minutes after baking. This step is crucial to achieving the perfect texture.
Use an Airtight Container
Once your crackers are fully cooled, it’s time to store them. The best way to keep them crunchy is by placing them in an airtight container. Glass jars, plastic containers with secure lids, or resealable bags work well for this purpose. Be sure the container is completely sealed to prevent air from getting in, as exposure to air can cause the crackers to lose their crispness.
Tip: If you’re using a resealable plastic bag, try squeezing out as much air as possible before sealing it to reduce the chances of the crackers becoming soggy.
Store in a Cool, Dry Place
The key to keeping your Goldfish crackers fresh is to store them in a cool, dry place away from heat and moisture. Heat and humidity can both affect the texture of the crackers, causing them to lose their crunch. Avoid storing them near heat sources like stoves, ovens, or direct sunlight.
A pantry or kitchen cabinet that stays at a consistent temperature works best. If you live in a particularly hot or humid climate, you might want to keep your crackers in the refrigerator to ensure they stay crispy.
Consider Using Desiccant Packs
If you’re storing a large batch of crackers, you can include desiccant packs in the storage container. These small packets absorb moisture from the air, helping to keep the crackers dry and crisp. While not necessary, they can be a great addition if you’re planning to store your crackers for an extended period.
Freezing for Long-Term Storage
If you’ve made a big batch of Goldfish crackers and want to store them for longer periods, freezing is a great option. Freezing helps preserve the freshness and crunchiness of the crackers. To do this:
- Place the crackers in a single layer on a baking sheet and freeze them for 1-2 hours.
- Once frozen, transfer the crackers into an airtight freezer-safe bag or container.
- Seal the container tightly and store it in the freezer.
When you’re ready to eat them, just take out a small portion and let them thaw at room temperature for a few minutes. The crackers will retain their crispiness, and you won’t lose any flavor.
How to Revive Soft Crackers
If you find that your crackers have become a bit softer than you’d like, don’t worry! You can easily revive them. Simply spread the crackers in a single layer on a baking sheet and place them in the oven at 300°F (150°C) for 5-7 minutes. This will help restore their crisp texture.
FAQs About Gluten Free Goldfish Crackers
Are These Crackers Celiac-Safe?
When making homemade gluten-free Goldfish crackers, ensuring they are celiac-safe is essential for those with celiac disease. Celiac disease is an autoimmune disorder triggered by gluten, so it’s important to avoid any trace of gluten in the ingredients and preparation.
Use Certified Gluten-Free Ingredients
To keep your crackers safe, always use certified gluten-free ingredients like rice flour, almond flour, or gluten-free all-purpose flour. This ensures no trace of wheat, barley, or rye, which can cause harm to those with celiac disease. Always check product labels to verify that ingredients are certified gluten-free.
Avoid Cross-Contamination
Cross-contamination is a major concern for individuals with celiac disease. Make sure to clean all utensils, bowls, and baking equipment thoroughly before use. Separate gluten-free and gluten-containing foods to prevent any accidental exposure to gluten.
Check for Hidden Gluten
Some processed ingredients like cheese powder or certain seasonings may contain hidden gluten. Always read labels carefully and choose products that are explicitly gluten-free. For the safest option, use natural, whole ingredients instead of pre-packaged mixes or powders.
Trust Certified Gluten-Free Labels
Not all “gluten-free” products are tested for trace amounts of gluten. To be sure your crackers are safe, choose ingredients with the certified gluten-free symbol. This symbol ensures the product has been tested and meets strict safety standards.
Can I Make Them Dairy-Free or Vegan?
Yes, you can easily make your gluten-free Goldfish crackers dairy-free or vegan with a few ingredient swaps. Here’s how:
Dairy-Free Adaptations
To make the crackers dairy-free, replace the cheese with plant-based alternatives. You can use vegan cheese or nutritional yeast for a cheesy flavor. For milk, swap cow’s milk with almond or oat milk. Use dairy-free butter or olive oil to maintain the crispiness.
Vegan Adaptations
For a vegan version, replace the egg with flaxseed meal or chia seeds mixed with water. You can also use aquafaba (chickpea liquid) as a binder. Keep using vegan cheese and seasonings for that cheesy flavor.
Tips for Texture and Flavor
To achieve the best texture, adjust the dough’s consistency with a bit more plant-based milk or water. Enhance the flavor with extra seasonings like garlic powder, nutritional yeast, or turmeric.
What’s the Best Flour for Crunchy Gluten-Free Crackers?
The flour you choose impacts the texture and crunch of your gluten-free crackers. Here are some of the best options:
1. Rice Flour
Rice flour creates a light, crisp texture. It has a neutral flavor, which makes it ideal for savory crackers. Combine it with other flours like tapioca or sorghum for better balance.
2. Almond Flour
Almond flour adds a nutty flavor and tender texture. It’s best used in moderation or mixed with rice or tapioca flour to prevent the crackers from being too soft.
3. Tapioca Flour
Tapioca flour helps with elasticity, giving crackers a slightly chewy texture and crispiness when baked. Pair it with rice flour for a crunchy result.
4. Chickpea Flour
Chickpea flour adds a hearty flavor and crisp texture. It’s great for savory crackers but should be combined with lighter flours to avoid making the crackers too dense.
5. Sorghum Flour
Sorghum flour adds protein and fiber to your crackers, giving them a dense, crunchy texture. Mix it with lighter flours to balance the overall texture.
6. Coconut Flour
Coconut flour gives crackers a slightly sweet flavor. However, it absorbs a lot of moisture, so it’s best used in small amounts and combined with other gluten-free flours.
Conclusion
Making your own gluten-free Goldfish crackers at home is a fun and rewarding experience. With the right ingredients, you can create a crunchy, cheesy snack that’s perfect for anyone with gluten sensitivities or celiac disease. By using high-quality gluten-free flours, experimenting with flavors, and customizing the recipe to fit your dietary preferences, you can enjoy a delicious snack without compromising on taste or texture. These homemade crackers are not only healthier but also versatile, allowing you to get creative with flavors and shapes. Whether you’re packing them in a lunchbox or enjoying them as a snack, your homemade gluten-free Goldfish will surely be a hit!