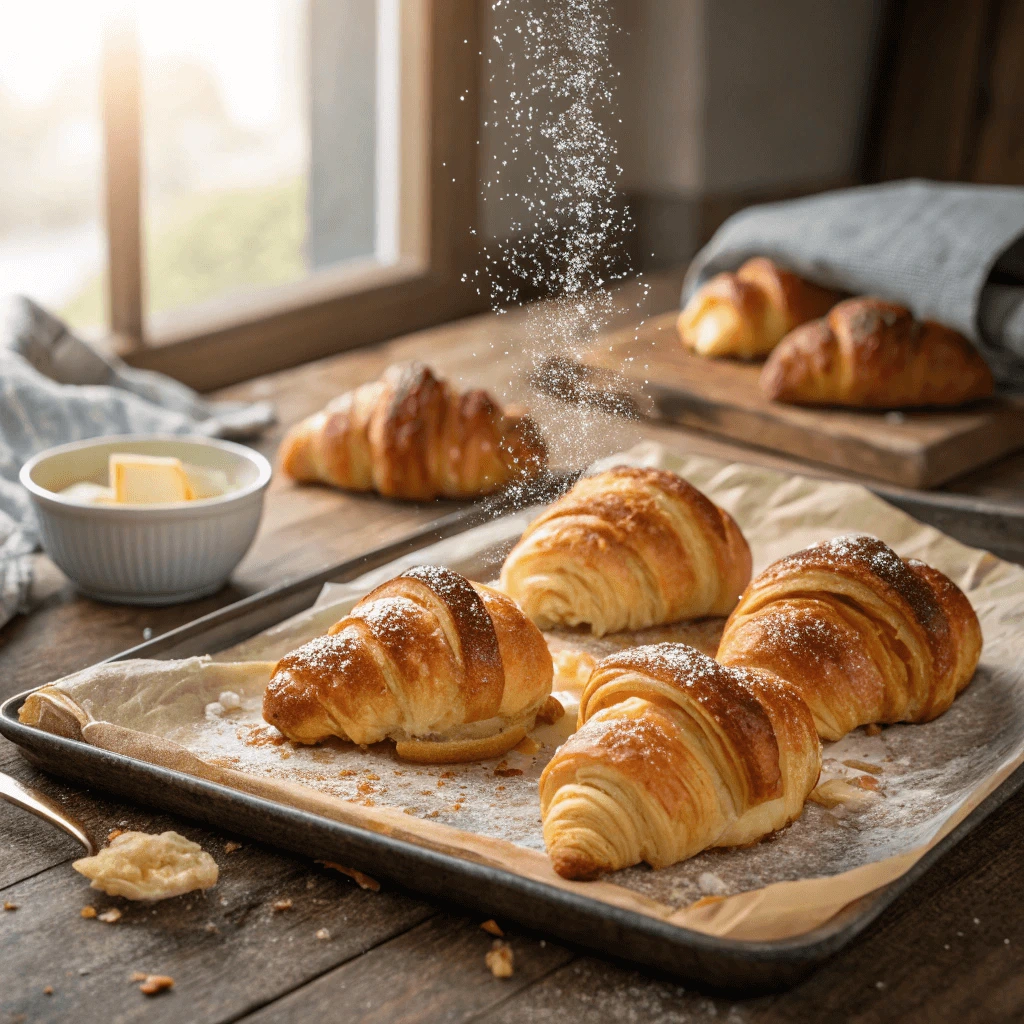
Making easy homemade mini croissants is a fun and beginner-friendly way to enjoy delicious, flaky pastries right from your kitchen. With just a few simple ingredients and clear instructions, you can create these bite-sized treats perfect for any occasion. Whether you’re serving them for breakfast, a snack, or as part of a larger spread, these mini croissants are sure to impress! 🥐✨
What Are Mini Croissants?
Origin and Popularity
Mini croissants may be small, but they have a rich history rooted in European baking traditions. Although most people associate croissants with France, their origins trace back to Austria. In the late 1600s, Austrian bakers crafted a crescent-shaped pastry called the kipferl. When Austrian princess Marie Antoinette married the future King of France, she introduced this beloved treat to the French court. Over time, French bakers refined the recipe by incorporating laminated dough and layers of butter, creating the flaky, airy croissant we recognize today.
How Mini Croissants Became Popular
As croissants became more widespread, bakers began experimenting with different shapes and sizes, eventually leading to the creation of mini croissants. Their bite-sized form made them ideal for quick breakfasts, elegant brunch platters, and easy-to-eat snacks. Many cafés and bakeries embraced mini croissants because they offer the same buttery, delicate texture as traditional croissants but in a more convenient size. Since they pair well with both sweet and savory flavors, their popularity continues to grow.
Mini Croissants Around the World
Today, mini croissants have found their place in bakeries and kitchens worldwide. In France, patisseries proudly display them alongside classic baguettes and pain au chocolat. Meanwhile, in the United States, supermarkets stock both freshly baked mini croissants and ready-to-bake frozen options, allowing home bakers to enjoy them with minimal effort. Across different cultures, people love to experiment with unique fillings, from rich chocolate and fruit preserves to creamy cheese and herbs.
Because of their versatility, convenience, and irresistible texture, mini croissants remain a beloved pastry across the globe. Whether served plain, dusted with powdered sugar, or filled with delicious ingredients, they continue to delight food lovers everywhere.
Difference from Regular Croissants
Mini croissants may look like smaller versions of traditional croissants, but they have key differences that set them apart. While both share the same flaky texture, buttery layers, and golden crust, their variations in size, preparation, and baking time influence their overall experience. Understanding these differences can help home bakers decide which type of croissant suits their needs.
1. Size and Portioning
The most obvious difference lies in their size. Regular croissants typically measure 5 to 6 inches in length, while mini croissants are much smaller, usually 2 to 3 inches long. Because of this size difference, mini croissants are often served in multiples, making them great for brunch spreads, appetizer platters, or quick snacks. Regular croissants, on the other hand, are often eaten individually as a standalone breakfast item.
2. Preparation and Dough Handling
Both mini and regular croissants use laminated dough, a technique that involves folding butter into layers of dough to create a flaky, airy texture. However, shaping mini croissants requires more precision because of their smaller size and delicate layers. The rolling and cutting process also differs slightly, as mini croissants need smaller triangles of dough to achieve their compact shape.
Additionally, mini croissants tend to proof faster than their larger counterparts. Since they contain less dough, they require less time to rise, which can be an advantage for bakers looking to speed up the process.
3. Baking Time and Texture
Due to their size, mini croissants bake much faster than regular croissants. A standard croissant typically requires 18 to 22 minutes in the oven, while mini croissants need only 10 to 15 minutes. Their smaller size allows them to develop a crispier exterior while maintaining a soft, buttery interior.
Regular croissants, in contrast, have a more layered bite, with a balance of crispness on the outside and chewiness inside. Because of their longer baking time, they often develop a deeper, more pronounced golden-brown crust.
4. Versatility in Serving and Pairing
Mini croissants work well for a variety of occasions. They make great additions to breakfast buffets, afternoon tea spreads, and party platters. Their small size also makes them ideal for pairing with sweet or savory fillings, such as chocolate, almond paste, or cheese.
Regular croissants, however, are commonly enjoyed on their own or as the base for sandwiches and breakfast meals. Their larger size makes them easier to slice and fill, which is why they are often used in croissant sandwiches or as a base for eggs Benedict.
Why They Are Perfect for Beginners
Making croissants from scratch may seem intimidating, especially for beginners. However, mini croissants offer a more approachable version of the traditional French pastry, making them a great starting point for anyone looking to dive into baking. Their small size, shorter baking time, and beginner-friendly steps make mini croissants the perfect choice for those new to the kitchen. Let’s break down why mini croissants are a great option for novice bakers.
1. Simpler Handling and Shaping
The most challenging part of making croissants is the shaping process. Mini croissants, due to their smaller size, are easier to handle compared to full-sized croissants. While larger croissants require more precise rolling and cutting to achieve the perfect crescent shape, mini croissants give you more flexibility in shaping. Their smaller size reduces the risk of overworking the dough, which could affect its texture. Additionally, the triangle shape of mini croissants is simple to cut and fold, reducing complexity for beginners.
2. Faster Preparation and Baking Time
Making croissants typically involves multiple steps, such as laminating the dough, letting it rest, and allowing it to proof. The longer proofing and baking times for regular-sized croissants can be intimidating, especially for beginners who may be unfamiliar with the techniques. Mini croissants, however, offer a faster path to croissant success. They require less time to proof, allowing beginners to get a feel for the process without worrying about waiting too long. The shorter baking time also means less chance for mistakes and more immediate gratification, which is a great confidence booster for anyone just starting out.
3. Less Waste and Easier Portioning
For beginners who may be experimenting with new techniques, it’s reassuring to know that mini croissants reduce the risk of waste. Unlike regular-sized croissants, which require precise portions of dough to ensure even baking, mini croissants are more forgiving. Because they’re smaller, you can easily adjust the dough to your needs without worrying about making perfect-sized croissants. Additionally, making mini croissants means you can practice your technique without feeling pressured to get everything perfect from the start.
4. More Room for Experimentation
One of the best things about mini croissants is their versatility. As a beginner, experimenting with flavors or fillings becomes less overwhelming when working with mini-sized portions. You can try a variety of combinations, such as chocolate, almond paste, cheese, or ham, without worrying about wasting an entire batch of dough. This hands-on experimentation helps build confidence, allowing you to perfect your technique while enjoying the creative process.
5. Enjoying the Reward of Homemade Pastries
Finally, there’s no better feeling for a beginner than enjoying a freshly baked pastry that they made from scratch. Mini croissants provide a sense of accomplishment because they offer the same flaky, buttery texture as traditional croissants, but in a more manageable size. The shorter preparation and baking time allow beginners to feel successful and motivated to continue their baking journey, giving them the confidence to try more challenging recipes in the future.
Essential Ingredients for Homemade Mini Croissants

Flour and Butter
When making mini croissants, flour and butter are two of the most essential ingredients that contribute to the flaky, buttery texture everyone loves. The right combination of these ingredients plays a crucial role in creating the perfect croissant dough. Here’s a breakdown of why flour and butter are so important and how to choose the best options for your mini croissants.
1. The Importance of Flour in Croissant Dough
Flour is the backbone of any baked good, and in croissants, it plays a key role in the dough’s structure and texture. For mini croissants, all-purpose flour is a popular choice due to its balanced protein content. This flour provides enough gluten formation to give the dough elasticity without being too dense. If you want even more delicate results, you can opt for pastry flour, which has a lower protein content, leading to a softer dough with more tender layers.
The type of flour you use will impact how well the dough rises and how flaky the layers turn out. Bread flour, which contains more gluten, could also work for a slightly chewier texture, but it might affect the flakiness. While all-purpose flour offers a good balance, experimenting with different flour types can help you find the perfect texture for your mini croissants.
2. Butter’s Role in Creating Flaky Layers
Butter is the star ingredient in mini croissants, providing the rich, flaky texture that defines these pastries. The butter used in the dough is folded into the layers to create the signature laminated dough. When selecting butter, it’s essential to choose a high-quality butter with a high-fat content, ideally around 82% fat. This butter will give you the best layers and create a crispy, golden-brown exterior.
While it’s tempting to use regular margarine or low-fat butter to cut calories, this can compromise the texture and flavor of your croissants. European-style butter is especially popular for croissants because of its higher fat content and superior flavor. When the butter is folded between layers of dough, it creates thin, crispy layers that puff up in the oven. The butter’s richness also adds depth of flavor, making every bite of the mini croissants irresistible.
3. Butter Temperature and Technique
The temperature of the butter is critical when preparing the dough. It needs to be cold but pliable, allowing it to be rolled out between the layers of dough without melting. Too soft or melted butter will result in a greasy dough, and too hard butter will make the dough difficult to roll and fold. Chilled butter is ideal because it helps to create those perfect flaky layers as the dough bakes.
In terms of technique, you will want to carefully fold the butter into the dough in a process known as lamination. During this process, layers of butter and dough are repeatedly rolled out and folded over to form hundreds of thin layers. The more you fold and roll, the flakier and airier the croissants will be.
Yeast and Proofing
Yeast and proofing are crucial steps in making mini croissants that rise perfectly and achieve that light, airy texture. The yeast helps the dough rise and expand, creating a soft interior, while proper proofing ensures that the dough develops the right amount of flavor and texture. Let’s explore how yeast and proofing work together to make mini croissants so delicious.
1. The Role of Yeast in Croissant Dough
Yeast is a living organism that plays a vital role in the leavening process of croissant dough. The yeast ferments the sugars in the dough, producing carbon dioxide gas, which causes the dough to rise and expand. In mini croissants, yeast provides the necessary air pockets inside the dough, giving it that fluffy texture. Yeast also contributes to the dough’s flavor development by adding a slight tanginess, which balances the richness of the butter.
When using yeast for croissants, it’s essential to choose the right type of yeast. There are two primary options: active dry yeast and instant yeast. Active dry yeast needs to be dissolved in warm water before being added to the dough, while instant yeast can be mixed directly into the dry ingredients. Both types of yeast work well for mini croissants, but instant yeast tends to be more convenient as it doesn’t require activation.
The freshness of the yeast is also important—expired yeast can fail to activate properly, leading to underwhelming results. Always check the expiration date and store yeast in a cool, dry place to maintain its potency.
2. Proofing: The Secret to Light, Fluffy Croissants
Proofing is the process of allowing the dough to rest and rise after it has been mixed and shaped. This step is critical for achieving the perfect texture in mini croissants. During proofing, the yeast continues to ferment the dough, causing it to rise and become lighter and airier.
There are two key stages of proofing in croissant dough: bulk fermentation and final proofing.
- Bulk fermentation occurs after the dough has been mixed and kneaded. The dough should rest in a warm, draft-free environment for about an hour to allow it to double in size. This process allows the yeast to do its work, giving the dough time to develop flavor and rise.
- Final proofing happens after the dough has been shaped into mini croissants. Once you’ve cut and rolled the dough, it’s essential to let it rest again for about 30 minutes to an hour. This second proofing step helps the mini croissants rise to their full potential before baking. It also ensures that the dough doesn’t collapse during baking, leading to the desired flakiness and height.
3. Temperature and Environment for Proofing
The temperature at which you proof your dough significantly impacts how well it rises. Ideal proofing temperatures are between 75°F and 80°F (24°C to 27°C). If the environment is too hot, the yeast can work too quickly, potentially over-proofing the dough. On the other hand, a cold environment will slow down yeast activity, leading to under-proofing.
To maintain the perfect proofing temperature, you can place the dough in a warm, draft-free area or use an oven with a light turned on to create a warm environment. Alternatively, some people use a proofing box, which is designed to regulate temperature for optimal yeast growth.
During proofing, it’s important not to rush the process. Over-proofing can cause the dough to become too airy, while under-proofing will result in dense mini croissants. You’ll know the dough is properly proofed when it has doubled in size, and a gentle press with your finger leaves an impression without the dough springing back.
Egg Wash and Baking Tips
Egg wash and baking techniques play an essential role in achieving the perfect golden, shiny, and crispy mini croissants. The egg wash is not only responsible for the beautiful color but also contributes to the croissants’ texture, creating a lovely crisp exterior. Along with the egg wash, the baking process itself requires some attention to detail to ensure that the mini croissants bake evenly and puff up perfectly. Let’s dive into the key aspects of egg wash application and some helpful baking tips.
1. The Importance of Egg Wash
An egg wash is a mixture of beaten eggs, sometimes combined with a bit of water or milk, that you brush over the dough before baking. This simple step significantly enhances the appearance and texture of your mini croissants. The egg wash creates a golden-brown finish, making them visually appealing, while the proteins in the egg help form a crispy outer layer.
There are a few variations of egg wash you can try, depending on the finish you desire for your croissants. Whole egg provides a deep, rich color and a glossy finish. For a slightly lighter finish, you can use just egg yolk, which adds richness without being too shiny. If you prefer a softer, less shiny look, you can mix egg whites with water or milk to create a matte finish.
Applying the egg wash properly is also important. Make sure to brush it on gently with a pastry brush, covering the croissants evenly. Be careful not to apply too much wash, as it can pool and make the dough soggy. A light coat will create the perfect finish.
2. Baking Tips for Perfect Mini Croissants
Once the egg wash is applied, it’s time to move on to the baking process. Baking mini croissants is an art that requires the right temperature, time, and techniques to ensure they are crisp on the outside and fluffy on the inside. Here are some essential baking tips for your mini croissants:
- Preheat the oven: Always preheat your oven to the right temperature, typically between 375°F and 400°F (190°C – 200°C). The oven should be hot before placing your croissants inside to ensure they puff up and bake evenly.
- Baking sheet placement: Place your croissants on a baking sheet lined with parchment paper. Parchment paper helps prevent the croissants from sticking to the sheet, and it provides even heat distribution. Leave enough space between each croissant to allow for proper puffing and expansion during baking.
- Use a stone or baking steel: If you want to get a really crispy base for your mini croissants, consider using a baking stone or baking steel. These tools help distribute heat more evenly and can help you achieve a more uniform bake. Preheat the stone or steel in the oven to get the best results.
- Monitor baking time: Mini croissants usually bake in about 15 to 20 minutes. Keep an eye on them as they bake and check for the classic golden-brown color. If they are not golden enough, give them a few extra minutes in the oven, but be careful not to burn them. The time may vary slightly depending on the size of your croissants, so watch them closely towards the end of the bake.
3. Adjusting the Oven for Optimal Results
Different ovens can have hot spots, so it’s important to rotate the baking sheet halfway through the baking process for even browning. If you notice that the tops are browning too quickly while the bottoms are not yet done, you can move the baking sheet to a lower rack for the remainder of the bake. Conversely, if the bottoms are over-browning, shift the sheet to a higher rack.
Additionally, if you’re baking multiple batches of mini croissants, let the oven return to the correct temperature between batches. Opening the oven door can cause the temperature to drop, which may affect the rise and texture of your croissants. Allow a minute or two for the oven to recover its heat before you place the next batch inside.
Step-by-Step Guide to Making Mini Croissants
Preparing the Dough
The process of preparing the dough for mini croissants is an essential step that sets the foundation for creating flaky, buttery pastries. Proper preparation of the dough ensures that it has the right texture, flavor, and puff. Let’s break down the steps involved in making the perfect mini croissant dough and how to get the best results.
1. Mixing the Dough Ingredients
The first step in preparing the dough is combining all the essential ingredients. To make mini croissants, you will need flour, yeast, salt, sugar, and water. The flour provides structure, while the yeast helps the dough rise, creating the light texture in the finished croissants. Salt adds flavor, and sugar helps activate the yeast while also balancing the richness of the butter.
Start by combining the dry ingredients, including the flour, sugar, and salt, in a large mixing bowl. Then, activate the yeast in a separate bowl by mixing it with warm water. Allow the yeast to dissolve and start bubbling, which indicates that it’s active. Once the yeast is ready, pour it into the dry ingredients and mix them together until a dough starts to form.
At this stage, you may find the dough a bit sticky. That’s completely normal! If it’s too wet, add a small amount of flour to make it easier to handle. Use a spoon or your hands to mix the dough until it forms a rough ball.
2. Kneading the Dough
Once the ingredients are mixed, you’ll need to knead the dough. Kneading develops the gluten, which is what gives the dough its elasticity and helps create layers in the finished croissants. Knead the dough for about 8 to 10 minutes on a lightly floured surface. Press the dough with your palms, fold it over, and turn it. Repeat the process until the dough becomes smooth and elastic.
During kneading, you’ll want to be careful not to add too much flour, as this can result in a dense croissant. The dough should be slightly tacky but not overly sticky. If the dough feels too sticky, add just a little more flour until it comes together. Kneading is essential for creating the layers, so make sure you knead for the recommended time.
3. Resting the Dough and Chilling
After kneading, it’s time to let the dough rest. Resting is important because it gives the gluten a chance to relax, making the dough easier to roll out later. Place the dough in a lightly oiled bowl and cover it with a damp cloth or plastic wrap. Allow the dough to rest for about 1 to 1.5 hours, or until it has doubled in size. You can let it rise in a warm, draft-free area to speed up the process.
Once the dough has risen, it’s time to chill it. This step is key for creating the flaky layers that are characteristic of croissants. Wrap the dough in plastic wrap and place it in the fridge for about 30 minutes to 1 hour. Chilling the dough helps solidify the butter you will be incorporating later, which leads to a flakier, more layered texture when baked.
4. Preparing the Butter Block
While the dough is chilling, prepare the butter block. The butter is essential for creating the signature layers in your mini croissants. To prepare the butter block, take cold unsalted butter and place it between two sheets of parchment paper. Use a rolling pin to pound and roll the butter into a thin, rectangular sheet, about 1/4 inch thick. You want the butter to be pliable but not too soft, so it holds its shape when incorporated into the dough.
Once the butter block is ready, remove the dough from the refrigerator and get ready to laminate it with the butter. The process of laminating the dough with butter is what creates the distinct layers in a croissant. This is the step where patience is key, as you’ll need to fold and roll the dough several times to create the perfect layers.
5. Final Preparations for Rolling
After chilling, you’ll be ready to roll out your dough. On a lightly floured surface, roll the dough into a large rectangle about 1/4 inch thick. Place the prepared butter block in the center of the dough and fold the dough over the butter to seal it inside. This is the beginning of the lamination process, where you’ll need to roll the dough out and fold it multiple times to create layers of butter and dough.
The dough should then be refrigerated between each fold to keep the butter from melting. This process can be repeated 2 to 3 times to ensure that you have the perfect flaky layers.
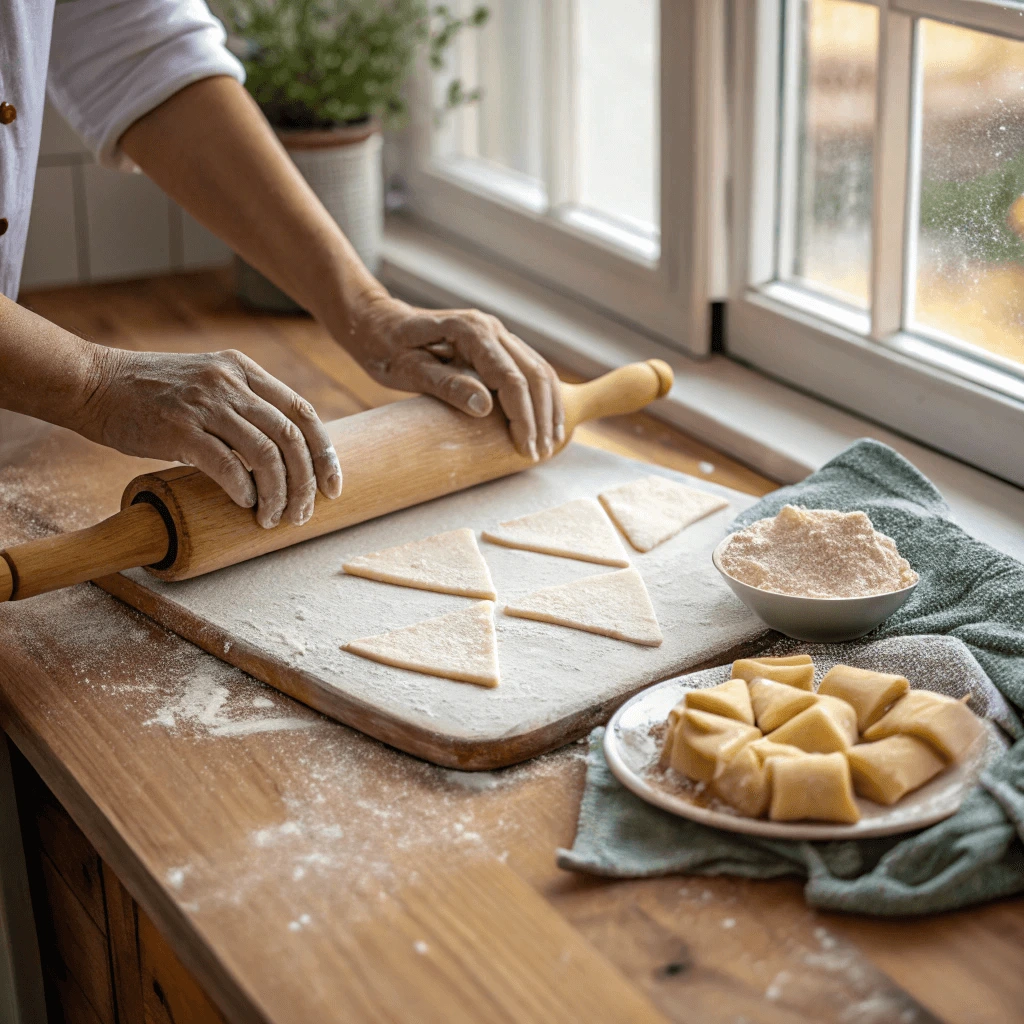
Rolling and Shaping
Rolling and shaping are two of the most crucial steps in creating perfect mini croissants. This is where the dough transforms from a simple ball into the flaky, buttery layers that make croissants so irresistible. Let’s break down the process to ensure you achieve the best results.
1. Rolling the Dough
After your dough has rested and chilled, it’s time to roll it out into a large, even rectangle. Start by flouring your work surface lightly, so the dough doesn’t stick. Begin rolling the dough from the center outward. Use gentle, even pressure to avoid compressing the dough too much. You want to maintain the flakiness that will eventually turn into those signature croissant layers.
As you roll, be sure to keep an eye on the thickness of the dough. It should be about 1/4 inch thick. Too thick, and your mini croissants might turn out too dense. Too thin, and the layers may not form properly. If you notice that the dough is sticking to the rolling pin, dust it lightly with flour or place it in the fridge for a few minutes to firm up before continuing.
Make sure your dough is even throughout, especially when you roll it into a rectangle. This will help ensure that all your mini croissants bake uniformly, with even layers.
2. Shaping the Croissants
Now that your dough is rolled out, the next step is to shape the croissants into their familiar form. Traditionally, croissants are cut into triangles, which are then rolled from the wide end to the point, forming a crescent shape. However, since you’re making mini croissants, the process will be slightly different.
Start by cutting the dough into smaller, rectangular or triangular pieces. You can make these pieces as small or large as you prefer, but since you’re aiming for mini croissants, aim for approximately 2 to 3 inches wide and 3 to 4 inches long. Use a sharp knife or a pizza cutter for clean cuts.
Once you have your pieces of dough, it’s time to shape them. Place each triangle on your work surface with the wide edge facing you. Gently stretch and roll the dough toward the point, ensuring that the layers stay intact as you roll. The tighter you roll, the more compact your mini croissants will be, which is perfect for achieving a nice, flaky bite-sized result.
As you roll each croissant, place it on a baking sheet lined with parchment paper. Space them a bit apart, as they will expand while baking. You can slightly bend the croissants into a crescent shape if desired, though it’s not necessary to create the traditional crescent moon shape for mini croissants. What matters most is keeping the layers intact and making sure each croissant is tightly rolled.
3. Proofing the Croissants
Once your mini croissants are shaped, the next step is to proof them. Proofing refers to allowing the dough to rest again before baking so that it can rise and develop its structure. This is where the magic happens, as the dough puffs up and forms its light, airy texture.
Place the shaped mini croissants in a warm, draft-free environment, ideally at around 75°F (24°C). Cover them loosely with a kitchen towel or plastic wrap to prevent them from drying out. Let them proof for 1 to 1.5 hours, or until they have doubled in size. You’ll notice that the dough becomes softer and slightly puffy as it rises.
During the proofing process, the yeast becomes more active, and the dough’s texture improves, creating an airy, tender pastry. Don’t rush this process—proofing is crucial to getting a light and fluffy texture in your mini croissants.
4. Final Adjustments Before Baking
Once your mini croissants have proofed and risen, it’s time for a final touch before they go into the oven. One of the most important steps at this stage is to brush the croissants with an egg wash. The egg wash, made from a mixture of egg yolk and milk or water, gives your mini croissants a beautiful, golden, glossy finish as they bake. Simply whisk the egg wash ingredients together and gently brush it over the tops of each croissant using a pastry brush.
Before baking, check the croissants one last time for any areas that need to be adjusted. If you prefer a more compact croissant, you can gently press them down a bit before baking. Otherwise, they should be ready to go into the oven.
Baking to Perfection
Baking your mini croissants to perfection is the final, most rewarding step in the process. This is where all your hard work in preparing the dough, shaping, and proofing pays off. Achieving that ideal golden-brown, flaky, and crispy exterior while maintaining a soft, airy interior requires attention to detail and the right baking techniques. Here’s how to ensure your mini croissants come out of the oven perfectly every time.
1. Preheating the Oven
Before you even begin baking, it’s crucial to ensure your oven is preheated to the right temperature. Preheating allows the mini croissants to rise properly as soon as they hit the heat, creating a crisp outer layer while the inside remains light and fluffy. Set your oven to 375°F (190°C) and allow it to fully heat before placing the croissants inside.
The preheating process is essential for even baking. If your oven isn’t hot enough, your mini croissants might not rise properly, and they could turn out dense or soggy. Additionally, remember to use the middle rack for baking. The middle rack provides even heat distribution, preventing the bottoms from burning or the tops from cooking too quickly while the rest of the croissant remains raw.
2. Bake Time and Monitoring
Once the oven is ready, carefully place your mini croissants on the middle rack. Bake them for about 15 to 20 minutes, or until they achieve a deep golden-brown color. The exact bake time may vary slightly depending on the size of your mini croissants and your oven, so keep an eye on them during the last few minutes.
During the baking process, the butter in the croissant dough will begin to melt and create steam, which contributes to the flakiness of the layers. The croissants will puff up, and you’ll notice the outer layer becoming crisp and golden. Avoid opening the oven door too often, as this can release heat and affect the rise of the croissants. It’s best to wait until they are almost finished baking before checking.
3. Checking for Doneness
While the visual cues of a golden-brown, crisp exterior are important, it’s also helpful to check if your mini croissants are done by tapping the bottom of one gently. If it sounds hollow, then your croissant is perfectly baked. This sound indicates that the layers inside are light and airy, with the steam and butter creating the necessary structure.
If you’re unsure, it’s always safer to bake the croissants a few extra minutes to avoid underbaking. However, avoid overbaking them, as this can result in a dry, tough texture. Once done, remove the mini croissants from the oven and let them cool slightly on a wire rack to maintain their crispness.
4. Cooling and Serving
Cooling your mini croissants properly is just as important as the baking process. Allow them to rest on a wire rack for a few minutes after you take them out of the oven. This will prevent moisture from building up at the bottom, which can make the croissants soggy.
Once cooled slightly, your mini croissants will have the perfect balance of crispy outer layers and a soft, buttery interior. For the best texture, serve them warm, ideally within an hour or so of baking. However, they will still be delicious even after they cool down.
5. Tips for Achieving Perfect Croissants Every Time
- Oven Temperature: Consistently check the temperature of your oven with an oven thermometer to ensure accuracy. This is particularly important when working with delicate pastries like mini croissants, where slight variations in heat can affect the outcome.
- Butter Temperature: Ensure your butter is chilled but not too hard when incorporating it into the dough. Butter that is too warm can result in greasy croissants, while butter that is too cold may not produce the desired flaky layers.
- Egg Wash: Applying a light egg wash (made from egg and water or milk) to the surface of the mini croissants before baking will give them that perfect glossy, golden finish. Brush them gently to avoid deflating the dough.
- Don’t Overcrowd: Give the mini croissants enough space to expand during baking. Overcrowding the baking sheet can result in uneven cooking and prevent the croissants from fully expanding.
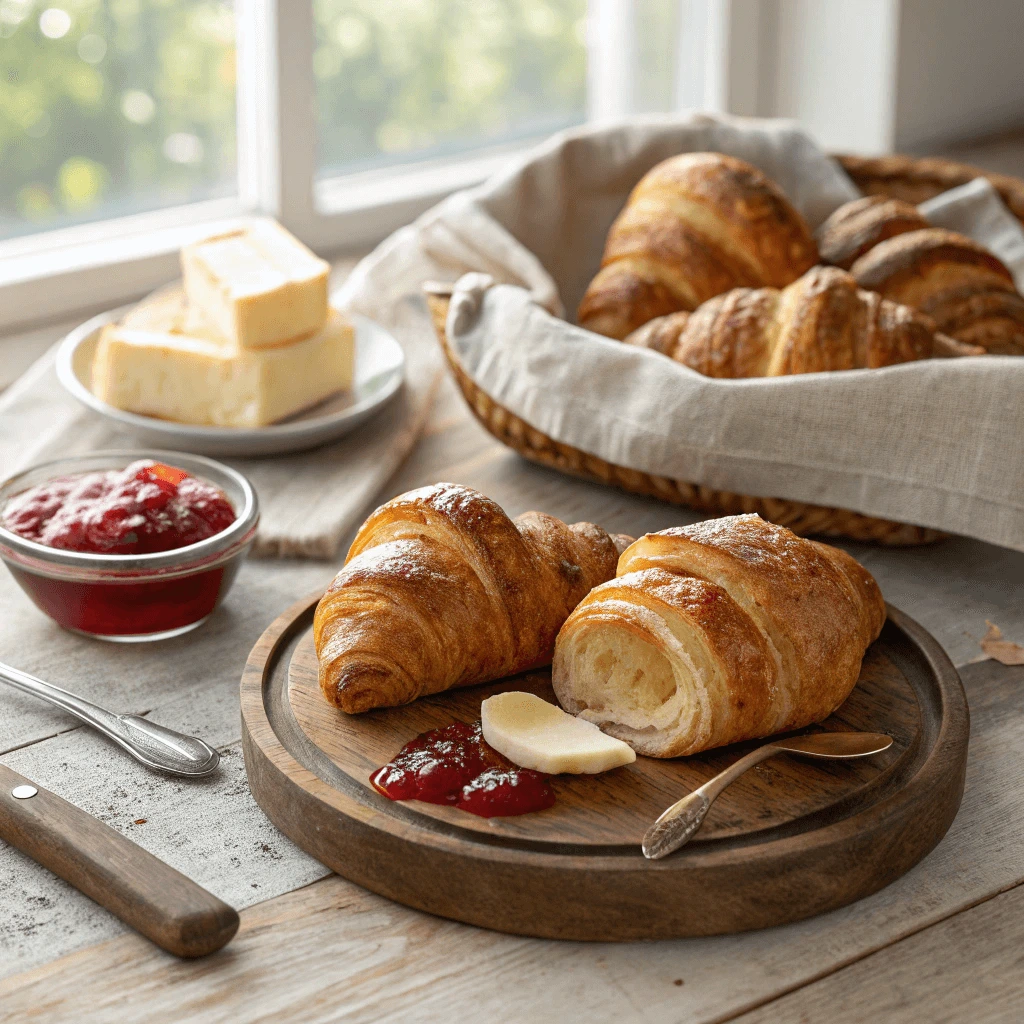
Delicious Fillings and Variations
Sweet Fillings
One of the most delightful aspects of mini croissants is their versatility when it comes to fillings. While classic croissants are often enjoyed plain or with butter, mini croissants offer a perfect opportunity to experiment with a variety of sweet fillings. These fillings can elevate the croissants to a whole new level, adding rich flavors and exciting textures. Whether you’re craving something fruity, chocolatey, or nutty, there are plenty of sweet filling options to satisfy your taste buds.
1. Chocolate Filling
Chocolate is a classic and beloved option for filling mini croissants. You can use dark, milk, or white chocolate, depending on your preference. A great way to create a gooey, indulgent filling is by using chocolate chips or chocolate spread. For a more decadent version, try incorporating a chocolate ganache filling. To make chocolate ganache, simply heat heavy cream and pour it over chopped chocolate. Stir until smooth and allow it to cool slightly before using it as a filling.
When using chocolate chips, place a small amount in the center of each mini croissant before folding the dough. The heat from the oven will melt the chocolate, creating a gooey and delicious center that’s hard to resist. If you’re using chocolate spread, spread a thin layer on the dough before rolling it up.
2. Fruit Preserves or Jam
For a fruitier filling, try adding fruit preserves or jam to your mini croissants. The sweetness and tanginess of fruit preserves add a burst of flavor that pairs wonderfully with the buttery, flaky pastry. Popular options include apricot, strawberry, and raspberry preserves, though you can experiment with any fruit preserve you like.
Spread a thin layer of your favorite jam or preserve onto the dough before rolling the croissant, ensuring the filling doesn’t spill out during baking. Be mindful not to overfill, as fruit preserves tend to melt and may leak out while baking. A small spoonful is all you need for a delightful fruit-filled treat.
3. Almond Paste or Marzipan
Almond paste and marzipan are wonderful sweet fillings that offer a unique, nutty sweetness. Almond paste is made from ground almonds, sugar, and a little bit of corn syrup. Marzipan, while similar, often contains a higher sugar content and is more pliable. Both fillings create a rich, sweet flavor that pairs well with the buttery croissant dough.
To use almond paste or marzipan, roll out the dough and spread a thin layer of almond paste in the center of each mini croissant. You can also shape marzipan into small logs and place them inside the croissants before rolling them up. This results in a sweet, nutty center that complements the delicate flakiness of the pastry.
4. Cinnamon Sugar Filling
If you enjoy the warm, comforting flavors of cinnamon, a cinnamon sugar filling is a perfect option for mini croissants. The combination of cinnamon and sugar creates a sweet, aromatic filling that is reminiscent of cinnamon rolls. To make cinnamon sugar filling, mix cinnamon and granulated sugar together and sprinkle it over the dough before rolling it up.
For an even more indulgent version, add a touch of butter on top of the dough before sprinkling the cinnamon sugar mixture. The butter will help the sugar caramelize during baking, creating a crunchy, sweet crust on the outside of the mini croissants.
5. Cream Cheese Filling
A creamy, slightly tangy filling made from cream cheese can be a wonderful choice for those looking for something a bit different. You can enhance the cream cheese with a bit of vanilla extract or even lemon zest for an added layer of flavor. For a simple cream cheese filling, mix softened cream cheese with powdered sugar until smooth and spreadable.
Place a small dollop of the cream cheese mixture in the center of each mini croissant before rolling them up. When baked, the cream cheese filling will become creamy and rich, making every bite incredibly satisfying.
6. Nutella or Hazelnut Spread
For chocolate and nut lovers, Nutella or other hazelnut spreads can be an irresistible filling. The creamy, chocolatey spread combined with the subtle nuttiness creates a rich and indulgent flavor that pairs perfectly with the flaky mini croissants. Spread a generous amount of Nutella onto the dough, and for added texture, you can even sprinkle some chopped hazelnuts on top of the spread before rolling up the croissants.
7. Lemon Curd
For a zesty and refreshing filling, lemon curd is a fantastic option. The smooth, tangy curd adds a burst of citrus flavor that contrasts beautifully with the rich, buttery pastry. To create a lemon curd filling, simply spoon a small amount of lemon curd into the center of each mini croissant and roll it up carefully.
Lemon curd can be homemade or store-bought, and its tanginess balances out the sweetness of the pastry, offering a sophisticated twist on traditional sweet croissant fillings.
8. Coconut Cream
Coconut lovers will adore a coconut cream filling. This tropical-inspired filling is made with coconut milk or cream, shredded unsweetened coconut, and a touch of sugar. To make the filling, combine these ingredients and cook them down to create a thick, creamy mixture. Spoon a little of the coconut cream into the center of each mini croissant before rolling.
The result is a flaky, coconut-infused croissant with a creamy filling that’s perfect for those looking for a tropical twist.
Savory Options
Mini croissants aren’t just for sweet fillings—they make an excellent base for savory combinations too! The light, flaky texture of croissants pairs beautifully with a wide range of savory ingredients, creating bite-sized snacks or meals that are perfect for breakfast, lunch, or dinner. Here are some creative savory filling ideas that exclude ham, bacon, or pork but still deliver plenty of flavor.
1. Spinach and Feta
For a classic and healthy option, try a spinach and feta filling. The earthy, slightly bitter flavor of fresh spinach complements the creamy, tangy taste of feta cheese. This vegetarian filling is light yet flavorful, making it a great choice for those looking to enjoy a satisfying bite without too much heaviness.
To prepare, simply sauté fresh spinach with a bit of olive oil until wilted and mix with crumbled feta. If you like, add a pinch of nutmeg or garlic powder for extra flavor. Then, spoon the mixture into the center of each mini croissant before rolling them up and baking. The spinach and feta filling will melt together, creating a perfectly savory bite in every croissant.
2. Mushroom and Swiss
For mushroom lovers, a mushroom and Swiss cheese filling is a delicious and savory option. Mushrooms bring a deep, earthy flavor that pairs wonderfully with the nutty, mild taste of Swiss cheese. This filling is perfect for a vegetarian croissant or as a hearty snack.
To make the filling, sauté a mixture of sliced mushrooms in olive oil or butter until golden and tender. Add a touch of garlic and thyme for extra flavor. Once the mushrooms are cooked, place a spoonful of the mixture in the center of each croissant and top with Swiss cheese. As the croissants bake, the cheese will melt, infusing the mushrooms with a rich, savory taste.
3. Pesto and Goat Cheese
For an herb-packed filling, try pesto and goat cheese. The vibrant flavors of basil pesto combine wonderfully with the creamy tanginess of goat cheese. This combination makes for a savory mini croissant that’s aromatic and full of flavor.
Simply spread a spoonful of pesto inside the croissant and top with crumbled goat cheese. You can also add a few sun-dried tomatoes for extra sweetness and richness. These croissants bake up golden and flavorful, with the pesto’s herby, garlicky punch and the goat cheese’s tangy richness.
4. Roasted Vegetables and Mozzarella
For a hearty yet light filling, roasted vegetables and mozzarella make for a flavorful combination. Roasting vegetables like zucchini, bell peppers, and eggplant brings out their natural sweetness, which pairs beautifully with the creamy, melty texture of mozzarella cheese.
To prepare this filling, roast your choice of vegetables until tender, then chop them into small pieces. Combine them with torn mozzarella or fresh mozzarella pearls before spooning the mixture into each mini croissant. When baked, the mozzarella will melt, creating a gooey, savory center inside the croissant.
5. Chickpea and Tahini
For a plant-based option that’s packed with flavor, try a chickpea and tahini filling. Chickpeas bring a nutty, creamy base, while tahini adds a rich, sesame-flavored depth. This filling is great for a vegan alternative to traditional savory croissants.
To prepare, mash cooked chickpeas and mix them with a tablespoon of tahini, a squeeze of lemon juice, and some ground cumin or paprika for extra seasoning. Once the mixture is ready, spoon it into the center of each mini croissant before rolling them up and baking. The tahini adds a velvety richness, while the chickpeas provide a hearty, satisfying texture.
6. Caramelized Onion and Brie
For a rich and indulgent filling, caramelized onion and Brie cheese are a match made in savory croissant heaven. The sweet, soft texture of caramelized onions balances the creamy, buttery taste of Brie cheese, making each mini croissant a luxurious treat.
To make the filling, caramelize sliced onions in butter or olive oil until golden and sweet. Place a spoonful of the onions in each croissant and top with slices of Brie. When baked, the Brie will melt into the croissant, adding a rich, creamy layer to the sweetness of the onions. This savory filling is perfect for more refined tastes or as an appetizer for a special occasion.
7. Roasted Red Pepper and Hummus
For a light, Mediterranean-inspired filling, try roasted red peppers paired with hummus. The sweetness of the roasted red peppers blends perfectly with the creamy, slightly tangy taste of hummus, creating a savory filling that is both satisfying and full of flavor.
To make this filling, slice roasted red peppers and spread a thin layer of hummus inside each mini croissant. You can add a sprinkle of fresh parsley or oregano for extra flavor. These croissants bake up to be light, flavorful, and perfect for a vegan or vegetarian snack.
Dairy-Free/Vegan Alternatives
Mini croissants are a delicious treat, and for those following a dairy-free or vegan lifestyle, there are plenty of ways to enjoy them without compromising on taste or texture. By swapping out certain ingredients for plant-based alternatives, you can make your mini croissants just as flaky, buttery, and delicious as the traditional ones. Below, we’ll explore some fantastic dairy-free and vegan options for key ingredients, allowing everyone to enjoy these flaky delights.
1. Plant-Based Butter Alternatives
One of the key ingredients in croissants is butter, which gives them their rich, flaky texture. Fortunately, there are several plant-based butter alternatives that work beautifully in vegan and dairy-free recipes. The best substitutes for butter in mini croissants are:
- Vegan Butter: This is the most straightforward substitute for dairy butter. Choose a high-quality vegan butter that has a good fat content. It mimics the texture and flavor of regular butter perfectly, giving your croissants the right amount of richness and flakiness.
- Coconut Oil: Another great alternative is coconut oil. It gives the croissants a slightly different flavor but works just as well in the dough. Choose unrefined coconut oil for a subtle coconut flavor or refined for a more neutral taste.
- Olive Oil: For a lighter, more savory touch, olive oil can also replace butter. It won’t produce quite the same flaky texture, but it still makes a delicious dough with a slightly different flavor profile, perfect for savory croissant fillings.
2. Dairy-Free Milk for the Dough
Traditional croissant recipes often use milk to add moisture and tenderness to the dough. To make your mini croissants dairy-free or vegan, you can swap regular milk with several plant-based options. Here are some great alternatives:
- Almond Milk: This is a popular choice for its light, slightly nutty flavor. Almond milk works well in most croissant doughs without altering the overall texture too much.
- Oat Milk: Known for its creamy consistency, oat milk is another excellent choice. It adds a subtle sweetness and works well for ensuring the dough stays soft and pliable.
- Soy Milk: Soy milk is rich in protein and mimics the texture of regular cow’s milk. It’s a great option for dairy-free baking, helping the dough come together nicely.
- Coconut Milk: If you want to give your croissants a slightly tropical twist, coconut milk is a great option. It’s rich and creamy, adding moisture to the dough while infusing a light coconut flavor.
3. Vegan Egg Wash Alternatives
The golden, glossy finish on traditional croissants often comes from brushing the dough with an egg wash before baking. For vegan and dairy-free options, there are several egg wash substitutes that provide the same beautiful finish and enhance the croissants’ appearance:
- Plant-Based Milk: A simple and effective egg wash substitute is plant-based milk like almond, soy, or oat milk. Brush it on the croissants before baking to give them a nice shine. You can also add a little sugar to the milk for a touch of sweetness and a richer color.
- Aquafaba: Aquafaba, the liquid from a can of chickpeas, is a fantastic vegan alternative to egg wash. Whisk it until frothy and use it in the same way you would use egg wash. Aquafaba creates a glossy, golden finish on your croissants, and its flavor is neutral enough not to interfere with the overall taste.
- Maple Syrup: For a slightly sweet and shiny finish, maple syrup can be brushed onto the croissants. It adds a hint of sweetness, which pairs well with certain fillings, like fruit or nut butters.
- Vegan Yogurt: For a more textured, slightly tangy option, vegan yogurt works wonders as an egg wash alternative. It gives the croissants a slightly thicker gloss and can add a hint of flavor to the final baked product.
4. Vegan Fillings and Customization
In addition to substituting the basic ingredients, you can also create delicious vegan fillings for your mini croissants. Here are some ideas to keep them exciting and flavorful:
- Fruit and Nut Butters: For a sweet treat, consider using fruit preserves, peanut butter, or almond butter as a filling. You can also make your own fruit compotes to spread inside the croissant dough, which will add a burst of flavor once baked.
- Vegan Chocolate: If you love chocolate-filled croissants, try using dairy-free chocolate or cocoa paste. Melted dairy-free chocolate chips work well as a gooey center, making these croissants a chocolate lover’s dream.
- Vegan Cheese: For savory croissants, there are several types of vegan cheese available. Look for options like vegan mozzarella or cheddar to fill your croissants with a cheesy, melty filling that’s just as satisfying as the original.
- Hummus and Roasted Veggies: For a heartier, savory option, you can fill your mini croissants with a mix of hummus and roasted vegetables like bell peppers, zucchini, or eggplant. This combination is both satisfying and nutritious, and it’s perfect for lunch or a snack.
5. Gluten-Free Options for Vegan Mini Croissants
If you need to make your mini croissants both vegan and gluten-free, there are several gluten-free flour blends available that work well in croissant dough. Be sure to use a blend that is designed for baking to ensure you achieve the right texture. Look for ones that contain rice flour, potato starch, and tapioca flour, which tend to provide a more flexible dough.
Another option is almond flour for a nutty, dense texture. However, almond flour alone will not give you the same light, airy flakiness as a gluten-free blend, so it’s best to experiment and find the right combination for your recipe.
Storing and Serving Mini Croissants
How to Store Mini Croissants
Proper storage of mini croissants ensures they stay fresh and delicious for as long as possible. Since croissants are best enjoyed fresh out of the oven, knowing how to store them properly will help maintain their taste and texture over time. Here’s a guide on how to store your mini croissants, whether you plan to keep them for a few hours or several days.
1. Storing Fresh Croissants
If you’ve just baked your mini croissants and you want to store them for later use, it’s essential to let them cool down to room temperature. While it may be tempting to store them immediately after baking, allowing them to cool will prevent condensation from forming inside the container, which can make the croissants soggy.
Once cooled:
- Store at Room Temperature: For short-term storage, place your mini croissants in an airtight container or a resealable plastic bag. This will help lock in moisture while preventing them from getting stale. Keep the container in a cool, dry place, such as your kitchen counter, and they should stay fresh for up to two days.
- Avoid Storing in the Refrigerator: While it’s common to store baked goods in the fridge, croissants are best kept at room temperature. The refrigerator’s humidity can cause the pastry to lose its flaky texture and become dry.
2. Storing Croissants for Longer Periods
If you want to store mini croissants for a longer period, freezing them is the best option. Freezing allows you to preserve their freshness and texture until you’re ready to enjoy them.
- Freeze Before Baking: If you’ve made the dough and shaped the mini croissants but haven’t baked them yet, you can freeze them before baking. After shaping the dough, place the croissants on a baking sheet and freeze them for about 1-2 hours. Once they’re frozen solid, transfer them to a freezer-safe container or zip-top bag. When you’re ready to bake, simply remove the frozen croissants, let them thaw for 20-30 minutes, and then bake them as you normally would. This method ensures the croissants retain their flaky, buttery texture.
- Freeze After Baking: If you’ve already baked your mini croissants and want to store them, freezing them is still a great option. Allow the croissants to cool completely before placing them in a freezer-safe container or bag. It’s a good idea to wrap each croissant individually in plastic wrap to prevent freezer burn. When you’re ready to enjoy them, simply reheat them in the oven at 350°F (175°C) for 5-10 minutes until they’re warm and crispy again.
3. Reheating Tips
Reheating mini croissants properly is key to restoring their fresh, crispy texture. Here’s how you can reheat them based on whether they’ve been stored at room temperature, in the fridge, or in the freezer:
- Room Temperature Croissants: If your croissants have been stored at room temperature and are only a day or two old, you can simply enjoy them as is. However, if they’ve become a little stale, pop them in a preheated oven at 350°F (175°C) for 5 minutes to revive their flakiness.
- Frozen Croissants: When reheating frozen mini croissants, it’s best to let them thaw for about 10-15 minutes before baking them at 350°F (175°C) for 5-10 minutes. If you’re in a hurry, you can reheat them directly from the freezer, but it may take a bit longer (around 10-15 minutes) for them to become warm and crispy again.
- Reheating in the Microwave: While it’s possible to use the microwave to reheat mini croissants, it’s not ideal for restoring the flaky texture. If you choose this method, place the croissant on a microwave-safe plate and cover it with a damp paper towel to prevent it from becoming too dry. Heat in 10-second intervals until warm. Keep in mind that this method might make the croissant soft rather than crispy.
4. Storing Sweet and Savory Mini Croissants
If your mini croissants are filled with sweet or savory fillings, such as chocolate, fruit, or cheese, it’s important to store them carefully to maintain their quality.
- Sweet Fillings: For croissants with sweet fillings, such as chocolate or fruit preserves, store them in an airtight container at room temperature for up to two days. The fillings can sometimes spoil more quickly than the dough itself, so it’s best to consume them sooner rather than later.
- Savory Fillings: Savory mini croissants with fillings like cheese or vegetables should also be stored in an airtight container in the fridge, especially if they contain perishable ingredients. Be sure to consume them within 2-3 days for optimal freshness.
5. Storing Vegan and Dairy-Free Croissants
If your mini croissants are made with dairy-free or vegan ingredients, the storage process remains the same. However, be mindful that plant-based fillings, especially those with dairy-free cheeses or nut butters, may have different shelf lives. For these croissants, it’s best to store them in an airtight container and consume them within 2-3 days if they contain fresh fillings.
Best Ways to Reheat Mini Croissants
Reheating mini croissants can help restore their flakiness and warmth. Here’s how to do it best:
1. Room Temperature Croissants
- Oven: Preheat to 350°F (175°C), place croissants on a baking sheet, and bake for 5 minutes to re-crisp.
- Toaster Oven: Preheat to 350°F (175°C) and heat for 3-5 minutes.
2. Frozen Croissants
- From Frozen (Oven): Preheat to 350°F (175°C) and bake for 10-15 minutes.
- Thawed Croissants: Let them thaw for 20-30 minutes, then bake at 350°F (175°C) for 5-7 minutes.
3. Quick Microwave Reheat
- Microwave: Place the croissant on a microwave-safe plate, cover with a damp paper towel, and heat on medium for 15-20 seconds. This method works in a pinch but won’t restore crispiness.
4. Reheating with Sweet Fillings
- Oven: Wrap filled croissants loosely in foil and bake at 350°F (175°C) for 5-7 minutes.
- Microwave: Heat with a damp towel to prevent the filling from spilling.
5. Reheating Savory Fillings
- Oven: Bake at 350°F (175°C) for 5-10 minutes.
- Stovetop: Heat in a covered non-stick pan for 3-5 minutes, flipping once.
6. Vegan/Dairy-Free Croissants
- Oven: Reheat at 350°F (175°C) for 5-10 minutes.
- Microwave: Heat for 15-20 seconds on medium, then finish with 1-2 minutes in the oven.
Serving Ideas for Mini Croissants
Mini croissants are incredibly versatile. Here are some simple serving ideas:
1. Breakfast or Brunch
- With Jam and Butter: Pair with jams or butter for a simple treat.
- Eggs and Plant-Based Alternatives: Serve with scrambled eggs, or tofu scramble for a vegan option.
- Cheese Platter: Pair with soft cheeses like brie or goat cheese.
2. Snack or Appetizer
- Stuffed with Savory Fillings: Try fillings like roasted veggies or spinach and ricotta.
- Dips: Serve with hummus, ranch, or guacamole.
- Mini Sandwiches: Fill with deli meats or plant-based alternatives for a tasty snack.
3. Dessert
- Chocolate Filling: Add chocolate inside before baking or dip in melted chocolate.
- Cinnamon Sugar: Brush with butter, sprinkle with cinnamon and sugar, then bake.
- Fruit Fillings: Try apple cinnamon or blueberry compote for a fruity twist.
4. Special Occasions
- Holiday Gatherings: Fill with cranberry sauce and brie for Thanksgiving, or prosciutto and fig jam for Christmas.
- Afternoon Tea: Serve with a selection of savory and sweet fillings.
Mini croissants are easy to customize for any occasion, whether sweet or savory!
Conclusion
Making mini croissants at home is surprisingly easy, even for beginners. With just a few basic ingredients and simple steps, you can create delicious, flaky treats that everyone will love. Don’t hesitate to get creative with fillings, whether savory or sweet, and explore new flavor combinations.
Now it’s your turn—give this recipe a try, experiment with your favorite fillings, and enjoy the process of baking!
We’d love to hear about your baking experience. Share your thoughts and any variations you tried in the comments below!