Unicorn cakes add a magical touch to any celebration. Even beginners can make one easily! With vibrant colors, fun decorations, and simple techniques, you’ll create a cake that’s both beautiful and delicious. Whether you’re baking for a birthday party or trying something new, this easy unicorn cake recipe will make your experience enjoyable. Follow our step-by-step guide to decorate your cake like a pro in no time!
What You Need to Make an Easy Unicorn Cake
Ingredients for the Cake Layers
Making the perfect unicorn cake starts with the right ingredients for the cake layers. Here’s what you’ll need:
1. Cake Mix or From-Scratch Ingredients
- Cake Mix: A box mix saves time and gives a soft, moist cake. Look for high-quality options.
- From-Scratch: Combine flour, sugar, baking powder, eggs, butter, and milk for a homemade cake.
2. Food Coloring for a Rainbow Effect
Use gel food coloring for vibrant, bold shades. Red, yellow, green, blue, and purple work well for a rainbow effect.
3. Butter or Oil for Moisture
- Butter adds richness and flavor, while vegetable oil ensures a soft, light texture.
4. Eggs for Structure
Eggs help bind ingredients and give the cake structure. Use large eggs for the best results.
5. Milk or Buttermilk for Tenderness
- Milk adds moisture, while buttermilk makes the cake tender and light.
6. Baking Powder for Leavening
Baking powder helps the cake rise, ensuring a fluffy texture. Be sure to use the correct amount.
7. Vanilla Extract for Flavor
Vanilla adds a rich, sweet flavor to the cake layers, balancing the sweetness.
Unicorn Cake Frosting Essentials
The frosting is what brings your unicorn cake to life. With its bright colors and smooth texture, it enhances the look and flavor of your cake. Below are the essentials you’ll need to create the perfect frosting for your unicorn cake:
1. Buttercream Frosting for a Fluffy Base
Buttercream frosting is a popular choice for unicorn cakes because of its smooth texture and versatility. It’s easy to work with and can be used to pipe designs, spread over cake layers, or create a smooth base for fondant decorations.
- Ingredients: You’ll need butter, powdered sugar, vanilla extract, and a little milk to achieve a creamy consistency. Adjust the milk for your desired thickness.
- Flavoring: You can also experiment by adding other flavorings like almond or lemon extract to give the frosting a unique twist.
- Why It’s Perfect for Unicorn Cakes: Buttercream can easily be colored, making it ideal for creating the rainbow effect you want for a unicorn cake.
2. How to Color Your Frosting
One of the most fun aspects of a unicorn cake is the vibrant colors. The right food coloring will help you create the magical rainbow layers and swirls that are the hallmark of these cakes.
- Gel Food Coloring: Gel food coloring is the best choice for vibrant colors. Unlike liquid food coloring, gel colors won’t water down the frosting.
- Coloring the Frosting: Divide the buttercream into separate bowls for each color. Start with small amounts of food coloring and gradually add more until you get the perfect shade.
- Creating the Rainbow: You can either pipe the frosting in rainbow stripes or gently swirl it to create a marbled effect. This technique gives your cake a fun, whimsical look.
3. Whipped Cream Frosting for a Lighter Texture
If you prefer a lighter, fluffier texture for your unicorn cake, whipped cream frosting is an excellent option. This frosting has a smooth, airy feel and pairs wonderfully with the rich cake layers.
- Ingredients: Whipped cream frosting is made by whipping heavy cream with powdered sugar and vanilla extract until stiff peaks form.
- Why Use Whipped Cream: This frosting is less sweet than buttercream, which can be a great balance if the cake layers are already quite sweet.
- How to Use: It’s perfect for frosting the top of your cake or using as a filling between cake layers. However, keep in mind that whipped cream frosting may not hold its shape as well in warm environments.
4. Combining Buttercream and Whipped Cream Frosting
For a unicorn cake that has both stability and a light, fluffy texture, you can combine both buttercream and whipped cream frostings. The buttercream will form a stable base, while the whipped cream provides a lighter finish.
- Layering the Frosting: Spread a layer of buttercream over your cake to provide structure, then top it with whipped cream for a smooth, airy finish. This combination will give your cake both visual appeal and great texture.
Decoration Tools and Supplies
Decorating your unicorn cake requires the right tools to achieve a magical, colorful result. Here’s a quick guide to the essentials:
1. Piping Bags and Tips
Piping bags help you create detailed designs on your cake. Choose reusable or disposable bags and pair them with various piping tips for rosettes, borders, and fine details. Star tips, round tips, and petal tips work especially well for unicorn cakes.
2. Fondant Tools
Fondant is great for crafting the unicorn’s ears and horn. Use a fondant rolling pin to roll out the fondant, and fondant cutters to shape it. A fondant smoother will help you achieve a flawless finish.
3. Cake Turntable
A cake turntable allows you to rotate the cake while decorating, making it easier to apply frosting evenly and add intricate designs.
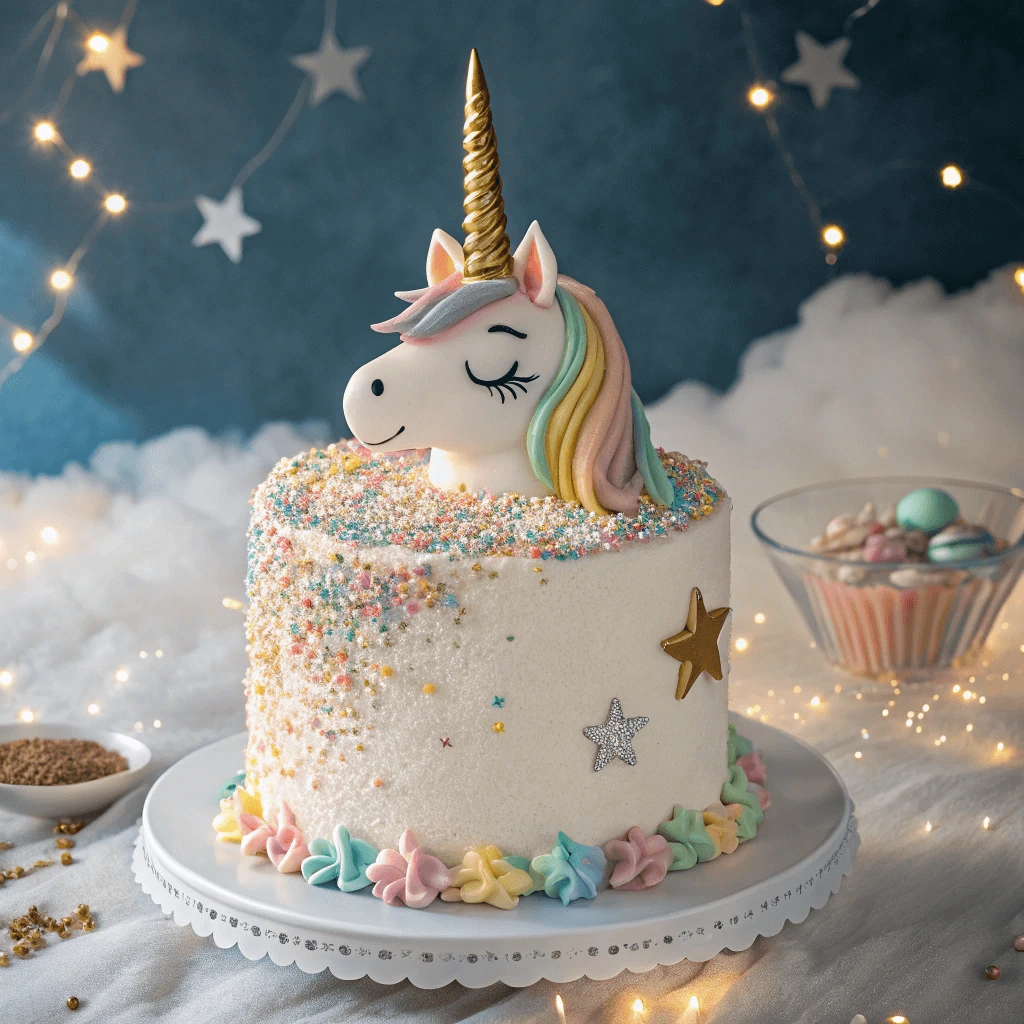
4. Unicorn Toppers and Edible Decorations
Unicorn cake toppers, like horns and ears, are essential for bringing the theme to life. Add edible glitter, sugar flowers, or edible pearls to enhance the cake’s magical look.
5. Coloring Tools
Gel food coloring is perfect for vibrant rainbow layers. If you want to take it a step further, an airbrush kit can help you create professional-looking gradients or shimmer effects.
Step-by-Step Instructions for Making Your Unicorn Cake
Bake the Cake Layers
Baking the cake layers is the foundation of your unicorn cake. Whether you’re using box mix or making the cake from scratch, getting the layers just right will ensure your cake is fluffy, moist, and perfect for decoration. Here’s a step-by-step guide to help you bake the perfect unicorn cake layers.
1. Prepare Your Cake Pans
Before you start mixing your batter, prepare your cake pans. Properly greasing and lining the pans ensures that your cake layers come out easily and have a smooth surface for frosting.
- Greasing the Pans: Coat the sides and bottom of the cake pans with butter or oil. You can also use non-stick spray for a quicker method.
- Lining the Pans: For extra security, line the bottom of the pans with parchment paper. This prevents any sticking and makes it easy to lift the layers out once they’ve baked.
2. Mix the Cake Batter
Now it’s time to mix your cake batter. Whether you’re using a box mix or homemade ingredients, ensure everything is mixed thoroughly for a smooth consistency.
- Follow the Recipe: If you’re using a box mix, follow the instructions on the package. For homemade cake batter, make sure to sift the dry ingredients together to avoid lumps.
- Avoid Overmixing: While it’s important to combine the ingredients well, overmixing can make the cake dense and tough. Mix until just combined for the best texture.
3. Divide the Batter
For a colorful unicorn cake, you’ll need to divide your batter into several portions to create different colors for each layer.
- How to Divide: Once your batter is mixed, split it evenly into separate bowls. Depending on how many colors you want, divide the batter accordingly—typically into 4 or 6 portions for a vibrant rainbow effect.
- Coloring the Batter: Add gel food coloring to each portion of the batter, stirring gently until you achieve the desired shades. Start with a small amount of coloring and add more for richer hues.
4. Pour and Bake the Layers
Once your batter is ready, pour it into the prepared pans. Bake each layer separately to ensure they cook evenly.
- Pouring the Batter: Pour the batter into each pan evenly, smoothing the top with a spatula to ensure a level surface.
- Baking Time and Temperature: Bake each cake layer at the temperature specified in your recipe (typically 350°F or 175°C) for the recommended time. Check for doneness by inserting a toothpick in the center—if it comes out clean, the cake is done.
5. Cool the Cake Layers
After baking, it’s important to let the cake layers cool completely before frosting them. If the layers are too warm, the frosting will melt and slide off.
- Cooling on a Wire Rack: Transfer the cake layers to a wire rack to cool. This allows air to circulate around the cake, helping it cool evenly.
- Trim the Layers (Optional): If your cakes have domed tops, you can trim them with a serrated knife to create flat, even layers. This helps your cake layers stack more evenly for a professional finish.
Prepare the Unicorn Cake Frosting
Creating a smooth, vibrant frosting is essential for a unicorn cake. The frosting should be rich, creamy, and easy to work with. Here’s how to prepare the perfect frosting for your cake, with a magical unicorn touch.
1. Choose the Right Type of Frosting
For a unicorn cake, a buttercream frosting works best because it holds its shape well and can be easily colored to match your design. You can use either classic American buttercream or Swiss meringue buttercream, depending on your preference for taste and texture.
- American Buttercream: This is the most common choice for cakes. It’s made with butter, powdered sugar, vanilla extract, and a bit of milk or heavy cream. It’s sweet, easy to make, and holds its shape well.
- Swiss Meringue Buttercream: If you prefer a less sweet frosting, Swiss meringue buttercream is a smoother, more buttery option. It takes a bit more time and technique to make, but it creates a silky finish that works wonderfully for detailed designs.
2. Color Your Frosting
A unicorn cake needs to be vibrant, so preparing your frosting in various colors is key. The best way to achieve rich, bold hues is to use gel food coloring instead of liquid food coloring, which can thin out the frosting.
- Divide the Frosting: Once your frosting is mixed and smooth, divide it into separate bowls depending on how many colors you want to use.
- Add the Color: Use a toothpick to add small amounts of gel food coloring to each bowl. Mix the color into the frosting until you achieve your desired shade. You can create a rainbow of colors or stick to pastel shades, depending on your theme.
3. Ensure the Right Consistency
The consistency of your frosting is crucial for both spreading and piping. If your frosting is too stiff, it will be difficult to spread smoothly. If it’s too runny, it will slide off the cake. Here’s how to adjust your frosting to the perfect consistency:
- Thicker Frosting: If your frosting is too runny, add a little more powdered sugar, a tablespoon at a time, to thicken it up.
- Thinner Frosting: If your frosting is too stiff, add a small amount of milk or heavy cream to loosen it up. Be sure to add liquid slowly to avoid making the frosting too thin.
4. Make the Unicorn Horn and Ears
In addition to the colorful frosting, you’ll need to prepare special decorations for the unicorn’s horn and ears. You can make these from fondant, gum paste, or purchase ready-made edible toppers.
- Making a Fondant Unicorn Horn: Roll out a small amount of fondant and shape it into a cone to form the horn. Twist it as you go for a spiral effect. To add sparkle, you can brush it with edible gold dust or paint it with metallic food paint.
- Creating Unicorn Ears: Mold fondant into simple ear shapes and paint them with a hint of pink or purple to match your unicorn’s theme.
5. Make Sure Everything is Ready for Decorating
Once your frosting is ready, make sure all your tools are prepared for decorating your unicorn cake. You’ll need piping bags, tips, and a cake turntable. Having everything ready before you start will make the decorating process easier and more enjoyable.
- Piping Bags: Fill each piping bag with the colored frosting. Use different tips, like star tips for rosettes or petal tips for smooth, curved lines.
- Cake Turntable: This tool allows you to rotate the cake smoothly while decorating, which helps you apply frosting evenly.
Assemble and Decorate the Cake
Assembling and decorating your unicorn cake is where the magic comes to life. Here’s a streamlined guide to help you build and decorate a beautiful unicorn cake.
1. Level and Stack the Cake Layers
Start by leveling the cake layers to create a flat surface for stacking.
- Level the Cake: Use a serrated knife to trim the domed top of each layer.
- Stack the Layers: Place one layer on a cake board, add frosting, and repeat with the next layers.
2. Apply a Crumb Coat
The crumb coat seals in crumbs and gives you a smooth base for the final layer of frosting.
- Crumb Coat: Spread a thin layer of frosting over the entire cake.
- Chill the Cake: Refrigerate for 20-30 minutes to set the crumb coat.
3. Frost the Cake
Once the crumb coat is set, apply the final layer of frosting.
- Smooth the Frosting: Use an offset spatula to cover the cake evenly.
- Create Texture: For a decorative touch, use piping tips or a spoon to add swirls or patterns.
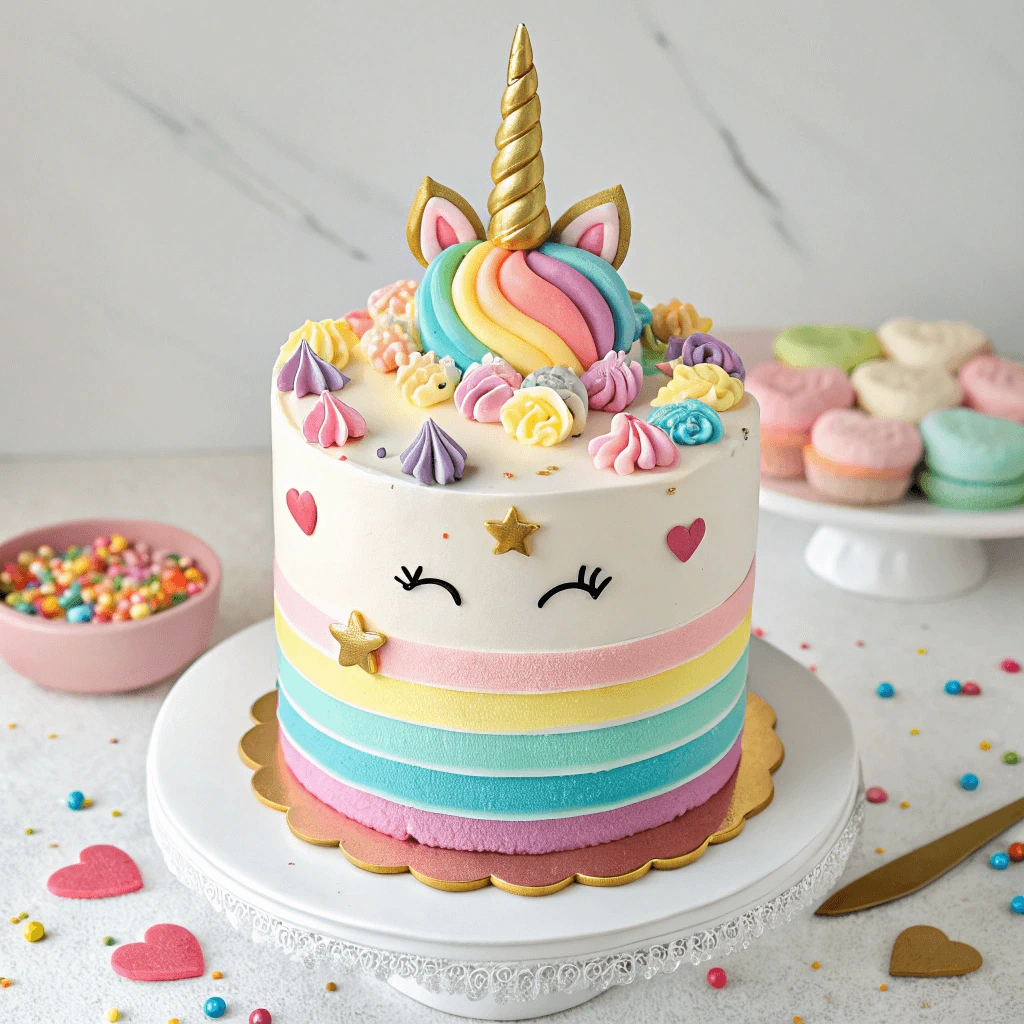
4. Add the Unicorn Details
Decorate the cake with the unicorn horn, ears, and colorful mane.
- Unicorn Horn and Ears: Attach these with frosting, positioning them on top of the cake.
- Pipe the Mane: Use a piping bag to create small rosettes or swirls along the top and sides.
5. Finish with Sparkles
Complete your unicorn cake with edible glitter or sprinkles for that extra magical touch.
- Add Glitter: Dust the cake with edible glitter for a shimmering effect.
- Decorate: Add rainbow sprinkles or edible flowers for a playful finish.
Creative Unicorn Cake Decorations for Beginners
Using Rainbow Colors
Rainbow colors bring the unicorn cake to life, making it vibrant and whimsical. Here’s how to use them effectively to achieve a colorful masterpiece.
1. Choose Your Color Palette
Before you start decorating, pick the rainbow colors you want to use. A typical rainbow cake includes red, orange, yellow, green, blue, and purple, but feel free to get creative with pastels or neon shades.
- Primary Colors: Red, yellow, and blue are the classic primary colors. These are often used in bright, bold cakes.
- Pastel Shades: For a softer, dreamier look, use pastel versions of the rainbow colors like light pink, mint green, and pale lavender.
2. Divide the Frosting into Separate Bowls
Once you have your color palette ready, divide your frosting into separate bowls—one for each color. You will need enough frosting to cover the entire cake, so be sure to prepare enough frosting for each color.
- Using Gel Food Coloring: Gel food coloring is ideal for vibrant hues. Add a small amount of coloring to each bowl of frosting and mix until you reach the desired color intensity.
- Tip for Even Coloring: Use a toothpick or small spatula to blend in the gel coloring, adding more as needed until you get the right shade.
3. Prepare Piping Bags
Next, prepare your piping bags with each colored frosting. This will allow you to pipe the colors onto the cake in a controlled and beautiful way.
- Filling the Bags: Fit each piping bag with a star or round tip, depending on your desired effect. Fill the bags with the colored frosting, making sure not to overfill them.
- Tip for Easy Piping: To prevent colors from mixing in the piping bags, you can layer the frosting in the bag. Place one color at a time inside, creating a rainbow effect as you pipe.
4. Apply the Rainbow Frosting to the Cake
Now comes the fun part—piping the rainbow frosting onto your unicorn cake! Whether you’re creating a layered look or a more abstract rainbow design, the key is to work quickly to keep the frosting fresh.
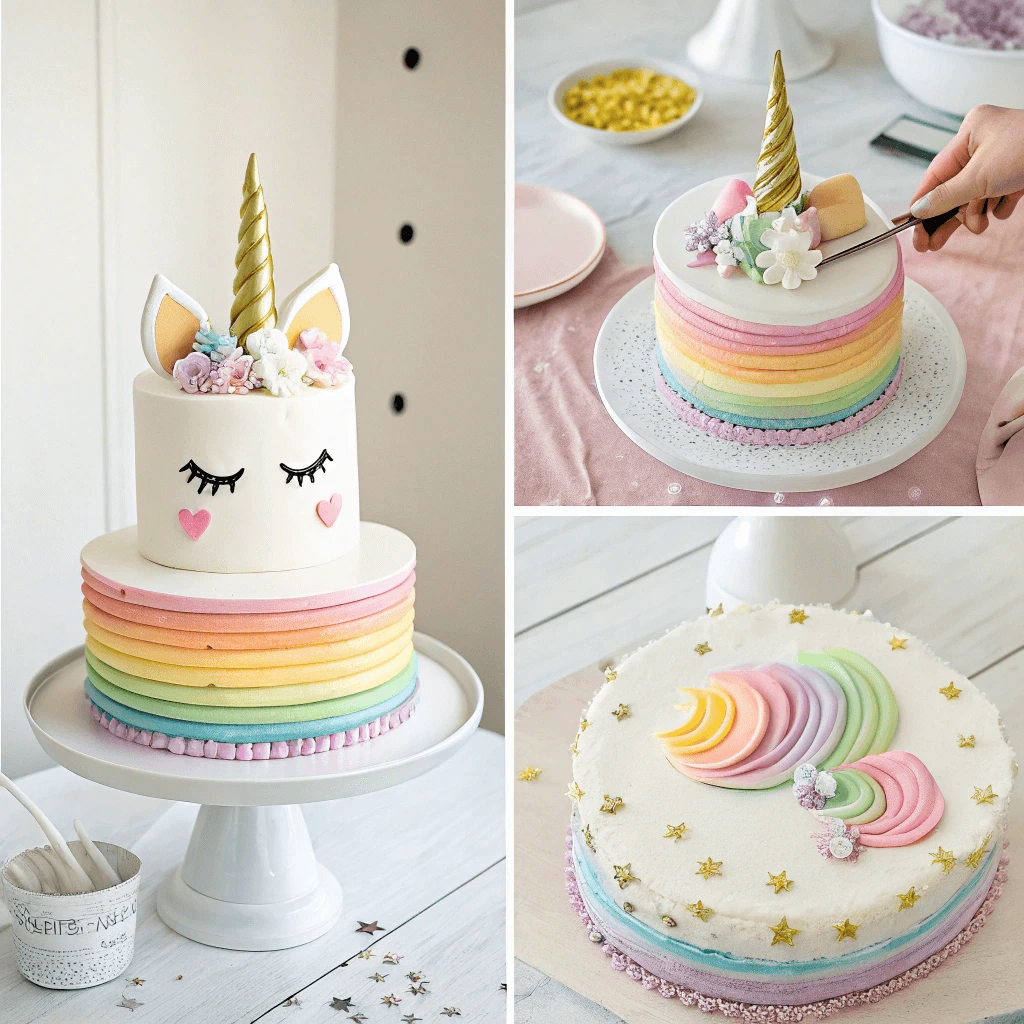
- Layered Rainbow Effect: Starting at the top of the cake, pipe each color in a circular pattern, working your way down. You can pipe each color next to the other or swirl them together for a softer, blended look.
- Mane Design: For the unicorn’s mane, pipe the different colors in rows or use a swirling motion to blend them together.
5. Blend the Colors for a Swirled Effect
If you prefer a softer, more blended look for your rainbow, you can use a method called “ombre” or a simple swirl effect.
- Ombre Effect: Apply frosting in a gradient, blending from one color to the next. This gives the cake a beautiful, flowing rainbow transition.
- Swirl the Colors: Use an offset spatula to gently swirl the colors together, creating a marbled effect across the cake’s surface.
6. Add Final Touches with Sparkles
After completing the rainbow frosting, you can add extra sparkle and shine to the cake. Edible glitter or shiny sprinkles give your unicorn cake an extra magical touch.
- Sprinkle Sparingly: Lightly sprinkle edible glitter or metallic pearls on the cake for a touch of magic.
- Rainbow Sprinkles: Consider adding rainbow-colored sprinkles over the top of the rainbow layers to enhance the colorful look.
Making Unicorn Cake Toppers
Unicorn cake toppers bring your cake to life. Here’s how to make the key elements like the unicorn horn, ears, and flowers.
1. Making the Unicorn Horn
- Shape the Horn: Roll a small piece of fondant into a cone, twisting it to create a spiral effect.
- Add Texture: Use a fondant smoother or your fingers to create a swirl pattern on the horn.
- Let It Dry: Allow the horn to dry for several hours or overnight to firm up before placing it on the cake.
2. Crafting the Unicorn Ears
- Shape the Ears: Roll two pieces of white fondant into ovals, then make smaller pink ovals for the inner ear.
- Assemble the Ears: Attach the pink pieces to the white fondant and place them symmetrically on the cake.
- Add Details: Use an edible pen to draw lines or pipe veins for added texture.
3. Creating the Unicorn Mane and Flowers
- Mane: Roll fondant into strips of rainbow colors and place them around the unicorn horn. Alternatively, use buttercream for a softer look.
- Flowers: Make small flowers from fondant by shaping petals and attaching them around the horn with edible glue.
4. Assembling the Cake Toppers
- Place the Horn and Ears: Position the dried horn at the center of the cake and attach the ears on either side.
- Arrange the Mane and Flowers: Add the fondant strips or buttercream rosettes for the mane, and place the flowers around the horn and ears.
Sprinkles and Edible Glitter for Sparkle
To elevate the magical appearance of your unicorn cake, adding sprinkles and edible glitter is the perfect finishing touch. These elements create a shimmering, eye-catching effect that makes the cake look even more enchanting.
1. Choosing the Right Sprinkles
Sprinkles come in a variety of shapes, sizes, and colors, making them ideal for adding texture and visual interest to your cake.
- Rainbow Sprinkles: For a unicorn theme, rainbow sprinkles are an obvious choice. They add bright colors that complement the vibrant design of the cake.
- Shaped Sprinkles: You can also opt for sprinkle shapes like stars, hearts, or even unicorns. These shapes help reinforce the magical theme and make the cake even more playful.
- Sugar Crystals: If you want a more elegant touch, consider sugar crystals. These give a sparkling finish that adds sophistication without overwhelming the cake’s design.
When choosing sprinkles, make sure to match their size and color with your overall theme for a harmonious look.
2. Applying Edible Glitter
Edible glitter is the key to giving your unicorn cake that extra sparkle. It can be sprinkled on top of the cake or brushed onto specific areas for a more controlled effect.
- Dusting Technique: To create a soft, glimmering effect, lightly dust edible glitter over the entire surface of the cake. Be sure to use a fine glitter to avoid clumping.
- Concentrated Areas: If you want a more dramatic effect, apply the glitter to specific areas such as the unicorn horn, ears, or flowers. This focused glitter application draws attention to those parts of the cake, making them stand out.
- Color Options: Edible glitter comes in many colors. Gold, silver, or iridescent glitter works especially well for a magical unicorn theme. Consider matching the glitter to the color palette of the cake.
3. How to Apply Sprinkles and Glitter
Once you have selected your sprinkles and edible glitter, it’s time to apply them to the cake. Follow these tips for the best results:
- Even Application: To ensure the sprinkles and glitter are evenly distributed, you can either gently sprinkle them with your fingers or use a small spoon or shaker for a more controlled application.
- Timing: Apply the sprinkles and glitter just before serving to avoid them losing their shine. The longer they sit on the cake, the more likely they are to fade or dissolve into the frosting.
- Positioning: Consider the placement of your sprinkles. For a cleaner look, you can apply them around the edges of the cake or as a border. Alternatively, sprinkle them on top of the unicorn’s mane or flowers for a whimsical effect.
4. Additional Sparkle Elements
If you want to take the sparkle to the next level, you can incorporate other edible decorative elements:
- Edible Pearls: Small edible pearls are perfect for adding dimension to your cake’s design. They can be used along with glitter and sprinkles or on their own for a more refined look.
- Sugar Dust: For a gentle shimmer, you can use sugar dust or lustre dust in specific areas. This creates a more subtle, sophisticated effect compared to larger glitter particles.
Tips for Perfecting Your Unicorn Cake
Frosting and Decorating Tips for Beginners
Decorating a unicorn cake might seem tricky, but with these beginner-friendly tips, you’ll create a beautiful cake with ease.
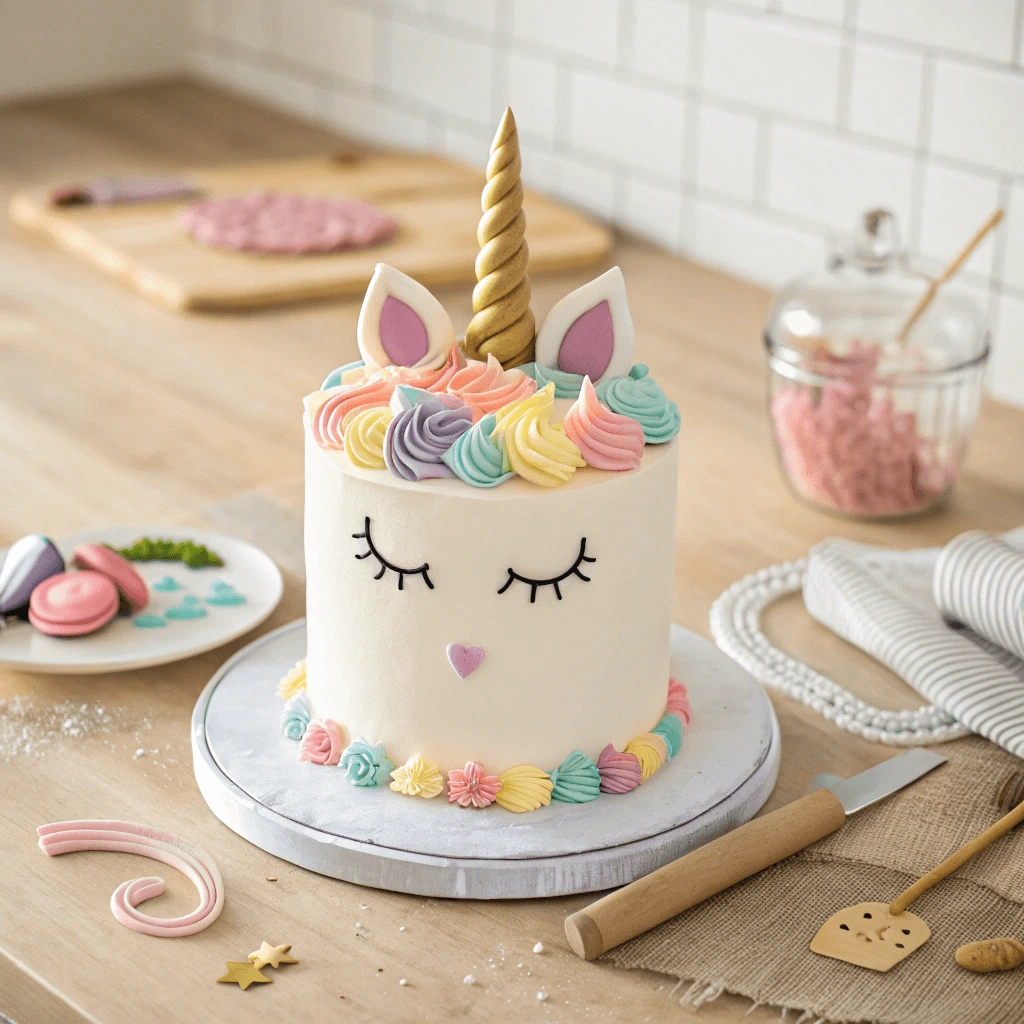
1. Smooth and Even Frosting
Start by applying a crumb coat to seal in crumbs, then chill the cake. Use an offset spatula to apply the final layer of frosting smoothly. This helps create a clean, professional finish.
2. Piping Frosting Designs
Use piping tips to create decorative effects. A star tip (like Wilton 1M) works well for rosettes on the unicorn’s mane. Practice on parchment paper first for better control.
3. Coloring Your Frosting
Use gel food coloring to achieve vibrant hues without thinning the frosting. Divide your frosting into bowls and add colors for a rainbow effect, layering them in the piping bag for an ombré look.
4. Unicorn Mane Design
Pipe colorful rosettes for the mane, using different textures to add dimension. Add small buttercream or fondant flowers for extra flair around the unicorn horn.
5. Final Touches
Finish by adding edible glitter and sprinkles for sparkle. You can also add a unicorn cake topper for the finishing touch. Make sure everything is set before serving.
How to Store and Transport Your Cake
Proper storage and transportation are key to keeping your unicorn cake fresh and beautiful. Here’s how to do it effectively.
1. Storing Your Cake
- Room Temperature: If you plan to serve the cake within a couple of days, store it in an airtight container or cover it with a cake dome.
- Refrigeration: For cakes with perishable fillings or buttercream, refrigerate them. Cover the cake with plastic wrap or foil to keep it fresh.
- Freezing: If you need to store it longer, wrap the cake tightly in plastic wrap and aluminum foil, then freeze it. Thaw in the fridge before serving.
2. Transporting Your Cake
- Use a Cake Carrier: Transport your cake in a cake carrier to keep it stable and safe.
- Secure the Cake: If you don’t have a carrier, use a sturdy cake board and non-slip mat to prevent movement.
- Keep It Cool: In hot weather, use ice packs or coolers to prevent the frosting from melting.
3. Handling Cake Toppers
- Add Toppers Last: Add delicate toppers like the unicorn horn and ears once you’ve reached your destination.
- Pack Separately: For larger toppers, wrap them in tissue paper and transport them in a separate box to avoid damage.
Troubleshooting Common Cake Decorating Issues
Cake decorating can be a fun and rewarding experience, but it doesn’t always go smoothly. Here’s how to tackle some common decorating issues and ensure your unicorn cake looks perfect.
1. Frosting Too Runny or Too Thick
- Frosting Too Runny: If your frosting is too runny, it can’t hold its shape, and it might slide off the cake. To fix this, add more powdered sugar to thicken it. If the frosting becomes too thick, a tablespoon of milk or cream should help loosen it up.
- Frosting Too Thick: If your frosting is too stiff to spread, you can add a small amount of milk or water, one teaspoon at a time, until it reaches the right consistency. The frosting should be spreadable but not too runny.
2. Uneven Frosting or Crumb Coat Issues
- Uneven Frosting: Achieving smooth, even frosting can be tricky. If you notice streaks or bumps in your frosting, try using an offset spatula to apply it in thin layers, smoothing it out as you go. Always use a crumb coat first to seal in crumbs before applying the final layer.
- Crumb Coat Issues: The crumb coat should be thin and light. If it’s too thick, it can create a rough texture when you add the final layer of frosting. Apply it evenly and chill the cake before adding the final layer to help it set properly.
3. Frosting and Cake Layers Sliding or Shifting
- Shifting Layers: Sometimes, the layers of the cake can slide if the frosting hasn’t fully set or if the layers are not properly aligned. To prevent this, let each layer of frosting set before adding the next. If you’re stacking multiple layers, consider using dowels or cake supports to keep the layers in place.
- Frosting Sliding Off the Cake: If your frosting slides off the cake during transport, the frosting may be too soft. Chill the cake for 30 minutes before transportation, and always keep it level to avoid the frosting shifting.
4. Piping Troubles
- Piping Bags Leaking: If you’re using a piping bag and the frosting starts to leak, check that the bag is properly secured at the tip. If it’s not, re-pipe the frosting and hold the bag firmly. You can also use a coupler to help secure the piping tip.
- Piping Doesn’t Hold Shape: If your piping designs are not holding their shape, the frosting may be too soft. Add more powdered sugar to firm it up. If the frosting is too hard, soften it with a few drops of milk until it becomes more manageable.
5. Handling and Decorating Cake Toppers
- Unicorn Horn or Ears Melting or Breaking: If you made your unicorn cake toppers from fondant, ensure they’re completely dry before applying them to the cake. If they’re still soft or too moist, they may collapse or break. Allow fondant pieces to air dry for 12-24 hours before use.
- Toppers Not Sticking: If your toppers aren’t sticking to the cake, use a small amount of frosting or edible glue to secure them in place. Avoid placing heavy toppers that can cause the frosting to shift.
Why Unicorn Cakes Are Perfect for Beginners
Fun and Easy to Customize
One of the most exciting aspects of making a unicorn cake is how easy it is to customize. With the right ingredients and tools, you can tailor your cake to any theme or personal taste. Whether you’re making it for a birthday, baby shower, or just for fun, here are a few ways to make your unicorn cake truly unique.
1. Colorful Cake Layers
- Create Rainbow Layers: A unicorn cake is known for its vibrant, rainbow-colored layers. You can make the layers by dividing your cake batter into different bowls and adding a few drops of food coloring to each. For a fun twist, use pastel shades for a softer look or go bold with brighter hues to make the cake pop.
- Marbled Effect: For a slightly different look, you can swirl the colors together for a marbled effect. Spoon the colored batters into the cake pan in sections, then gently swirl them with a knife to create a fun pattern when sliced.
2. Customizing the Frosting
- Flavor Variations: While classic vanilla frosting works great for a unicorn cake, you can customize the flavor to suit your taste. Try strawberry, chocolate, or even fun flavors like cotton candy. To infuse extra flavor, you can add extracts like almond, lemon, or mint to the frosting.
- Textured Frosting: You can also create texture in your frosting by using different tools. A comb or spatula can help you add fun, playful designs on the sides of the cake. Experimenting with different frosting techniques allows you to create a more personalized unicorn cake.
3. Adding Fun Cake Toppers
- Create Your Own Toppers: While unicorn-themed toppers are easy to find, why not try making your own? You can create a unicorn horn and ears from fondant or modeling chocolate. Add some glitter, rhinestones, or edible gold paint for a touch of magic.
- Personalized Decorations: Customize the decorations by adding names, age numbers, or other symbols related to the event. You can pipe names onto the cake with colorful frosting or use letter-shaped toppers to create a more personalized touch.
4. Incorporating Edible Glitter and Sprinkles
- Magical Sparkle: Add edible glitter or shimmering sprinkles for a sparkly effect. These can be sprinkled over the top of the cake or around the base for a magical look. You can even mix different colors of edible glitter for a more eye-catching effect.
- Sprinkle Variety: Use a variety of sprinkles, such as confetti, sugar crystals, or shaped sprinkles, to add texture and visual interest. Rainbow-colored sprinkles work especially well to complement the unicorn theme.
5. Themed Accents and Details
- Unicorn Ears and Horns: You can customize your unicorn cake by choosing different colors or designs for the unicorn’s horn and ears. Use a combination of pastel-colored fondant or icing to create a horn that looks shiny and realistic.
- Floral Accents: Add a touch of nature by decorating the cake with edible flowers, like roses, violets, or daisies. The soft colors and delicate designs of flowers blend perfectly with a unicorn theme.
- Themed Characters or Figurines: In addition to the traditional unicorn horn, you can place unicorn figurines or themed characters like rainbows, clouds, or stars on the cake. These figurines can be made from fondant, gum paste, or even purchased ready-made from cake supply stores.
Great for Kids’ Birthday Parties
A unicorn cake is the perfect addition to any kids’ birthday party. Its whimsical design and bright colors capture children’s attention and create an exciting atmosphere. Here’s why it’s such a popular choice for celebrations:
1. A Fun and Magical Theme
The unicorn theme is timeless and instantly fun. Kids are drawn to the magic of unicorns, and the combination of rainbows and sparkles makes the cake a hit. It works well for various party themes, from fairy tales to fantasy, and can appeal to children of all ages.
2. Easy to Personalize
Unicorn cakes are incredibly customizable. You can incorporate your child’s favorite colors into the cake layers and frosting. Adding personalized decorations, like their name or favorite colors, makes the cake feel special and tailored to them.
3. Perfect for Photos
The vibrant colors and creative design make the unicorn cake an eye-catching centerpiece for any birthday party. Not only does it look great on the table, but it also creates fantastic photo opportunities for parents to capture memories.
4. Simple to Serve
Despite its fancy appearance, a unicorn cake is easy to cut and serve. The multiple layers and smooth frosting make it easy to slice, ensuring all your guests get a piece of the magic.
5. Fun Activity for Kids
Decorating the cake together can be a fun activity for the kids. Letting them add sprinkles or design their own colorful touches adds an extra layer of enjoyment and creativity to the party.
A Stress-Free Way to Impress
Creating a beautiful and impressive cake doesn’t have to be a stressful experience. The unicorn cake is a fantastic option for anyone looking to wow their guests while keeping things simple and enjoyable. Here’s how you can impress with minimal effort:
1. Simple Yet Stunning Design
- Easy Decorations: The unicorn cake relies on bright, simple colors and whimsical designs that make it visually stunning. You don’t need to be an expert decorator to make it look amazing. The vibrant frosting, edible glitter, and colorful sprinkles will create an eye-catching cake without needing complex techniques or intricate details.
- No Fancy Skills Required: Even beginners can master the design. With a basic understanding of frosting techniques and the right tools, you can easily create a professional-looking cake. The charm of a unicorn cake lies in its playful, colorful nature, so the more fun and creative you get with colors, the better!
2. Quick and Easy Assembly
- Minimal Time Commitment: The unicorn cake is perfect for those who want to save time without compromising on quality. You can prepare the cake in a few simple steps—bake the layers, frost with a few colors, and decorate with sprinkles, toppers, and edible glitter.
- No Need for Complicated Techniques: You don’t have to worry about advanced cake-decorating techniques. Swirling frosting, piping a few designs, and placing a few edible glitter pieces are all you need to create a showstopper. It’s stress-free and easy, even for novice bakers.
3. Less Pressure, More Enjoyment
- Focus on Fun: The ease of making a unicorn cake means you can focus more on enjoying the process and having fun with your decorating rather than stressing over perfection. Whether you’re baking alone or with your kids, it’s a relaxed experience where you can be as creative as you want.
- Create Memories: Rather than feeling pressured to make everything perfect, you can embrace the joy of creating something beautiful and magical. The unicorn cake is all about enjoying the process, so you’re free to experiment and have fun.
4. Impress Your Guests with Minimal Effort
- Wow Factor: Even though it’s easy to make, a unicorn cake will still impress your guests. The combination of bright, bold colors and the whimsical design will catch everyone’s eye. It’s a cake that looks fancy without requiring advanced baking skills or hours of work in the kitchen.
- Appealing to Everyone: The universal appeal of the unicorn theme—especially to kids—ensures that your cake will be a hit at any party. Guests will marvel at the vibrant layers, the playful design, and the fact that you made it yourself with minimal hassle.
Making an easy unicorn cake is simple, fun, and rewarding. With the tips provided, even beginners can create a cake that wows guests without stress. Don’t be afraid to dive in and give it a try—embrace the creativity! We’d love to see your cake creations, so feel free to share your experiences and photos with us. Happy baking!