Craving bold flavor and homemade quality? This from-scratch beef salami recipe delivers just that. With simple ingredients and rich spices, you can create a delicious, preservative-free salami right in your own kitchen. Whether it’s for snacking, gifting, or your next charcuterie board—this recipe is a game-changer.
Why Make a From Scratch Beef Salami Recipe?
The Benefits of Homemade From Scratch Beef Salami
Making beef salami at home isn’t just about flavor—it’s about control, creativity, and quality. When you create salami from scratch, you decide exactly what goes into your food and how it’s prepared.
Full Control Over Ingredients
Store-bought salami often contains preservatives, additives, and excess sodium. By preparing it yourself, you skip the unnecessary extras and focus on clean, natural ingredients. You can choose the cut of beef, manage the fat content, and adjust the spice level to match your preferences. Every bite reflects your choices and meets your standards.
Customizable Flavor Profiles
Homemade salami opens the door to endless flavor combinations. Want more heat? Add red pepper flakes. Craving a smoky edge? Try smoked paprika. You can also experiment with herbs, garlic, or mustard seed. Each batch becomes a custom blend tailored to your taste.
Higher Quality and Freshness
Using freshly ground beef and hand-blended spices ensures rich flavor and great texture. Unlike store-bought options that sit on shelves for weeks, your homemade salami starts with fresh ingredients and cures under your care. The end result is fresher, bolder, and far more satisfying.
A Rewarding DIY Experience
Crafting your own salami is more than cooking—it’s a hands-on project with real rewards. You gain a deeper appreciation for traditional food-making, and the process becomes something to enjoy. Plus, sharing your homemade salami makes a memorable gift or a standout addition to any charcuterie board.
A Healthier and Tastier From Scratch Beef Salami Option
Homemade beef salami isn’t just about bold flavors—it’s a healthier option compared to store-bought varieties. When you make it from scratch, you control what goes in, making it a far better choice for your health. Not only does this give you a healthier snack, but it also enhances the overall taste, creating something uniquely satisfying.
Control Over Sodium and Preservatives
Commercial salami often includes high amounts of sodium and nitrates, which act as preservatives. These additives can contribute to high blood pressure and other health concerns when consumed in excess. By making your own salami, you skip these unhealthy ingredients and control the amount of salt added to your meat. You can even experiment with natural preservatives like celery powder or sea salt for a more health-conscious alternative.
Lean, High-Quality Beef
When you make beef salami at home, you have the freedom to choose lean cuts of meat that fit your dietary preferences. You’re not restricted to fatty, low-quality beef commonly found in mass-produced salami. By selecting fresh, lean ground beef, you can create a healthier version of this popular snack without sacrificing flavor. The result is a higher protein content and lower fat, making it a better option for those watching their calorie intake.
No Hidden Additives or Artificial Flavors
Store-bought salami is often filled with artificial flavorings, colorings, and additives to enhance its taste or appearance. These ingredients don’t add any nutritional value and may even contribute to health issues over time. Homemade salami, on the other hand, contains only the spices and flavors you choose. It’s a more natural, clean option, allowing you to enjoy a tasty snack without worrying about the hidden chemicals in mass-produced meats.
Better Taste, Guaranteed
Homemade salami provides a richer and more authentic flavor. Since you control the seasoning and curing process, you can tailor the taste to your liking. Fresh garlic, premium black pepper, and a custom blend of spices create a bold, satisfying flavor that store-bought salami just can’t match. The longer curing process enhances the complexity of flavors, giving your homemade salami an unmatched depth that’s hard to find in commercially produced options.
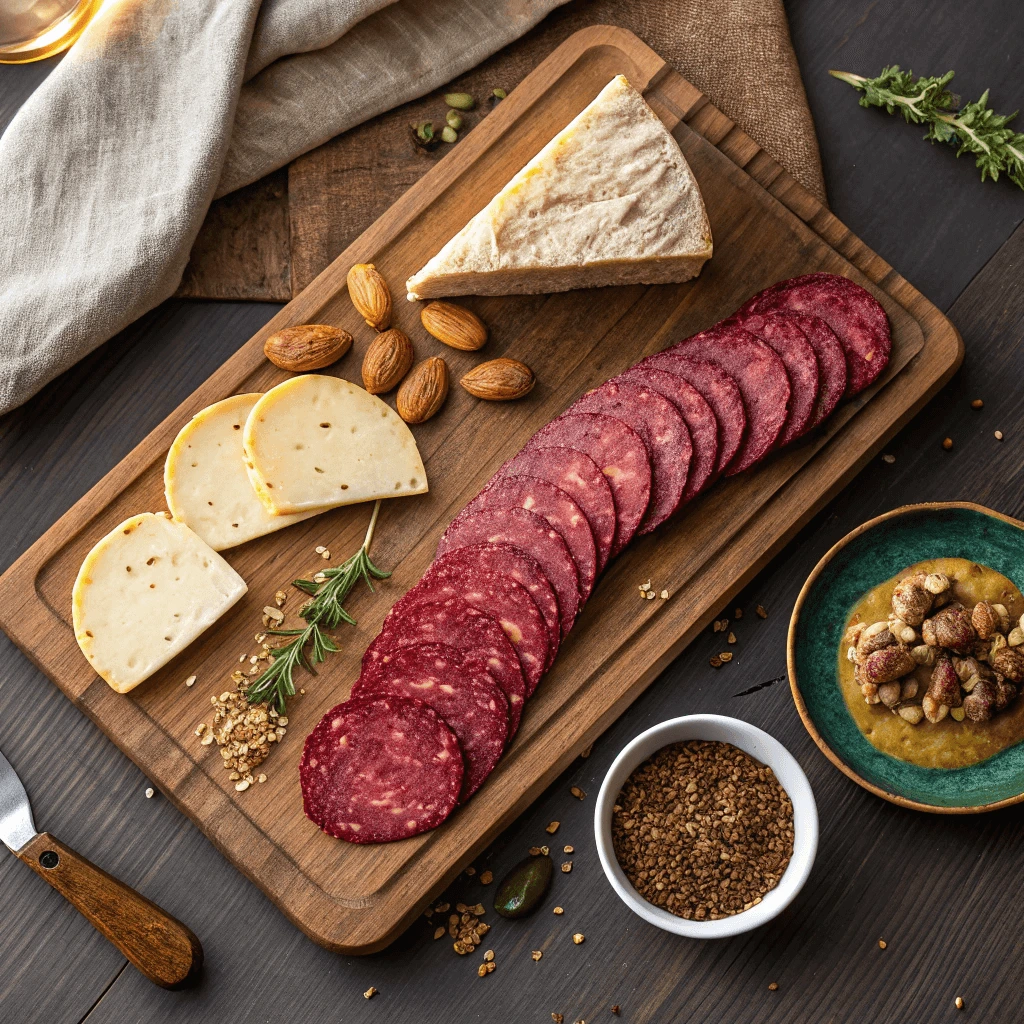
Perfect From Scratch Beef Salami for Charcuterie Boards and Gifting
Homemade beef salami isn’t just a treat for your taste buds—it’s a standout addition to charcuterie boards and makes for an impressive, thoughtful gift. Whether you’re preparing for a gathering or looking to give a personalized gift, homemade salami always makes a statement.
A Star on Your Charcuterie Board
Homemade salami elevates any charcuterie spread, adding a touch of artisan craftsmanship that store-bought options simply can’t match. With its rich flavor and appealing texture, it pairs beautifully with cheese, crackers, fruits, and other cured meats. Your guests will be impressed by the care and creativity that went into making this savory delight. Plus, you have the flexibility to slice it to your preferred thickness, allowing you to customize the presentation to suit your board.
Perfect for Special Occasions and Entertaining
A homemade beef salami is more than just a snack; it’s a conversation starter. Whether you’re hosting a dinner party, family gathering, or holiday celebration, having your own salami on the charcuterie board adds a touch of luxury. It’s a perfect complement to wines and cocktails and invites guests to indulge in something uniquely flavorful. Additionally, because homemade salami can be personalized with unique spices, you can cater it to the specific tastes of your guests.
An Impressive and Thoughtful Gift
Making beef salami at home gives you the opportunity to create a personalized gift for food lovers. Wrapped and presented beautifully, homemade salami offers a personal, heartwarming touch that’s perfect for birthdays, holidays, or any special occasion. Your friends and family will appreciate the effort and attention to detail that goes into making something by hand. Whether presented in a gift basket or as a standalone gift, homemade salami adds a delightful and memorable touch to any celebration.
Create Custom Flavors for Gifting
With homemade salami, you can customize the flavor profile to suit the recipient’s tastes. If they love spicy foods, try adding extra chili flakes or smoked paprika. For those who prefer milder flavors, create a more subtle version with rosemary or thyme. This ability to personalize makes homemade salami an even more special and thoughtful gift, tailored perfectly to the recipient’s preferences.
Essential Ingredients for a From Scratch Beef Salami Recipe

Choosing the Best Ground Beef for Your From Scratch Beef Salami
When making beef salami from scratch, selecting the right ground beef is essential to achieving the perfect flavor and texture. The quality of the beef directly impacts the final product, so it’s crucial to choose carefully based on factors like fat content, freshness, and cut.
The Importance of Fat Content
One of the most important factors when choosing ground beef for salami is the fat-to-meat ratio. Beef salami needs a certain level of fat to ensure it remains moist, tender, and flavorful. Typically, a fat content of around 20-30% is ideal. Too little fat can result in a dry, tough salami, while too much fat may overwhelm the flavors. When shopping for ground beef, look for cuts that offer a balanced fat ratio, such as chuck or brisket, to create a rich, well-textured salami.
Selecting Fresh, High-Quality Beef
Freshness is key when making any cured meat, including beef salami. Always opt for fresh, high-quality beef from a reputable source. If possible, buy directly from a butcher or a trusted local farm. This ensures the beef is fresh and free from any preservatives or additives that could affect the taste or texture. Fresh, high-quality beef also allows the flavors to develop more naturally as it cures.
Choosing the Right Cut of Beef
While ground beef is often the go-to choice for salami, the cut of beef you select will make a difference in the texture and flavor. For a leaner salami, you may choose cuts like sirloin or round. However, for a more traditional, richer salami, cuts like chuck, brisket, or short rib work well due to their natural marbling. These cuts offer the perfect balance of lean meat and fat, which is essential for achieving that characteristic, melt-in-your-mouth texture.
Consider Grass-Fed or Organic Options
For an even higher quality product, consider opting for grass-fed or organic beef. Grass-fed beef tends to have a leaner profile and a slightly different flavor compared to conventionally raised beef. It may add a unique, earthy richness to your salami that makes it stand out. Organic beef also ensures that you’re using meat free from antibiotics and hormones, making it a healthier option for both you and the environment.
Must-Have Spices and Seasonings for Your From Scratch Beef Salami
The spices and seasonings you choose for your homemade beef salami play a significant role in defining its flavor profile. Using the right combination of spices creates a unique and delicious salami that elevates any charcuterie board. Here’s a guide to the must-have spices and seasonings that will bring your beef salami to life.
1. Garlic: A Flavorful Base
Garlic is a cornerstone of any salami recipe. Its deep, savory flavor complements the richness of the beef and enhances the overall taste. Fresh garlic or garlic powder can both be used, but fresh garlic offers a more robust and aromatic essence. Depending on your preference, you can adjust the amount of garlic to suit your taste—whether you prefer a subtle hint or a bold presence in every bite.
2. Black Pepper: The Essential Kick
Black pepper adds the perfect level of heat and a sharp, slightly earthy flavor to salami. It balances the richness of the beef and creates a more complex taste. Coarsely ground black pepper works best in salami, as it provides a satisfying texture and bite. The pepper’s sharpness enhances the other spices and is one of the most essential components in salami seasoning.
3. Paprika: A Touch of Smokiness
Paprika is a versatile spice that can contribute both color and flavor to your salami. It adds a mild smokiness, especially if you opt for smoked paprika, which is a popular choice. Paprika brings out the natural flavors of the beef while offering a subtle sweetness and depth. You can also experiment with different varieties of paprika, like hot or sweet, depending on the flavor profile you want to achieve.
4. Fennel Seeds: A Classic Salami Spice
Fennel seeds are a traditional ingredient in many types of salami. They provide a slightly sweet, anise-like flavor that pairs beautifully with beef. The distinctive taste of fennel seeds gives your salami an authentic touch and complements the other spices. Use crushed fennel seeds to release their natural oils and ensure they blend seamlessly into the meat mixture.
5. Red Pepper Flakes: For a Spicy Kick
If you like your salami with a bit of heat, red pepper flakes are a must-have. They offer a spicy kick without overpowering the other flavors. Red pepper flakes also add a touch of color to the salami, making it visually appealing. Adjust the amount to suit your spice tolerance—more flakes for a hotter salami, or just a pinch for a mild heat.
6. Salt: Enhancing All Flavors
Salt is an essential ingredient in any cured meat, as it enhances and balances the flavors of the other seasonings. It also plays a crucial role in the curing process by drawing out moisture from the meat. Without salt, your salami would lack the necessary depth and complexity. It’s important to use the right amount of salt, as too little will leave the salami bland, while too much will overpower the other spices.
7. Curing Salt: For Safety and Preservation
Curing salt, also known as pink salt or Prague Powder, is a must when making homemade salami. This specialized salt contains sodium nitrite, which helps preserve the meat and prevents harmful bacteria like botulism from growing. It also contributes to the characteristic pink color of cured meats. Be sure to use curing salt in the recommended quantities to ensure safe and effective curing.
8. Coriander: A Subtle, Citrusy Flavor
Coriander adds a delicate, citrusy note to your salami. This spice balances the heavier flavors of beef and brings out the complexity in your seasoning mix. Ground coriander or whole seeds can both be used, but ground coriander will disperse more evenly throughout the meat mixture. The mild, fragrant flavor works beautifully with garlic, fennel, and black pepper.
Curing Agents and Optional Add-ins for From Scratch Beef Salami
Curing agents are essential for making salami, as they help preserve the meat, enhance flavor, and ensure food safety. Along with curing agents, you can also add optional ingredients to customize the flavor and texture of your beef salami. Here’s what you need to know about both curing agents and optional add-ins.
1. Curing Salt: Essential for Preservation
Curing salt, often referred to as pink salt or Prague Powder, is an indispensable ingredient in homemade beef salami. It contains sodium nitrite, which not only helps preserve the meat but also inhibits harmful bacteria, such as botulism, from growing. This ingredient is crucial for safety, particularly when fermenting the salami. Curing salt also contributes to the signature pink color and slightly tangy flavor of cured meats.
While curing salt is essential, it’s important to use it in precise quantities. Typically, you’ll need about 1 teaspoon of curing salt per 5 pounds of meat. Too little curing salt may compromise the preservation process, while too much can lead to harmful effects. Always measure carefully and follow recommended guidelines.
2. Non-Curing Salt: For Flavor Balance
Non-curing salt is another optional ingredient used in the salami-making process. Unlike curing salt, non-curing salt does not contain sodium nitrite and is not used for preservation. Instead, it’s added for flavor, enhancing the overall seasoning profile. Some people prefer using a combination of curing salt and non-curing salt for an added depth of taste. However, non-curing salt can’t replace curing salt, as it doesn’t provide the same safety and preservation benefits.
3. Starter Cultures: For Fermentation and Flavor
Starter cultures are live bacteria cultures that are used in the fermentation process. These bacteria help develop the characteristic tangy flavor of salami and aid in the fermentation process, which is crucial for creating a safe and shelf-stable product. There are different types of starter cultures, such as lactic acid bacteria (LAB), which lower the pH of the salami, promoting safe fermentation and ensuring that the salami has the right texture.
Using starter cultures is especially important for traditional dry-cured salamis. While some people skip this step when making fresh salami, it’s highly recommended for dry-cured varieties to ensure they are safely fermented and properly aged.
4. Optional Add-ins for Flavor
While curing agents are necessary, you can also experiment with optional add-ins to enhance the flavor and texture of your homemade beef salami. Here are some popular choices:
- Herbs and Spices: Beyond the basic spices like garlic and pepper, you can experiment with fresh or dried herbs like thyme, oregano, or basil to add more depth to the salami. You can also add mustard seeds, cloves, or bay leaves for a more aromatic profile.
- Nuts or Dried Fruit: For a creative twist, you can add finely chopped nuts like pistachios or hazelnuts to give the salami an unexpected crunch. Some people also like to add dried fruits such as raisins or apricots for a hint of sweetness that balances the savory flavors.
5. Smoking Agents: For Extra Flavor
If you enjoy the smoky taste of cured meats, you can incorporate smoking agents into your salami-making process. Smoking agents, such as liquid smoke or smoking chips, can be used to impart a subtle smoky flavor to your salami. If you’re cold smoking your salami, you can hang it in a smokehouse or use a smoker at a low temperature to infuse that irresistible smoky aroma.
Tools and Equipment You’ll Need
Grinding and Mixing Tools
The right tools are essential for creating the perfect beef salami. A good meat grinder, mixer, and sausage stuffer ensure that the meat is prepared and stuffed properly, resulting in a delicious and well-textured salami.
1. Meat Grinder
A meat grinder is necessary for achieving the desired texture in your salami. You can choose between manual or electric grinders, with electric models offering faster and more consistent results. A manual grinder, while more labor-intensive, is great for small batches.
2. Meat Mixer
Mixing the spices evenly into the ground meat is key to a flavorful salami. A meat mixer helps distribute the seasoning thoroughly. Manual mixers are affordable but require more effort, while electric mixers make the job easier and faster, especially for larger batches.
3. Sausage Stuffer
Once the meat is ready, a sausage stuffer is needed to pack it into casings. This tool ensures that the meat is evenly packed without air pockets. Manual stuffers are ideal for small batches, while electric stuffers are quicker for larger quantities.
Stuffing and Curing Essentials
Stuffing and curing are key steps in making beef salami, as they shape the texture and flavor. Here’s a breakdown of what you need to know.
1. Stuffing the Salami
- Choose Casings: You can use natural (hog or sheep intestines) or synthetic (collagen or cellulose) casings. Natural casings provide a tender texture, while synthetic ones are easier to work with.
- Stuff Evenly: Use a sausage stuffer to pack the meat into the casings evenly. Avoid air pockets and over-tight packing to ensure a smooth texture.
- Tie the Ends: Seal both ends with butcher’s twine to keep the meat inside and prevent contamination.
2. Curing the Salami
- Dry Curing vs. Wet Curing: Dry curing involves hanging the salami to dry in a cool space, while wet curing uses a brine solution. Dry curing is more traditional and gives a firmer texture.
- Fermentation: Ferment the salami with starter cultures for a few days to help develop flavor and ensure safety by lowering the meat’s pH.
3. Curing Environment
- Temperature: Keep the temperature between 50°F and 60°F (10°C to 15°C) to prevent spoilage.
- Humidity: Maintain 70-80% humidity to ensure proper drying without mold growth or cracking.
4. Drying Time
- Monitor the Drying: Check the salami regularly to ensure it’s drying properly. It should feel firm to the touch when it’s ready. This can take a few weeks or months, depending on the conditions.
Storage and Aging Setup
Proper storage and aging are crucial for achieving the best flavor and texture in your beef salami. Here’s how to set up the right environment.
1. Choosing the Right Location
For optimal aging, select a cool, dry, and well-ventilated space. The ideal temperature for aging salami is between 50°F and 60°F (10°C to 15°C), and humidity should be kept at 70-80%. Use a curing chamber or a temperature-controlled refrigerator with airflow to maintain these conditions.
2. Aging Equipment
- Curing Chamber or Refrigerator: A dedicated curing chamber or a fridge with adjustable settings is perfect for aging salami. You can also use a wine cooler with humidity control.
- Humidity Control: Use a hygrometer to monitor humidity and consider a humidifier or dehumidifier to adjust levels if needed.
- Hanging Tools: Hang the salami on hooks or place it on racks to ensure air circulation around the meat.
3. Regular Monitoring
Check the temperature, humidity, and salami every day to ensure the environment remains stable. Rotate the salami occasionally to promote even drying. Inspect the salami for mold or spoilage; a little mold can be wiped off, but discard any salami with a slimy texture or off smell.
4. Aging Time
- Short Aging (3-6 Weeks): Results in a milder flavor and softer texture.
- Longer Aging (3-6 Months): Leads to a firmer, more flavorful salami. Monitor closely during extended aging.
5. Post-Aging Storage
Once your salami reaches the desired aging, wrap it in wax or butcher’s paper, avoiding plastic wrap. Store it in a cool, dry place or in the refrigerator for longer storage.
Step-by-Step: How to Make Beef Salami
Mixing and Preparing the Meat
The process of mixing and preparing the meat is where the magic of creating a flavorful beef salami happens. Properly preparing the meat ensures that all the ingredients are evenly distributed, leading to a consistent texture and flavor throughout the salami. Here’s a step-by-step guide to get it just right.
1. Selecting the Right Cut of Meat
Before you start mixing, it’s crucial to choose the right cuts of beef. The best options for making salami are beef chuck or a mix of lean beef and fatty cuts like brisket or flank. The ratio of fat to lean meat is important; aim for about 70% lean meat and 30% fat. This balance ensures the salami is moist and flavorful without being greasy.
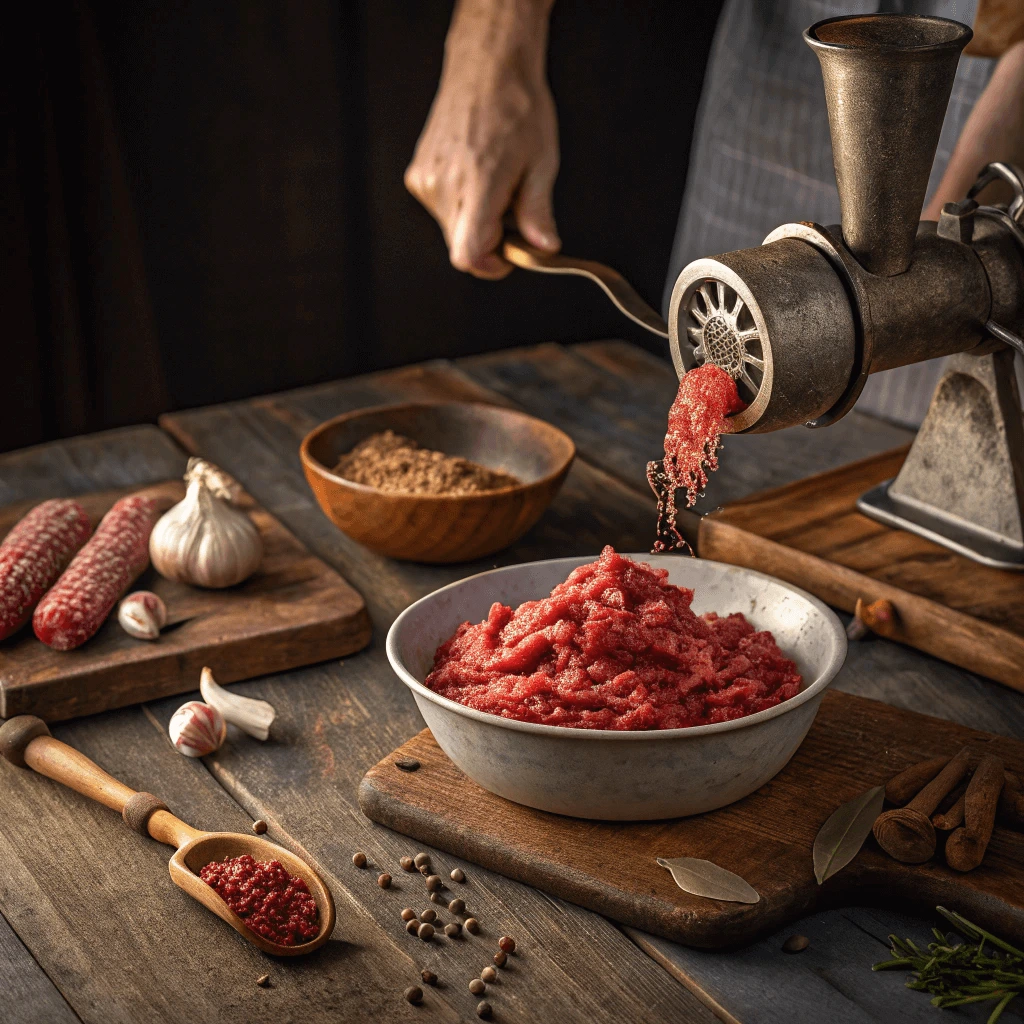
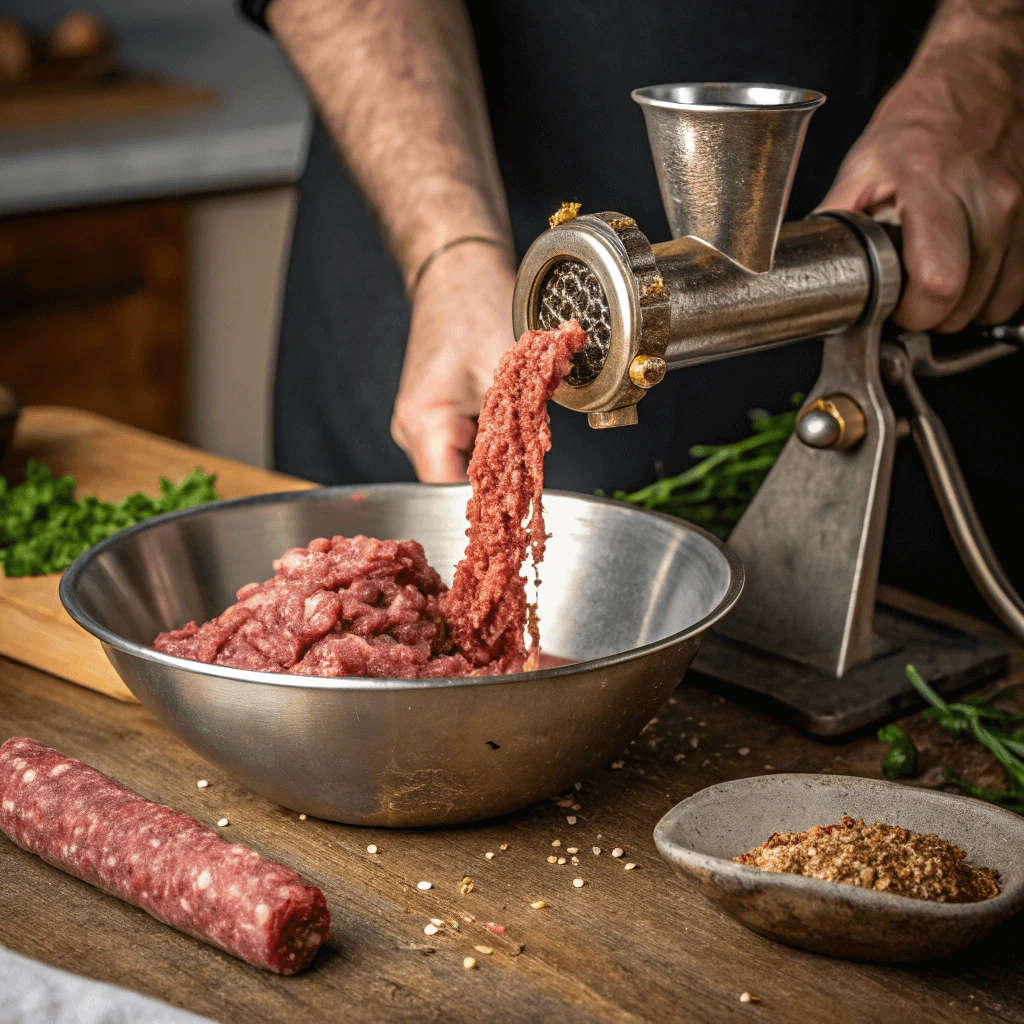
2. Grinding the Meat
Once you’ve chosen your cuts, the next step is to grind the meat. You can use a meat grinder or a food processor to do this. The goal is to achieve a coarse grind to give the salami a satisfying texture.
- Grind Twice: To ensure the meat is evenly mixed, it’s recommended to grind it twice. The first grind should be coarse, followed by a finer grind to break down the meat further and help it bind better during the stuffing process.
- Keep Meat Chilled: Keep the meat cold throughout the grinding process. Cold meat helps maintain the texture and ensures the fat doesn’t melt, which can lead to a poor texture in the final product.
3. Adding the Seasonings
This step is where the flavor comes to life. The right blend of spices and seasonings transforms basic ground meat into delicious salami.
- Salt and Cure: Start with salt as the base seasoning. Use curing salt (such as Prague Powder #1) to help preserve the meat and develop that signature salami flavor. Follow the specific measurements to avoid over-salting or under-curing.
- Spices and Herbs: Common spices include black pepper, garlic powder, fennel seeds, paprika, coriander, and mustard seeds. For additional flavor, you can experiment with different spices like red pepper flakes or smoked paprika. Add these to your ground meat mixture and ensure they’re evenly distributed.
- Sugar: Adding a small amount of sugar helps balance the savory flavors and contributes to the fermentation process.
4. Mixing the Meat
After adding your seasonings, it’s time to mix the meat. This is where you ensure that all the ingredients are incorporated and evenly distributed throughout the mixture.
- Mixing by Hand or with a Mixer: You can mix the ingredients by hand or with a stand mixer fitted with a paddle attachment. If you’re mixing by hand, use your hands to knead the meat mixture until it becomes sticky and cohesive. This process helps the meat bind together and ensures the spices are well incorporated.
- Test the Consistency: After mixing, take a small portion of the mixture and cook it in a pan. Taste the cooked sample and adjust seasoning if necessary. This step helps you ensure the flavor and seasoning levels are to your liking before proceeding.
5. Binding the Meat
In this step, the proteins from the meat will begin to bind together, creating a firm and cohesive texture. If your mixture feels too loose, you can add a little bit of ice water or crushed ice to help bind the mixture together. It’s important to keep the meat cold throughout this process to maintain the texture.
- Use Collagen or Natural Casings: Once the meat is properly mixed and bound, you can begin stuffing it into your chosen casing. Collagen casings are popular because they’re easy to handle, but natural hog or beef casings give the salami a more traditional feel and texture.
- Stuffing Technique: Stuff the casings firmly, making sure there are no air pockets. Tie off the ends securely with butcher’s twine.
Stuffing and Tying the Sausages
Stuffing and tying sausages is a crucial step in making beef salami, ensuring both shape and proper curing. Here’s a simplified guide to help you through the process.
Preparing the Casings
Soak natural casings in warm water for 30 minutes to rehydrate them, rinsing away any excess salt. For synthetic casings like collagen, simply slide them onto the stuffer tube without needing additional preparation.
Stuffing the Sausages
Using a sausage stuffer or a pastry bag, carefully stuff the casings with your seasoned meat mixture. Make sure to pack the meat tightly, but leave space at both ends for tying. Keep the filling even to avoid air pockets, and prick any bubbles you notice.
Tying the Sausages
After stuffing, twist the sausages every few inches to create links, then tie off both ends and the twists with butcher’s twine. If using collagen casings, you can use sausage clips to seal the ends.
Airflow and Curing
Hang the sausages in a cool, well-ventilated area, ensuring that air circulates around them for proper curing. The sausages should be evenly stuffed and tied for consistent drying and flavor development.
Troubleshooting
If you encounter air bubbles, simply prick them to release the air. For casing breakage, cut and re-stuff the affected section. Ensure even stuffing to avoid inconsistent curing.
Curing, Drying, and Storing Your Beef Salami
Curing, drying, and storing are essential steps in making beef salami. These processes ensure your salami is safe to eat and develops a rich flavor.
1. Curing the Meat
Curing preserves the meat and gives salami its signature flavor. Use curing salt (pink salt) for proper preservation and color. Fermentation can also be used to add a tangy flavor, where beneficial bacteria work during the curing process. The curing period typically lasts a few days in a cool place.
2. Drying Process
Drying removes moisture and firms up the salami, concentrating its flavors. For best results, dry the salami in a cool, dry environment (50-60°F and 70-80% humidity). Hang the sausages with enough space between them to allow air to circulate. Drying can take from 3 to 6 weeks, depending on size and conditions.
3. Storing Your Salami
Store your salami in a cool, dry place or a fridge (around 40°F) for longer shelf life. Wrap the salami in wax paper or cloth to protect it from drying out too much. If you prefer long-term storage, vacuum seal the salami or freeze it after drying.
Tips, Flavor Variations, and Serving Ideas for Your From Scratch Beef Salami
Flavor Variations to Try
Making beef salami at home allows you to explore a variety of flavor profiles. Below are some exciting variations to try:
1. Garlic and Black Pepper Salami
To begin with, garlic and black pepper deliver a classic, bold, savory flavor. Simply add minced garlic and freshly ground black pepper to your meat mixture. As a result, you’ll enjoy a deliciously simple salami that’s both aromatic and flavorful.
2. Smoky Chipotle Salami
If you’re craving something smokier, chipotle peppers are a great choice. Not only do they offer an earthy heat, but they also impart a rich smoky flavor to the salami. For the best results, use smoked chipotle powder or flakes, and you’ll be amazed at the depth of flavor.
3. Sweet Mango and Chili Salami
For a sweet and spicy kick, mango and chili are a perfect combination. The tropical sweetness of mango helps balance the heat from chili peppers. Simply add fresh mango puree along with chili flakes, and you’ll achieve a delightful mix of flavors.
4. Herb-Infused Salami with Rosemary and Thyme
For a more herbaceous profile, rosemary and thyme are ideal choices. These herbs bring a fragrant, earthy flavor that complements the savory beef. When combined with garlic and black pepper, this variation becomes a well-rounded and aromatic treat.
5. Italian-Inspired Salami with Fennel
Next, fennel seeds offer a mild, licorice-like taste that works wonderfully in Italian-style salami. By adding fennel seeds, you introduce a classic Italian flavor. Additionally, red pepper flakes can give it a slight kick, enhancing its complexity.
6. Mediterranean-Style Salami with Olives and Sun-Dried Tomatoes
For something with a Mediterranean flair, olives and sun-dried tomatoes are excellent choices. The briny tang of Kalamata olives paired with the rich flavor of sun-dried tomatoes creates a salami that’s both savory and satisfying.
7. Spicy Sriracha and Ginger Salami
For those who enjoy a bit of heat, try adding sriracha sauce along with freshly grated ginger. This combination offers bold heat and a fresh, zesty kick. It’s the perfect choice for anyone who loves a spicy, tangy flavor in their salami.
8. Mustard and Dill Salami
Lastly, mustard and dill are perfect for a tangy, sharp flavor. When you mix ground mustard and dried dill into your meat, you’ll create a savory, deli-inspired salami. It’s a great choice for anyone who enjoys a flavorful, slightly sharp bite.
Serving and Pairing Suggestions
When it comes to serving your homemade beef salami, the possibilities are endless. Whether you enjoy it on its own or as part of a larger meal, the right pairings can elevate its bold and savory flavors. Here are some creative ways to serve and pair your salami:
1. Charcuterie Boards
A charcuterie board is a timeless and popular way to serve beef salami. Pair it with a variety of cheeses, like sharp cheddar, creamy brie, or tangy goat cheese, to balance the salami’s richness. Adding fresh fruits like grapes, figs, or apple slices can bring a sweet contrast that complements the savory meat. Include a selection of crackers or crusty bread as a neutral base to complete the experience.
2. Sandwiches and Wraps
Beef salami makes an excellent sandwich or wrap filling. For a classic sandwich, layer it with fresh lettuce, tomatoes, and a spread like mustard or mayo. If you prefer a lighter option, wrap the salami in a large leaf of lettuce along with cheese and some tangy dressing. Use a fresh baguette or a soft roll to add an extra burst of flavor.
3. Pairing with Refreshing Beverages
If you prefer non-alcoholic options, pairing your salami with refreshing drinks is a great choice. Try sparkling water, which offers a refreshing contrast to the richness of the salami. Alternatively, fruit juices such as apple cider or cranberry juice can bring out a bright, slightly sweet note that balances the savory taste. These beverages complement the bold flavors without overpowering them.
4. Pairing with Pickles and Condiments
Pickles are the perfect accompaniment to beef salami, as their tangy acidity cuts through the richness of the meat. Dill pickles, pickled onions, or even pickled jalapeños can add a satisfying crunch and a sharp contrast to the salami’s savory flavor. Mustard, whether classic yellow or spicy Dijon, also works wonderfully as a condiment, adding a zesty touch to the salami.
5. Adding to Salads
For a more substantial and nutritious meal, beef salami can be added to salads. Slice the salami thinly and toss it with mixed greens, olives, cucumber, and a tangy vinaigrette. The richness of the salami enhances the freshness of the vegetables, creating a balanced dish that’s both satisfying and delicious.
6. Enjoying with Pasta Dishes
Beef salami can be incorporated into pasta dishes for added flavor. Slice it thinly or dice it and toss it into pasta with a creamy Alfredo sauce or a zesty tomato-based sauce. The salami adds a savory depth to the dish, complementing hearty pastas like penne or rigatoni. The robust flavors of the salami pair beautifully with a rich pasta sauce.
7. Serving as a Snack
If you prefer a quick and simple snack, slice the beef salami thinly and serve it with a side of olives, nuts, or cheese. You can also enjoy it with a spicy dipping sauce or a dollop of mustard for extra flavor. This makes for a satisfying, savory snack that’s easy to prepare and enjoy anytime.
Storage and Shelf Life
Proper storage is essential for maintaining the quality and safety of your homemade beef salami. Understanding how to store your salami correctly will ensure it remains flavorful and safe to eat for as long as possible. Let’s break down the best practices for storing your beef salami and how long it lasts.
1. Storing Beef Salami in the Refrigerator
After making your beef salami, it’s crucial to store it in the refrigerator to preserve its freshness. Wrap the salami tightly in plastic wrap or butcher paper to prevent air from coming into contact with the meat. Placing it in an airtight container can also help to keep moisture out and preserve its flavor. Stored this way, beef salami can last for up to 3 weeks in the refrigerator.
To further prolong the shelf life, you can vacuum-seal your homemade salami. Vacuum-sealing removes air, which helps prevent the growth of bacteria and molds, allowing the salami to stay fresh longer. Make sure that the seal is tight and that no air pockets are left in the packaging.
2. Freezing Homemade Beef Salami
If you want to store your salami for a more extended period, freezing is an excellent option. While freezing might change the texture slightly once thawed, it helps preserve the salami’s flavor and safety. To freeze your beef salami, slice it into manageable portions and wrap each piece tightly in plastic wrap or aluminum foil. Then, place the wrapped portions in a freezer-safe bag or container. This method allows you to freeze your salami for up to 3 months.
When you’re ready to eat, thaw the salami in the refrigerator to prevent bacterial growth. Avoid thawing it at room temperature, as this can increase the risk of spoilage. Once thawed, consume the salami within a few days for the best flavor.
3. Signs of Spoilage
Even though homemade beef salami has a relatively long shelf life when stored properly, it’s important to keep an eye out for signs of spoilage. If your salami develops an off smell, slimy texture, or noticeable discoloration, it’s best to discard it. Salami that’s gone bad will also often have a sour or rancid odor, which is an indication that it has spoiled.
Another thing to watch out for is mold growth. While some types of mold on the casing may be normal and safe (especially if you’re making air-dried salami), mold on the inside of the meat is a sign of contamination. If this occurs, it’s safer to throw the salami away.
4. Aging Salami for Enhanced Flavor
If you made dry-cured beef salami, you may want to age it to enhance its flavor. This process requires careful attention to temperature and humidity. Place your salami in a cool, dry place, ideally between 55°F to 65°F (13°C to 18°C) with 70% humidity. A dedicated curing chamber or a cool basement can be ideal for this process.
Salami that is properly aged can develop richer, deeper flavors as it ferments. Depending on your taste preferences and the specific recipe, aging for 3 to 6 weeks can yield a salami with a more intense taste. However, it’s important to monitor the conditions closely to avoid any unwanted spoilage during the aging process.
5. How to Extend Shelf Life
To maximize the shelf life of your homemade beef salami, avoid exposing it to direct light or excessive heat, as this can degrade its quality over time. Always keep your salami in a cool environment, and remember that the longer it stays in storage, the more its flavor and texture may change. While salami can remain safe for consumption for several weeks or even months, it’s always best to enjoy it within a reasonable time frame for the freshest taste.
Conclusion
Making beef salami from scratch offers a rewarding opportunity to craft a personalized, bold-flavored snack that stands out from store-bought options. By choosing quality ingredients, experimenting with spices, and mastering the curing process, you can create a salami that’s both delicious and unique.
This homemade salami is perfect for charcuterie boards, gifting, or simply enjoying on its own. Plus, it allows you to control the ingredients for a healthier and more flavorful result. Whether you’re a seasoned maker or a beginner, this recipe offers a fun and satisfying experience.
In the end, creating your own beef salami brings both pride and taste to your kitchen—so why not give it a try?