Making sugar-free chocolate at home is a fun and rewarding way to enjoy a healthier treat. You control the ingredients, ensuring that every bite is free from added sugars and artificial sweeteners. Whether you’re following a keto or low-carb diet or simply avoiding sugar, homemade sugar-free chocolate lets you indulge without the guilt. In this guide, we’ll show you how to make smooth, rich, and delicious chocolate with just a few simple ingredients. Get ready to enjoy a healthy, homemade treat you can feel good about!
Why Make Sugar Free Chocolate at Home?
Health Benefits of Avoiding Refined Sugar
Choosing to avoid refined sugar can significantly improve your health while still allowing you to enjoy sweet treats like homemade sugar free chocolate.
More Stable Energy
Natural sweeteners like stevia and monk fruit don’t spike blood sugar the way refined sugar does. By using them, you help your body maintain steady energy levels and avoid crashes that often follow sugary snacks.
Easier Weight Control
Refined sugar adds empty calories and increases hunger. Sugar free chocolate made with healthy fats and natural sweeteners keeps you satisfied longer and helps reduce overall calorie intake, making it easier to manage your weight.
Better for Teeth and Heart
Unlike sugar, which feeds harmful bacteria and raises inflammation, most sugar alternatives don’t damage your teeth or put extra strain on your heart. Reducing sugar lowers your risk of cavities, heart disease, and even type 2 diabetes.
Budget-Friendly and Customizable
Making sugar free chocolate at home not only supports your health goals but also helps you save money. Store-bought sugar free chocolates can be pricey, and they often come with additives or ingredients you don’t need. When you make it yourself, you gain full control over cost, flavor, and quality.
Save Money Over Time
While natural sweeteners and cocoa butter might seem expensive at first, they go a long way. One bag of erythritol or a bottle of monk fruit drops can last through many batches of chocolate. By buying ingredients in bulk or during sales, you reduce the cost per serving significantly compared to ready-made keto chocolate bars.
Choose Your Ingredients
Homemade chocolate lets you skip fillers, artificial sweeteners, or preservatives. You pick the quality of your cocoa powder, the type of sweetener, and whether to include extras like chopped nuts, shredded coconut, or spices. This control means you can adjust recipes based on your dietary needs, allergies, or taste preferences.
Experiment with Flavors
When you create chocolate in your own kitchen, you open the door to customization. Prefer extra dark chocolate? Use more cocoa and less sweetener. Want to add crunch? Stir in almonds or chia seeds. Looking for a flavor twist? Try orange extract, peppermint oil, or a sprinkle of sea salt. Each batch becomes a chance to personalize your treat exactly how you like it.
Fits Special Diets
Homemade sugar free chocolate is a great option for people following specific diets. Whether you’re managing your blood sugar, avoiding animal products, or reducing carbs, you can easily tailor recipes to meet your needs.
Ideal for Keto and Low-Carb Diets
The ketogenic diet relies on high-fat, low-carb foods to help the body burn fat for fuel. Traditional chocolate is loaded with sugar, but homemade sugar free chocolate uses ingredients like cocoa butter, unsweetened cocoa powder, and low-carb sweeteners such as erythritol or stevia. These options keep carbs low and taste rich, making them perfect for keto-friendly snacking or dessert.
Great for Diabetic-Friendly Eating
For people with diabetes, managing blood sugar is essential. Refined sugar causes sharp glucose spikes, which can lead to complications over time. When you make chocolate at home, you can control the sweetener and avoid hidden sugars often found in store-bought treats. Natural alternatives like monk fruit and allulose provide sweetness without affecting blood sugar, giving you a safe and satisfying dessert choice.
Easily Adaptable for Vegan Lifestyles
Store-bought chocolates often contain dairy or milk solids, making them unsuitable for vegans. With homemade sugar free chocolate, you can skip dairy entirely and use plant-based ingredients like cocoa butter, coconut oil, or oat milk powder. Vegan-friendly sweeteners and add-ins—such as nuts, seeds, and dried fruit—further personalize your treat while keeping it animal-free and delicious.
Key Ingredients for Sugar Free Chocolate

Natural Sweeteners
When you make sugar free chocolate at home, natural sweeteners help you skip the refined sugar while keeping all the flavor. Stevia, monk fruit, and erythritol are three popular plant-based options that offer sweetness without the negative effects of traditional sugar.
Stevia: Plant-Based and Powerful
Stevia comes from the leaves of a South American plant and is hundreds of times sweeter than sugar. It contains no calories or carbs, which makes it perfect for people following low-carb, diabetic, or keto-friendly diets. Because it’s so concentrated, you only need a tiny amount. If you find the taste slightly bitter, you can blend it with other natural sweeteners for a smoother flavor.
Monk Fruit: Sweet and Clean
Monk fruit extract, derived from a small melon-like fruit native to Asia, offers a clean, sugar-like sweetness without raising blood sugar. It’s completely natural, safe for diabetics, and ideal for people sensitive to aftertastes. It blends easily into homemade chocolate and works well in vegan recipes too. Many home chefs love monk fruit for its pleasant flavor and versatility.
Erythritol-Free Alternatives
If you prefer to avoid erythritol or any sugar alcohols, you can still enjoy delicious results. Blend stevia and monk fruit together to create a well-balanced taste. Coconut sugar or date paste can work for non-keto, natural desserts, though they do contain some carbs. Always check the label when buying sweeteners to ensure they don’t include hidden sugar alcohols.
Cocoa Powder vs. Cocoa Butter
Understanding the difference between cocoa powder and cocoa butter is essential when making sugar free chocolate at home. Both ingredients come from the cacao bean, but they serve very different roles in texture, taste, and consistency.
What Is Cocoa Powder?
Cocoa powder is made by grinding roasted cacao beans and removing most of the fat (cocoa butter). What remains is a dry, rich powder that provides a strong chocolate flavor. It’s the key ingredient in many chocolate desserts, from mousses to brownies. However, since cocoa powder contains no fat, it won’t melt or harden like traditional chocolate on its own. You’ll need to combine it with fats (like coconut oil or cocoa butter) to get that creamy texture.
What Is Cocoa Butter?
Cocoa butter is the natural fat extracted from cacao beans. It’s pale, solid at room temperature, and melts smoothly. This ingredient gives chocolate its silky mouthfeel and helps it solidify when cooled. When making chocolate bars or truffles, cocoa butter adds richness and structure. It’s also dairy-free and plant-based, making it perfect for vegan recipes.
When to Use Each
Use cocoa powder when you want intense flavor without added fat—great for hot cocoa, low-fat desserts, or chocolate sauces. Choose cocoa butter when you need that melt-in-your-mouth experience or want your chocolate to harden properly, such as in molded chocolates or coating layers.
For homemade sugar free chocolate, combining both gives you the best of both worlds: bold flavor from the cocoa powder and a smooth, luxurious texture from the cocoa butter.
Additional Flavorings and Add-ins
Homemade sugar free chocolate becomes more exciting and personal when you add natural flavorings and healthy mix-ins. With a few thoughtful additions, you can enhance both taste and texture.
Boost Flavor Naturally
To deepen your chocolate’s taste, add pure vanilla extract or try other options like almond, peppermint, or orange extract. These natural flavors blend well with cocoa and make each bite more interesting. Use alcohol-free versions if you prefer to avoid alcohol in your recipe.
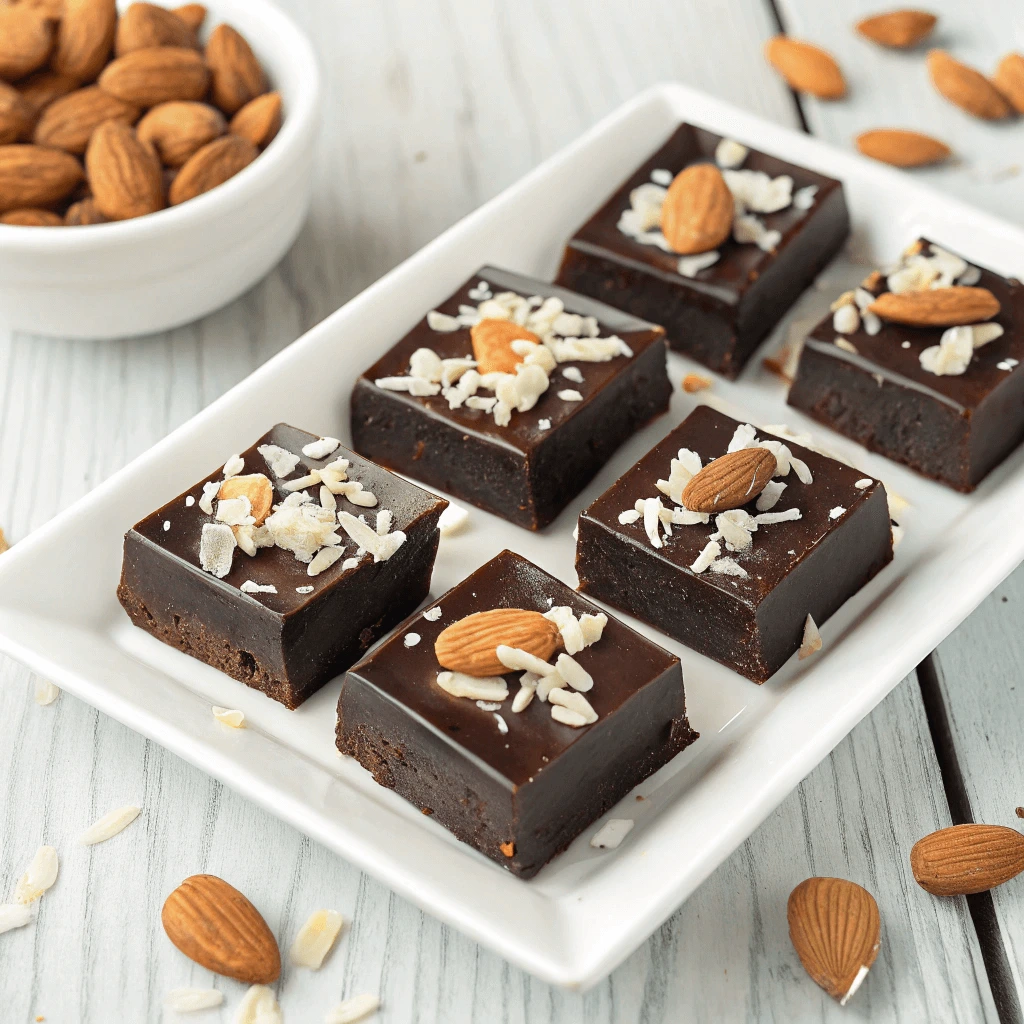
Add Texture and Crunch
Mix in chopped nuts, unsweetened coconut flakes, or roasted cacao nibs to add crunch and variety. These ingredients also boost the nutritional content of your chocolate, offering healthy fats and fiber.
Create Sweet Contrast
For a hint of natural sweetness, try unsweetened dried berries or a small amount of finely chopped dates (if not strictly keto). These add-ins pair well with dark chocolate and make your treat more satisfying.
By experimenting with simple, wholesome ingredients, you can turn your homemade sugar free chocolate into a customized, delicious experience.
Step-by-Step: How to Make Sugar Free Chocolate
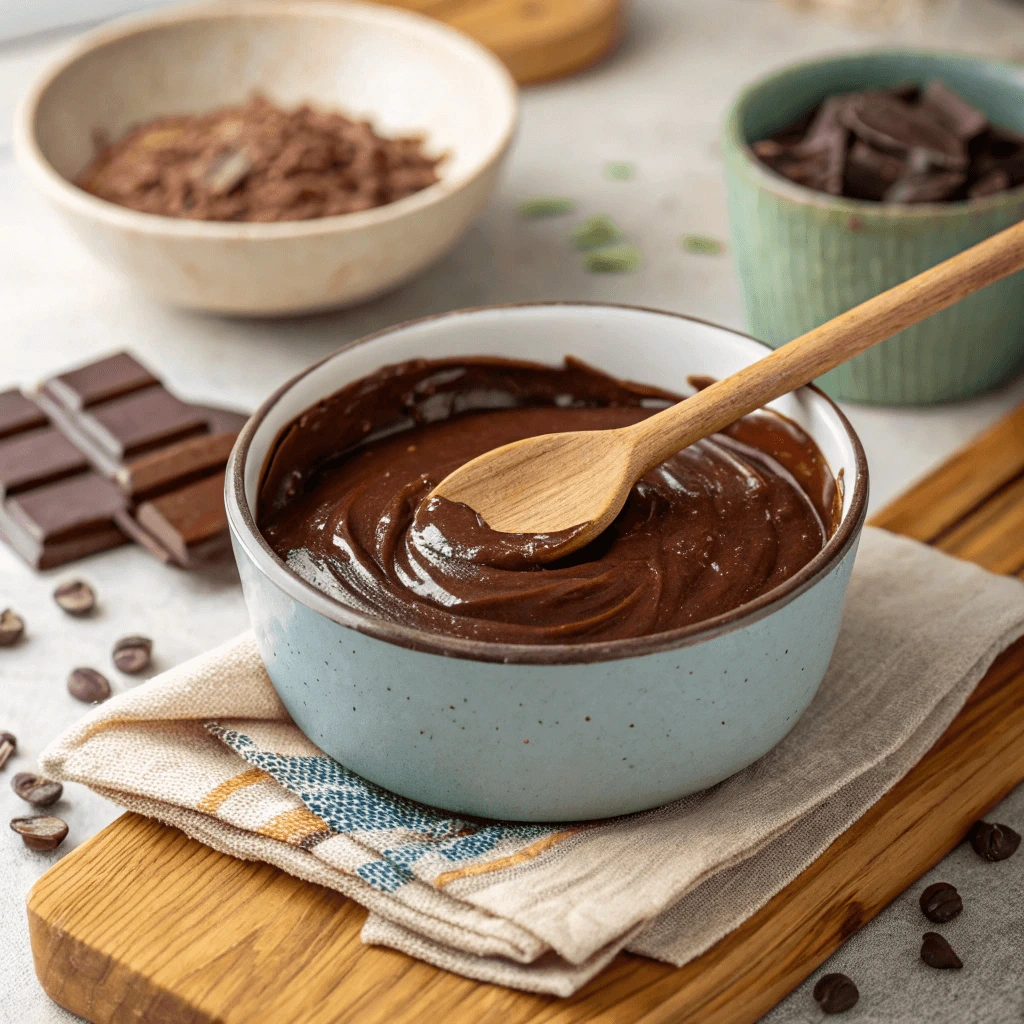
Melting the Base Ingredients
Melting your base ingredients properly is the first step to making smooth, delicious sugar free chocolate. How you handle cocoa butter and cocoa powder directly affects your final texture and flavor.
Use the Double Boiler Method
To melt cocoa butter gently, use a double boiler. Fill a small pot with an inch or two of water, then place a heat-safe bowl on top, making sure it doesn’t touch the water. Bring the water to a simmer and add cocoa butter to the bowl. Stir frequently as it melts. This method prevents scorching and keeps the temperature stable.
Stir in Sweetener and Cocoa Powder
Once the cocoa butter has fully melted, slowly add your chosen sweetener (like stevia or monk fruit). Stir constantly to ensure it dissolves evenly. After that, whisk in the cocoa powder gradually. Avoid dumping it all at once—adding it slowly helps you blend everything into a silky, lump-free base.
Avoid Overheating
Keep the temperature low throughout the process. High heat can burn the chocolate or cause the fats to separate, which ruins both taste and texture. If you use a microwave instead, heat in short 10–15 second bursts and stir each time. Patience leads to better results.
Adding Sweeteners and Flavors
Once your base of cocoa butter and cocoa powder has fully melted, it’s time to build flavor and sweetness into your sugar free chocolate. Choosing the right sweeteners and knowing how to blend them in properly can make all the difference.
Choose the Right Sweetener
Use natural, sugar-free sweeteners like stevia, monk fruit, or erythritol to match your dietary needs. Each one behaves differently. Stevia is extremely sweet, so you’ll only need a small amount. Monk fruit has a more neutral aftertaste and works well in combination with other sweeteners. Erythritol adds bulk and a sugary texture but can crystallize if not mixed in evenly. You can also find blends of these sweeteners specifically made for chocolate or baking.
Blend Sweeteners Smoothly
Stir your chosen sweetener into the melted cocoa butter before adding cocoa powder. This step helps it dissolve more completely, reducing graininess. Whisk continuously to ensure a smooth, even distribution. For powdered or liquid sweeteners, sift or measure carefully to avoid clumps or excess.
Enhance Flavor with Extracts and Spices
After adding sweeteners, include a few drops of pure vanilla extract to enhance the chocolate flavor. You can also experiment with almond, mint, or orange extracts—just a drop or two goes a long way. For a warm twist, sprinkle in spices like cinnamon or chili powder. Always taste your mixture as you go and adjust based on your preferences.
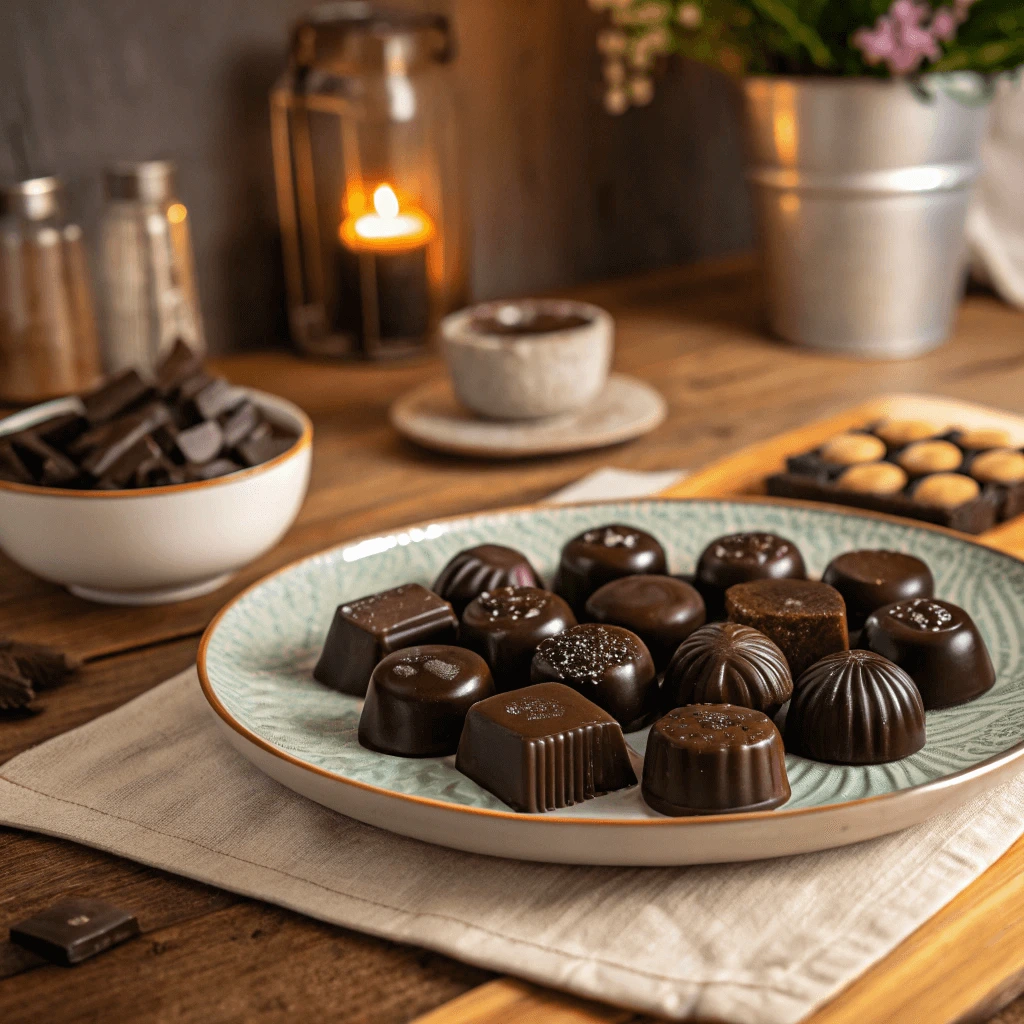
Molding and Setting Your Chocolate
Once you’ve melted your base and added sweeteners and flavors, it’s time to shape your chocolate and let it set properly. This step helps you turn your liquid creation into neat, snackable bars, bites, or fun shapes.
Choose the Right Mold
Select silicone or plastic molds designed for chocolate. Silicone molds work best because they flex easily, making it simple to pop out the hardened chocolate. You can use traditional bar molds, fun shapes for kids, or even ice cube trays in a pinch. Make sure your molds are completely dry—any water can cause the chocolate to seize or develop a dull surface.
Pour with Precision
Carefully pour the warm chocolate mixture into your chosen molds. To reduce mess and get an even finish, use a small funnel or pour the chocolate from a container with a spout. Gently tap the molds on the counter to release any air bubbles that may be trapped inside. You can also sprinkle toppings—like chopped nuts, coconut flakes, or seeds—into the molds before the chocolate sets.
Let It Set Properly
Place the filled molds in the refrigerator for 30–60 minutes, depending on thickness. Once firm, remove the chocolate gently by peeling back the mold or pressing from the bottom. Store the finished chocolate in an airtight container in the fridge to maintain its texture and freshness.
Common Mistakes and How to Avoid Them
Chocolate That Won’t Set
When making sugar-free chocolate at home, one of the most common problems people face is chocolate that refuses to harden. If your chocolate remains soft or sticky, several factors may be at play. The good news is—most of them are easy to fix.
Check Your Ingredient Ratios
Improper balance between cocoa butter and cocoa powder can keep your chocolate from setting. If you use too little cocoa butter, the mixture may not solidify fully. On the other hand, adding too much sweetener—especially if it’s in syrup or liquid form—can throw off the structure. Stick to recipes or measurements that have been tested and tweak gradually.
Watch the Temperature
If you overheat your chocolate during melting, you can damage its structure and texture. High heat can cause cocoa butter to break down or separate, which leads to chocolate that won’t firm up. Keep your temperatures low and steady, and avoid boiling the mixture. If using a microwave, heat in short bursts and stir between each.
Dry Molds and Cool Storage Matter
Before pouring chocolate into molds, make sure they’re completely dry. Even small droplets of water can interfere with the setting process and create a grainy or sticky surface. After pouring, let your chocolate set in the fridge—not the freezer—to avoid condensation or uneven hardening.
Grainy or Bitter Texture
When making sugar-free chocolate, a grainy or bitter texture can be disappointing. Luckily, a few small adjustments can dramatically improve the smoothness and flavor.
Why Chocolate Turns Grainy
Graininess often comes from sweeteners that don’t dissolve well—especially erythritol. To avoid this, use powdered versions or grind your sweetener in a blender before adding it. Stir the mixture thoroughly during melting to prevent clumping, and avoid overheating, which causes fats to separate and leads to a rough texture.
Fixing Bitterness
Bitterness usually results from too much cocoa powder or burning your chocolate. To fix this, balance cocoa with the right amount of natural sweeteners like monk fruit or stevia. Add vanilla extract or a pinch of salt to mellow sharp flavors, and always melt ingredients slowly to avoid scorching.
Smoother Results Every Time
Use a silicone spatula or whisk to mix ingredients evenly. If you’re still noticing grittiness, briefly blend the mixture for a silkier finish. You can also add a touch of lecithin to improve texture naturally.
Overpowering Sweeteners
Sugar-free chocolate should taste indulgent, not overly sweet or artificial. When sweeteners dominate the flavor, they can ruin the balance of your homemade chocolate. Understanding how to properly use sugar alternatives will help you create chocolate that tastes natural and satisfying.
Why Sweeteners Can Be Overpowering
Some sugar substitutes—especially stevia and monk fruit—are far sweeter than sugar. If you use them in the same amounts as traditional sugar, the result can taste overly sweet, metallic, or even bitter. Each sweetener has its own intensity level, and adjusting quantities is essential to avoid overwhelming your recipe.
How to Balance Flavors
Start with a small amount of sweetener and increase gradually until you reach your desired sweetness. Combining sweeteners can also produce a smoother flavor. For example, mixing stevia with erythritol helps tone down stevia’s bitter aftertaste. Vanilla extract, cocoa butter, or a pinch of sea salt can also balance out strong sweeteners and enhance the richness of your chocolate.
Choosing the Right Sweetener for Chocolate
When selecting a sweetener, opt for one that performs well in chocolate recipes. Erythritol, allulose, and monk fruit blends tend to work best in terms of taste and texture. Avoid liquid sweeteners unless the recipe calls for them specifically, as they can affect the setting and consistency of your chocolate.
Storing and Enjoying Your Homemade Sugar Free Chocolate at Home
Best Storage Practices for Sugar Free Chocolate Made at Home
Proper storage helps maintain the taste, texture, and quality of your homemade sugar-free chocolate. Without refined sugar or preservatives, these treats require a bit more care to stay fresh and delicious.
Ideal Temperature and Environment
Store sugar-free chocolate in a cool, dry place—ideally between 60°F and 70°F (15°C to 21°C). Avoid humid areas, which can cause chocolate to bloom (a whitish film caused by sugar or fat rising to the surface). If your home is warm or lacks air conditioning, use the refrigerator as a backup storage option.
Refrigeration Tips
If you refrigerate your chocolate, place it in an airtight container to protect it from moisture and strong odors. Allow refrigerated chocolate to come to room temperature before serving to prevent condensation, which can affect its texture and appearance.
Freezing for Long-Term Storage
You can freeze sugar-free chocolate for extended shelf life. Wrap it tightly in plastic wrap or foil and then place it in a freezer-safe, airtight container. When you’re ready to enjoy it, thaw the chocolate gradually in the fridge first, then let it reach room temperature. This step helps avoid cracks or texture changes.
Avoiding Common Storage Mistakes
Don’t store your chocolate near the stove, dishwasher, or windows—these spots expose it to fluctuating temperatures. Keep it away from direct sunlight and any source of heat. Also, avoid storing it with fragrant foods like onions, as chocolate absorbs odors easily.
Serving Ideas and Flavor Pairings for Sugar Free Chocolate at Home
Sugar-free chocolate desserts offer versatility beyond just being a sweet treat. Presenting them creatively and pairing them with complementary flavors can elevate your dessert experience, making them perfect for parties or everyday indulgence.
Elegant Plating Techniques
Start by using stylish serving dishes like glass bowls, small ramekins, or wooden boards. These add visual appeal and make your desserts look more inviting. You can also garnish sugar-free chocolate with fresh berries, chopped nuts, or a sprinkle of unsweetened shredded coconut to add color and texture.
Flavor Pairings to Enhance Taste
Pair sugar-free chocolate desserts with flavors that balance or contrast sweetness. Fresh mint leaves, raspberries, or a dollop of unsweetened whipped cream brighten rich chocolate flavors. For a hint of warmth, sprinkle cinnamon or chili powder on top. These additions create layers of flavor that surprise and delight your taste buds.
Beverage Pairings
Sugar-free chocolate pairs well with beverages like herbal teas, black coffee, or sparkling water with a splash of lemon. These drinks cleanse the palate between bites, allowing you to fully enjoy each mouthful without overwhelming your senses.
Tips for Serving at Gatherings
When serving at parties, create a dessert platter featuring a variety of sugar-free chocolate options—like bars, truffles, and mousse—alongside fresh fruit and nuts. Label each item clearly to highlight the sugar-free benefit, helping guests make informed choices.
Using these serving ideas and pairings will make your sugar-free chocolate desserts a memorable highlight at any occasion.
Exciting Variations to Try Next Time in Your Sugar Free Chocolate at Home Creations
Exploring different variations of sugar-free chocolate recipes can keep your homemade treats exciting and tailored to your taste preferences. Experimenting with new ingredients and techniques allows you to discover unique flavors and textures.
Adding Nuts and Seeds
Incorporate chopped nuts like almonds, walnuts, or pecans to add crunch and nutritional benefits. You can also sprinkle chia seeds or flaxseeds into your chocolate for a boost of fiber and omega-3 fatty acids. These additions not only enhance texture but also create a satisfying contrast with smooth chocolate.
Infusing with Spices and Extracts
Try adding spices such as cinnamon, cardamom, or chili powder for a subtle kick that complements the chocolate’s richness. Vanilla extract is a classic choice, but you might also experiment with almond, peppermint, or orange extracts to bring fresh, aromatic notes to your recipes.
Using Different Sweetener Combinations
Mix and match natural sweeteners like stevia, monk fruit, and erythritol to find the perfect balance of sweetness without bitterness. Combining sweeteners often improves flavor complexity and reduces aftertastes associated with single sweeteners.
Experimenting with Chocolate Types
Swap out cocoa powder for raw cacao or try white sugar-free chocolate made with cocoa butter. Each variation offers a different depth of flavor and creaminess, providing new taste experiences.
Conclusion
Making delicious sugar-free chocolate at home is both rewarding and simple with the right ingredients and techniques. By choosing quality cocoa, natural sweeteners like stevia or erythritol, and customizing flavors to your liking, you can create rich, satisfying chocolate without added sugar. Pay attention to melting, mixing, and setting processes for the best texture and taste. With practice and creativity, homemade sugar-free chocolate can become a healthier, personalized treat that satisfies your cravings while supporting your dietary goals. Enjoy the process and indulge guilt-free!