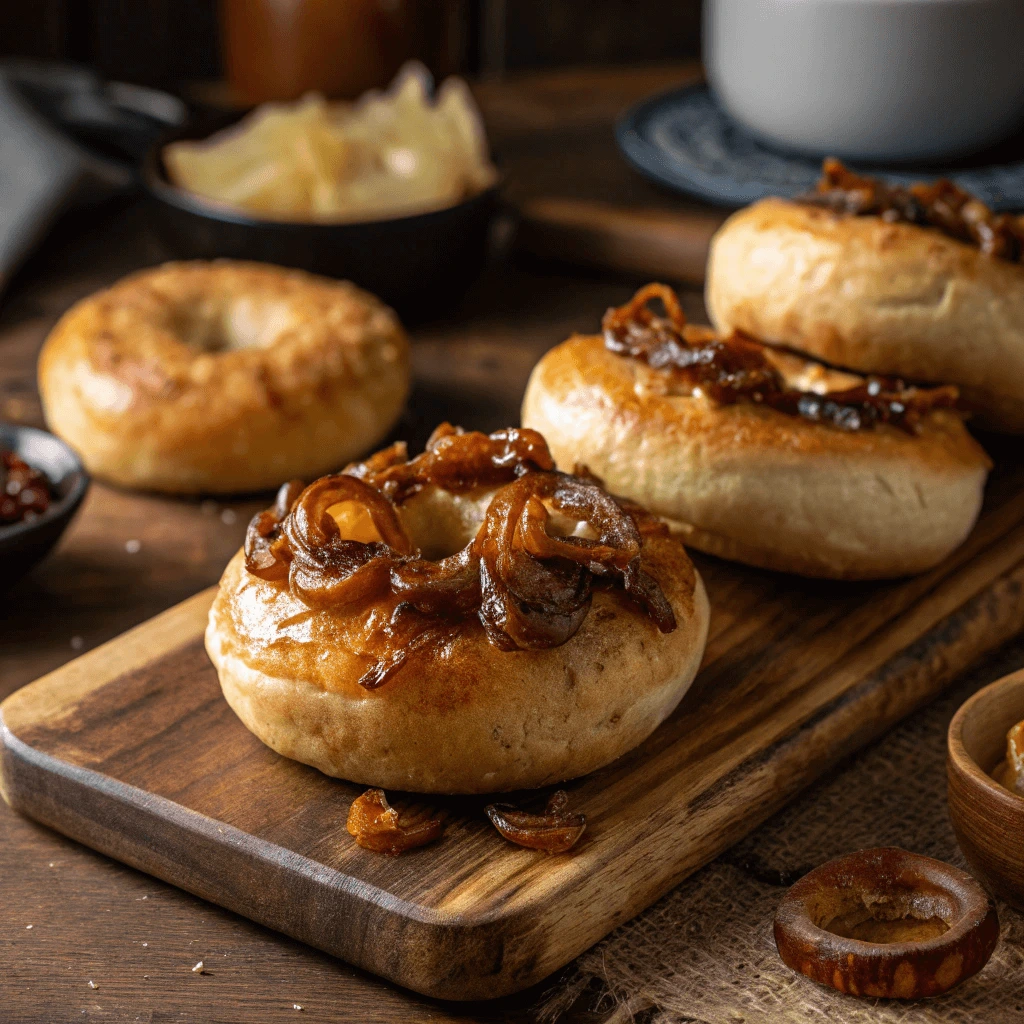
There’s nothing like the smell of freshly baked onion bagels filling your kitchen. With a golden crust, chewy center, and savory onion topping, they’re a bakery favorite for a reason. The best part? You can make them at home with ease.
This step-by-step guide will show you how to create perfect onion bagels from scratch. You’ll learn how to select the right ingredients, shape the dough, and boil and bake like a pro. No fancy equipment or complicated steps—just a simple method that delivers bakery-style results.
We’ll also share ideas for toppings, storage tips, and flavor twists to make your bagels even better. Ready to start baking? Let’s dive in and make onion bagels that everyone will love!
Why Onion Bagels Are a Must-Try at Home
What Makes Onion Bagels Unique
Onion bagels stand out from the bagel crowd for good reason. Their bold flavor, golden appearance, and versatility make them a staple in many kitchens. Let’s explore what sets them apart.
A Flavor That Packs a Punch
Unlike plain or sweet varieties, onion bagels deliver a savory kick with every bite. The toasted onions on top caramelize slightly during baking, adding a rich umami flavor and slight crunch. This distinct taste pairs beautifully with both savory and creamy toppings, making the onion bagel a top pick for breakfast and lunch sandwiches.
A Visual and Aromatic Experience
From the moment you open the oven, onion bagels grab your senses. The baked onions give off a warm, inviting aroma that signals something special. Their speckled, golden-brown tops look just as good as they taste. These bagels don’t just satisfy your taste buds—they also appeal to your sense of smell and sight.
A Versatile Base for Savory Creations
Onion bagels offer a neutral yet flavorful base. Whether you pile them high with avocado, eggs, or dairy-free cream cheese, they hold up beautifully. Unlike sweeter bagels, their savory flavor doesn’t clash with salty or spicy add-ons. That makes them a favorite for bagel sandwiches, brunch spreads, or even a quick snack on the go.
Onion Bagels vs. Other Flavors
When it comes to bagels, the variety of flavors can be overwhelming—but onion bagels hold their own in a crowd of sweet and savory choices. Let’s break down how they compare to other popular types and why onion often comes out on top.
Savory Strength: Onion vs. Plain, Poppy, and Everything
Onion bagels bring a bold, savory taste that sets them apart from plain or lightly seasoned options like poppy seed or sesame. While plain bagels offer a neutral base, onion bagels infuse flavor right into every bite. Compared to the all-in-one seasoning of everything bagels, onion bagels have a more focused flavor that complements—not overpowers—your toppings.
Sweet vs. Savory: Onion vs. Blueberry, Cinnamon Raisin, and Chocolate Chip
Sweet bagels like blueberry or cinnamon raisin appeal to a different crowd. They’re ideal for breakfast with butter or cream cheese but rarely work well in savory applications. Onion bagels, on the other hand, pair easily with both breakfast and lunch ingredients—eggs, avocado, hummus, or even vegan deli slices. Their flexibility makes them a practical favorite for those who prefer savory over sweet.
Versatility in Meals
While sweeter bagels may limit your topping choices, onion bagels open the door to endless combinations. They hold up well to hearty fillings and taste amazing toasted with dairy-free spreads, nut butters, or vegan cheeses. You can use them for sandwiches, brunch boards, or even mini bagel pizzas. Their adaptability makes them more than just a breakfast item—they’re an all-day option.
The Best Time to Enjoy Onion Bagels at Home
Onion bagels are more than just a morning treat. Their savory flavor and chewy texture make them a satisfying choice for various meals throughout the day. Here’s how you can enjoy them from breakfast to dinner—and even as a late-night snack.
Morning Kickstart: A Savory Start to Your Day
There’s no denying that onion bagels shine brightest at breakfast. Toast one and top it with a generous layer of vegan cream cheese or mashed avocado for a quick and flavorful start. If you’re craving protein, add a plant-based egg patty or tofu scramble. The subtle sweetness of the onions pairs perfectly with robust breakfast flavors and helps you power through the morning.
Midday Meal: Lunchtime Sandwiches That Satisfy
Need a filling lunch that doesn’t feel heavy? Use an onion bagel as the base for a sandwich loaded with fresh veggies, hummus, or sliced vegan deli meat. Toasted or untoasted, it holds up well to thick fillings and sauces. You can also use a halved onion bagel as a base for an open-faced sandwich—think tomato, lettuce, cucumber, and a dash of olive oil.
Evening or Snack: Bagel Pizzas or Simple Sides
Onion bagels aren’t just for traditional meals. Turn one into a mini pizza with tomato sauce and shredded vegan mozzarella. Serve it as a hearty side with a warm soup or salad. And if you’re up late, a lightly toasted onion bagel with your favorite spread makes the perfect comfort snack.
Key Ingredients for Perfect Onion Bagels at Home
Flour, Yeast, and Dough Basics
Making the perfect onion bagels starts with understanding the key ingredients and how they work together to create that chewy, bakery-style texture. Flour, yeast, and the dough itself form the backbone of any great bagel. Let’s break down each element and understand its role in creating the best homemade onion bagels.
The Right Flour for Bagels
The foundation of any good bagel lies in the flour you choose. Bagels require a high-protein flour, such as bread flour, which gives the dough its structure and chewy texture. The high gluten content in bread flour helps the dough rise well and hold its shape during boiling and baking, creating that dense yet chewy bagel that’s loved by many. While all-purpose flour can be used in a pinch, bread flour is the ideal choice for bagels.
Yeast: The Secret to Rise and Texture
Yeast is another crucial ingredient when making onion bagels. It is responsible for the rise and light texture of the dough. Yeast ferments the sugars in the flour, producing carbon dioxide and alcohol, which causes the dough to rise. There are two main types of yeast you can use: active dry yeast and instant yeast. Both work well for bagel dough, but instant yeast is quicker to use since it doesn’t require activation in warm water, making it convenient for those in a hurry.
When activating yeast, ensure the water is at the right temperature—too hot, and the yeast will die; too cold, and it won’t activate properly. Warm water around 110°F (43°C) is the sweet spot to ensure the yeast grows and helps the dough rise beautifully.
The Art of Kneading and Shaping the Dough
Once you’ve combined your flour, yeast, and other ingredients like salt and sugar, it’s time to knead the dough. Kneading develops the gluten in the flour, giving the dough its elasticity. You’ll need to knead for about 8 to 10 minutes until the dough becomes smooth and elastic. Proper kneading is essential for bagels to achieve that chewy texture we all crave.
After kneading, shape the dough into bagels. To do this, divide the dough into small portions, roll each into a ball, and then poke a hole through the center with your finger to create the traditional bagel shape. You can gently stretch the hole if necessary. Once shaped, allow the bagels to rest and rise for a bit before boiling and baking.
Choosing the Right Onions
When it comes to onion bagels, the type of onion you choose can make a significant difference in both flavor and texture. While onions are the star topping, choosing the right variety and preparing them properly is essential for creating a bagel that’s bursting with flavor. Let’s dive into the best onion choices for your bagels and how to use them effectively.
Sweet Onions for a Milder Flavor
Sweet onions, such as Vidalia or Walla Walla, are perfect for bagels if you prefer a milder, less pungent taste. These onions have a natural sweetness that softens the sharpness that some other onion varieties bring. When you use sweet onions for bagels, you can achieve a balanced flavor that enhances the overall taste without overwhelming it. If you’re concerned about a strong onion bite, sweet onions are your best bet.
You can slice them thinly or chop them finely, depending on how you want the onion flavor to integrate with your dough. Sweet onions caramelize beautifully, offering a subtle sweetness when baked, which works wonderfully with bagels.
Yellow Onions for Boldness and Depth
Yellow onions are the go-to for classic, bold onion bagels. They strike the perfect balance between sweetness and sharpness. When these onions are cooked or caramelized, they develop a rich, savory flavor that pairs well with the chewy texture of the bagel. Yellow onions are versatile and tend to complement the dense dough, making them ideal for bagels that deliver a hearty, satisfying bite.
While yellow onions are typically sliced thinly for bagels, you can also experiment with chopping them more finely for a different texture. Their robust flavor provides an excellent backdrop for any savory toppings you choose to add.
Red Onions for a Sharp Kick
Red onions can bring a sharper, more intense onion flavor to your bagels. Their vibrant color also adds a visually appealing touch. While red onions are often associated with fresh dishes like salads, their mild yet spicy flavor works surprisingly well in onion bagels. When caramelized or sautéed, red onions soften, but they maintain a little of their sharpness, which can add a delightful kick to your bagels.
If you want to add a zesty punch, consider using red onions as the topping for your onion bagels. Sautéing them lightly before placing them on top can help mellow out the intense flavor while retaining the sharp bite they offer.
Yellow or Sweet Onions for Topping vs. Red Onions for a Kick
As you prepare your onion bagels, consider using a combination of different onions to balance the flavor profile. You can top your bagels with sweet or yellow onions for a milder, savory taste and incorporate red onions into the dough for an added layer of complexity. This combination can bring a depth of flavor that is sure to impress.
Preparing Onions for Bagels
Once you’ve chosen the perfect onions, it’s time to prepare them for your bagels. Start by slicing or dicing the onions according to your preference. For those who like a crunchier texture, you can keep the slices a bit thicker. If you prefer a more integrated flavor, finely chop or sauté the onions until they soften.
To prevent your onions from becoming too bitter or overpowering, consider caramelizing them lightly. Caramelized onions bring out the natural sweetness and richness, which complements the chewy texture of bagels perfectly. When adding onions to the bagel dough, you can mix them in or sprinkle them on top, depending on your desired outcome.
Optional Add-Ins and Flavorful Toppings for Onion Bagels
When making onion bagels at home, the sky’s the limit when it comes to customizing the flavor. While the onion bagel itself provides a savory and chewy base, you can enhance it with various add-ins and toppings. Whether you’re aiming for extra flavor, a bit of crunch, or a touch of creaminess, adding a few optional ingredients can elevate your bagel game to the next level. Let’s explore some popular choices.
Cheese Additions for Extra Flavor
Cheese is a classic addition to bagels, and it can work wonders with your onion bagels. You can fold cheese into the dough or sprinkle it on top before baking. Here are some cheeses to consider:
- Cheddar Cheese: Sharp cheddar adds a bold and tangy flavor to your bagels. The rich, melty cheese contrasts wonderfully with the savory onions.
- Cream Cheese: Cream cheese is a popular topping for bagels. You can opt for a plain version, or experiment with flavored cream cheeses such as chive, garlic, or even smoked salmon.
- Mozzarella: For a milder, gooey cheese pull, mozzarella works well with onion bagels. It’s perfect if you want to keep the focus on the onion flavor while adding a creamy texture.
Herbs and Seasonings for Added Freshness
Herbs and seasonings can elevate your onion bagels with fresh, aromatic flavors. Consider adding any of these options to your bagels:
- Garlic: Adding garlic to the dough or as a topping brings a savory, aromatic element that complements the onion flavor. You can sauté garlic for a mellow taste or use fresh garlic for a sharper bite.
- Rosemary: Fresh rosemary pairs beautifully with onion bagels, adding an herbal, piney note. Consider sprinkling rosemary leaves over the bagel dough or incorporating them into the bagel’s topping.
- Thyme: Thyme brings a subtle earthy flavor that works well with onions. This herb pairs wonderfully with any savory bagel topping or can be kneaded directly into the dough.
Seeds and Nuts for a Crunchy Finish
Adding seeds or nuts to the dough or as a topping not only gives your onion bagels a delightful crunch but also contributes extra flavor and texture. Here are some great options:
- Sesame Seeds: A popular choice for bagels, sesame seeds offer a subtle nuttiness that pairs nicely with the savory onions. You can add them on top before baking to create a crunchy exterior.
- Poppy Seeds: Poppy seeds provide a mild flavor and slight crunch that adds texture without overpowering the onion flavor.
- Sunflower Seeds: If you want a heartier crunch, consider adding sunflower seeds to your bagels. These seeds contribute a nutty flavor that complements the onions and can add a satisfying texture.
- Chopped Walnuts: For a more substantial crunch and nutty flavor, consider adding chopped walnuts to your dough. They pair well with the savory and sweet notes of the onions.
Sweet Additions for a Unique Twist
While savory toppings are the most common, you can experiment with a bit of sweetness to add complexity to your onion bagels. The contrast between sweet and savory can be delightful. Here are some sweet options:
- Honey: Drizzle a bit of honey on your freshly baked onion bagels for a sweet touch that balances the sharpness of the onions.
- Apple Slices: Thin slices of apples can be an unexpected but delicious topping. The slight sweetness and crisp texture work harmoniously with the soft and savory onion bagels.
- Cinnamon: Lightly sprinkle cinnamon on top of your bagels for a warm, comforting flavor. You can pair this with a sweet cream cheese or enjoy it on its own for a unique twist.
Veggies for Extra Freshness and Flavor
If you’re looking to add more nutrition and freshness to your onion bagels, you can layer on some vegetables. These toppings can also introduce new textures and flavors, creating a more vibrant bagel experience. Consider adding:
- Lettuce or Arugula: A handful of fresh greens like arugula or lettuce can brighten up your onion bagels, offering a peppery contrast to the savory onions.
- Tomato Slices: Add fresh tomato slices for a burst of juiciness and a mild sweetness. The tomato’s softness balances the bagel’s chewiness while enhancing the overall flavor.
- Avocado: Creamy avocado is a perfect addition for a rich, buttery texture. The smoothness of the avocado complements the slight crunch of the onions, creating a satisfying combination.
Spreads for Extra Creaminess
To make your onion bagels even more decadent, consider pairing them with a spread or dip. Here are some ideas for spreads that will work beautifully with the onions:
- Hummus: Hummus, with its creamy texture and garlicky flavor, is an ideal spread for onion bagels. You can go for classic hummus or try variations like roasted red pepper or olive hummus.
- Guacamole: If you’re in the mood for a creamy, zesty topping, guacamole adds a flavorful contrast to the onions. The richness of the avocado and the bite of the onion make for a dynamic pairing.
- Baba Ganoush: For a smoky twist, try baba ganoush. This eggplant-based spread is creamy and has a hint of smokiness that complements the onion flavor.
Step-by-Step: Making Onion Bagel Dough and Shaping at Home
Mixing and Kneading Dough for Onion Bagels
When making onion bagels, the dough is the foundation of your delicious creation. Properly mixing and kneading the dough ensures that your bagels turn out chewy with a perfect texture. The process may seem intimidating, but with the right technique, you’ll have the dough ready in no time. Let’s break down the essential steps for mixing and kneading your dough.
Mixing the Ingredients
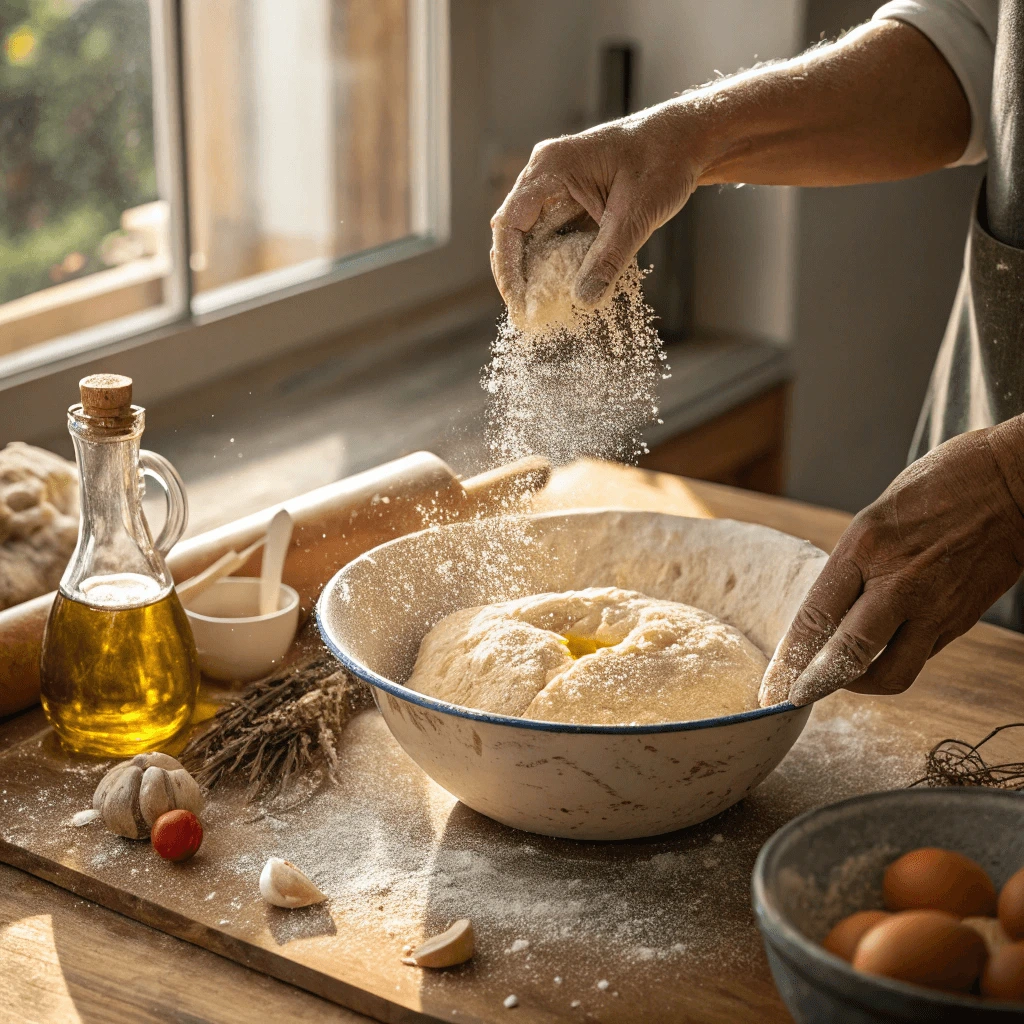
The first step in making bagel dough is to gather all the dry and wet ingredients. Start by adding your flour, yeast, salt, and sugar to a large mixing bowl. The flour provides structure, while the yeast is responsible for making the dough rise. The sugar helps activate the yeast, and the salt balances the flavors.
Once the dry ingredients are well combined, it’s time to add the wet ingredients. Begin by pouring in warm water—around 110°F (43°C)—which activates the yeast and allows it to begin fermenting. A little bit of olive oil can be added to the dough for extra moisture and flavor, but it’s optional. Some recipes also call for honey or molasses, adding a touch of sweetness to the dough. Slowly mix the ingredients together with a spoon or spatula until a rough dough starts to form.
Kneading the Dough
After mixing the ingredients, it’s time to knead the dough. This step is crucial because it helps to develop the gluten, which gives the bagels their signature chewy texture. If you knead the dough correctly, it will have the right consistency for shaping into perfect bagels.
Transfer the dough onto a clean, lightly floured surface. Begin by pressing the dough with your palms, pushing it away from you, and then folding it back over itself. Repeat this motion, gradually turning the dough as you go. Knead the dough for about 8-10 minutes, or until it becomes smooth and elastic. You can also use a stand mixer with a dough hook attachment, which can save time and effort.
During kneading, keep an eye on the dough’s consistency. It should be slightly tacky but not overly sticky. If it feels too sticky, add a little extra flour, a tablespoon at a time. On the other hand, if it feels too dry, add water in small increments. Aim for a dough that feels soft, firm, and slightly elastic when you press it.
Testing Dough Consistency
To make sure you’ve kneaded the dough long enough, perform the “windowpane test.” Take a small piece of dough and stretch it between your fingers. If the dough stretches without tearing and forms a thin, translucent sheet, it’s ready for the next step. If it tears easily, keep kneading for a few more minutes until it reaches the right consistency.
Proper kneading ensures that your bagels will have the perfect texture. Over-kneading can make the dough tough, while under-kneading may result in a dough that’s too sticky and difficult to shape. By paying close attention to the dough’s feel and using the windowpane test, you can ensure a smooth, elastic dough.
Resting the Dough
Once the dough reaches the right texture, it’s time to let it rest. This resting period allows the dough to rise and become lighter. Form the dough into a ball and place it in a lightly oiled bowl. Cover it with a clean kitchen towel or plastic wrap to keep it from drying out. Allow the dough to rise for about 1-1.5 hours, or until it has doubled in size.
The resting time is important because the yeast needs time to ferment, creating air pockets that help the dough expand. During this time, the dough also develops more flavor, making the final bagels taste even better. If you’re short on time, you can let the dough rise in a warmer area (like a turned-off oven with the light on) to speed up the process.
Shaping Your Bagels Like a Pro
Shaping your onion bagels properly is a crucial step in the process. The way you form the dough determines the final texture and appearance of your bagels. If you want to achieve that perfect bagel shape that’s chewy on the inside with a golden crust, you’ll need to use the right techniques. Fortunately, with a few simple steps, you can shape your bagels like a pro. Let’s walk through the process, including tips and tricks for flawless results.
Preparing the Dough for Shaping
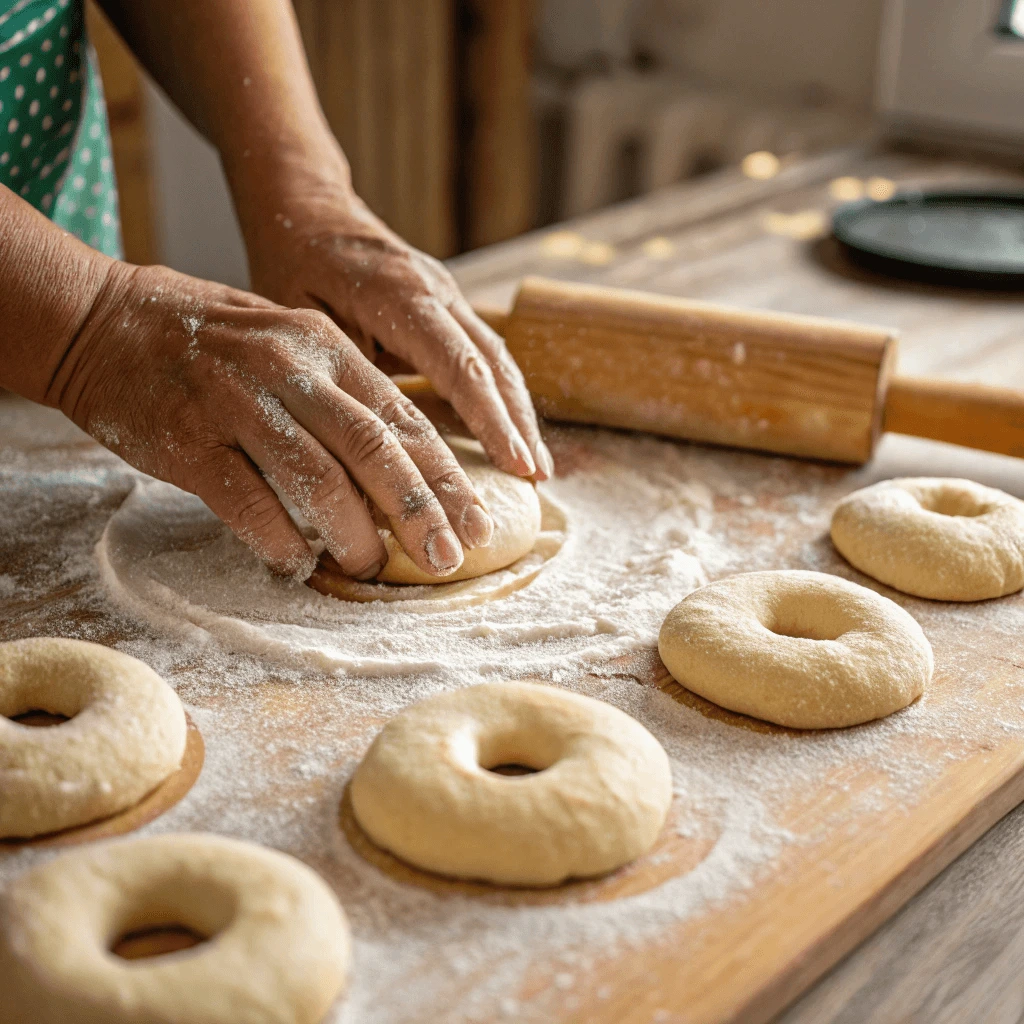
Before you start shaping the dough, make sure it has completed its first rise. After the dough has rested and doubled in size, it’s time to punch it down to release the excess air. Turn the dough out onto a lightly floured surface. You should have a soft, elastic ball of dough that’s ready to be divided.
To ensure uniform bagels, divide the dough into equal portions. Using a dough scraper or knife, cut the dough into about 8-10 pieces, depending on the size of the bagels you want. Each portion should weigh about 3-4 ounces. Roll each piece into a small ball to prepare for shaping.
The Classic Bagel Hole Method
Once you have your dough balls ready, it’s time to shape them. The traditional method for forming bagels involves creating a hole in the center of each dough ball. To do this, take one dough ball and press your thumb through the middle, creating a hole. Then, gently stretch the dough, rotating the ball in your hands to expand the hole. Aim for a hole that’s about 1-2 inches wide. As the dough rises, the hole will shrink, so make it a bit wider than you think you need.
Be careful not to overwork the dough while shaping it. The key to a soft, chewy bagel is not to knead it too much after the first rise. The bagel should have a slightly rough, rustic look, with a smooth, uniform shape.
Shaping Alternative: The Rope Method
Some bakers prefer the rope method for shaping bagels, especially if they want a more uniform appearance. To use this technique, take one dough ball and roll it into a long, even rope, about 8-10 inches in length. Then, bring the ends of the rope together to form a circle and pinch them to seal. This method helps ensure that each bagel is round and symmetrical, which can be especially useful if you’re making a large batch.
While both the classic hole method and the rope method are widely used, it ultimately depends on your preference. The hole method gives a more traditional bagel appearance, while the rope method creates a uniform, even circle.
Ensuring Proper Thickness
When shaping your bagels, aim for a consistent thickness across all of them. The thickness of the dough affects how well the bagels rise and bake. If you make the dough too thick, they may not cook evenly or may turn out too dense. On the other hand, bagels that are too thin may become overly crunchy. Focus on creating a uniform thickness of about 1/2 inch around the entire bagel to ensure an even bake.
If you find that your dough balls are too sticky to handle, lightly flour your hands and the surface to make the process easier. However, avoid adding too much flour, as it can make the dough dry and affect the texture of the bagels.
Letting the Bagels Rest
Once all your bagels are shaped, it’s important to let them rest before boiling them. Lay the shaped bagels on a parchment-lined baking sheet, making sure they don’t touch each other. Cover them loosely with a clean kitchen towel or plastic wrap. Let the bagels rest for 15-20 minutes to allow the gluten to relax and the bagels to slightly puff up. This resting period is important because it ensures that the bagels won’t lose their shape during boiling.
Final Tips for Perfectly Shaped Bagels
- Don’t Overcrowd the Bagels: When placing the shaped bagels on the baking sheet, make sure there’s enough room for them to expand slightly during the resting period.
- Uniformity is Key: For the most professional-looking bagels, focus on uniformity. Each bagel should look similar in size and shape, so pay attention to the consistency of the dough portions.
- Be Gentle with the Dough: Avoid handling the dough too roughly. Gentle shaping ensures that the bagels maintain their soft texture.
Resting and Preparing for Boiling
After shaping your bagels, the next crucial step is the resting period before they go into the pot of boiling water. This phase is essential for both texture and appearance, as it allows the dough to relax, rise slightly, and prepare for the boiling process. Resting the dough for a short time ensures the bagels hold their shape and achieve that signature chewy texture once baked. Let’s explore how to handle this important phase, so you can get the perfect bagels every time.
The Importance of Resting the Dough
Resting the dough after shaping helps the gluten strands to relax. When you knead dough, you activate the gluten, which helps give the bagels structure. However, after shaping, it’s important to let the dough rest before moving on to the boiling step. Resting the dough for 15 to 20 minutes allows the gluten to relax, which prevents the bagels from becoming too tough or dense. Without this resting period, the dough may spring back too much during boiling, resulting in bagels that lack that smooth, round shape and chewy consistency.
Resting also gives the bagels time to puff up slightly, which helps them develop a light texture. The dough should feel soft and slightly puffy but still firm enough to maintain its shape. If you skip this resting time, your bagels may come out denser than you desire, and they might not hold their shape as well when boiled.
How to Rest the Shaped Bagels
Once you’ve shaped your bagels, place them on a parchment-lined or floured baking sheet. Arrange them with enough space between each bagel to allow for a little expansion. Cover the tray loosely with a clean kitchen towel or some plastic wrap to prevent the dough from drying out during the resting period. The cover helps maintain moisture while the bagels relax, making them easier to handle and ensuring they stay soft.
It’s crucial not to over-rest the dough. While a 15-20 minute rest is ideal, leaving the bagels for too long can cause them to overproof. Overproofed bagels may become too soft or collapse when boiled, which is not the desired outcome. Keep an eye on the dough and stick to the recommended resting time to ensure the best results.
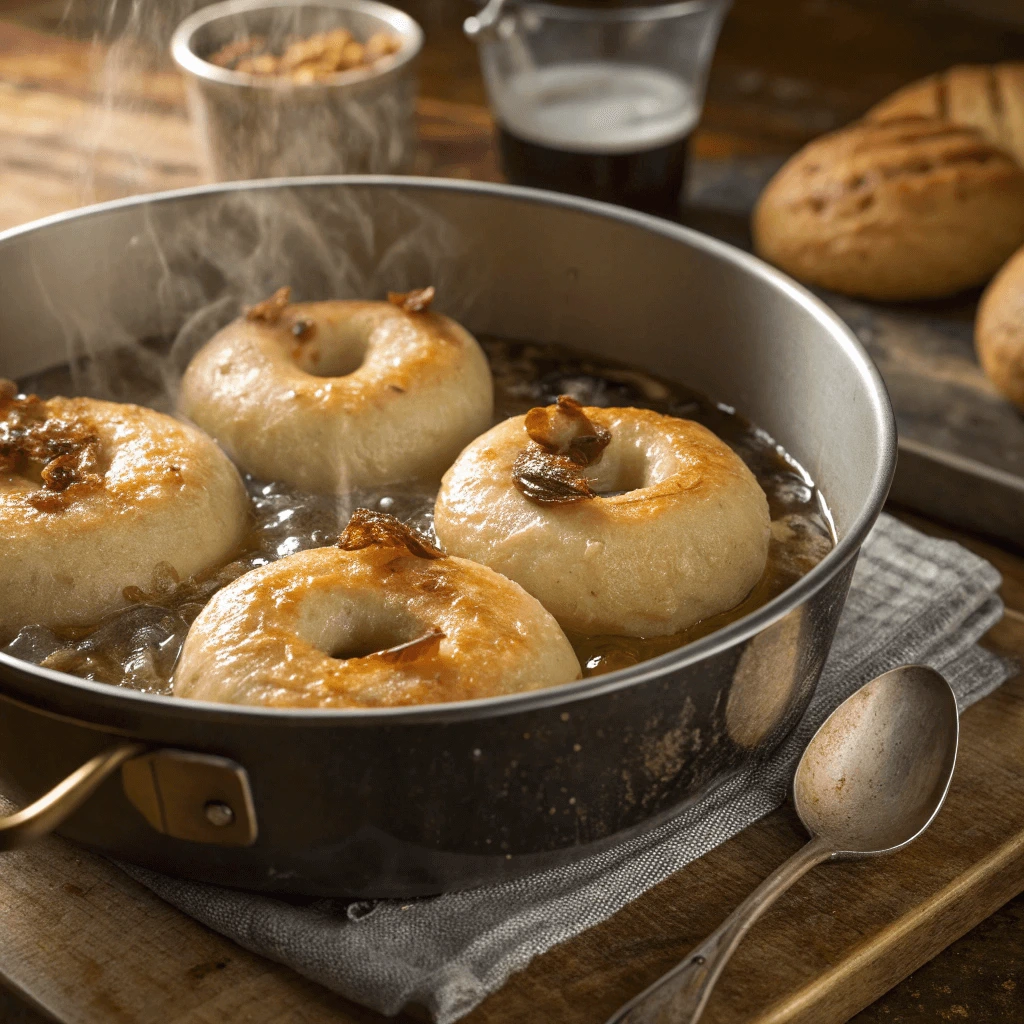
Preparing the Water for Boiling
While your bagels are resting, it’s a good time to prepare the water for boiling. The boiling step is what gives bagels their characteristic chewy texture and glossy, golden crust. To achieve this, bring a large pot of water to a gentle boil. Aim for at least 4-6 quarts of water to ensure the bagels have enough space to float freely. You want the water to be boiling, but not so vigorously that the bagels will get tossed around or lose their shape.
Some bakers recommend adding a little sweetener or baking soda to the water to enhance the bagels’ color and flavor. A tablespoon of honey or sugar can help produce a slightly sweeter crust, while a tablespoon of baking soda increases the pH level of the water, making the bagels brown more effectively during baking.
Once the water is boiling, reduce the heat to a simmer so that the water stays at a gentle boil. This ensures the bagels cook evenly without breaking apart. Having the water at the right temperature is key to achieving that perfect chewy exterior.
Why Boiling is Essential for Bagels
Boiling the bagels before baking is a unique step in the bagel-making process that distinguishes them from other breads. The reason for boiling is to create the glossy, chewy exterior that bagels are known for. When bagels boil, the starches on the surface of the dough gelatinize, forming a layer that helps seal in the moisture. This creates that perfect contrast of a crisp outer crust and a tender, airy inside.
Skipping the boiling step would result in a bread-like consistency rather than the traditional bagel texture. The longer the bagels boil, the chewier the crust will be, so some bakers prefer to boil their bagels for longer periods of time to enhance this texture. A 1-2 minute boil per side is typical for most bagels, but if you prefer a chewier crust, you can adjust the boiling time accordingly.
Final Tips for Resting and Preparing Bagels
- Avoid Overproofing: Keep a close eye on the resting time. Overproofed dough will lead to bagels that lack structure and may fall apart during boiling.
- Space Them Out: Don’t overcrowd the bagels on the baking sheet while they’re resting. Give each one enough space to puff up and maintain its shape.
- Temperature Control: Make sure the water is at a gentle simmer when boiling the bagels. Too high of a boil could cause the bagels to collapse.
- Add Sweeteners or Baking Soda: Experiment with adding a tablespoon of sugar, honey, or baking soda to the boiling water for enhanced flavor and color.
Boiling and Baking for That Classic Finish
Why Boiling is Essential for Perfect Bagels
Boiling bagels is one of the most crucial steps in making them turn out perfectly, and it directly impacts their texture and flavor. This simple yet vital step sets bagels apart from other breads, creating that signature chewy interior and crispy exterior that bagels are known for.
Boiling Locks in Moisture
When you boil the dough, the heat causes the surface starches to gelatinize. This helps lock in moisture, ensuring that the inside of the bagel stays soft and tender while the outside crisps up. Without boiling, bagels would be much denser and would lack the contrast between a chewy interior and a crispy, golden-brown crust.
The Effect on Texture and Shape
Boiling is essential for achieving the chewy texture that characterizes traditional bagels. During the boiling process, the dough undergoes partial cooking, which helps it maintain its shape while baking. This step ensures the bagels don’t spread out too much, giving them that perfectly round, thick shape. It also prevents the dough from drying out, ensuring a more satisfying bite.
How Boiling Impacts Appearance
Aside from affecting the texture, boiling also plays a role in the bagels’ appearance. When the bagels are boiled, the sugars on the surface caramelize. This process gives the bagels a deep golden-brown color and a glossy finish. This shiny, attractive exterior is what gives bagels their visual appeal and makes them stand out when they’re served fresh out of the oven.
Controlling the Boiling Time for Desired Results
The time spent boiling the bagels can be adjusted to alter their texture. Boiling for a longer period of time results in a denser, chewier bagel, while a shorter boiling time leads to a softer and airier result. This flexibility allows bakers to customize their bagels to their exact preferences.
In conclusion, boiling is an essential step to achieving the perfect bagel. It not only contributes to the texture and shape but also impacts the overall flavor and appearance. By boiling your bagels, you ensure they have the classic chewy interior, crisp exterior, and golden color that define a bakery-style bagel.
Baking to Golden Perfection
Baking bagels is the final step in the process, where all the hard work comes together to create a delicious, golden-brown masterpiece. The oven does more than just cook the bagels—it enhances their texture, creates a crispy exterior, and ensures that the bagels achieve their signature chewy interior. This section will walk you through the process of baking bagels to golden perfection.
Preheating the Oven for Even Baking
Before placing your bagels in the oven, it’s essential to preheat it to the right temperature. Most recipes call for a temperature between 425°F and 475°F (220°C to 245°C). Preheating ensures that the oven is hot enough to bake the bagels quickly, which helps develop that crispy, golden crust while preserving the soft, chewy inside. It’s important to let the oven reach the desired temperature before putting your bagels inside to ensure even baking.
Using a Baking Stone or Sheet
To achieve a perfect bake, many bakers swear by using a baking stone or a baking sheet. A baking stone helps distribute heat more evenly across the surface, resulting in a consistent texture on the bottom of the bagels. If you don’t have a stone, a baking sheet works well too, but make sure it’s lined with parchment paper to prevent sticking. The key is to ensure that the bagels have enough space between them to rise and bake properly.
Adjusting the Baking Time for Desired Crispness
The length of time your bagels spend in the oven plays a significant role in their final texture. A typical baking time is between 20 to 30 minutes, but you can adjust this depending on how crisp or soft you like your bagels. If you prefer a softer, slightly chewy bagel, aim for the lower end of the baking time. If you enjoy a crispier bagel with a more defined crust, you can leave them in for a few extra minutes.
Broiling for Extra Golden Brownness
For an extra golden-brown finish, you can broil your bagels for the last minute or two of baking. Simply turn on the broiler and watch closely as the tops of your bagels become even more golden and crispy. Be careful, though—broiling can quickly burn your bagels if left too long, so keep an eye on them to prevent over-baking.
Testing for Doneness
One of the best ways to test if your bagels are done is by tapping the bottom of one gently. If it sounds hollow, your bagels are ready. Alternatively, you can insert a thermometer into the center of one bagel; it should read around 200°F (93°C) when fully baked. These simple methods ensure that your bagels have reached the ideal texture and temperature.
Cooling and Enjoying
Once your bagels are perfectly golden, remove them from the oven and let them cool for a few minutes. Cooling slightly helps them firm up, making them easier to slice. Bagels are best served warm, but you can store them for later use if necessary.
In conclusion, baking your bagels to golden perfection involves the right combination of temperature, time, and equipment. By preheating your oven, using the proper baking tools, adjusting the baking time for your preferred texture, and testing for doneness, you’ll achieve bakery-quality bagels right at home.
Adding Onions at the Right Time
Timing plays a vital role in making the perfect onion bagels. To achieve that delightful onion flavor without compromising texture, it’s important to add the onions at the right stage during the dough preparation process.
When to Add the Onions
The best time to add onions is after the dough has gone through its first rise. Adding onions too early can cause them to lose their flavor, and mixing them in before the dough has risen can result in uneven distribution. Wait until the dough is smooth and elastic, then gently fold in the finely chopped onions to ensure they’re evenly spread throughout the dough.
Choosing the Right Onion Type
Yellow onions are most commonly used for their balanced flavor, but you can experiment with red onions or shallots for a sweeter or milder taste. For a more intense flavor, try caramelizing the onions first. No matter which onion you choose, finely chop them before adding to the dough to make sure the pieces distribute evenly.
Adding Onions as a Topping
For extra flavor, you can also sprinkle chopped onions on top of the bagels after shaping them. Brushing the dough with water or an egg wash before adding the onions will help them stick to the surface, creating a beautiful golden crust with a burst of onion flavor.
Serving, Storing & Creative Ways to Enjoy Onion Bagels
Savory Topping Ideas
Onion bagels offer a rich, savory base that pairs wonderfully with a wide variety of toppings. These toppings can elevate your bagels to new heights, creating the perfect balance of flavors. Whether you’re in the mood for something light or indulgent, the possibilities are endless. Here are some savory topping ideas to try with your freshly baked onion bagels:
Cream Cheese and Fresh Herbs
One of the classic, yet delicious toppings for an onion bagel is a generous spread of cream cheese. To add a twist, mix fresh herbs like chives, dill, or parsley into your cream cheese for an herbaceous flavor that complements the onion. You can also mix in a touch of garlic or lemon zest for an extra kick.
Smoked Salmon and Capers
For a more luxurious topping, smoked salmon pairs beautifully with the savory flavor of onion bagels. Add a few capers and a sprinkle of fresh dill for a classic “bagel and lox” experience. This combination is perfect for breakfast, brunch, or a light lunch.
Avocado and Tomato
For a healthier, yet still savory, topping, try slicing ripe avocado and layering it on your onion bagel. Add sliced tomato, a dash of salt, and a sprinkle of crushed red pepper for some heat. This topping gives your onion bagel a creamy texture with fresh and zesty flavors.
Sautéed Mushrooms and Goat Cheese
If you’re looking for something hearty and flavorful, sautéed mushrooms and goat cheese are a perfect choice. The earthy, rich flavor of the mushrooms pairs beautifully with the tangy, creamy goat cheese. You can add some arugula for a peppery crunch that will round out the flavor profile.
Egg and Cheese
For a filling breakfast bagel, top your onion bagel with a fried egg and melted cheese. Choose a cheese that melts well, like cheddar, Swiss, or mozzarella. The creamy, runny yolk combines perfectly with the rich onion flavor, creating a satisfying meal that’s both indulgent and savory.
Hummus and Roasted Veggies
For a lighter, plant-based savory topping, spread hummus on your onion bagel and top with roasted vegetables. Try roasted bell peppers, zucchini, and eggplant for a hearty, satisfying option. A sprinkle of sesame seeds or pine nuts can add texture and a nutty flavor to this savory topping.
By experimenting with these savory topping ideas, you can customize your onion bagels to fit your cravings or dietary preferences. Whether you go classic with cream cheese or get creative with roasted veggies, your onion bagels will become a delicious canvas for all kinds of savory flavors.
Making Bagel Sandwiches at Home
Bagel sandwiches are a great way to enjoy a filling and customizable meal. With the right combination of fillings, they can be perfect for breakfast, lunch, or even dinner. Here’s a quick guide to creating the perfect bagel sandwich at home.
1. Start with Toasted Bagels
Freshly toasted onion bagels are the perfect base for a delicious sandwich. The warm, slightly crispy texture adds a nice contrast to the fillings.
2. Choose Your Protein
Select a protein for the sandwich, such as:
- Smoked Salmon: Ideal for a classic bagel and lox combo, with cream cheese and capers.
- Chicken or Turkey: Lean, roasted meats that pair well with fresh veggies.
- Tofu or Tempeh: Perfect for a plant-based sandwich with smoky flavor.
3. Add Fresh Veggies
Incorporate veggies like:
- Lettuce: For a crisp texture.
- Tomatoes: Adds juiciness and flavor.
- Cucumbers: Offers a refreshing crunch.
4. Cheese for Creaminess
Choose your cheese, such as:
- Cream Cheese: Classic and perfect with smoked salmon.
- Cheddar or Swiss: Adds richness to the sandwich.
5. Add Sauces and Spreads
Spread on sauces like:
- Mustard: Tangy and sharp.
- Avocado: For a creamy touch.
6. Assemble Your Sandwich
Layer your fillings carefully, ensuring a balance of flavors in every bite.
Making bagel sandwiches at home lets you experiment with your favorite ingredients. Have fun customizing your sandwich for a delicious, satisfying meal!
Storing and Freezing Tips for Onion Bagels
Once you’ve made your perfect batch of homemade onion bagels, you might want to store some for later use. Proper storage techniques will help maintain the freshness and flavor of your bagels. Whether you’re storing them for a few days or freezing them for several weeks, here’s everything you need to know.
1. Storing Fresh Bagels
Fresh bagels should be stored at room temperature for up to 2 days. To keep them soft and fresh:
- Use a Paper Bag: Store bagels in a paper bag to prevent moisture from building up. Paper bags allow airflow, keeping the crust crispy while preventing the bagels from becoming soggy.
- Avoid Plastic Bags: Plastic bags can trap moisture, making the bagels chewy and soft instead of retaining the ideal texture.
If you want your bagels to last a little longer (up to 3 days), you can also wrap them in a kitchen towel or store them in a bread box.
2. Freezing Homemade Bagels
Freezing bagels is a great way to extend their shelf life. Here’s how to do it:
- Cool Completely: Before freezing, make sure the bagels are completely cool. Freezing hot or warm bagels will cause condensation, leading to freezer burn.
- Wrap Them Well: Wrap each bagel individually in plastic wrap or wax paper, then place them in a freezer-safe Ziploc bag. This will keep the bagels from absorbing odors from other foods in the freezer.
- Label and Date: Make sure to label the bag with the date you froze them. Bagels can last up to 3 months in the freezer.
3. Reheating Bagels After Freezing
When you’re ready to enjoy a frozen bagel, follow these simple steps for the best results:
- Thaw at Room Temperature: Remove the bagel from the freezer and let it thaw for 10 to 15 minutes at room temperature. This helps retain moisture.
- Toast for Freshness: To restore the crispy texture, slice the thawed bagel in half and toast it lightly. This will give it that fresh-baked feel and warm up the inside.
- Microwave for Speed: If you’re in a hurry, you can microwave the bagel for 15-20 seconds, but this won’t give you that crisp texture. Toasting is always the better option for a crispy finish.
4. Tips for Keeping Bagels Fresh
Slice Before Freezing: If you prefer a quicker option, slice the bagels before freezing. This makes it easier to toast individual halves without needing to defrost the entire bagel.
Avoid Storing Bagels in the Fridge: Storing bagels in the fridge can cause them to dry out and lose their freshness faster. The fridge tends to dry out baked goods, so it’s best to stick to room temperature or freezing.
In conclusion, making perfect onion bagels at home is simpler than you might think. By following this easy, step-by-step guide, you can create delicious, bakery-quality bagels right from your own kitchen. From selecting the right ingredients to mastering the art of boiling and baking, each step contributes to achieving that perfect golden, chewy texture. Whether you enjoy them fresh out of the oven, with savory toppings, or as part of a bagel sandwich, your homemade onion bagels will be a hit every time. So roll up your sleeves, gather your ingredients, and get ready to enjoy the satisfying process of making your very own onion bagels at home!