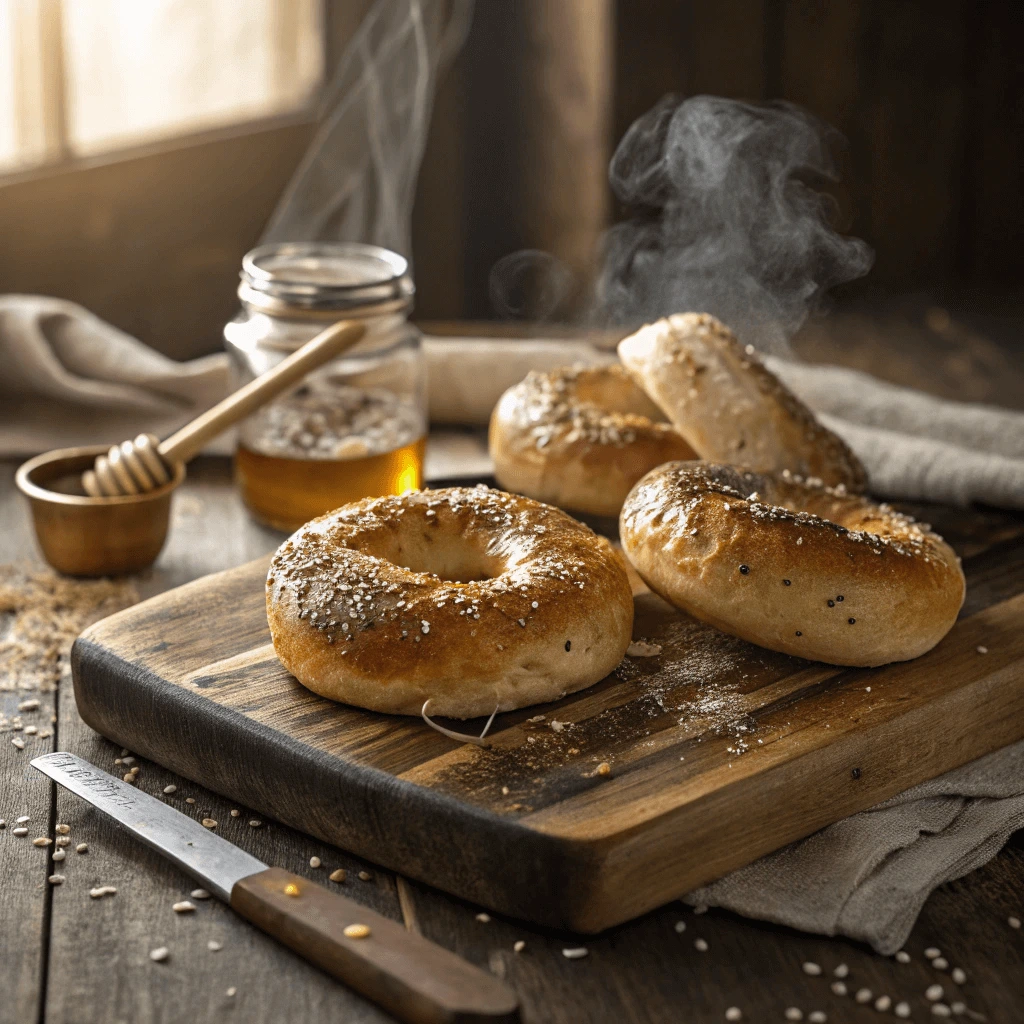
If you’ve ever craved a soft, chewy, and perfectly golden bagel, you’re in the right place! Strathmore bagels, known for their delicious flavor and satisfying texture, can easily be made right in your own kitchen. With the right ingredients and a little patience, you can create bagels that rival your favorite bakery’s offerings.
In this step-by-step guide, we’ll walk you through the process of making Strathmore bagels at home—from preparing the dough to boiling and baking to achieve that irresistible chewy crust. Whether you’re a seasoned baker or a beginner, this recipe will help you make the perfect Strathmore bagels every time. So, roll up your sleeves and get ready to enjoy homemade bagels that are as fresh and delicious as they come!
Essential Ingredients for Making Strathmore Bagels
The Importance of High-Quality Bread Flour
When making Strathmore bagels at home, choosing the right flour is crucial for achieving the perfect texture and taste. Bread flour, in particular, plays a significant role in shaping the final product. Let’s explore why high-quality bread flour is essential for successful bagel-making.
Why Bread Flour Is Different
Bread flour contains more gluten than all-purpose flour. Gluten is a protein that gives bread its structure and chewiness, which is exactly what makes bagels so satisfying to eat. When you knead dough, gluten strands develop and create a strong network that holds the dough together. This network helps the bagels maintain their shape during the boiling and baking processes.
The Role of Gluten in Bagel Texture
The chewy texture of bagels comes from the gluten in the bread flour. As you knead the dough, gluten proteins link together, giving it elasticity. This elasticity is essential for creating the dense, satisfying texture that distinguishes bagels from other types of bread. If you use all-purpose flour, which has less gluten, your bagels may turn out softer and less chewy, lacking the characteristic bagel bite.
Choosing the Best Bread Flour for Strathmore Bagels
Not all bread flours are created equal. When selecting a flour for your Strathmore bagels, look for a high-protein bread flour. A higher protein content will ensure a firmer dough and better gluten development. Many professional bakers recommend using bread flours from brands like King Arthur or Bob’s Red Mill, which are known for their consistency and quality. If you can find a local, artisanal bread flour, that’s even better. These flours often contain higher-quality grains, leading to more flavorful bagels.
Avoiding Substitutes: Why All-Purpose Flour Won’t Cut It
Some recipes may suggest substituting all-purpose flour for bread flour. While all-purpose flour works for other baked goods, it’s not ideal for bagels. It lacks the necessary gluten content to provide the same chewy texture. Substituting it can lead to bagels that are too soft and don’t hold up well after boiling.
How Bread Flour Enhances the Final Product
The use of high-quality bread flour also affects the color and rise of the bagels. Because of the strong gluten structure, bagels made with bread flour tend to rise higher and develop a crispier crust. The dough will feel firmer, making it easier to shape into perfect rings. After boiling, the bagels bake up beautifully, achieving that classic glossy exterior and slightly firm texture that bagel lovers crave.
Why Yeast Is Crucial for Bagel Dough
Yeast plays a vital role in making bagel dough rise and develop its signature texture. Without it, your bagels would lack the light, airy quality that complements their chewy bite. Let’s take a deeper look at why yeast is essential for your Strathmore bagel dough.
The Role of Yeast in Fermentation
Yeast is a living organism that feeds on sugars in the dough. As it consumes these sugars, it produces carbon dioxide and alcohol in a process called fermentation. The carbon dioxide creates air pockets in the dough, which causes it to rise and expand. This rise is crucial for giving bagels their structure and texture. Without proper fermentation, the dough would remain dense, resulting in bagels that are flat and heavy instead of light and chewy.
How Yeast Affects the Texture of Bagels
Fermentation doesn’t just make your dough rise; it also enhances its texture. The gas bubbles produced by the yeast make the dough softer and more elastic, which is key to achieving that desirable bagel chewiness. As the dough rises, gluten strands form, creating a network that holds the gas in place. This results in the chewy, firm texture that is characteristic of bagels. If you use too little yeast or let the dough rise too quickly, the bagels may end up tough or crumbly, instead of soft and dense.
Choosing the Right Type of Yeast
Not all yeast is the same. There are different types of yeast you can use for bagels: active dry yeast and instant yeast. Both work well, but they have slightly different methods of activation.
- Active dry yeast needs to be dissolved in warm water before use. If you’re using this type, make sure to proof it first to ensure it’s active. You can do this by adding a pinch of sugar to the warm water along with the yeast. Let it sit for a few minutes. If it foams, it’s ready to go.
- Instant yeast doesn’t require proofing. It can be added directly to the flour, saving time. This makes instant yeast a popular choice for experienced bakers or those looking for a quicker process.
Both yeasts will give you good results, but choosing one depends on how much time you want to spend preparing the dough and your preference for ease.
How Temperature Affects Yeast Activity
The temperature of your dough can significantly impact how well the yeast works. Yeast thrives in a warm environment. However, if the dough gets too hot, it can kill the yeast, preventing it from fermenting properly. On the other hand, if the dough is too cold, the yeast will work very slowly, leading to a longer rise time. Aim for a dough temperature of about 75°F to 80°F (24°C to 27°C) for optimal yeast activity.
To achieve the perfect rise, let your dough rest in a warm spot, away from drafts. Some bakers even use an oven with the light on to create a warm environment for the dough to rise in. Alternatively, you can place your dough in a covered bowl and let it rise at room temperature for 1 to 2 hours, or until it has doubled in size.
Yeast and Flavor Development
Beyond its role in fermentation, yeast also contributes to the flavor of your bagels. As the yeast ferments, it produces alcohol and organic acids, which enhance the overall taste of the dough. This slow fermentation process creates a rich, slightly tangy flavor that is a hallmark of well-made bagels. If you rush the rise or use too little yeast, your bagels may lack that deep flavor, and their texture may suffer as well.
Troubleshooting Yeast Issues
Sometimes, things don’t go as planned with yeast. If your dough doesn’t rise as expected, check the following:
- Expired yeast: Yeast has a shelf life, so always check the expiration date before using it.
- Incorrect water temperature: Too hot or too cold water can kill or stunt yeast growth. Always use lukewarm water, around 110°F (43°C).
- Overproofing: If you let the dough rise for too long, the yeast can exhaust its food supply, leading to flat or dense bagels. Stick to the recommended rise times.
With proper care and attention, yeast will give you the perfect bagel dough every time.
Adding Flavor with Toppings and Sweeteners
Toppings and sweeteners are key to making Strathmore bagels truly stand out. While the dough itself is important, the right toppings and sweeteners can elevate the flavor and make each bite memorable. From savory to sweet, adding these extras allows you to customize your bagels and enjoy a range of delicious options.
Sweeteners to Enhance Flavor
While traditional bagels are known for their savory toppings, sweeteners can add a unique twist to the flavor profile. The right sweetener balances the dough’s natural taste and helps bring out the bagel’s texture. Here are a few sweeteners you can experiment with:
- Honey: Honey is a popular choice in bagel recipes. It adds a natural sweetness and a subtle floral note that pairs perfectly with the chewy texture of the bagel. Adding honey to the dough also helps achieve a slightly golden crust when baked. You can use honey in the dough or drizzle it on top after baking for extra flavor.
- Maple Syrup: Maple syrup imparts a rich, warm flavor to your bagels. It pairs well with cinnamon and other spices, making it ideal for creating fall-inspired or breakfast-style bagels. Use maple syrup in the dough or brush it on the surface before baking to create a glossy, sweet finish.
- Brown Sugar: Brown sugar, with its molasses content, brings a deeper, caramel-like sweetness. Adding a bit of brown sugar to the dough will give the bagels a more pronounced flavor and a slight richness. It can also complement savory toppings like cream cheese or smoked salmon.
Savory Toppings for a Unique Twist
Bagels are often seen as a savory snack, and the right toppings can enhance the flavor of the dough. Whether you’re in the mood for something classic or adventurous, these savory toppings can transform your bagels:
- Sesame Seeds: One of the most iconic bagel toppings, sesame seeds add a delightful crunch and nutty flavor. Sprinkle them generously over the bagels before baking to achieve a golden, toasted crust. The sesame seeds also enhance the chewiness of the bagel, making each bite more satisfying.
- Everything Bagel Seasoning: If you love bold flavors, everything bagel seasoning is a must-try. This blend of sesame seeds, garlic, onion, poppy seeds, and salt creates a perfect savory topping that adds complexity and depth to the bagel. It’s easy to make at home, and it adds instant flavor to your bagels.
- Cheese: Shredded cheese like cheddar, mozzarella, or Parmesan can be sprinkled on top of bagels before baking to create a cheesy, gooey topping. It melts beautifully, creating a crispy, flavorful crust that pairs wonderfully with a variety of bagel fillings.
Creative Sweet Toppings for a Dessert Twist
If you’re in the mood for something a little sweeter, you can add unique sweet toppings to your bagels. These toppings work especially well when paired with a cup of coffee or as a dessert option:
- Cinnamon Sugar: Cinnamon sugar is a classic sweet topping that pairs beautifully with warm bagels. It’s easy to make by combining cinnamon and sugar in equal parts. Sprinkling this mixture on the bagel before baking creates a sweet, aromatic crust. If you prefer a sweeter bagel, you can add more sugar for an extra boost of flavor.
- Fruit Preserves or Jam: Spread fruit preserves or jam over your bagels after baking for a fruity, sweet flavor. Strawberry, raspberry, or blueberry jam are popular choices that provide a burst of sweetness and a little acidity, balancing out the dough’s richness. You can also use marmalade or lemon curd for a tangier option.
- Nut Butters: Nut butters, like almond butter or peanut butter, offer a creamy, nutty flavor that complements the chewy texture of the bagel. Spread a generous layer of peanut butter or almond butter on your warm bagel for a satisfying, protein-packed snack. You can also drizzle honey over it for added sweetness.
How to Use Toppings During Baking
For the best results, add your toppings before baking so they can melt into the dough and become part of the bagel’s crust. Here’s how to apply different toppings:
- For Seeds: Brush the bagels lightly with water or egg wash before sprinkling seeds on top. This helps the seeds adhere better and gives the bagels a shiny finish.
- For Sweet Toppings: Apply sweet toppings, like cinnamon sugar or honey, right before placing the bagels in the oven. For sticky toppings, like honey or maple syrup, consider brushing the bagels after baking to prevent burning during the baking process.
Step-by-Step Process to Make Strathmore Bagels at Home
Preparing the Bagel Dough
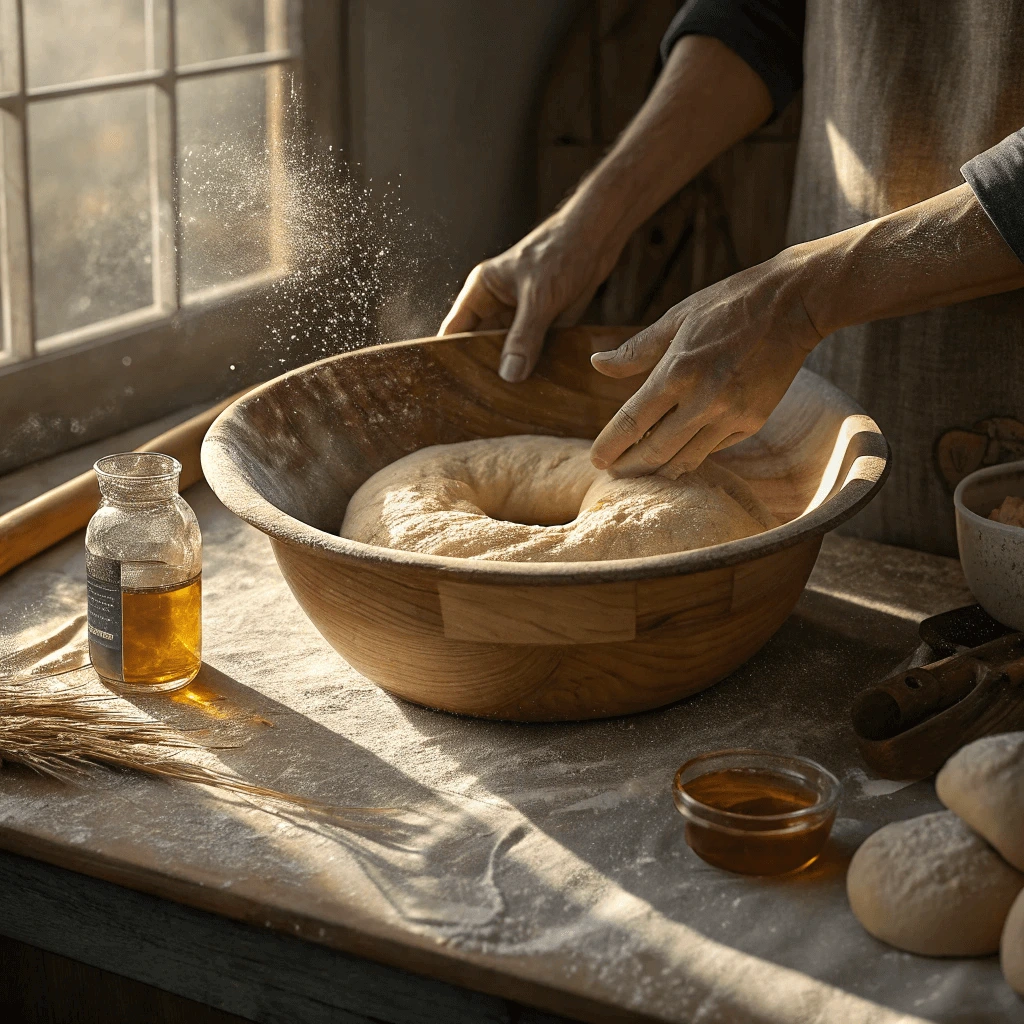
The process of preparing bagel dough is essential to getting that perfect chewy texture and golden crust. Making the dough correctly can be a game changer in bagel-making. By following a few key steps, you’ll be able to prepare dough that rises properly, handles well, and bakes into delicious, soft, and chewy bagels.
Step 1: Mixing the Dough Ingredients
The first step in preparing your bagel dough is to mix all the dry ingredients together. Start by combining bread flour, yeast, salt, and sugar in a large mixing bowl. Bread flour is crucial for bagels because it has a higher protein content than regular flour, which helps develop gluten, contributing to the chewy texture of the bagels.
Once you’ve mixed the dry ingredients, it’s time to add the wet ingredients. Pour in warm water and a bit of honey or sugar to activate the yeast. Stir everything together until a rough dough begins to form. The warmth of the water will help the yeast activate, starting the fermentation process that will help the dough rise and develop flavor.
Step 2: Kneading the Dough
Kneading the dough is an important step that helps develop the gluten structure, which is key to the bagel’s chewy texture. Once the dough comes together, turn it out onto a clean surface and knead it by hand for about 8-10 minutes. If the dough feels too sticky, add a small amount of flour, but be careful not to add too much. The goal is to have a smooth, elastic dough that’s slightly tacky but not overly sticky.
If you have a stand mixer, you can also use the dough hook attachment to knead the dough. This makes the process quicker and easier, especially if you’re making a large batch of bagels. However, kneading by hand allows you to feel the dough and ensures you get the right texture.
Step 3: Allowing the Dough to Rise
After kneading, it’s time to let the dough rise. Place the dough in a lightly oiled bowl and cover it with a damp cloth or plastic wrap. Let it rise in a warm place for about 1 to 1.5 hours, or until it has doubled in size. This rise is essential for creating the air pockets in the dough that will make your bagels chewy and light.
You can speed up the rise by placing the dough in a warm oven with the light on. Be cautious not to make it too hot, as temperatures above 120°F (49°C) could kill the yeast. A steady, warm environment will allow the dough to rise slowly and develop flavor.
Step 4: Punching Down the Dough
Once the dough has risen, gently punch it down to release the air bubbles and deflate it. This step is necessary to ensure that your bagels won’t rise too much or become overly airy. After punching down the dough, divide it into equal portions, typically about 8 to 12, depending on the size of the bagels you want.
Use your hands to shape each portion of dough into a ball. If you want to make classic bagels, you can shape each ball into a round shape and then poke a hole in the middle using your thumb, stretching the hole to about 1.5 inches in diameter. Be sure to make the hole large enough because it can shrink while the bagel rises.
Step 5: Resting the Dough
Let the shaped bagels rest for another 10-15 minutes. This short resting period allows the dough to relax, making it easier to handle when you’re ready to boil and bake. If you skip this step, your dough might shrink back and lose the round shape, making it difficult to form proper bagels.
While the bagels are resting, you can prepare your pot of water for boiling, and preheat the oven. The resting period ensures that your bagels will maintain their shape and texture throughout the boiling and baking process.
Step 6: Boiling the Bagels (Optional, But Recommended)
Although not all recipes require this step, boiling bagels before baking is a critical part of the process that creates their iconic chewy texture. Bring a large pot of water to a boil, adding a tablespoon of baking soda or malt syrup to enhance the flavor and create that beautiful golden color on the crust.
Boil each bagel for about 1 minute per side, making sure not to overcrowd the pot. After boiling, transfer the bagels to a wire rack to drain before placing them on a baking sheet. This step also helps develop a crisp, shiny exterior.
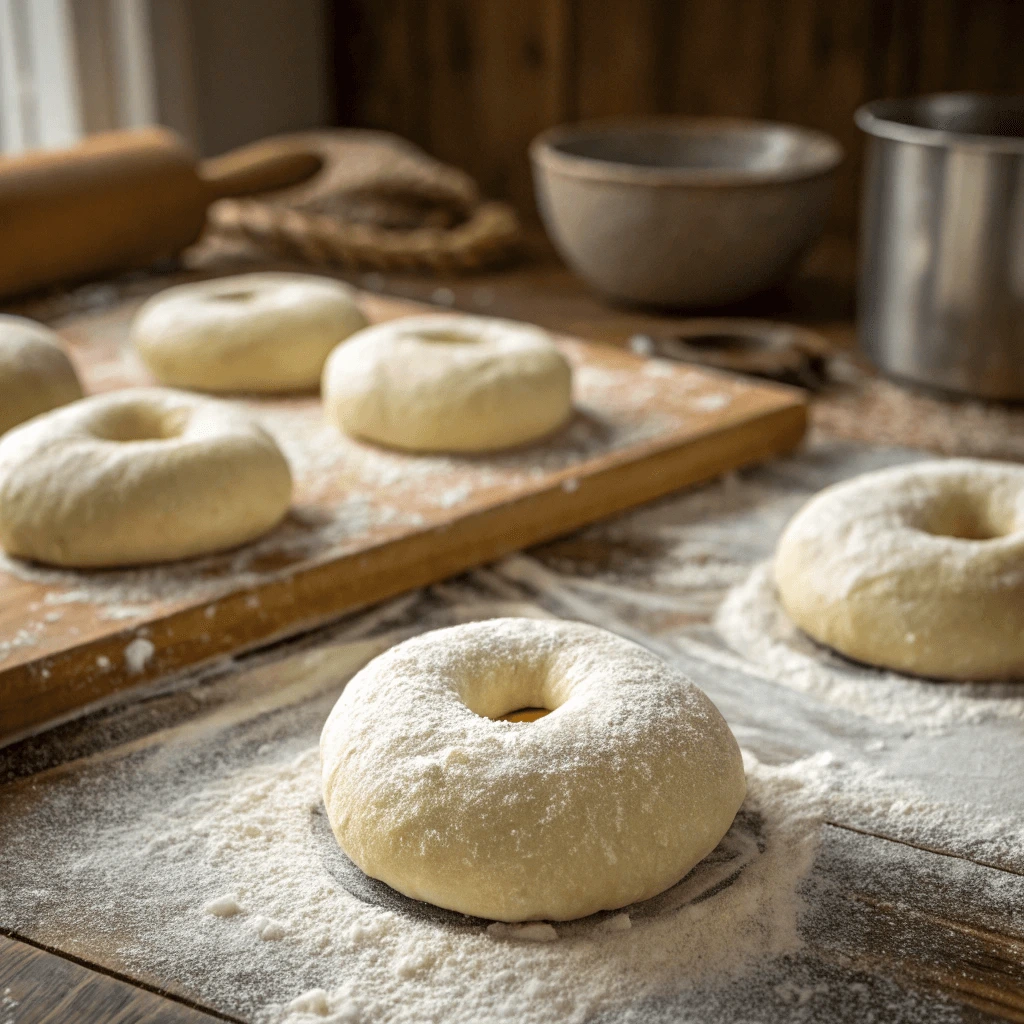
Shaping the Bagels
Shaping the bagels is a crucial step in ensuring they have the right texture and appearance. It’s where the dough transforms from a simple mass into a recognizable bagel shape. How you handle the dough during this process will determine the final look and texture of your bagels, so it’s important to get this step just right.
Step 1: Divide the Dough
Before shaping, the first step is to divide the dough into equal portions. Depending on the size of the bagels you want to make, cut the dough into 8 to 12 portions. Each portion should weigh between 3 to 4 ounces if you want medium-sized bagels. Use a sharp knife or dough scraper to cut through the dough evenly.
Once divided, roll each piece of dough into a smooth ball by cupping your hands around it and rolling it gently against the countertop. The dough should feel firm but smooth. A well-formed dough ball will help maintain the shape of the bagel during the next steps.
Step 2: Forming the Hole
The classic bagel shape features a round ring with a hole in the middle. To create this shape, you’ll need to create the hole with your fingers. Take each dough ball and poke your thumb through the center. Then, gently stretch the hole, rotating the dough as you work, until it reaches about 1.5 inches in diameter.
Be careful not to make the hole too small, as it can close up during the rise or baking process. Similarly, don’t make the hole too large, as it may make the bagel’s structure weak and result in an uneven bake. Aim for a hole that’s large enough to maintain its shape throughout baking but not so big that it compromises the integrity of the bagel.
Step 3: Handling the Dough Gently
As you shape the dough, be sure to handle it gently. Overworking the dough at this stage can lead to dense, tough bagels. You want to maintain the light, airy texture that comes from a well-kneaded dough. If your dough becomes too sticky during shaping, lightly dust your hands and work surface with flour. However, avoid using too much flour as it can affect the bagel’s texture.
If you notice that the dough shrinks back as you try to shape it, give it a short rest of 5-10 minutes. This allows the gluten to relax and makes it easier to shape the bagel without resistance.
Step 4: Resting the Shaped Bagels
After you’ve shaped the bagels, place them on a parchment-lined baking sheet. It’s important to let the shaped bagels rest for a brief period before they go into the boiling water. This resting time allows the dough to relax and prevents the bagels from shrinking when boiled.
Cover the bagels with a clean kitchen towel or plastic wrap to prevent them from drying out. Allow them to rest for 10-15 minutes, which gives them time to rise slightly, ensuring a lighter, fluffier texture after baking.
Step 5: Adjusting the Hole Size (Optional)
After the resting period, you may notice that the hole has closed slightly or become smaller. If this happens, gently use your fingers to re-stretch the hole back to the desired size. This is especially important for ensuring the traditional bagel look and ensuring that the hole doesn’t disappear during boiling and baking.
Be mindful not to overdo it, as too much stretching can cause the dough to tear, leading to an uneven bagel shape. Aim for a consistent, even hole that’s not too tight or too loose.
Step 6: Preparing for Boiling
Once the bagels are shaped and rested, they are ready for the next step: boiling. But before you begin the boiling process, ensure that the water is ready to go. Bring a large pot of water to a gentle boil and add a tablespoon of baking soda or malt syrup. This helps create the characteristic chewy texture and golden color of the bagels’ crust.
The bagels should be boiled one or two at a time to avoid overcrowding. Use a slotted spoon to gently drop them into the boiling water, making sure they float to the top. Boil each side for about 1 minute, and then remove the bagels and place them back on the baking sheet.
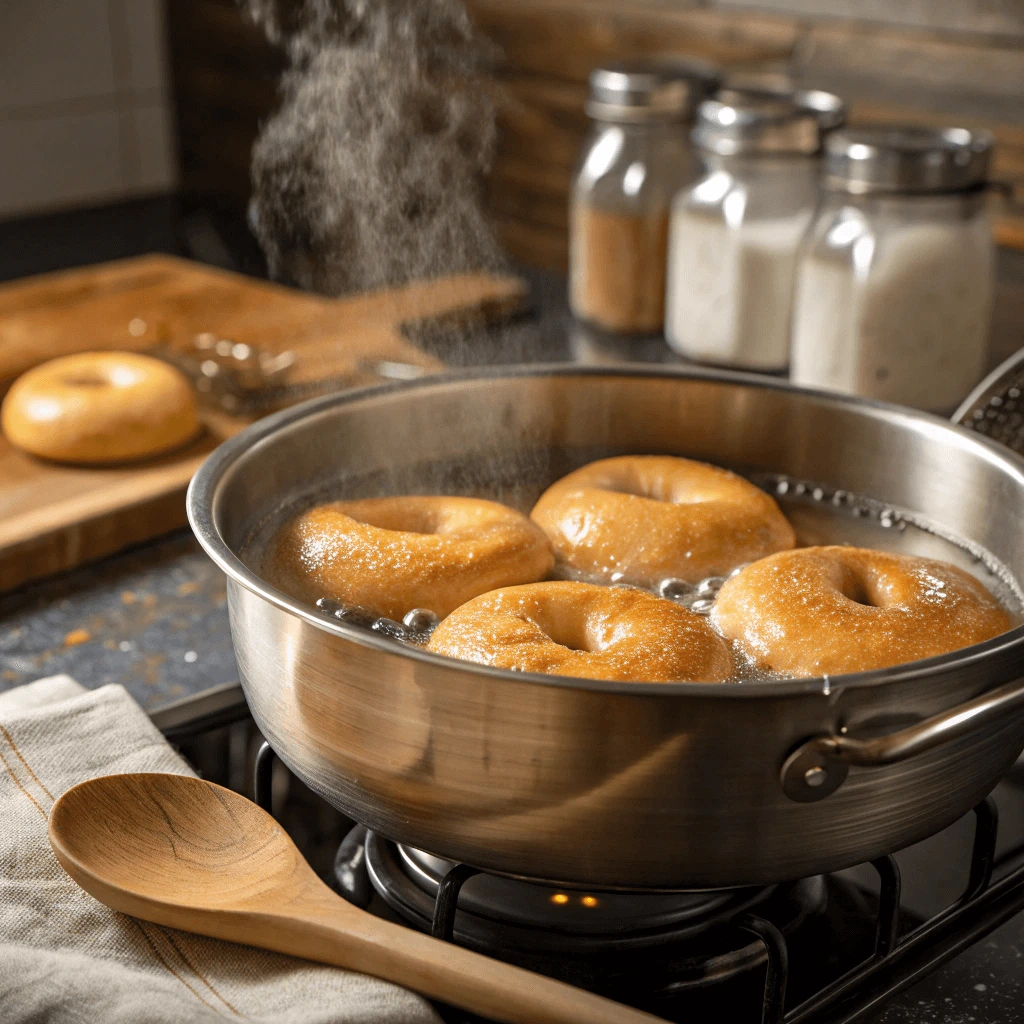
Boiling the Bagels: The Secret to That Chewy Texture
Boiling the bagels before baking is a crucial step in the bagel-making process. This technique not only helps to set the shape of the bagels but also contributes to the bagel’s signature chewy texture and glossy, golden-brown crust. It might seem unusual to boil dough before baking it, but this step is what gives bagels their distinct character. Let’s dive into why boiling is so important and how you can perfect this step to get the best bagels possible.
Why Boiling Makes Bagels Chewy
The key to achieving a chewy bagel lies in the boiling process. Boiling the dough before baking it helps to form a dense, compact crust that seals in the bagel’s moisture. This creates that chewy texture that bagels are known for, which is difficult to achieve without boiling. The hot water rapidly sets the outer layer of the dough, preventing it from over-expanding in the oven and creating a soft, tender interior.
In addition, the boiling process causes the bagels to puff up slightly, creating a lighter, airier interior while maintaining a chewy, firm exterior. Without boiling, the bagels would bake into softer, less chewy rolls, which wouldn’t have that satisfying bite.
Preparing the Boiling Water
Before you can start boiling, you need to prepare the water. The temperature of the water plays a significant role in the texture of the bagel. You want to bring a large pot of water to a gentle boil. It’s essential to use enough water to allow the bagels to float freely without crowding, as overcrowding could cause them to stick together.
To enhance the texture and flavor of your bagels, add a tablespoon of baking soda or malt syrup to the boiling water. The baking soda increases the pH of the water, helping the crust become shiny and golden. On the other hand, malt syrup adds a slightly sweet flavor and encourages a more golden color. You can use either, but baking soda is the most common choice for home bakers.
Boiling the Bagels
Once the water is at a gentle boil, it’s time to add your shaped bagels. To avoid crowding the pot, it’s best to boil only a few bagels at a time, depending on the size of your pot. Use a slotted spoon to carefully lower each bagel into the water. If your bagels are large, you might only want to boil two or three at a time. If they’re smaller, you can boil up to four.
The bagels should begin to float after about 30 seconds. Let them boil for about 1 minute per side. This is the optimal boiling time for bagels that are chewy but still have a slightly airy interior. If you want an extra chewy texture, you can boil them for a little longer, but be careful not to overdo it, as this can cause the bagels to become too dense.
Flipping the Bagels
Once one side of the bagel has been boiled, use the slotted spoon to flip it gently over and boil the other side for 1 minute. The goal is to allow both sides to develop that signature chewy, firm texture. Flipping the bagels ensures they cook evenly, giving you a consistent result across the whole batch.
If you’re using malt syrup in the boiling water, you’ll also notice that the bagels’ color deepens as they boil, making them look even more delicious. The time spent in the boiling water directly impacts the color and texture, so make sure to keep an eye on the clock.
After Boiling: Drain and Transfer
Once the bagels have boiled on both sides, remove them from the water with the slotted spoon and place them on a wire rack to drain. This step helps to get rid of excess water, preventing soggy bagels when baking.
Let the bagels rest on the rack for a few minutes. During this time, you can prep your baking sheet and preheat your oven. This resting period also helps the bagels hold their shape and ensures that the dough has settled before baking.
Boiling Variations: Sweet or Savory?
While traditional bagels are boiled in water with a bit of baking soda, you can experiment with different boiling liquids for varied results. For example, you could add honey to the water for a slightly sweet bagel that pairs well with breakfast spreads or cream cheese. Some bakers even use beer for a more complex flavor.
If you want a savory twist, you can boil your bagels with a bit of sea salt in the water to enhance the overall flavor. This is a common method for bagels like everything bagels that have savory toppings. The choice of boiling liquid can add extra flavor and customize your bagels to suit your preferences.
Baking Tips for Perfect Strathmore Bagels
Oven Temperature and Baking Time: Perfecting Your Strathmore Bagels
Once your bagels are shaped, boiled, and ready for the final step, it’s time to bake them. The oven temperature and baking time are key factors that determine how crispy, golden, and chewy your bagels will turn out. Baking your bagels correctly will ensure they develop the perfect texture and color, so understanding how to manage these variables is crucial for success.
Choosing the Right Oven Temperature
The ideal oven temperature for baking bagels is typically 425°F (220°C). At this temperature, your bagels will bake quickly, allowing them to develop a crisp, golden crust while maintaining their chewy interior. It’s important to preheat your oven fully to ensure an even bake from start to finish.
If you find that your bagels are not browning as much as you’d like, you can increase the temperature slightly, but be cautious—too high of a temperature may result in an overly dark or burnt crust while leaving the inside too doughy. Conversely, if the temperature is too low, your bagels may bake too slowly, resulting in a soft or pale crust with a less desirable texture.
Preheating the Oven: A Critical Step
Before you put the bagels in, make sure your oven is fully preheated. Preheating is important because it ensures the bagels begin to bake immediately once they enter the oven, allowing them to rise properly and form a crisp crust. A hot oven creates the necessary environment for your bagels to puff up and bake evenly.
It’s also a good idea to place a baking stone or baking sheet in the oven while it’s preheating. If you’re using a baking stone, make sure to preheat it as well for at least 15 minutes before baking your bagels. This helps create an evenly heated surface, promoting a consistent crust.
Baking Time: The Right Balance
Baking time is a critical component in achieving the perfect bagel. Bagels typically need 20 to 25 minutes in the oven, depending on their size and the temperature of your oven. The key is to keep an eye on the bagels as they bake, checking for that perfect golden-brown color on the crust.
If you prefer your bagels to have a thicker crust, you can bake them for a bit longer, up to 30 minutes, but be sure to monitor them closely to avoid over-baking. On the other hand, if you like a softer, more delicate crust, aim for the lower end of the baking time range.
How to Check for Doneness
You can easily check if your bagels are done by tapping the bottom of one of the bagels with your finger. If it sounds hollow, they are fully baked. Another method is to check the color of the crust. The bagels should have a rich golden-brown color with a slight sheen. If they are pale or unevenly browned, they may need a few more minutes in the oven.
Don’t be afraid to take a peek at the bagels toward the end of the baking time to check their progress, but avoid opening the oven too frequently, as this can cause the temperature to fluctuate and affect the final result.
Using a Convection Oven: Adjusting Time and Temperature
If you’re using a convection oven, you’ll need to make a slight adjustment to both the oven temperature and baking time. A convection oven circulates air, which can cause food to cook faster and more evenly. For bagels, you may want to lower the temperature by about 20°F (10°C), making it 400°F (200°C), and reduce the baking time slightly.
With a convection oven, you’ll still aim for a golden-brown crust and hollow sound when tapping the bagel’s bottom, but keep in mind that the bake will be quicker. Be sure to monitor your bagels closely during the last few minutes of baking to prevent overcooking.
Finishing Touches: Cooling the Bagels
After baking, remove the bagels from the oven and let them cool on a wire rack for several minutes. This cooling step allows the bagels to set properly, ensuring they don’t become soggy or lose their shape. If you cut into them too soon, the steam inside may cause them to collapse or become doughy.
Cooling your bagels also allows the crust to firm up completely, giving them that perfect balance of crispiness on the outside and softness on the inside. Let them cool for at least 15 minutes before slicing them, though you can enjoy them warm if you prefer.
Using a Baking Sheet or Stone: The Best Way to Bake Bagels
When it comes to baking bagels at home, the surface you choose to bake them on can make a big difference in the final result. Two common options for baking bagels are using a baking sheet or a baking stone. Each method has its own benefits, and understanding the differences can help you decide which one is best for your bagel baking needs. Let’s explore both options in detail, so you can choose the one that will give you the best results.
Baking Sheet: Simple and Convenient
A baking sheet is the most common and accessible choice for home bakers. It’s simple to use, widely available, and doesn’t require any special equipment. If you choose to use a baking sheet, here are some tips for getting the best results.
Preparing the Baking Sheet
Before placing your bagels on the baking sheet, make sure it’s lined with parchment paper or a silicone baking mat. This will prevent the bagels from sticking and make cleanup easier. It also provides a non-stick surface that helps maintain the bagel’s shape as it bakes.
Space and Arrangement
When using a baking sheet, it’s important to leave some space between each bagel. As the bagels bake, they will expand slightly, so giving them room to spread out ensures they cook evenly. If the bagels are too close together, they may merge into one another, affecting their shape and texture. Arrange the bagels in a single layer, leaving at least 2 inches of space between them.
Baking Time with a Baking Sheet
The baking time when using a baking sheet is generally the same as using a baking stone—around 20 to 25 minutes at 425°F (220°C). However, the bagels may not develop the same level of crispiness on the bottom compared to when using a baking stone. But, with proper monitoring and the right oven temperature, a baking sheet can still yield delicious bagels with a lovely golden color.
Baking Stone: Achieving a Professional-Quality Crust
A baking stone (also called a pizza stone) is an excellent tool for achieving a perfect bagel crust. It absorbs and retains heat more effectively than a regular baking sheet, which allows for better heat distribution while baking. This results in a crispier bottom and a more even bake overall, which is why many professional bakers and enthusiasts prefer using one.
Preheating the Baking Stone
One of the key factors when using a baking stone is to preheat it. Place the baking stone in the oven when you begin preheating the oven to 425°F (220°C). It’s crucial to give the stone enough time to heat up, typically 15 to 20 minutes. A well-preheated stone ensures that the bagels will bake evenly from the moment they hit the stone, creating a better crust.
Transferring Bagels to the Stone
When you use a baking stone, you need to transfer your bagels to the hot stone once they’re shaped and boiled. A great tool for this is a pizza peel or flat spatula. Dust the peel with flour or cornmeal to prevent the bagels from sticking, then gently slide the bagels onto the preheated stone. Alternatively, you can use a piece of parchment paper to help slide the bagels onto the stone easily.
Crispier Bottom and Better Rise
The baking stone’s ability to maintain high and consistent heat helps the bagels rise more evenly, giving them a well-developed texture. It creates the signature crispy bottom that is characteristic of professional bagels. The stone provides heat from below, which allows the bagels to rise quickly, creating a chewy, dense interior with a nicely browned exterior.
Key Differences Between a Baking Sheet and Baking Stone
While both a baking sheet and a baking stone can be used to bake bagels, they each offer distinct advantages.
Heat Distribution
A baking stone provides more even heat distribution, which leads to a crisper bottom and a more uniform bake. It’s especially useful if you want professional-quality bagels with an excellent rise. On the other hand, a baking sheet will work fine for home bakers and may be easier to manage, especially if you don’t have a stone.
Convenience and Accessibility
A baking sheet is easy to use and doesn’t require any special equipment. You can simply place it in the oven, arrange the bagels, and bake. However, a baking stone requires more attention, such as preheating, and can be trickier to handle without a pizza peel. But, if you’re aiming for that traditional bagel crust, the extra effort can be worth it.
Cost and Storage
A baking stone can be a bit more expensive than a baking sheet. It also requires more space to store, which can be an issue if you have a small kitchen. A baking sheet, on the other hand, is inexpensive, easy to store, and doesn’t require as much maintenance.
How to Get the Best of Both Worlds
If you want to combine the benefits of both methods, you can start baking your bagels on a baking sheet and transfer them to a preheated baking stone halfway through the bake. This gives you the best of both worlds: a crispy, even bottom from the stone and an easy-to-handle baking sheet for the initial phase of baking. However, this technique does require a bit of precision and timing, so it’s best for more experienced bakers.
Achieving the Perfect Crisp on the Outside
The crisp outer crust is one of the most defining features of a great bagel. Achieving this perfect balance between crunch and chewiness requires the right techniques at every step of the baking process.
1. Boiling: The Secret to a Crispy Exterior
Boiling the bagels before baking creates the signature chewy, crisp texture. The alkaline solution in the boiling water, often enhanced with baking soda or malt syrup, helps form a gelatinized layer that contributes to the crust’s crunch. Boil your bagels for about 30 seconds to 1 minute per side for the best result.
Quick Tip: Avoid overcrowding the pot. Give each bagel space to boil freely.
2. Oven Temperature: Baking at the Right Heat
Baking at 425°F (220°C) ensures that the bagels cook quickly and develop a golden, crispy crust. A high temperature allows the Maillard reaction, giving the bagels their crispy exterior without drying out the interior.
Pro Tip: For extra crispiness, add a pan of water in the oven to create steam while baking.
3. Baking Surface: Stone vs. Sheet
Baking stones help produce a crispier bottom by distributing heat evenly. If you’re using a baking sheet, consider flipping the bagels halfway through baking to ensure both sides bake evenly.
Tip: Preheat your baking stone to get the best crisping effect.
4. Adding Egg Wash or Toppings
Brushing the bagels with an egg wash gives the crust a glossy, golden finish while adding a layer of crunch. Toppings like sesame seeds or coarse salt enhance both the flavor and texture.
5. Cooling: Set the Crust
Let the bagels cool on a wire rack for 15-20 minutes. This allows the steam to escape, leaving the bagels with a perfectly crisp exterior while maintaining a soft, airy interior.
Variations and Customization for Your Strathmore Bagels
Experimenting with Different Toppings: Elevate Your Strathmore Bagels with Unique Flavors
Bagels are versatile, and one of the best ways to personalize your homemade Strathmore bagels is by experimenting with various toppings. Whether you’re craving something savory or sweet, there are endless ways to make your bagels uniquely yours.
1. Savory Toppings: Rich and Flavorful Options
Herbs and Spices
Herbs like rosemary, thyme, and oregano can give your bagels a fresh, fragrant taste. You can sprinkle dried or fresh herbs on top before baking, or even mix them into the dough.
Cheese
For a savory kick, top your bagels with shredded cheddar, mozzarella, or parmesan. These cheeses melt beautifully, creating a crispy, golden crust. For a creamy option, spread some cream cheese before adding the cheese topping.
Garlic and Onion
A sprinkle of garlic powder, onion flakes, or even fresh onion slices can add a wonderful, savory depth to your bagels.
2. Sweet Toppings: Treat Yourself to Something Sweet
Cinnamon and Sugar
Cinnamon and sugar are a classic pairing for a sweet bagel. Sprinkle the mix generously over the bagel before baking for a delightful treat.
Fresh Fruit
Top your bagel with fresh fruits like strawberries, blueberries, or even apples for a refreshing, light touch. You can add a drizzle of honey for a little extra sweetness.
Maple Syrup or Honey
For those with a sweet tooth, drizzle maple syrup or honey on top of your bagel after baking. These toppings bring a delicious, natural sweetness that pairs well with cream cheese.
3. Creative and Unique Toppings: Add a Personal Touch
Avocado
Avocado is a fresh and creamy topping that pairs well with many savory toppings like fresh tomato or cucumber slices. Add a sprinkle of sea salt and pepper for a balanced, nutritious snack.
Smoked Salmon
For a slightly more luxurious topping, try smoked salmon paired with cream cheese. Add fresh dill or capers for an extra layer of flavor.
Hummus or Vegan Cream Cheese
For those who prefer plant-based options, hummus or vegan cream cheese are perfect choices. These spreads complement a variety of toppings like cucumbers, tomatoes, or even sprouts.
4. Seasonal Toppings: Celebrate the Flavors of the Season
Fall Flavors
During the autumn months, try topping your bagels with pumpkin puree mixed with cinnamon and sugar. It’s warm and comforting, perfect for chilly mornings.
Spring and Summer Flavors
In the warmer months, fresh fruits like strawberries or peaches are ideal for topping your bagels. Pair them with a light spread like whipped goat cheese or vegan cream cheese for a refreshing option.
Creating Flavored Bagels with Add-ins
Add-ins are a great way to create unique, flavorful bagels. From savory to sweet, the possibilities are endless. Here’s how to add those extra flavors to your bagels.
1. Choosing Your Add-ins
Pick ingredients that complement the dough. Common add-ins include:
- Herbs and Spices: Garlic, onion, rosemary, dill.
- Cheese: Cheddar, mozzarella, or Parmesan.
- Dried Fruits and Nuts: Raisins, cranberries, walnuts.
- Seeds: Sesame, poppy, or sunflower seeds.
Tip: Make sure any wet ingredients are well-drained to keep the dough from getting soggy.
2. Mixing Add-ins into the Dough
Once your dough is kneaded, gently fold in your add-ins. Don’t overwork the dough to avoid tough bagels.
- Mix evenly to ensure every bagel gets the same flavor.
- For dry ingredients like spices, you can mix them directly into the flour before adding the wet ingredients.
3. Topping Your Bagels
For extra flavor, top your bagels before baking. Consider these options:
- Everything Bagel Topping: Sesame seeds, poppy seeds, garlic, and onion.
- Cinnamon Sugar: A sweet topping for a dessert-style bagel.
- Cheese: Sprinkle shredded cheese on top before baking for a cheesy finish.
Tip: Wet the surface with an egg wash to help toppings stick.
Making Mini Strathmore Bagels for Snacks or Parties
Mini bagels are a fun and versatile alternative to regular-sized ones. They make perfect finger foods for parties, lunchboxes, or anytime snacking. Despite their small size, they still deliver that classic chewy texture and rich flavor that Strathmore bagels are known for.
Adjusting the Dough Size
To make mini bagels, prepare your dough as you normally would. After it rises, divide the dough into small, equal portions—each about the size of a golf ball. You can use a kitchen scale to measure out roughly 1.5 to 2-ounce pieces. Roll each piece into a smooth ball, poke your finger through the center, and gently stretch the hole to form a ring. These mini rings will puff up as they bake, so don’t worry if they look small now.
Shortening the Boiling and Baking Times
Because mini bagels cook faster than full-sized ones, you’ll need to adjust the cooking times. Boil them for about 30 to 45 seconds on each side to lock in moisture and build the chewy crust. For baking, reduce the time to around 12 to 15 minutes at 425°F (220°C). Keep a close eye on them, as they’ll brown more quickly. A golden finish with a slight sheen means they’re ready.
Serving Ideas for Parties and Snacks
Mini Strathmore bagels are easy to dress up for any occasion. Create mini sandwiches by slicing them and adding fillings like cream cheese, smoked salmon, or sliced veggies. Offer a DIY bagel bar at parties with spreads and toppings so guests can build their own. For a sweet option, sprinkle them with cinnamon sugar or drizzle with honey. You can also freeze a batch and reheat them later for quick snacks on busy days.
Troubleshooting Common Bagel Baking Problems
Why Are My Bagels Too Dense or Tough?
If your Strathmore bagels are dense or tough, a few factors might be causing it. Here are the key issues and how to fix them:
1. Underproofing the Dough
If you don’t let the dough rise enough, it won’t develop the desired texture. Allow the dough to double in size in a warm spot before shaping.
2. Overworking the Dough
Over-kneading can make bagels dense. Knead the dough just enough to form a smooth, elastic ball without overworking it.
3. Using the Wrong Flour
Bread flour, with higher protein content, is ideal for bagels. Using all-purpose flour can result in a less chewy, dense texture.
4. Not Enough Water in the Dough
The dough should be slightly tacky. If it’s too dry, add more water until you achieve the right consistency.
5. Boiling Too Long or at Too High a Temperature
Boil the bagels for 1-2 minutes in water that’s at a gentle simmer (not a full boil). Overboiling can lead to dense bagels.
6. Not Using Enough Yeast
Using too little yeast or expired yeast can prevent the dough from rising properly. Ensure you’re using fresh, active yeast.
7. Overbaking the Bagels
Overbaking can dry out bagels. Bake for about 20 minutes at 425°F, checking for golden-brown color and a firm texture.
By addressing these common mistakes, your Strathmore bagels will have the perfect chewy texture every time.
How to Prevent Your Bagels from Losing Shape
One of the challenges of making Strathmore bagels at home is ensuring they hold their shape while they rise and bake. Bagels should maintain their round, smooth shape throughout the entire process. However, if the dough isn’t handled correctly or if certain conditions aren’t met, bagels can lose their structure. Let’s explore several methods to help prevent this and ensure that your Strathmore bagels turn out with a perfect, sturdy shape.
1. Proper Shaping Techniques
The way you shape your Strathmore bagels is crucial for maintaining their structure. After the dough has risen and been divided into portions, handle it gently. Overworking the dough or pressing it too firmly can lead to deflation, causing bagels to lose their shape. To shape your bagels, roll each piece of dough into a smooth ball, and then use your thumb to make a hole in the center. Gently stretch the hole, being careful not to tear the dough. Ensure the ring is even, with a consistent thickness all around. This will help the bagels maintain their shape while boiling and baking.
2. Resting the Shaped Dough
After you shape the bagels, it’s important to let them rest before boiling. This resting period allows the dough to relax and firm up, reducing the chance of the bagels spreading too much during boiling. Let your bagels rest for about 10 minutes, covering them with a clean cloth to prevent them from drying out. The dough should be firm enough to hold its shape, but still slightly pliable. If the dough is too soft after resting, gently reshape the bagels before proceeding to the boiling step.
3. Boiling with Care
Boiling is a crucial step that helps your Strathmore bagels achieve that perfect chewy texture and proper shape. To prevent your bagels from losing their shape during boiling, be mindful of the water temperature and the time they spend in the water. Bring the water to a gentle simmer (not a rolling boil), and carefully lower each bagel into the pot. Let each bagel cook for about 1-2 minutes on each side, making sure not to overcrowd the pot. Too many bagels in the water at once can cause them to bump into each other and lose their shape.
4. Use a Baking Sheet or Pizza Stone
The way you bake your Strathmore bagels also plays a role in maintaining their shape. If you’re baking directly on a baking sheet, make sure to line it with parchment paper to prevent sticking. Alternatively, using a pizza stone can help evenly distribute heat, providing consistent baking and preventing the bagels from spreading out too much during the process. Preheat your pizza stone or baking sheet before placing the bagels on it to ensure even cooking.
5. Avoid Overproofing the Dough
Overproofing occurs when the dough is left to rise for too long. While it’s essential to let your dough rise enough for the yeast to work, letting it sit for too long can cause it to lose its structure. Overproofed dough can become too soft and delicate, resulting in bagels that may collapse or lose their shape during boiling or baking. Stick to the recommended rise times and check the dough periodically to ensure it’s ready for shaping.
6. The Right Flour for the Job
Using high-protein bread flour is essential for bagels that maintain their shape. Bread flour has more gluten than all-purpose flour, providing strength and elasticity to the dough. This is what helps the bagels keep their round form, even after boiling and baking. If you use a lower-protein flour, your bagels might not rise as high and could lose their shape more easily.
Fixing Bagels That Aren’t Rising Properly
If your Strathmore bagels aren’t rising properly, it can be frustrating. A bagel’s rise is essential to achieving that perfect chewy texture and the right size. However, don’t worry—there are several factors that could be causing the issue, and with a few adjustments, you can fix them and still get the perfect batch.
1. Check Your Yeast
Yeast is the key ingredient in making Strathmore bagels rise, so ensuring it’s fresh and active is crucial. If your yeast is expired or not activated properly, the dough won’t rise as it should. To test the yeast, mix it with warm water and a pinch of sugar. Let it sit for 5-10 minutes. If the mixture becomes bubbly and frothy, your yeast is active. If not, discard it and use a new packet.
2. Make Sure You’re Using the Right Temperature
Yeast thrives at a warm, but not hot, temperature. When proofing your dough, avoid using water that’s too hot, as it could kill the yeast and prevent the dough from rising. The ideal temperature for the water should be between 100°F and 110°F. If your kitchen is too cold, you can place the dough in a warm spot, like an oven with the light on, to encourage proper rising.
3. Allow Enough Rising Time
Bagels need adequate time to rise before boiling and baking. Typically, Strathmore bagels should rise for about an hour, but this can vary depending on the temperature of your kitchen. If your dough hasn’t risen enough, give it more time. Don’t rush this step, as allowing the dough to fully rise will ensure that your bagels have a soft, airy texture. If you’re short on time, you can try placing the dough in a slightly warmer location to speed up the process.
4. Adjust the Flour-to-Water Ratio
Sometimes, bagel dough may be too dry or too wet, leading to problems with rising. Strathmore bagels require a stiff dough, but if you don’t add enough flour or if there’s too much, the dough may not rise properly. Make sure to measure your flour correctly, and if the dough feels too sticky, add small amounts of flour until you reach the right consistency. Conversely, if the dough feels too dry, you can add a bit of water to bring it to the right texture.
5. Handle the Dough with Care
When shaping your Strathmore bagels, be gentle with the dough. Overworking the dough can deflate the air bubbles that contribute to the rise, making the bagels dense instead of airy. Roll the dough into smooth balls and gently shape them into rings, without pressing or squeezing too hard.
Enjoy Your Perfect Strathmore Bagels!
Now that you know how to make Strathmore bagels at home, you’re just a few simple steps away from bakery-style results. From using high-quality bread flour to boiling and baking with care, each part of the process helps create that iconic chewy texture and golden crust.
Don’t be afraid to get creative—experiment with different toppings, mix-ins, and sizes to make each batch your own. Whether you love classic sesame or bold flavors like cinnamon raisin, there’s a perfect bagel waiting for you to create it.
Tried the recipe? Share your homemade Strathmore bagels with us in the comments or on social media. We’d love to see your delicious creations!