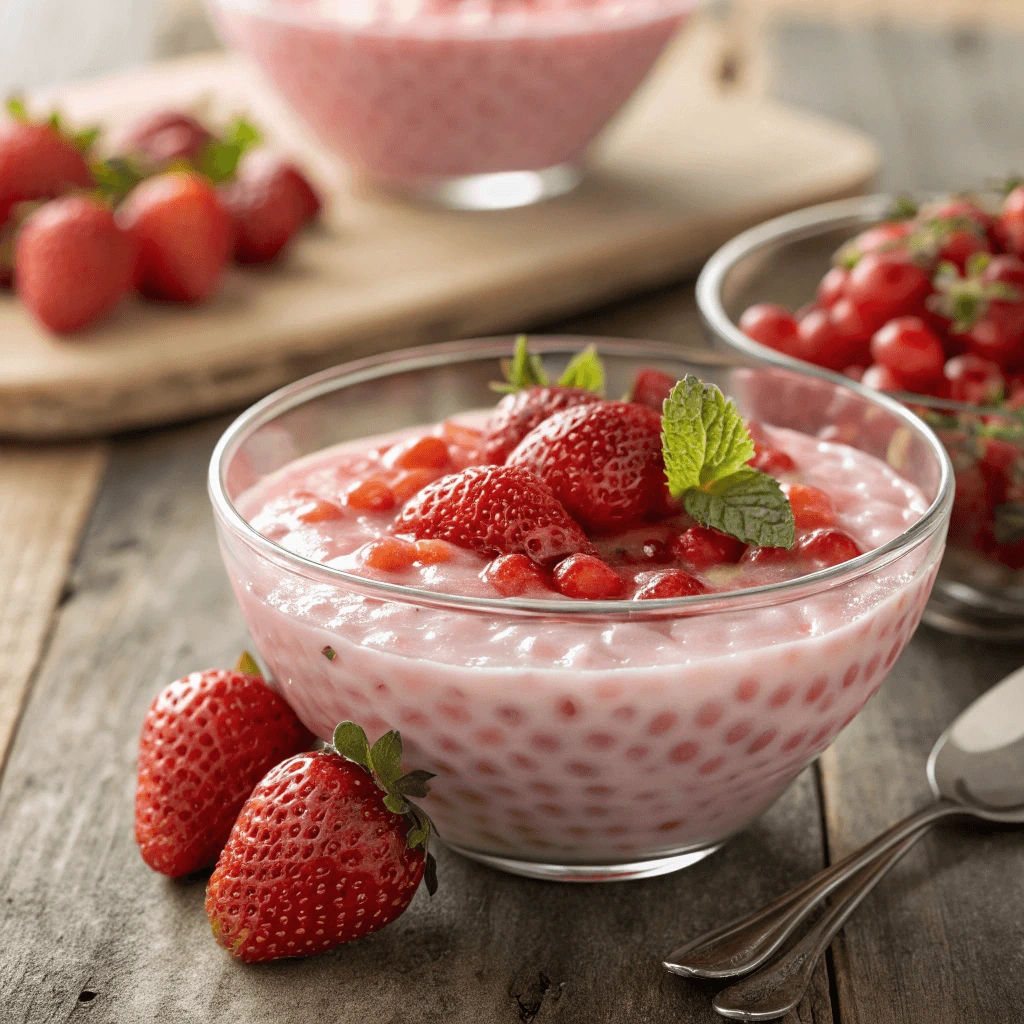
Craving a light and refreshing dessert? Try this Strawberry Sago recipe—a chilled treat that’s creamy, fruity, and easy to make. It’s perfect for warm days or when you want something sweet without being too heavy. This dessert features chewy sago pearls, fresh strawberries, and creamy coconut milk. The bright flavor and smooth texture make it a favorite in many Asian households. In this guide, you’ll learn how to make strawberry sago step by step using simple ingredients. Let’s get started and whip up a dessert everyone will love!
What Is Strawberry Sago?

What Makes It Special
Strawberry Sago stands out for its perfect balance of texture, flavor, and visual appeal. Unlike many rich or heavy desserts, this one feels light and refreshing—ideal for hot weather or after a hearty meal.
🍓 A Perfect Blend of Chewy and Creamy
The contrast between soft, chewy sago pearls and rich, creamy coconut milk creates a unique mouthfeel. Each spoonful delivers a gentle bounce from the tapioca and a smooth finish from the milk. You don’t need to be a professional chef to appreciate how satisfying this simple combo can be.
🌸 Naturally Sweet and Fruity
Fresh strawberries bring a burst of natural sweetness and bright color to the dish. Unlike artificial flavors, real strawberries offer a juicy, slightly tangy flavor that pairs beautifully with the mild creaminess of the coconut base. This balance makes the dessert feel indulgent without being overpowering.
🌿 Light, Vegan-Friendly, and Gluten-Free
One of the best things about this dessert? It’s easy to adapt. Most recipes use coconut milk, making it naturally dairy-free. You can also skip condensed milk or use plant-based alternatives for a fully vegan version. And since sago pearls are naturally gluten-free, it’s a great option for people with dietary restrictions.
🎉 Great for Any Occasion
Whether you’re hosting a summer gathering, preparing for a family dinner, or just craving a sweet treat after lunch, Strawberry Sago fits the occasion. Its pretty pink hue and chilled temperature make it a crowd-pleaser at parties and potlucks.
Origin and Popularity
Rooted in Asian Culinary Traditions
Sago-based desserts have deep roots in countries like China, Malaysia, Thailand, and the Philippines. For generations, people in these regions have created sweet, creamy desserts using sago pearls. These treats often include ingredients like coconut milk, palm sugar, and tropical fruits such as mango or lychee. Although strawberries weren’t traditionally part of the recipe, the concept of pairing sago with fruit and creamy textures inspired modern versions like strawberry sago. As strawberries became more widely available, home cooks and dessert vendors started adding them for a fruity twist.
Gaining Global Popularity
Strawberry sago has gained a following far beyond Asia. You’ll now find it in bubble tea shops, Asian dessert cafés, and food blogs around the world. Its beautiful pink color and layered look make it popular on platforms like Instagram and TikTok. Content creators often share quick video tutorials, drawing in more people who want to try this chilled dessert at home. As the demand for visually appealing and refreshing desserts increases, strawberry sago continues to trend.
Why It Continues to Win Hearts
People love strawberry sago not only for its flavor but also for its versatility. You can easily adjust the sweetness, swap the milk for a dairy-free version, or add other fruits like kiwi or mango. It fits well into a wide range of diets, including vegan and gluten-free. Because it’s so easy to prepare and customize, it’s a go-to choice for beginners and experienced cooks alike. Its simple ingredients and refreshing taste keep it popular year-round, especially during warm seasons.
Why People Love It
It’s Incredibly Refreshing
Strawberry sago delivers a cool and creamy texture that people crave, especially during warm weather. The chilled coconut milk soothes the palate, while the juicy strawberries add a fresh, fruity kick. Sago pearls give it just the right amount of chewiness, making every bite more satisfying. Many enjoy it as a light dessert after a heavy meal or as a midday treat to cool off.
The Ingredients Are Simple and Accessible
Another reason people love strawberry sago is how easy it is to make. You don’t need any fancy equipment or hard-to-find ingredients. Most recipes use basic pantry items like sago pearls, strawberries, milk (or coconut milk), and a sweetener. This simplicity means that anyone—no matter their cooking skill level—can enjoy making it at home. Plus, it only takes a short time to prepare and chill.
It Fits Many Diets and Lifestyles
With growing interest in plant-based and gluten-free diets, strawberry sago has become a go-to option for many. Coconut milk or other non-dairy alternatives make it suitable for vegans and those with lactose intolerance. Because sago is naturally gluten-free, people with gluten sensitivities can also enjoy it worry-free. Even those who follow low-sugar diets can adjust the sweetness to match their preferences.
It’s Customizable and Fun to Make
Strawberry sago isn’t just delicious—it’s also fun to personalize. Some people like to mix in other fruits like mango or lychee. Others top it with a swirl of condensed milk or a sprinkle of chia seeds for added texture. Kids love it for the color and texture, while adults appreciate its lightness and elegance. Whether you’re making it for yourself or serving it at a party, it’s a dessert that impresses with very little effort.
Ingredients You’ll Need for Strawberry Sago
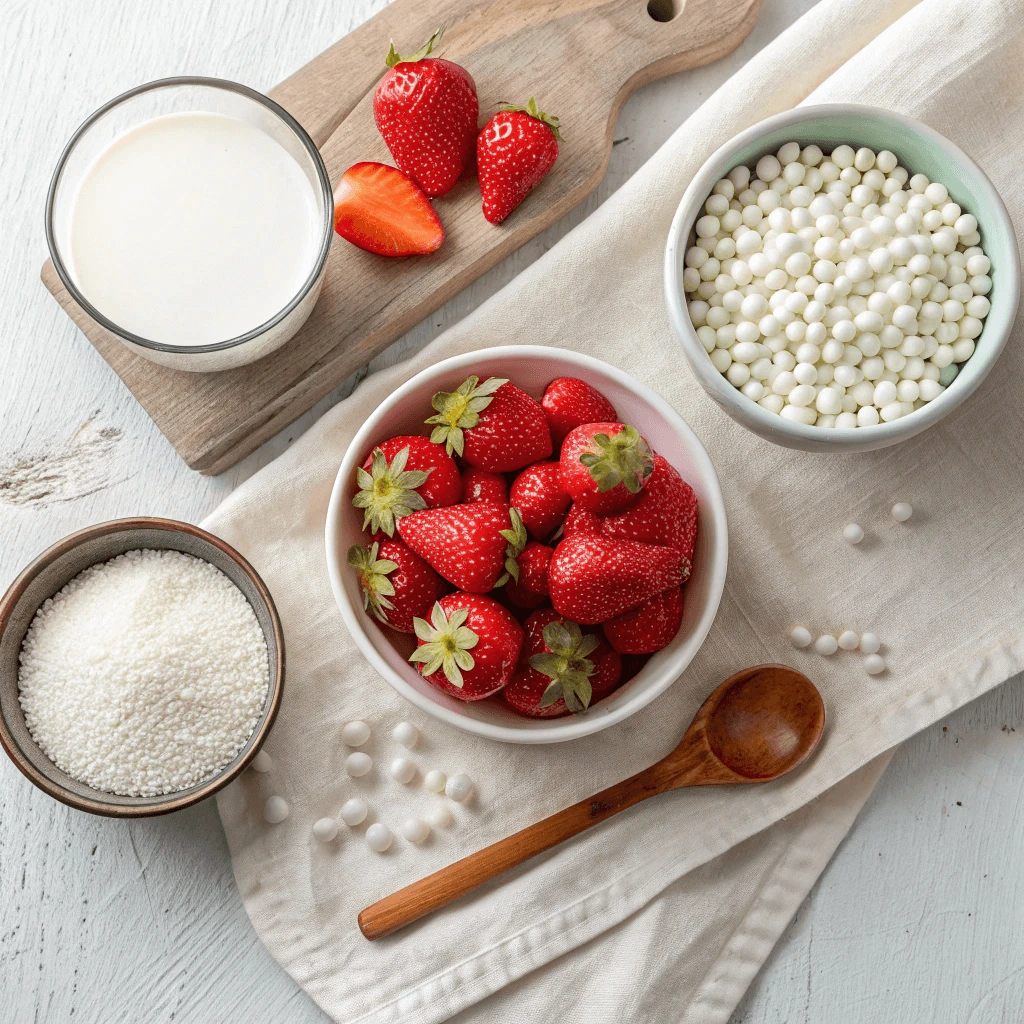
Core Ingredients
Sago Pearls: The Heart of the Dessert
Sago pearls are the key ingredient in this dessert. These small, translucent pearls, made from starch extracted from the sago palm, create the unique chewy texture that sets strawberry sago apart from other desserts. When cooked correctly, sago pearls should be soft and slightly translucent but still have a firm, bouncy bite. To cook them, you simply boil them until they become tender and translucent, then rinse them to remove any excess starch.
Fresh Strawberries: Adding Flavor and Color
Fresh strawberries play a central role in giving this dessert its vibrant color and bright, tangy flavor. Ripe, sweet strawberries pair perfectly with the mild creaminess of the coconut milk and add a natural sweetness to the dish. You can use them in various ways—either blending them into a puree, chopping them into small pieces, or even using them whole as a garnish. The key is to use fresh strawberries for maximum flavor. Frozen strawberries can also work in a pinch but may lack the texture and freshness that fresh berries bring.
Coconut Milk: Creaminess with a Tropical Twist
Coconut milk adds richness and creaminess to the dish without overpowering the delicate flavors of the strawberries. It helps bind the sago pearls together, making the dessert feel smooth and satisfying. You can use full-fat coconut milk for a richer flavor, or opt for a lighter version if you prefer a less heavy treat. Some variations of the recipe even use a combination of coconut milk and condensed milk, adding extra sweetness and thickness. For a non-dairy or vegan version, coconut milk is the ideal choice, but almond or soy milk can work as well for a different flavor profile.
Sweeteners: Balancing the Flavors
To enhance the natural sweetness of the strawberries, you’ll need a sweetener. Most recipes call for simple syrup, sugar, or condensed milk. The sweetener you choose will impact the overall flavor of the dessert. For a healthier version, you can substitute regular sugar with a natural sweetener like maple syrup, agave nectar, or stevia. Keep in mind that you should adjust the amount of sweetener to your taste. If you prefer a more tangy flavor, you can add less sugar to allow the strawberries’ natural acidity to shine through.
Optional Additions
Additional Fruits for Extra Flavor
While strawberries are the star of the dish, many people enjoy adding other fruits to their strawberry sago for more layers of flavor. Mangoes, with their smooth texture and tropical sweetness, make a great pairing. You could also try lychee, which adds a juicy, slightly floral note that complements the strawberries’ tartness. For a fun twist, kiwi slices offer a tangy contrast to the sweetness of the coconut milk and sago pearls.
These fruits can be mixed in with the sago or used as a topping. Their natural flavors enhance the dish, creating a more complex and refreshing dessert. Experiment with your favorite seasonal fruits to make it your own!
Toppings for Extra Crunch
To add more texture to the dessert, consider using toppings that provide a satisfying crunch. Chopped nuts like almonds, cashews, or pistachios are great options. They offer a nutty flavor and a contrast to the soft and chewy sago pearls. Toasted coconut flakes also work well, bringing a nutty, slightly caramelized taste that pairs beautifully with the coconut milk in the dessert. For a more indulgent touch, you can even sprinkle crumbled graham crackers or cookies on top for extra crunch.
Sweetened Condensed Milk for Extra Creaminess
If you’re looking for a richer version of strawberry sago, consider adding sweetened condensed milk. This thick, sweet milk creates a velvety smooth texture and boosts the sweetness. It complements the coconut milk while adding an extra layer of creaminess. Some people even add a drizzle of condensed milk on top before serving to give the dessert an indulgent finish. For a lighter option, you can skip this addition or use a smaller amount to control the sweetness level.
Herbal Touches: Mint and Basil
For a refreshing, aromatic twist, try adding fresh mint leaves or Thai basil. Mint pairs beautifully with the cool, fruity nature of the dessert, while Thai basil adds a slightly spicy, peppery flavor that balances the sweetness. Both herbs can be used as a garnish or mixed into the sago to create a more herbal flavor profile. This addition gives the dessert a more sophisticated taste that surprises the palate.
Agar-Agar for a Gelatinous Twist
Some people like to transform their strawberry sago into a firmer, more gelatinous dessert by using agar-agar. This vegetarian alternative to gelatin can help set the sago and coconut milk into a more solid form, similar to a jelly. The texture change adds variety and makes it easier to serve in neat squares or cubes. If you enjoy a firmer, more structured dessert, this addition can be a fun way to switch things up.
Ingredient Tips
Choosing the Right Sago Pearls
Not all sago pearls are the same, so it’s important to choose the right kind for your dessert. White sago pearls are the most commonly used for strawberry sago, as they cook up beautifully and take on a glossy, translucent appearance when done. Colored sago pearls (often in shades of pink or yellow) can also add a pop of color, but they can sometimes alter the texture or taste slightly. When buying sago, make sure to check the instructions on the package for specific cooking times, as different brands may have slight variations in their cooking methods.
If you’re looking for a quicker preparation, instant sago pearls are available, but they might not give you the same chewy texture as the traditional pearls. For best results, always rinse the pearls well after cooking to remove any excess starch, which can make the dish too sticky.
Selecting Fresh Strawberries
The quality of your strawberries plays a major role in the flavor of your dessert. Choose ripe, red strawberries that are firm, fragrant, and free from blemishes. Overripe strawberries can turn mushy and may not hold up well in the dish. If fresh strawberries are out of season, you can opt for frozen strawberries, but be mindful that they may not have the same bright flavor or texture when thawed.
Before using them, wash your strawberries thoroughly and hull them (remove the green tops) to ensure you’re left with just the sweet, edible part. For a smoother texture, you can blend the strawberries into a puree or, if you prefer more texture, simply chop them into small pieces.
Coconut Milk vs. Coconut Cream
While coconut milk is most commonly used for strawberry sago, you can choose between coconut milk or coconut cream depending on the richness you desire. Coconut milk provides a lighter, more delicate flavor, while coconut cream adds a thicker, more indulgent consistency. If you’re using coconut cream, you may need to dilute it slightly with water to achieve a more fluid texture, as it can be too thick on its own.
If you prefer a dairy-free option but still want a richer flavor, you could also try using almond milk or oat milk. These alternatives offer a neutral flavor and creaminess but won’t overpower the fresh strawberry flavor.
Sweetener Adjustments
The sweetener you choose can significantly affect the final taste of your strawberry sago. Granulated sugar is the most common choice for sweetness, but it’s easy to swap it out for other options based on dietary needs or preferences. Honey or maple syrup can add a natural, more complex sweetness to the dish, while stevia or monk fruit sweetener are great low-calorie alternatives for those watching their sugar intake.
Always taste as you go! Start by adding a small amount of sweetener and adjusting it to your personal preference. Keep in mind that the strawberries themselves will provide some natural sweetness, so you may not need to add as much sugar as you think.
Tips for Customizing Your Ingredients
Strawberry sago is incredibly versatile, and you can experiment with different variations of the ingredients to create a dessert that fits your tastes. Vanilla extract can be added to enhance the overall flavor, while lemon zest can add a refreshing, citrusy twist. For added texture, sprinkle in some chia seeds or tapioca pearls.
If you’re feeling adventurous, you could even add a splash of rose water for a floral note or incorporate some lime juice to balance the sweetness with a bit of tartness. Whatever you choose, don’t be afraid to make it your own!
Step-by-Step Strawberry Sago Recipe

Step 1 – Preparing the Sago Pearls
Rinse the Sago Pearls
Before you begin cooking, it’s important to rinse the sago pearls thoroughly. This step removes any excess starch from the pearls, which can make the final dessert too sticky or gummy. Simply place the sago pearls in a fine-mesh sieve and rinse them under cold water until the water runs clear. This helps prevent clumping during the cooking process and ensures the pearls cook evenly.
Boil the Water
In a medium saucepan, bring a large amount of water to a boil. You’ll need plenty of water to cook the sago pearls properly. For every 1/2 cup of sago pearls, use about 4 cups of water. This allows the pearls to move freely while cooking and helps them cook evenly. Stir occasionally to ensure the pearls don’t stick together as they cook.
Add the Sago Pearls
Once the water is boiling, add the rinsed sago pearls to the pan. Stir gently to prevent them from sticking to the bottom of the pan. You’ll notice the pearls start to turn translucent as they cook. Keep the heat on medium to low and simmer the pearls for about 10-15 minutes, stirring occasionally. Be sure to follow the package instructions, as cooking times may vary slightly depending on the type and size of the sago pearls.
Stir and Check Consistency
As the sago pearls cook, they will gradually change from opaque to translucent. Stir the mixture frequently to ensure that the pearls do not stick together. Keep an eye on their texture by tasting a few pearls. The pearls should have a soft, slightly chewy texture when done but should still maintain their shape. If the pearls are too firm or opaque, continue cooking them for a few more minutes until they become fully translucent.
Rinse the Sago Pearls Again
Once the sago pearls are fully cooked, remove the pan from the heat and pour the cooked pearls into a sieve. Rinse them under cold water again to stop the cooking process and cool them down. This also helps to remove any residual starch, ensuring that your dessert has the perfect texture.
Step 2 – Preparing the Strawberry Mixture
Wash and Hull the Strawberries
Start by washing the fresh strawberries under cold water to remove any dirt or pesticides. Once clean, hull the strawberries by removing the green tops and stems. You can use a small knife or a strawberry huller to easily remove the green part. After hulling, slice the strawberries into small pieces, depending on your preference. If you prefer a smoother texture, you can blend the strawberries into a puree instead. This step will help incorporate the natural sweetness of the strawberries into the dish.
Cook the Strawberries
In a small saucepan, add the sliced strawberries along with a tablespoon or two of water to help them soften. Heat the saucepan over medium heat and stir occasionally to ensure that the strawberries cook evenly. As the strawberries heat up, they will release their juices, creating a syrupy mixture. Cook for about 5-7 minutes until the strawberries become soft and begin to break down.
Add Sweetener
Once the strawberries are softened, it’s time to add your sweetener. You can use granulated sugar, honey, maple syrup, or any sweetener of your choice, depending on your taste preferences. Start by adding a small amount and then taste the mixture to see if it needs more sweetness. Stir well to dissolve the sweetener completely into the strawberry juices. If you like a more complex flavor, you can also add a splash of vanilla extract or lemon juice to enhance the flavor.
Simmer the Mixture
Once the sweetener has dissolved, bring the strawberry mixture to a simmer. Allow it to cook for another 5-10 minutes, stirring occasionally, until the strawberries are fully softened and the syrup has thickened slightly. The cooking time can vary depending on how thick you want the syrup to be, but be sure not to overcook it. The mixture should be a syrupy consistency, not a jam.
Mash or Puree the Strawberries
For a smoother consistency, you can mash the cooked strawberries with a fork or potato masher, or use an immersion blender to puree the mixture until smooth. This will create a more uniform texture for the dessert. If you prefer some chunks of fruit in the mixture, simply mash the strawberries lightly or leave them in slices. Either way, this strawberry base will add flavor and sweetness to your sago.
Cool the Strawberry Mixture
Once the strawberries are cooked and mashed to your liking, remove the saucepan from the heat and let the mixture cool to room temperature. If you want to speed up the cooling process, you can place the saucepan in an ice bath or transfer the mixture to a shallow bowl to allow it to cool more quickly. Cooling the strawberry mixture is crucial as it helps maintain the freshness of the fruit and prevents the sago pearls from becoming too soft when combined.
Step 3 – Combining the Sago and Strawberry Mixture
Mix the Sago with Coconut Milk
Once both your sago pearls and strawberry mixture have cooled, it’s time to combine them. In a large mixing bowl, pour the cooked sago pearls into the bowl first. Then, add the coconut milk to the sago. Coconut milk gives the dessert its creamy texture, which balances out the sweetness of the strawberries. If you want a richer texture, you can use coconut cream instead of coconut milk. However, be mindful to add a little water or regular milk if using coconut cream to achieve the desired consistency.
Add the Strawberry Mixture
Now, it’s time to add the strawberry mixture into the bowl with the coconut milk and sago. Stir the mixture well to ensure the sago pearls are fully coated in the coconut milk and strawberry syrup. The strawberries will infuse their vibrant flavor into the sago, creating a beautiful and flavorful dessert. If you blended the strawberries into a puree, you’ll get a smoother consistency. However, if you left some chunks, you’ll enjoy the added texture with each bite.
Taste and Adjust Sweetness
Before moving forward, taste the mixture to check if it’s sweet enough for your preference. If you feel it needs more sweetness, you can add a little more sugar or sweetener at this stage. Stir well to dissolve any extra sweetener. Remember, the flavors will intensify as the dessert chills, so don’t over-sweeten it at this stage. If you’re using a sugar substitute, like honey or stevia, ensure they’re properly dissolved in the mixture.
Chill the Dessert
After everything is mixed, cover the bowl with plastic wrap or transfer the mixture into individual serving glasses or bowls. To allow the flavors to meld and for the dessert to set, place it in the refrigerator for at least 2-3 hours. Chilling the sago gives it the perfect refreshing consistency. The dessert will thicken slightly as it cools, and the sago pearls will absorb some of the strawberry syrup, making it even more flavorful.
Optional Garnishes
If you’d like to add a special touch, garnish the chilled sago dessert with fresh fruits like chopped strawberries, shredded coconut, or even a few mint leaves for a pop of color. These garnishes add extra flavor and texture, making the dish even more inviting.
Tips for the Perfect Chilled Strawberry Sago Treat
Soaking and Rinsing Sago
Why Soaking Sago is Important
Before cooking the sago pearls, it’s crucial to soak them. Soaking the sago helps to soften the pearls and reduce the cooking time. It also ensures that the pearls cook more evenly, preventing them from becoming too mushy or hard. Soaking allows the pearls to absorb water, making them plumper and more tender when cooked. For the best results, soak the pearls for about 30 minutes in cold water before using them in your recipe.
How to Soak the Sago
To soak the sago, simply place the pearls in a large bowl and cover them with plenty of water. The pearls will absorb the water, so make sure there is enough to allow them to expand. Stir the sago occasionally to prevent it from sticking together. After 30 minutes, you can proceed to the next step of cooking the sago. However, if you’re short on time, you can also use hot water to speed up the soaking process, but be sure not to let the sago sit for too long, as it can become too soft.
Rinsing the Sago
After soaking the sago, rinse it thoroughly under cold running water. This step is essential because it removes any excess starch that could cause the pearls to become sticky or clump together during cooking. Use a fine-mesh sieve to make sure the pearls don’t slip through. Rinse the sago for a few minutes until the water runs clear. This ensures that all the residual starch is removed, and you’ll be left with clean pearls ready for cooking.
Checking the Sago Consistency
After soaking and rinsing, check the sago pearls for any remaining starch or stickiness. The pearls should feel smooth to the touch and separate easily. If you notice that the sago is still too sticky, rinse it again under cold water until you’re satisfied with the consistency. It’s important to ensure that the pearls don’t stick together during cooking, as this can affect the texture of your final dessert or dish.
Why Rinsing is Essential
Rinsing the sago after soaking not only removes excess starch but also prevents it from clumping together during cooking. It allows the pearls to cook separately and evenly, which results in a perfect texture when you combine the sago with the rest of your ingredients. If you skip this step, the sago might form a sticky mass that won’t be pleasant to eat.
Cooling and Serving Suggestions
Cooling the Sago Dessert
Once you have combined all the ingredients and mixed them well, it’s time to chill the dessert. Cooling the sago dessert is an essential step to achieve the right texture and flavor. Transfer the dessert into a large bowl or individual serving glasses, and cover it with plastic wrap to prevent any contamination. Place the dessert in the refrigerator for at least 2-3 hours, allowing the flavors to meld together. As the sago cools, it will thicken slightly, and the pearls will absorb more of the strawberry syrup, enhancing the overall taste.
For best results, let the dessert chill overnight. This extra time helps the sago set perfectly, and the flavors will be even more pronounced. If you’re in a rush, however, a few hours of chilling should suffice, though the dessert may not reach the same depth of flavor as it would with longer cooling.
Enhancing the Texture
As the sago cools, its texture will change. The coconut milk and strawberry mixture will meld together, and the sago pearls will become more firm yet still delightfully chewy. The dessert should not be too watery or too thick but have a smooth, creamy consistency with a slight chew from the sago pearls.
If you prefer a lighter texture, stir in a little extra coconut milk after chilling to loosen up the mixture. Alternatively, if you find it too runny, you can let it chill for a bit longer or refrigerate it in a shallow container to speed up the thickening process.
Serving Suggestions
Once the dessert has chilled to perfection, it’s time to serve and enjoy. There are many ways you can present and serve your strawberry sago for different occasions.
- Individual Serving Glasses: For a more elegant presentation, serve the sago in individual cups or glasses. This works especially well for gatherings or dinner parties. Top each serving with extra fresh strawberry slices or shredded coconut for added flavor and visual appeal.
- In a Large Bowl: If you’re serving it for family or a casual gathering, serve the dessert in a large bowl and let everyone scoop out their portion. Garnish the dessert with mint leaves or extra fruits, such as mango or kiwi, to add a colorful contrast to the dish.
- Toppings: Add a crunchy texture by sprinkling crushed nuts (like almonds or cashews) on top of the sago before serving. This contrast between creamy sago and crunchy nuts makes each bite more exciting.
Adding Extra Flavor
If you’d like to give your strawberry sago an extra burst of flavor, consider adding a few optional ingredients just before serving:
- Coconut Flakes: Shredded coconut adds both texture and a tropical flavor that pairs wonderfully with the coconut milk in the sago.
- Citrus Zest: Grate some lemon or lime zest over the dessert to provide a fresh, zesty contrast to the sweet strawberries and coconut milk.
- Honey or Syrup: Drizzle a little honey or maple syrup on top just before serving to add a touch of extra sweetness if needed.
Best Time to Serve
This chilled dessert is perfect for warm weather or after a heavy meal. Serve it as a refreshing afternoon snack, a light dessert, or even as part of a brunch spread. It’s especially popular during summer months or for festive occasions like birthdays and holidays, where you want a dish that is both light and satisfying.
Make-Ahead Ideas
Why Make-ahead Works Well for Strawberry Sago
One of the best aspects of Strawberry Sago is its ability to be prepared in advance. Make-ahead options save you time and effort on the day you plan to serve the dessert. Preparing the dessert a day or two in advance ensures that the flavors have time to develop and meld together, enhancing the overall taste. Chilling the sago overnight allows the pearls to fully absorb the strawberry syrup and coconut milk, resulting in a much richer, more flavorful dessert. Plus, it makes hosting or meal prepping much easier!
How Far in Advance Can You Make It?
You can make Strawberry Sago up to 2 days ahead of time, depending on your schedule. For optimal freshness and flavor, it’s best to prepare the dessert at least 6-8 hours in advance, but it will keep well for 48 hours in the fridge. The longer it sits, the more the sago absorbs the coconut milk and strawberry syrup, which intensifies the flavor. However, be mindful not to let it sit in the refrigerator for too long, as the texture of the sago could change slightly, and the coconut milk may begin to separate.
Storing the Dessert
Once you have made the Strawberry Sago, you’ll want to store it properly to maintain its texture and flavor. Here are some tips:
- Use an Airtight Container: Store the sago in an airtight container to prevent it from absorbing other odors in the refrigerator. It also helps to maintain the creamy texture of the dessert.
- Cover with Plastic Wrap: If you plan to store the dessert in a serving bowl, cover it tightly with plastic wrap to prevent it from drying out or forming a skin on top.
- Keep it Chilled: Store the dessert in the refrigerator at all times until you’re ready to serve it. This will help keep the pearls firm and prevent the dessert from becoming too soft or runny.
How to Freshen It Up Before Serving
If you prepare Strawberry Sago in advance, it’s important to refresh the dessert just before serving. While the dessert can be eaten straight from the fridge, here are some ways to ensure it’s just as delicious as when you first made it:
- Stir it Gently: Before serving, stir the sago gently to ensure that the coconut milk and strawberry syrup are well combined. This will help restore its creamy consistency.
- Add Fresh Toppings: For added texture and flavor, top the sago with fresh strawberries, mint leaves, or crushed nuts just before serving. This adds a fresh contrast to the creamy dessert.
- Adjust the Consistency: If the sago thickens too much after sitting in the fridge, you can add a little more coconut milk to loosen it up. Stir it in gradually until you achieve your desired consistency.
Freezing Strawberry Sago
While it’s ideal to serve Strawberry Sago fresh or after refrigerating for a short period, you can freeze the dessert if you need to make it even further in advance. Freezing is especially useful for bulk preparation. Here’s how to freeze it properly:
- Store in a Freezer-safe Container: To freeze the sago, transfer it into a freezer-safe container and cover it tightly with a lid or plastic wrap.
- Defrost Before Serving: When you’re ready to serve it, remove it from the freezer and let it thaw in the refrigerator overnight. After thawing, stir it gently to restore its creamy consistency. If the texture becomes too watery, simply add a little more coconut milk and give it a good stir.
Make-ahead Benefits for Special Occasions
Strawberry Sago is a fantastic make-ahead dessert, especially for parties, barbecues, or family gatherings. Preparing it in advance ensures that you’re not stressed about dessert on the day of the event. It also gives the dessert a chance to settle, allowing the flavors to shine. Make-ahead options help you focus on other dishes while your dessert is already ready to impress.
Strawberry Sago Variations and FAQs
Vegan and Dairy-Free Versions
Simple Substitutes for Dairy Ingredients
Making a vegan or dairy-free Strawberry Sago is easy! The recipe naturally works well with plant-based ingredients. Start with coconut milk, which offers the same creamy texture as dairy milk. For a lighter version, you can try almond or oat milk. Make sure to choose vegan sweeteners like maple syrup, agave, or coconut sugar to replace traditional sugar.
Vegan Toppings and Additions
Add fresh fruits like strawberries, kiwi, or mango slices for a refreshing touch. Toasted coconut flakes or shredded coconut can enhance the flavor, and crushed nuts or seeds add a nice crunch.
Easy Dairy-Free Recipe
Simply swap dairy for plant-based alternatives. Use coconut milk (full-fat for creaminess or light for a lighter texture), replace butter with vegan butter, and use maple syrup or coconut sugar as sweeteners. Ensure your sago pearls are plant-based, and choose vegan toppings like dairy-free whipped cream or vanilla ice cream.
Why Go Vegan or Dairy-Free?
Many choose the vegan version for health reasons, as plant-based ingredients can be easier to digest and have fewer allergens. Additionally, it aligns with ethical choices and reduces environmental impact. It’s also an ideal option for those with lactose intolerance or anyone on a vegan diet.
Fruit Swaps and Mix-ins
Fruit Swaps
If you want to change up the flavor of your Strawberry Sago, try these fruit swaps:
- Mango: Adds tropical sweetness and a creamy texture.
- Blueberries: Offers a burst of tartness and vibrant color.
- Pineapple: Provides a tangy, refreshing twist.
- Kiwi: Brings a tangy flavor and bright green color.
- Peach: Adds a fragrant, summery touch to your dessert.
Mix-ins
Enhance the flavor and texture of your dessert with these mix-ins:
- Coconut Flakes: Adds texture and a tropical coconut flavor.
- Chia Seeds: Provides fiber and thickens the dessert.
- Nuts: Crushed almonds or walnuts add a crunchy texture.
- Tapioca Pearls: For extra chewiness alongside sago.
Presentation Tips
Layer your fruit and mix-ins in a clear glass for a visually appealing dessert. This not only looks beautiful but also allows you to enjoy different textures with each bite.
FAQs
Can I Use Frozen Strawberries?
Yes, you can absolutely use frozen strawberries to make Strawberry Sago. While fresh strawberries are ideal for their juicy sweetness, frozen strawberries work just as well, especially when fresh strawberries are out of season.
To use frozen strawberries, simply thaw them first before incorporating them into your recipe. You can blend them into a smooth puree or chop them into chunks, depending on the texture you prefer. If you’re using frozen strawberries, keep in mind that they might release more juice, so you may want to reduce the amount of sweetener to balance the flavors.
Frozen strawberries also retain much of their nutritional value, so they’re a good substitute if fresh ones aren’t available.
How Long Does Strawberry Sago Last in the Fridge?
Strawberry Sago can be stored in the fridge for up to 3-4 days. To ensure the dessert stays fresh:
- Cover tightly: Store it in an airtight container to prevent any odors or contamination from other foods in the fridge.
- Stir before serving: Sago can thicken over time, so you may need to stir in a little extra coconut milk or water if the dessert becomes too thick.
While the sago pearls might continue absorbing moisture, the dessert should still taste delicious. However, for the best taste and texture, it’s recommended to consume the dessert within the first few days.
Is This Dessert Gluten-Free?
Yes, Strawberry Sago is naturally gluten-free. The main ingredients—sago pearls, strawberries, and coconut milk—do not contain any gluten. Therefore, it’s a safe dessert option for people with gluten sensitivities or those following a gluten-free diet.
Just make sure to double-check the labels of any additional ingredients or toppings you might add, such as pre-packaged sweeteners or mix-ins, to ensure they are also gluten-free. If you’re making a vegan version, ensure that your coconut milk and sweeteners are free from any hidden gluten.
In conclusion,Strawberry Sago is a refreshing and customizable dessert, perfect for any occasion. With its simple ingredients and easy steps, you can enjoy a chilled treat that’s both creamy and fruity. Whether you make it with fresh or frozen strawberries, this gluten-free dessert is sure to satisfy your sweet cravings. Try it out today and enjoy a cool, delicious treat!