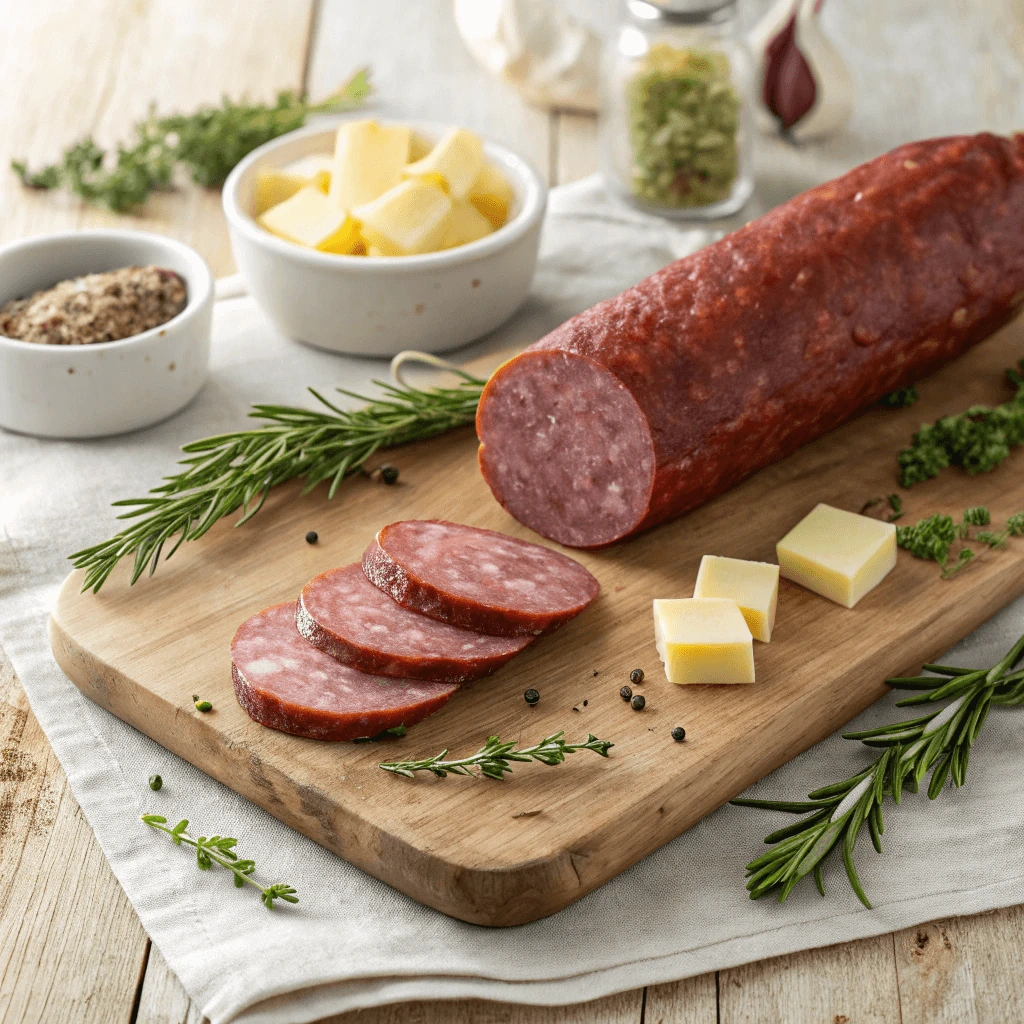
perfect Making summer sausage at home is a rewarding and delicious endeavor that allows you to enjoy a homemade, savory treat tailored to your taste. Whether you’re a novice or have experience in making sausages, learning how to make summer sausage at home gives you full control over the ingredients, seasonings, and texture. This step-by-step guide will walk you through the essential process, from selecting the right ingredients to the final curing process. If you’re looking for a fun and customizable way to enjoy this classic snack, this guide is the perfect place to start.
Why Make Summer Sausage at Home?

Control Over Ingredients
One of the biggest benefits of making summer sausage at home is having full control over every ingredient that goes into it. You can skip artificial preservatives, adjust salt levels to your dietary needs, and fine-tune the flavor to suit your taste. Whether you’re after a smoky, spicy, or mild sausage, homemade lets you make it your way.
Choose Your Own Meat Blend
Instead of settling for store-bought sausage made with mystery meat, you get to decide exactly what goes in. Prefer lean beef? Want a mix of turkey and venison? You’re in charge. Many home cooks enjoy experimenting with different meat combinations to find the perfect balance of fat and flavor.
Customize the Flavor Profile
When you make your own summer sausage, you get to build the flavor from the ground up. Add more garlic if you love bold taste. Prefer a hint of sweetness? Mix in a little brown sugar or maple syrup. You can also experiment with herbs and spices like coriander, paprika, cracked black pepper, or crushed red pepper flakes for heat.
Control Additives and Allergens
Store-bought sausages often contain additives like MSG, nitrates, and fillers. By making it yourself, you can avoid unwanted ingredients and allergens. This is especially important for people with dietary restrictions or food sensitivities. You can also opt for gluten-free binding agents or go entirely additive-free.
Cost-Effective and Fresh
Making summer sausage at home isn’t just rewarding—it’s also a smart way to save money and enjoy fresher, better-tasting results. While high-quality store-bought sausage can be expensive, preparing it yourself allows you to make more for less while using the freshest ingredients possible.
Save Money by Buying in Bulk
When you make summer sausage at home, you can purchase ingredients like ground meat and spices in larger quantities. Bulk buying often leads to significant savings, especially if you’re making multiple batches or preparing for holidays, parties, or gift baskets. Over time, the cost per sausage drops well below what you’d pay for gourmet pre-packaged versions.
Avoid Price Markups on Specialty Sausage
Specialty sausages at grocery stores or butcher shops often come with a premium price tag. Brands charge extra for packaging, shipping, marketing, and shelf space. When you skip all those middle costs and make your sausage from scratch, you get the same gourmet flavor without the inflated price.
Enjoy Peak Freshness and Quality
Homemade sausage lets you work with the freshest possible ingredients. You can grind your meat the same day, season it just the way you like, and control the curing and smoking process to preserve freshness. This results in sausage that not only tastes better but also lasts longer when stored properly.
Perfect for Gifting or Entertaining
Homemade summer sausage makes a thoughtful and practical addition to any gathering or gift basket. Whether you’re hosting friends or celebrating the holidays, this flavorful, protein-packed treat leaves a lasting impression.
Impress Guests with Homemade Charm
Serving your own summer sausage shows effort, skill, and hospitality. When guests see a beautifully sliced sausage on your charcuterie board, they’ll know you went the extra mile. You can pair it with cheeses, fruits, and artisan crackers for an eye-catching and satisfying appetizer spread that sparks conversation and compliments.
Ideal for Holiday Gifts and Care Packages
Summer sausage holds up well in packaging, making it a fantastic homemade gift. Wrap it in butcher paper, add a label or handwritten note, and tie it with twine for a rustic, heartfelt presentation. It fits perfectly into gift baskets alongside jams, cheeses, and homemade crackers. Friends, family, and coworkers will appreciate a gift that’s both delicious and practical.
Customizable for Every Occasion
You can easily tailor your homemade sausage to fit different tastes or events. Add a little heat for spicy food lovers, go with a mild garlic blend for casual snackers, or use venison or turkey for health-conscious friends. With a little planning, your sausage can match the theme of any party or the preferences of any recipient.
Ingredients and Tools You’ll Need

Essential Ingredients
Making summer sausage at home starts with choosing the right ingredients, especially if you’re avoiding pork. You can create a flavorful, satisfying sausage using beef, turkey, venison, or chicken.
Choose a Lean, Flavorful Protein Base
For pork-free summer sausage, lean ground beef is a popular option, especially when combined with a small amount of fat for moisture. Ground turkey thigh meat or ground chicken also work well and absorb spices beautifully. Venison is another excellent choice for a slightly gamey, rich flavor. Aim for a 90/10 ratio of lean meat to fat to keep the sausage juicy without being greasy.
Use Curing Salt and Seasonings
To preserve the sausage and enhance its flavor, curing salt is essential. Prague Powder #1 or a similar curing agent ensures food safety by preventing bacterial growth and giving the sausage its signature cured texture and pink color. Use it in small, precise amounts according to the recipe guidelines.
Seasoning is where summer sausage gets its unique taste. Common spices include garlic powder, black pepper, mustard seed, coriander, smoked paprika, and a touch of cayenne for a bit of heat. Some recipes add brown sugar or maple syrup for a subtle sweetness that balances the spices.
Add Moisture and Binding Agents
Proper binding ensures your sausage holds together well and stays tender. Instead of traditional pork fat, you can use non-fat dry milk powder, oat flour, or chickpea flour. These options help retain moisture and support structure. Adding cold water or crushed ice during mixing helps distribute the spices evenly and activates the meat proteins, which improves the sausage texture after curing.
Must-Have Tools
To make delicious summer sausage at home without any pork, you’ll need a few essential tools that ensure safety, consistency, and professional results. These items don’t have to break the bank, and many can be used for other homemade meat preparations as well.
Meat Grinder for Custom Texture
A quality meat grinder gives you full control over the texture of your sausage. Whether you’re using lean beef, turkey, chicken, or venison, grinding the meat yourself allows you to choose the fat ratio and freshness. Electric grinders save time, but a manual one works well for small batches. Make sure to chill the grinder parts before use to prevent the meat from smearing.
Sausage Stuffer for Uniform Logs
If you want evenly shaped summer sausage, a sausage stuffer is key. You can find vertical or horizontal stuffers that make the process smoother and quicker than using your hands or a makeshift funnel. Choose a model with different nozzle sizes so you can adjust based on the casing diameter. Stuffing your sausage evenly prevents air pockets, which can cause spoilage or uneven curing.
Smoker or Oven for Curing
You can smoke or bake your sausage, depending on your preference and available tools. A smoker adds rich, smoky flavor and is ideal for a more traditional result. Use hickory, applewood, or mesquite chips for variety. If you don’t have a smoker, your oven will still work well—just make sure it maintains a low, steady temperature. Using a digital thermometer will help monitor the internal temperature of the sausage to ensure it cooks safely and evenly.
Additional Helpful Tools
- Mixing bowls – For combining the meat and spices thoroughly
- Digital scale – For accurately measuring curing salt and spices
- Vacuum sealer or freezer bags – For storing leftovers or aging the sausage
- Butcher’s twine or racks – To hang sausage if you’re air-drying or cold-smoking
Where to Buy Specialty Items
Finding high-quality, ingredients and tools for homemade summer sausage is easier than ever, thanks to both online and local sources. Whether you’re looking for casing alternatives, curing salt, or unique spice blends, knowing where to shop makes the process smoother and more enjoyable.
Online Retailers for Convenience and Variety
Many home cooks prefer to shop online for specialty sausage-making supplies because it offers convenience and a wide selection. Websites like Amazon, LEM Products, and Sausage Maker stock everything from collagen casings and spice kits to digital thermometers and meat grinders. If you’re using non-pork meats like beef, turkey, or venison, you can also find pre-mixed seasonings designed specifically for those proteins.
Be sure to check customer reviews and confirm that the sellers offer fresh, food-safe items. Some specialty sites even provide recipe guides and instructional videos to help first-time sausage makers.
Local Butcher Shops and Meat Markets
Local butcher shops often carry high-quality meat and sausage-making supplies, especially if they cater to hunters or DIY food enthusiasts. Visit your local shop and ask about their seasoning blends, meat cuts, and casing options. Many butchers are happy to provide advice or custom-cut meats like lean beef chuck or turkey thighs, which are perfect for your no-pork summer sausage.
Also, consider reaching out to game processors if you’re working with wild meats like venison—they often stock items for home processing.
Specialty Grocery and Kitchen Stores
Some gourmet grocery stores or ethnic markets offer unique spice blends, high-quality cuts of meat, and sausage-making tools. Look for places that carry bulk spices, curing salts, and non-pork casings. Stores like Whole Foods or international markets may carry ingredients like mustard seeds, coriander, or garlic powder in larger quantities and better quality than standard grocery stores.
Kitchen supply stores like Sur La Table or Williams Sonoma sometimes stock sausage-making kits or tools like meat thermometers, grinders, and stuffers, especially around the holidays.
Step-by-Step: How to Make Summer Sausage at Home
Mixing the Ingredients
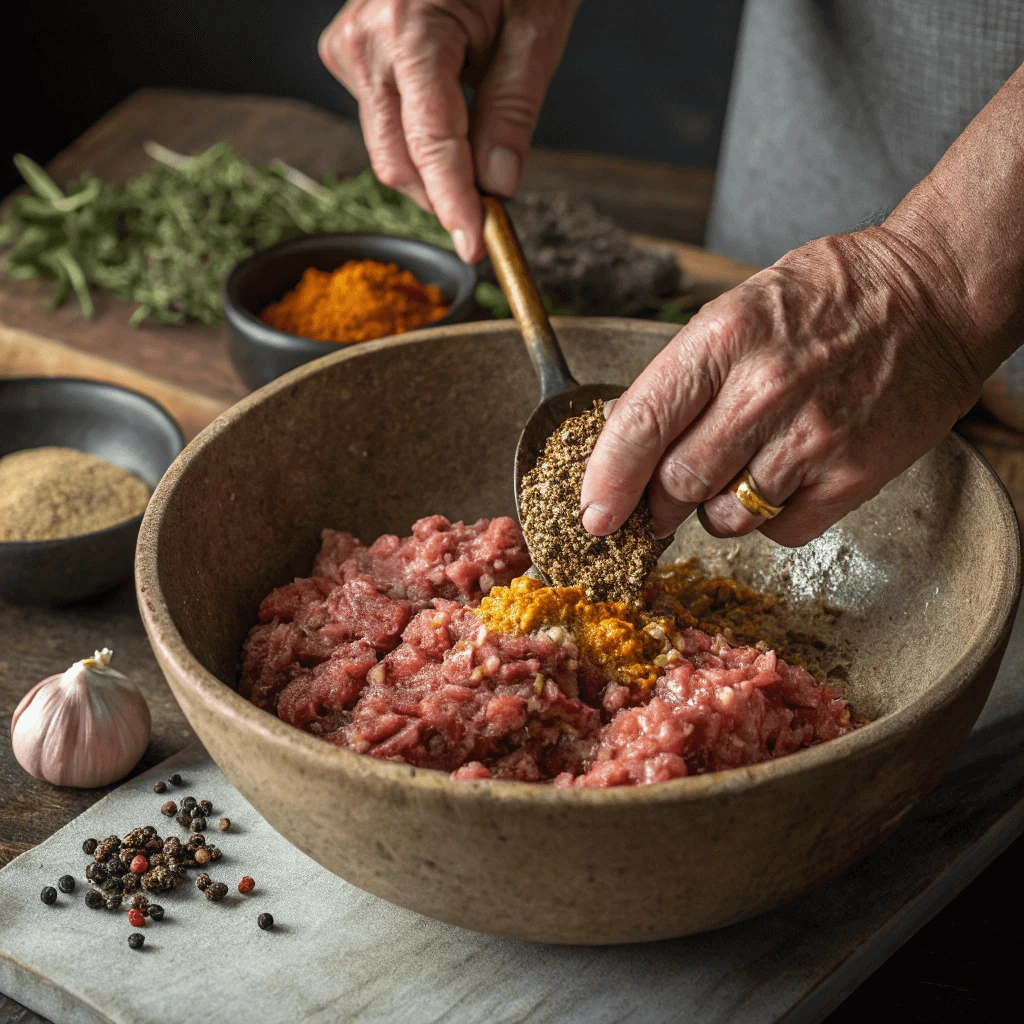
Mixing the ingredients for homemade summer sausage is key to achieving a flavorful, well-textured sausage. Here’s a simple guide to help you get it just right:
1. Prepare the Meat
Start by grinding lean cuts of beef, turkey, or venison. Chill the meat to prevent fat from melting and ensure a better texture when mixing.
2. Combine Dry Ingredients
Mix seasonings such as salt, pepper, garlic powder, and paprika in a bowl. Use finely ground spices to ensure even seasoning throughout the sausage.
3. Add Wet Ingredients
Gradually incorporate liquids like water, broth, or vinegar to the mixture. This helps the spices dissolve and spread evenly.
4. Ensure Binding
To achieve the right consistency, knead the mixture until it becomes sticky. Consider adding non-fat dry milk or potato starch to bind the sausage.
5. Test the Flavor
Cook a small patty to taste, and adjust the seasoning if necessary. This ensures the perfect flavor before you stuff the sausage.
Shaping and Wrapping the Sausage
Shaping and wrapping your homemade summer sausage is an essential step in ensuring a uniform texture and optimal cooking results. Properly formed sausage logs are easier to handle, store, and cook, creating a professional-looking product. Here’s how you can shape and wrap your sausage effectively:
1. Prepare Your Work Surface and Tools
Start by cleaning and preparing a flat surface to work on. Lay out parchment paper or plastic wrap to handle the sausage mixture with ease. You’ll need sausage casings (either natural or synthetic), twine for securing the ends, and a sausage stuffer if you are using one.
2. Forming the Sausage Log
Once your meat mixture is well-seasoned and mixed, take portions of the mixture and begin shaping them into logs. You can shape the sausages by hand or use a sausage stuffer for a more consistent shape. If you prefer a thinner sausage, aim for a diameter of about 2 inches, but feel free to adjust based on personal preference or how you plan to cook or serve it.
3. Stuffing the Casings
If you’re using sausage casings, slide them over one end of your sausage stuffer. Carefully stuff the casing with the sausage mixture, being cautious not to overstuff, as this can cause the casing to burst during cooking. Ensure the mixture fills the casing evenly, with no air pockets, for the best texture.
4. Securing the Ends
After you’ve filled the casing, tie both ends tightly with kitchen twine. Make sure the sausages are well-sealed to prevent the stuffing from leaking out during cooking. If you’re not using casings, you can also wrap the sausage logs in plastic wrap and twist the ends, securing them tightly.
5. Resting the Sausage
Once your sausages are shaped and wrapped, allow them to rest for a few hours or even overnight in the refrigerator. This helps the sausages firm up, and the flavors continue to develop. Resting also helps to set the casing around the meat, ensuring that the sausage maintains its shape during cooking.
Cooking and Curing Process
The cooking and curing process is key to making summer sausage. It ensures the sausage has the right texture, flavor, and safety for consumption. Here’s a breakdown of the process:
1. Preparing the Sausage
Before you start, make sure the casings are secure with no gaps or air pockets. Preheat your smoker if you’re using one.
2. Curing the Sausage
Curing helps preserve the meat. You can use either a dry curing or wet curing method, depending on your preference.
- Dry curing involves hanging the sausages in a cool, dry place for several days or weeks.
- Wet curing involves soaking the sausages in a brine mix for a few days.
Both methods ensure the sausage remains safe to eat and develops its signature flavor.
3. Smoking or Baking the Sausage
You can either smoke or bake the sausage. Smoking adds a deep, smoky flavor and is done at a low temperature, around 130-150°F for several hours. Alternatively, you can bake at 250°F for about 2-3 hours.
4. Monitoring Temperature
Always use a meat thermometer to ensure the internal temperature reaches 160°F to ensure the sausage is fully cooked.
5. Resting and Storing
Once cooked, let the sausage rest to allow the juices to settle. Store in the refrigerator for up to a few weeks or freeze for long-term storage.
Storing and Serving Your Homemade Sausage

Storage Tips for Long Shelf Life
Proper storage is key to keeping your homemade summer sausage fresh and safe to eat for as long as possible.
1. Refrigerating for Short-Term Storage
Refrigerating is the best option if you’re planning to consume the sausage within a few weeks. Wrap it tightly in plastic wrap and foil, or store it in an airtight container to keep moisture out and prevent contamination. This can help the sausage stay fresh for up to 3 weeks in the fridge.
2. Freezing for Extended Storage
Freezing is ideal for long-term storage. Wrap the sausage in plastic wrap or butcher paper, and place it in a vacuum-sealed or freezer-safe bag. Label the bag with the date, and it can last up to 6 months without losing quality. Freezing helps preserve the flavor and texture.
3. Drying and Curing for Shelf-Stability
If you’re looking to store sausage without refrigeration, curing and drying is the way to go. Once cured, hang the sausage in a cool, dry place with good airflow. It will stay good for a few months this way, but check for spoilage regularly.
4. Vacuum Sealing for Freshness
Using a vacuum sealer helps remove air and prevent freezer burn, extending the shelf life of your sausage. Whether refrigerated or frozen, vacuum-sealing can help preserve the sausage’s flavor and texture longer.
5. Checking for Spoilage
Even with proper storage, always inspect your sausage for signs of spoilage such as strange odors or discoloration. If you notice anything unusual, it’s best to discard it to ensure food safety.
Best Ways to Serve
Summer sausage is a versatile treat that can be enjoyed in various ways. Whether it’s for a casual snack or a full meal, here are some creative ways to serve it.
1. Charcuterie Boards
One of the best ways to serve summer sausage is as part of a charcuterie board. Pair it with different cheeses, crackers, and fresh fruits like grapes or apple slices. Add a selection of olives, pickles, and spreads to enhance the variety of flavors.
2. Sandwiches and Wraps
Summer sausage works wonderfully in sandwiches and wraps. You can make a hearty sandwich with cheese, mustard, and fresh veggies. For a lighter option, wrap it with lettuce and avocado. It’s an easy and delicious meal.
3. On Pizza or Flatbreads
Top your pizza or flatbread with slices of summer sausage. It adds a smoky flavor that complements cheese and tomato sauce. Add some caramelized onions or bell peppers for extra richness.
4. As a Snack or Appetizer
Serve summer sausage as a snack by slicing it thin and pairing it with cheese and crackers. You can also make small sausage bites with toothpicks for easy snacking at parties.
5. In Pasta Dishes
Summer sausage can elevate pasta dishes. Try adding it to a tomato-based pasta sauce, or mix it into a creamy Alfredo sauce for a savory twist.
These simple yet delicious serving suggestions will help you make the most of your homemade summer sausage.
Creative Leftover Ideas
If you find yourself with leftover summer sausage, there are plenty of ways to turn it into exciting new dishes. Here are some simple and tasty ideas for using up those extra slices:
1. Scrambled Eggs or Omelets
Chop leftover summer sausage into small pieces and add it to scrambled eggs or omelets. You can also mix in some cheese, peppers, or onions for a delicious breakfast or brunch.
2. Grain Bowls
Summer sausage can be a great addition to a grain bowl. Pair it with quinoa or brown rice, along with roasted veggies and greens, to create a filling, flavorful meal.
3. Salads
Add sliced summer sausage to salads for extra protein and flavor. It works especially well in hearty salads like potato salad or pasta salad, enhancing the taste with its savory kick.
4. Stuffed Vegetables
Use leftover sausage to stuff bell peppers, zucchini, or mushrooms. Combine it with rice, breadcrumbs, and cheese for a delicious, filling dish.
5. Soups and Stews
Chop up the sausage and add it to soups and stews. It pairs wonderfully with beans, potatoes, and vegetables, giving the dish a rich, smoky flavor.
These ideas are a great way to make the most of your leftover summer sausage and create delicious meals with minimal effort.
Troubleshooting and Pro Tips
Common Mistakes to Avoid
Making summer sausage at home can be a fun and rewarding experience, but it’s easy to make mistakes that can affect the quality of the final product. Here are some common mistakes to avoid:
1. Using the Wrong Meat
Selecting the right type of meat is crucial. Lean cuts of beef or venison are ideal, while fattier meats can lead to a greasy texture. If mixing meats, balance fat content for the best results.
2. Overmixing the Meat
Overmixing the meat can result in a dense, tough sausage. Mix just enough to distribute the spices evenly, but avoid overworking the meat to maintain a tender texture.
3. Improper Stuffing
Stuff the sausage tightly into casings, but don’t overstuff. Air pockets can cause uneven cooking and spoilage. Make sure the casing is packed evenly to prevent these issues.
4. Skipping the Curing Process
Curing is essential for both flavor and safety. Don’t skip this step, as it helps preserve the sausage and ensures it is safe to eat.
5. Not Using a Meat Thermometer
Make sure to cook the sausage to an internal temperature of at least 160°F (71°C) to ensure it’s fully cooked and safe to eat. A meat thermometer is key for accurate cooking.
Avoiding these common mistakes will help you create the perfect homemade summer sausage, ensuring it’s flavorful and safe to enjoy
Flavor Variations to Try
Making homemade summer sausage gives you the opportunity to get creative with flavor combinations. Here are some great variations to consider:
1. Spicy Kick
For a bit of heat, add red pepper flakes, chili powder, or even jalapeños. These spices will give your sausage a bold flavor that pairs well with sharp cheeses like cheddar.
2. Garlic and Herb
Garlic, thyme, rosemary, and sage add savory, earthy notes. This classic combination works well with crackers or as a flavorful topping for bread.
3. Sweet and Savory
Try adding brown sugar or maple syrup for a sweet contrast to the savory sausage. This combination pairs excellently with cheeses like blue cheese or goat cheese.
4. Smoked or Barbecue
Smoked paprika or liquid smoke will infuse your sausage with a deep, smoky flavor. Perfect for pairing with grilled veggies or coleslaw.
5. Cheese-Infused
For a cheesy twist, add small chunks of mozzarella, cheddar, or pepper jack to your sausage mixture. It’s a perfect pairing with crackers or bread.
6. Citrus Zest
Lemon, lime, or orange zest will brighten up the sausage and add a refreshing, aromatic note.
7. Wild Game Meats
Venison, bison, or elk create a unique, richer sausage. You can pair these meats with earthy spices like juniper berries for a wild flavor.
Experimenting with these variations can elevate your homemade summer sausage to a whole new level!
Safety and Temperature Tips
Ensuring safety and controlling temperatures are key when making summer sausage. Here’s how to do it effectively:
1. Keep Everything Clean
Cleanliness is essential to avoid contamination. Wash your hands, tools, and surfaces thoroughly before and after handling meat to prevent harmful bacteria.
2. Store Meat Correctly
Store raw meat at or below 40°F (4°C) in the fridge to prevent bacterial growth. If you’re not using it right away, freeze the meat for long-term storage.
3. Maintain Proper Mixing Temperatures
Keep your meat mixture cold while mixing. Warm meat can lose its texture and become a breeding ground for bacteria, so chill your tools and work surface if necessary.
4. Smoke and Cook Safely
Always use a thermometer to ensure your sausage reaches an internal temperature of 160°F (71°C) to eliminate harmful pathogens. Smoking should be done at a low temperature (130°F–160°F or 54°C–71°C) to preserve the sausage’s flavor and texture.
5. Curing Process
If you’re curing your sausage, use the right curing salt and follow instructions carefully. This helps preserve the sausage and maintain safety throughout the process.
6. Proper Cooling
Once cooked, allow the sausage to cool properly. Don’t leave it out at room temperature for more than two hours, as this can lead to bacterial growth. Refrigerate as soon as possible to keep it fresh.
Following these steps will ensure your summer sausage is both delicious and safe to eat.
Conclusion
Learning how to make summer sausage at home offers a unique opportunity to craft a delicious, customizable snack that can be enjoyed year-round. With the right ingredients, tools, and techniques, you can create a flavorful sausage that perfectly suits your taste. Whether you’re making it for personal enjoyment or gifting it to friends, homemade summer sausage adds a special touch to any occasion. By following the simple steps in this guide, you’ll be on your way to mastering how to make summer sausage at home with ease.