Who says dessert can’t be both delicious and good for you? If you’re looking for a sweet treat that satisfies your cravings without the guilt, this ice cream cup recipe is your new go-to. Packed with natural ingredients, easy to customize, and ready in just minutes—these healthy frozen delights are perfect for busy families, health-conscious snackers, or anyone who loves a cool, creamy dessert. Whether you’re planning a summer party or need a quick weeknight indulgence, this recipe proves that ice cream can be both quick, healthy, and absolutely delicious.
Why Choose a Healthy Ice Cream Cup Recipe?
Perfect for Portion Control with Ice Cream Cups Recipe
When it comes to dessert, portion control can make a big difference. Ice cream cups solve this problem with ease. By preparing the dessert in individual containers, you decide exactly how much to serve—no more oversized scoops or accidental overindulging. Each cup holds just the right amount, making it easier to enjoy sweets without straying from your healthy goals.
Easy to Grab, Easy to Enjoy
Ice cream cups also make snacking more convenient. You don’t need to scoop or measure anything when cravings hit. Just take a frozen cup out of the freezer and enjoy. These ready-to-eat treats are perfect for lunchboxes, after-school snacks, or a quick dessert after dinner. They’re especially helpful on busy days when you want something healthy and satisfying without spending extra time in the kitchen.
Great for Kids and Adults Alike
Kids love the fun, individual size of ice cream cups, and parents love the built-in portion control. You can customize each cup with different toppings or flavors to suit every taste. Adults who want a lighter treat can stick to fruit-based or dairy-free versions, while kids might prefer chocolate chips or granola on top. Everyone gets something they enjoy—without overdoing it.
Kid-Friendly and Easy-to-Customize Ice Cream Cups
Ice cream cups are a hit with kids—not just because they taste great, but because they’re fun to make and even more fun to eat. From colorful toppings to sweet fruit layers, kids can get creative while building their own frozen treat. These customizable cups turn snack time into a hands-on activity that even picky eaters will love.
Let Kids Choose Their Own Flavors
When children help build their dessert, they feel more involved and excited to try it. Offer a few simple base options like blended bananas, Greek yogurt, or coconut milk. Then, lay out bowls of toppings such as berries, sliced bananas, chopped nuts, raisins, or dairy-free chocolate chips. Give them a spoon and let them layer their own cup. This approach encourages independence and healthy choices in a way that feels like fun, not a chore.
Great for Parties and Playdates
Ice cream cups also work beautifully for parties and playdates. You can prep the bases in advance, set up a toppings bar, and let kids assemble their own treats. This eliminates the need for extra dishes and keeps everything organized and mess-free. Plus, the individual servings help reduce food waste since each child gets only what they want.
Allergy-Friendly and Adaptable
Customization also means you can easily accommodate food allergies or dietary restrictions. Swap out dairy for plant-based yogurt, avoid nuts for allergy-sensitive kids, or skip added sugar by using fruit-only layers. You stay in control of the ingredients, ensuring every treat fits your family’s health goals.
Naturally Sweet Ice Cream Cups Without Added Sugar
You don’t need to rely on refined sugars to make a dessert taste amazing. Ice cream cups get their sweetness from natural ingredients like ripe bananas, juicy berries, and unsweetened applesauce. These whole-food options not only taste great but also add important nutrients and fiber to each serving.
Use Fruit for Flavor and Sweetness
Fruits like mangoes, dates, and strawberries pack natural sugars that deliver a rich, satisfying sweetness without needing syrups or artificial sweeteners. Bananas, in particular, work beautifully as a base. When blended and frozen, they create a creamy texture that feels like traditional ice cream—only healthier.
You can blend fruits directly into your ice cream mixture or layer them on top. Either way, the result is a flavor-packed treat that satisfies your sweet tooth and keeps your sugar intake in check.
Healthier Choice for All Ages
Choosing naturally sweet ingredients helps reduce blood sugar spikes and makes these ice cream cups suitable for kids and adults alike. They’re especially helpful for families trying to avoid processed snacks. Even better, they fit into many diets, including gluten-free, vegetarian, and dairy-free lifestyles when made with the right base ingredients.
Add Depth with Spices and Extracts
To boost flavor without sugar, try using vanilla extract, cinnamon, nutmeg, or even a dash of cocoa powder. These pantry staples add warmth and richness to your recipe. A sprinkle of shredded coconut or a swirl of peanut butter also enhances taste while keeping the treat wholesome.
Simple Ingredients for Your Guilt-Free Ice Cream Cup Recipe
Frozen Bananas or Greek Yogurt as Base
The base of your ice cream cups is crucial for texture and flavor, and both frozen bananas and Greek yogurt make excellent options. These ingredients provide a creamy, naturally sweet foundation without added sugars or artificial ingredients.
Frozen Bananas: Creamy and Sweet
Frozen bananas are a favorite for a reason. When blended, they create a creamy texture similar to traditional ice cream. Their natural sweetness helps eliminate the need for added sugar, and they’re a perfect choice for dairy-free or vegan diets. Just freeze ripe bananas and blend them until smooth for an easy, healthy base.
Greek Yogurt: Protein-Packed and Tangy
Greek yogurt is another great base, offering a creamy and slightly tangy flavor. It’s packed with protein and probiotics, making it a nutritious addition to your ice cream cups. For a sweeter version, mix it with fruits or a touch of honey, and freeze. It’s a great choice for a lighter, protein-rich treat.
Versatile and Customizable
Both frozen bananas and Greek yogurt can be easily customized with various flavorings or fruits, giving you endless possibilities. Whether you stick with one base or mix them, both options help create a delicious and healthy dessert.
Fresh Fruits and Natural Sweeteners
Incorporating fresh fruits and natural sweeteners into your ice cream cups not only enhances flavor but also boosts the nutritional value of your dessert. These wholesome ingredients provide natural sweetness and vibrant taste, making them an excellent alternative to processed sugars.
Fresh Fruits for Natural Sweetness
Fruits are a fantastic way to naturally sweeten your ice cream cups without relying on added sugars. Bananas, strawberries, blueberries, mangoes, and peaches all bring their own distinct flavors and textures. Whether blended into the base or used as toppings, fruits offer a refreshing and healthy addition to your dessert.
For example, ripe bananas add natural sweetness and a creamy texture when blended, while berries provide a tangy flavor and antioxidant benefits. You can layer different fruits within your cups or mix them into the base for a fruity twist. The possibilities are endless, and the result is always delicious.
Using Natural Sweeteners
While fresh fruits already contribute natural sweetness, you can also enhance your dessert with other natural sweeteners like honey, maple syrup, or agave nectar. These alternatives are less processed than refined sugar and bring additional flavor nuances. Just a small drizzle of honey can balance the tartness of Greek yogurt or boost the sweetness of a banana base.
Another popular option is stevia, a plant-based sweetener that doesn’t spike blood sugar levels. It’s perfect for those looking for a low-calorie or sugar-free option while still enjoying a sweet treat. Natural sweeteners give you more control over the sweetness level and help keep the dessert healthier.
Why Choose Fresh Fruits and Natural Sweeteners?
Choosing fresh fruits and natural sweeteners ensures that your ice cream cups remain a healthier alternative to store-bought versions that often contain artificial ingredients and excess sugars. These options provide essential vitamins, minerals, and fiber, supporting your overall health while satisfying your sweet cravings.
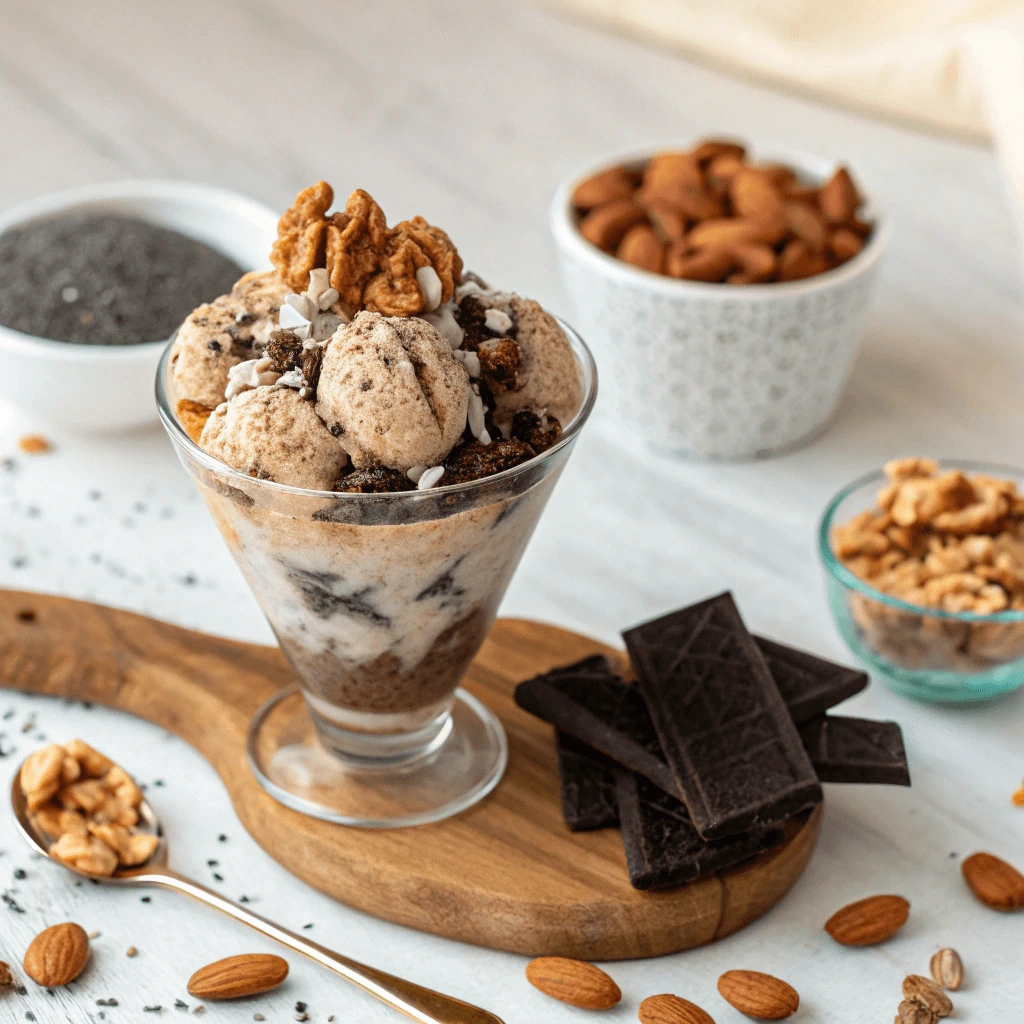
Healthy Toppings: Nuts, Seeds, or Dark Chocolate
Toppings can make your ice cream cups even more delicious and nutritious. Opting for healthy options like nuts, seeds, and dark chocolate adds texture, flavor, and extra health benefits to your treat.
Nuts: Crunch and Nutrition in Every Bite
Nuts are a great way to add crunch and healthy fats to your dessert. Almonds, walnuts, and pistachios are packed with protein, fiber, and omega-3 fatty acids. Chop them up and sprinkle them over your ice cream for a satisfying texture and heart-healthy benefits.
Seeds: Small but Mighty
Seeds like chia seeds, flaxseeds, and pumpkin seeds are nutrient-dense, offering protein, fiber, and healthy fats. Chia seeds are great for texture, while flaxseeds and pumpkin seeds provide extra health benefits like heart support and magnesium.
Dark Chocolate: A Decadent, Antioxidant-Rich Option
Dark chocolate is a flavorful and healthy topping, providing antioxidants that promote heart health. Choose chocolate with at least 70% cocoa content for the best benefits. Dark chocolate adds a rich flavor that pairs perfectly with the creaminess of your ice cream cups.
Why These Toppings Work
By adding nuts, seeds, and dark chocolate, you make your ice cream cups not only tastier but also more nutritious. These toppings are packed with healthy fats, protein, and antioxidants, making your dessert both indulgent and nourishing.
Blend the Base and Prepare Your Ice Cream Cup Recipe
Blend the Base and Prepare Your Cups
Making a healthy ice cream cup starts with the base. Once you choose your main ingredients—such as frozen bananas or Greek yogurt—you can quickly blend them into a smooth, creamy mixture. This step sets the stage for a delicious and customizable dessert.
Choose and Combine Your Ingredients
Select your base based on your preferences. For a dairy-free option, frozen bananas create a creamy texture with natural sweetness. Greek yogurt works well if you want a protein-rich and slightly tangy flavor. Add your base to a blender or food processor, then include a splash of plant-based milk or a spoonful of natural sweetener if needed. Blend until the mixture becomes smooth and silky.
Check for Consistency and Adjust
After blending, check the texture. If it looks too thick, add a small amount of milk and blend again. If it’s too runny, toss in more frozen fruit or a few ice cubes to thicken it. You should aim for a texture similar to soft-serve ice cream—thick enough to scoop, yet smooth enough to pour into cups.
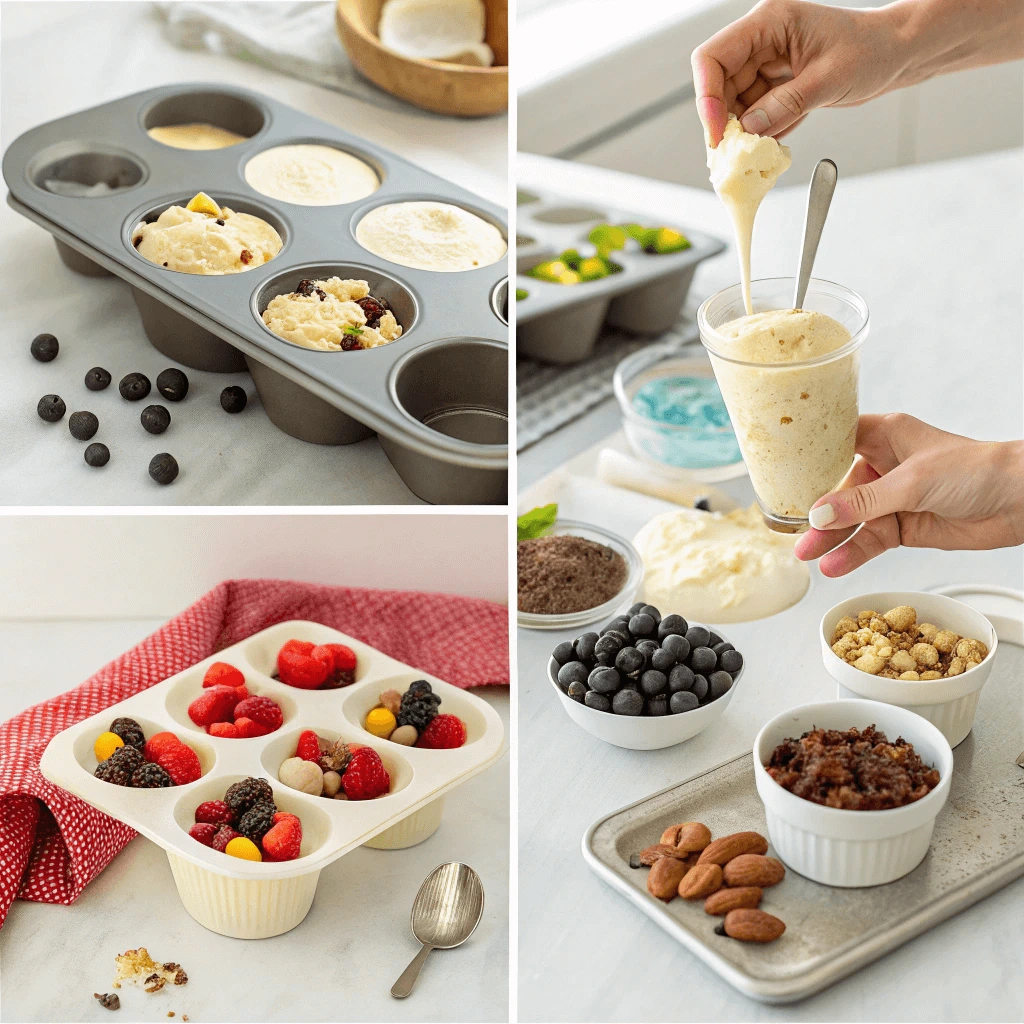
Pour Into Cups and Smooth the Surface
Spoon or pour the blended mixture into small serving cups or bowls. Use a spatula or the back of a spoon to smooth the tops. You can use glass jars, silicone molds, or paper cups depending on your presentation style. If you plan to add layers, now is the perfect time to add a spoonful of nut butter, fruit puree, or crushed granola between scoops.
Layer in Fruits, Cream, and Toppings
Once you’ve prepared your creamy base, it’s time to build flavor and texture with colorful, healthy layers. Carefully layering fresh fruits, smooth cream, and nutritious toppings turns your ice cream cup into a fun and satisfying treat.
Add Fresh Fruit for Natural Sweetness
Start by placing a spoonful of chopped fruit directly over the blended base. Use options like strawberries, mangoes, blueberries, or kiwi to bring in vibrant colors and refreshing flavors. Fruits not only sweeten the dessert naturally but also add vitamins, fiber, and antioxidants.
Spoon in Creamy Layers for Richness
Next, add a creamy component. You can swirl in Greek yogurt, coconut cream, or a dollop of nut butter for extra texture and richness. These creamy layers balance the icy freshness of the base and fruit, making each bite smooth and indulgent. If you want a dairy-free version, choose coconut cream or almond-based alternatives.
Top with Crunch for Texture and Flavor
Finish by sprinkling on your favorite healthy toppings. Crushed nuts, seeds, dark chocolate shavings, or homemade granola add crunch and a satisfying bite. These toppings elevate both taste and nutrition—giving your cup a gourmet feel while keeping it wholesome.
Build Each Cup with Care
As you layer, pay attention to portion size and distribution. Alternate between creamy and crunchy textures so every spoonful delivers variety. Whether you’re making one cup or a full batch, keep the layers even for a visually appealing and flavorful dessert.
Freeze and Serve When Ready
Once you’ve finished layering your ice cream cups, it’s time to let the freezer work its magic. Proper freezing ensures a firm, scoopable texture and enhances the overall taste and experience.
Freeze for the Right Amount of Time
Place your prepared cups in the freezer, ideally covered with lids or plastic wrap to prevent freezer burn. For best results, freeze them for at least 2 to 3 hours. This allows the mixture to firm up without becoming rock-hard. If you prefer a softer consistency, check after 1.5 hours and adjust based on your texture preference.
Store Properly for Freshness
Organize your cups in a flat, stable position inside the freezer so they freeze evenly. Label each cup if you’ve made different flavor variations—this makes serving easier later. If you plan to store them for several days, use airtight containers to lock in freshness and prevent ice crystals from forming.
Serve with Style and Enjoy
When you’re ready to enjoy them, remove the cups from the freezer and let them sit at room temperature for 5 to 10 minutes. This softens the texture slightly, making it easier to scoop and enjoy. Add a final garnish, such as a mint leaf, a sprinkle of cinnamon, or a drizzle of honey just before serving for extra appeal.
Fun and Healthy Variations of Ice Cream Cup Recipes to Try
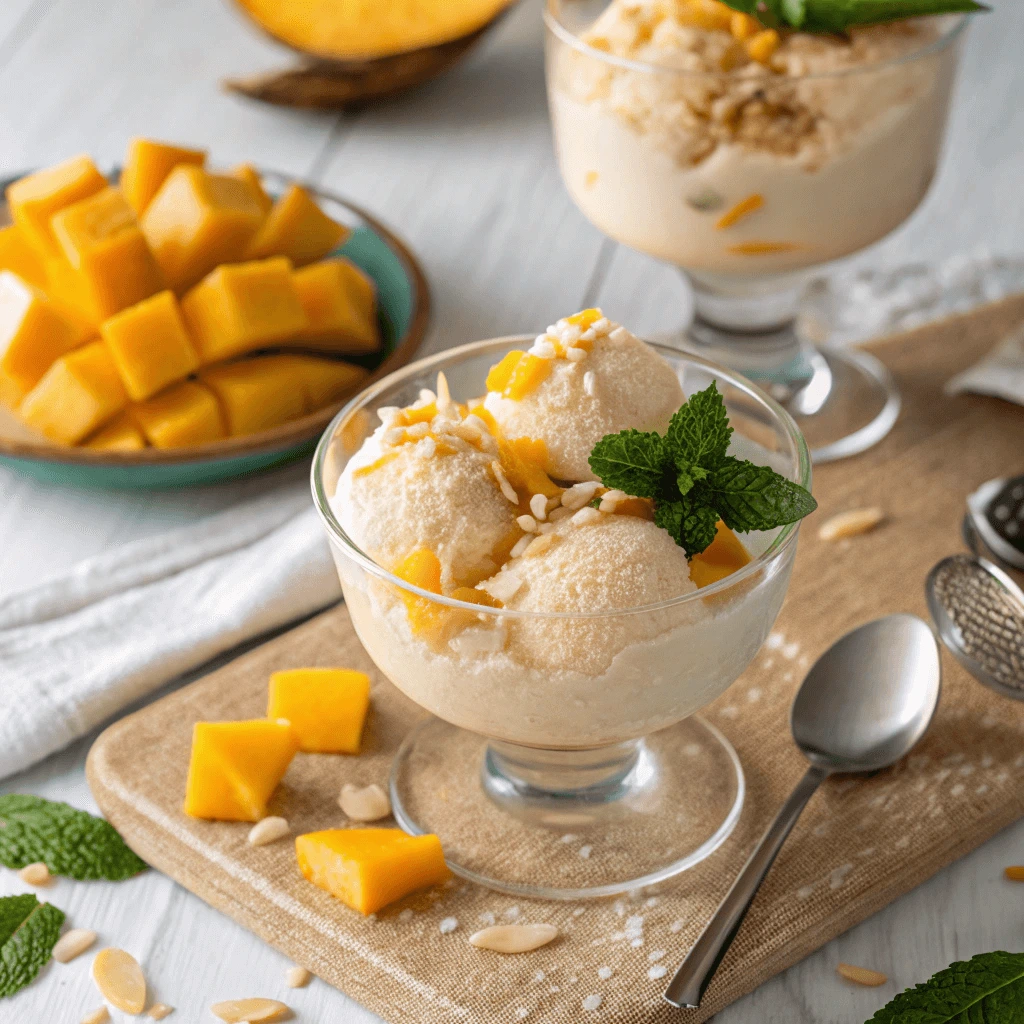
Vegan Coconut Mango Cups
If you’re looking for a dairy-free treat that’s tropical, refreshing, and easy to make, vegan coconut mango cups are a fantastic option. This combination delivers a creamy texture and natural sweetness—without any added sugars or animal products.
Create a Creamy Coconut Base
Begin by blending chilled full-fat coconut milk or coconut cream with a few frozen banana slices. This mixture creates a velvety base with a hint of natural sweetness. You can enhance the flavor with a splash of vanilla extract or a pinch of sea salt.
For an extra boost of nutrition, add a tablespoon of chia seeds or flax seeds to the blend. These seeds thicken the base slightly and contribute fiber and healthy fats.
Add Fresh Mango Layers
Peel and dice a ripe mango into small cubes or puree it until smooth, depending on your texture preference. Layer the mango over the coconut base to add brightness, tanginess, and a pop of vibrant color. Mango is rich in vitamin C and pairs beautifully with the richness of coconut.
If you enjoy extra contrast in texture, leave some small mango chunks in the puree for a delightful bite.
Top and Freeze for a Tropical Finish
Finish your cups with toppings like shredded coconut, chopped pistachios, or a sprinkle of cinnamon. Place the cups in the freezer for 2–3 hours until firm. When ready to serve, allow them to sit at room temperature for 5 minutes for easy scooping.
These vegan coconut mango cups make a perfect guilt-free dessert or mid-day snack, especially on warm days when you want something light, fruity, and satisfying.
Chocolate-Banana Protein Cups
Chocolate-banana protein cups offer a rich, satisfying flavor while packing a nutritional punch. They’re ideal for a post-workout snack, a midday energy boost, or a healthy dessert.
Blend a Rich Protein Base
Start by blending ripe bananas with your favorite unsweetened cocoa powder and a scoop of chocolate or vanilla plant-based protein powder. The bananas add natural sweetness and creaminess, while the cocoa brings in that deep chocolate flavor. You can also mix in a few tablespoons of Greek yogurt or dairy-free yogurt for extra creaminess and gut-friendly probiotics.
To adjust the consistency, pour in a splash of almond milk or oat milk—just enough to help blend everything smoothly.
Add Nut Butter for Flavor and Nutrition
Enhance the richness of your base by swirling in a spoonful of peanut butter, almond butter, or sunflower seed butter. This adds healthy fats and a nutty flavor that complements the chocolate-banana combo beautifully.
Nut butters also make the cups more filling, turning them into a satisfying snack option for both kids and adults.
Layer, Top, and Freeze
Pour the blended mixture into small reusable cups or silicone molds. For added texture, top each one with mini dark chocolate chips, crushed nuts, or unsweetened coconut flakes. Freeze them for at least 2–3 hours until firm.
Before serving, let them sit out for 5 minutes to slightly soften. The result is a smooth, creamy treat with the rich taste of chocolate, the sweetness of banana, and the added benefit of plant-based protein.
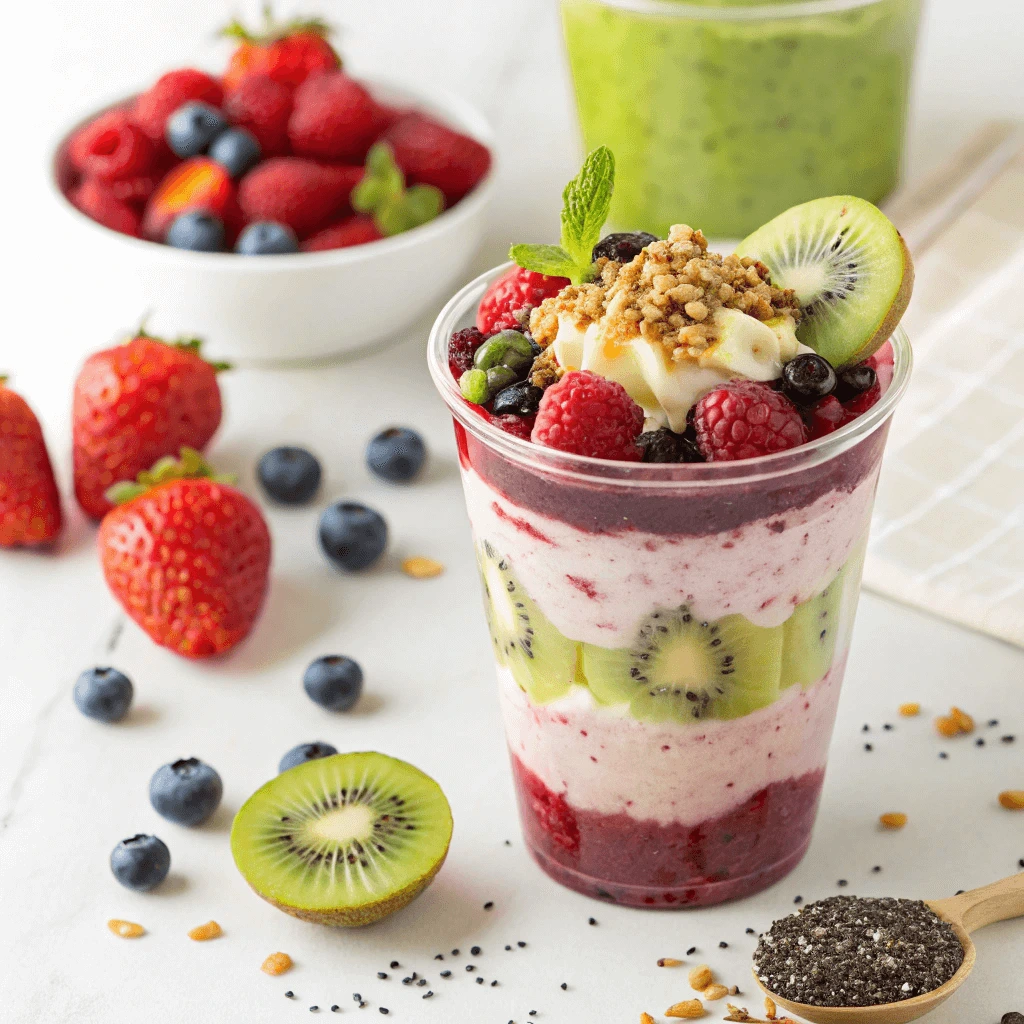
Berry Yogurt Granola Ice Cream Cup Recipe
Berry yogurt granola cups bring together a delightful mix of textures and flavors. They’re crunchy, creamy, fruity, and naturally sweet—making them perfect for breakfast, snacks, or even a light dessert.
Build the Granola Base
Start by preparing the base using your favorite granola. Press about 2 tablespoons of granola into the bottom of each silicone muffin cup or small container. If the granola is loose, bind it with a teaspoon of honey or maple syrup and a bit of melted coconut oil. Press the mixture firmly to form a solid crust.
Chill the granola base in the fridge for 10–15 minutes to help it set and hold its shape when the yogurt is added.
Layer with Creamy Yogurt
Spoon in a layer of Greek yogurt or a dairy-free alternative such as coconut or almond milk yogurt. Choose plain or vanilla yogurt to keep the flavor balanced, or go with a berry-flavored one for extra fruitiness. This layer adds a creamy texture and a healthy dose of protein and probiotics.
You can also mix in a touch of vanilla extract or a drizzle of honey to enhance the flavor naturally.
Top with Fresh Berries and Freeze
Finish each cup with a colorful mix of fresh berries—blueberries, raspberries, strawberries, or blackberries all work well. Not only do berries add a sweet-tart bite, but they also provide antioxidants, fiber, and vitamins.
Once topped, freeze the cups for about 1–2 hours until firm. Let them sit out for a couple of minutes before serving to soften slightly. These berry yogurt granola cups are refreshing, energizing, and easy to grab and go.
Storage Tips and Serving Ideas for Your Ice Cream Cup Recipe
Use Silicone Molds for Easy Ice Cream Cup Recipe Release
Silicone molds are one of the best tools for making homemade ice cream cups. Their flexibility, non-stick surface, and reusability make the preparation and serving process much smoother.
Why Silicone Molds Work Best
Silicone molds allow you to easily pop out frozen ice cream cups without breaking or damaging them. Unlike metal or plastic containers, silicone doesn’t require greasing or lining. You simply fill the molds, freeze them, and press from the bottom to release each cup.
They also come in a variety of shapes and sizes—perfect for making portion-controlled treats or kid-friendly fun designs. Whether you use standard muffin molds or mini versions, silicone offers consistent results every time.
Make Cleanup Simple and Stress-Free
Silicone molds clean up with ease. Since they’re non-stick, leftover yogurt, fruit, or chocolate doesn’t cling to the sides. Most molds are also dishwasher-safe, which cuts down on cleanup time and keeps your kitchen running efficiently.
For those who meal prep or make batches in advance, having a few extra molds helps you cycle through recipes without needing to stop and wash up each time.
Store and Stack Without Mess
You can stack filled silicone molds in the freezer without worrying about spills. Their flexible material adapts to tight spaces, making them ideal for smaller freezers or crowded shelves. To avoid freezer burn, cover each mold with a lid or a layer of plastic wrap.
Using silicone molds not only improves your recipe’s final appearance—it also simplifies the whole process from start to finish.
How to Store Your Ice Cream Cup Recipe Without Freezer Burn
Freezer burn can ruin the texture and taste of your carefully prepared ice cream cups. Fortunately, you can easily prevent it by using the right materials and techniques.
Cool Completely Before Freezing
Before placing your ice cream cups in the freezer, make sure they are fully chilled or slightly firm. This step helps reduce condensation, which can create ice crystals and contribute to freezer burn. If you’ve just made the cups and they’re still soft, allow them to sit in the fridge for about 30 minutes first.
Use Airtight Storage Containers
Always store your ice cream cups in airtight containers. Choose containers that match the size of your ice cream cups as closely as possible to minimize air gaps. You can also use reusable silicone food bags or wrap each cup tightly in plastic wrap followed by foil. This dual-layer method locks out air and moisture, which are the main causes of freezer burn.
If you’re using silicone molds, cover them tightly with plastic wrap or place them inside a larger sealed container to maintain freshness.
Label and Rotate for Freshness
Label each batch with the preparation date, so you always know how long they’ve been stored. Most homemade ice cream cups stay fresh in the freezer for up to two weeks. Try to rotate your frozen treats regularly—consume older ones first and keep newer ones in the back.
By using these simple techniques, you can keep your ice cream cups tasting as fresh and creamy as the day you made them.
When and How to Serve Your Ice Cream Cup Recipe for the Best Texture
Serving your ice cream cups at the right time and temperature helps preserve their creamy texture and enhances the overall eating experience. Timing and technique make all the difference.
Let Them Soften Before Serving
Remove the ice cream cups from the freezer about 5 to 10 minutes before serving. This short thawing period softens the texture slightly, making it smoother and easier to enjoy. If you try to eat them straight from the freezer, they may feel icy or too hard to scoop with a spoon.
Place the cups on a plate or countertop at room temperature during this brief wait. Avoid microwaving them, as that can cause uneven melting or ruin the consistency of the ingredients.
Serve in Small Batches
If you’re hosting or preparing snacks for multiple people, take out only the amount you plan to serve. Leaving the full batch out for too long increases the risk of refreezing, which creates unwanted ice crystals. To keep texture smooth and flavors intact, store the remaining cups right away after serving.
Use serving tongs or a clean spoon to remove individual cups from molds or containers, keeping the rest undisturbed.
Add Toppings Just Before Eating
To maintain crunch and freshness, add toppings like nuts, seeds, or granola just before serving. If you sprinkle them on too early and freeze the cups with toppings, they can become soggy or lose their original texture. Drizzle sauces like chocolate or fruit puree after the cups thaw slightly for a more appealing look and taste.
In conclusion, this Ice Cream Cup Recipe offers a quick, healthy, and delicious way to enjoy a frozen treat without the guilt. Using wholesome ingredients like fruits, yogurt, and natural sweeteners, you can create customizable, portion-controlled desserts perfect for any occasion. Whether you’re making them for kids, guests, or just yourself, these cups are simple to prepare and fun to enjoy. With endless flavor combinations and nutritious toppings, they prove that healthy desserts can be both satisfying and exciting. Try them today and enjoy a cool treat with a wholesome twist!