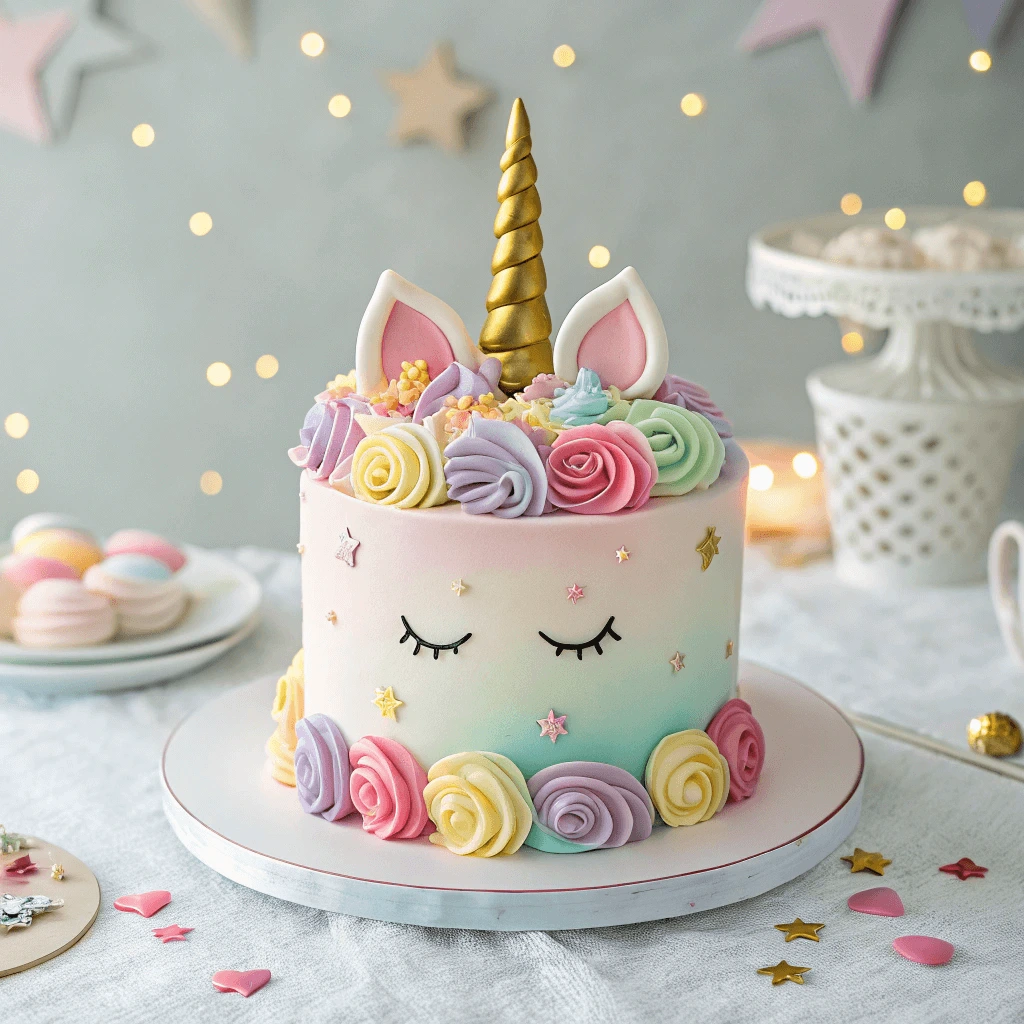
Looking to add a sprinkle of magic to your next celebration? This magical unicorn cake tutorial will show you exactly how to turn a simple dessert into a show-stopping centerpiece. Whether you’re planning a whimsical birthday bash, a themed baby shower, or just want to impress your guests, a unicorn cake is the perfect way to bring fun, color, and creativity to the table. With step-by-step instructions, beginner-friendly tips, and plenty of room for customization, you’ll be whipping up your own enchanted creation in no time!
Getting Started with Your Magical Unicorn Cake
Must-Have Tools and Supplies for a Perfect Unicorn Cake
Creating a stunning unicorn cake starts with having the right tools at your fingertips. These essentials will not only make the decorating process smoother but also help you achieve a professional-looking finish—even if you’re a beginner.
🎂 Baking Essentials
Start with a good set of cake pans. Opt for round pans in 6-inch or 8-inch sizes for a classic layered unicorn cake. Make sure your mixing bowls are sturdy and large enough for batch mixing. Hand mixers or stand mixers help you whip up buttercream smoothly and evenly.
Don’t forget parchment paper for lining your pans. It makes removing the cakes much easier and keeps the layers intact. Cooling racks are also key for letting your cakes rest properly before stacking.
🍰 Decorating Tools
Offset spatulas (in both small and large sizes) allow you to spread frosting evenly and create a smooth finish. A turntable makes it much easier to apply and perfect your frosting as you spin the cake. Piping bags and a variety of piping tips (especially star tips and round tips) let you create the unicorn’s signature mane with rosettes, swirls, and stars.
Use a bench scraper or cake smoother to get clean edges when you apply the final frosting layer.
🦄 Special Elements for Unicorn Magic
To truly bring your unicorn cake to life, gather fondant for crafting the horn and ears. Use edible gold dust or glitter to give them that sparkly, magical touch. Toothpicks or skewers help anchor the horn and ears securely into the cake. Food-safe paintbrushes come in handy when applying shimmer dust or fine details.
Gel food coloring is also a must—liquid colors can thin your frosting. Stick to gel options for vibrant, pastel hues that hold their shape when piped.
Choosing the Best Cake Base for Your Unicorn Cake
Your unicorn cake’s foundation matters just as much as the decorations. The right cake base ensures your dessert is not only beautiful but also delicious and sturdy enough to support layers and fondant. Let’s explore the best flavor options and structural considerations to help you choose with confidence.
🎂 Popular Flavors That Work Well
Start by selecting a cake flavor that appeals to both kids and adults. Vanilla is a classic choice because of its light color and subtle taste—it pairs well with colorful frostings and fillings. Funfetti is another favorite, especially for parties, as it adds a pop of fun with colorful sprinkles baked into the batter.
If you’re looking for something richer, chocolate offers a decadent contrast to pastel colors and balances the sweetness of buttercream. However, avoid overly moist or crumbly cakes, as they may not hold up well when layered or carved.
🍰 Structure and Texture Matter
You want a cake that’s moist but still firm enough to handle multiple tiers and decorations. Sponge cakes or butter cakes tend to hold their shape better than lighter chiffon or angel food cakes. When baking, make sure the layers are even and fully cooked—undercooked cakes will sag or collapse under the weight of frosting and fondant.
For added stability, some bakers use a simple syrup between layers to keep the cake moist without compromising structure. Just brush it lightly on each layer before adding your filling.
🎉 Matching Cake with Theme and Guests
Think about who will be eating the cake. For a kid’s party, funfetti or strawberry might be more exciting, while adults might enjoy red velvet or lemon. You can even make a rainbow-layered cake for a magical surprise when you slice it!
Always do a quick taste test beforehand if you’re trying a new recipe, and consider any dietary needs such as gluten-free or eggless options.
Prepping Your Layers for a Flawless Unicorn Cake Assembly
Before you dive into decorating, it’s crucial to prepare your cake layers correctly. Smooth, even, and cooled layers will make your unicorn cake look polished and professional. Follow these steps to ensure a strong, stable base for stacking and decorating.
🍰 Bake Evenly for Consistent Layers
Start by dividing your batter evenly between cake pans. Weigh the pans to ensure each layer bakes to the same height. Use bake-even strips or a heating core if you’re working with deeper pans—these help distribute heat more evenly, preventing domed tops.
If your cake does dome, don’t worry! Wait until the cakes are completely cool, then use a serrated knife or cake leveler to trim the tops. Aim for flat, uniform surfaces so your layers stack neatly without wobbling.
❄️ Let Layers Cool Completely
Never rush into stacking warm cakes. Warm layers can melt the frosting, making the whole structure unstable. Let each layer cool in the pan for 10–15 minutes, then transfer to a wire rack until they cool completely. If you’re short on time, wrap the layers in plastic wrap and pop them in the freezer for 20–30 minutes—this also makes trimming and handling easier.
🔪 Trim and Tidy the Edges
Once cooled, inspect the sides of each layer. If they’re uneven or have crispy edges, gently shave them down with a knife. Consistent shape and size make frosting and final decorations much easier later on.
Optionally, you can lightly brush the layers with a simple syrup (equal parts water and sugar, boiled and cooled). This keeps the cake moist—especially if you plan to make it a day or two ahead.
Designing Your Magical Unicorn Cake
Coloring Buttercream for Your Unicorn Cake Mane
A vibrant unicorn cake starts with dreamy, colorful buttercream. Whether you’re going for soft pastels or bold rainbow hues, mastering the art of coloring your frosting will bring your unicorn vision to life.
🎨 Choose the Right Food Coloring
Always use gel-based food coloring instead of liquid dye. Gel colorings are more concentrated, so you only need a small amount to achieve bright shades. They also won’t thin out your buttercream, which is key for maintaining texture and structure during piping.
Popular brands like AmeriColor, Wilton, and Chefmaster offer a wide range of unicorn-worthy colors. Look for sets that include pinks, purples, teals, and yellows.
🧁 Start Small and Build Gradually
Add just a toothpick amount of gel coloring to start, especially if you’re aiming for pastel shades. Mix thoroughly and assess the color—then adjust gradually. It’s easier to deepen the shade than to lighten it if you go too dark too soon.
To create a rainbow mane, divide your frosting into separate bowls and color each one individually. Clean your spoon or spatula between batches to keep colors pure.
⏳ Let Colors Develop Over Time
Buttercream colors tend to deepen after they sit. If you’re unsure about a shade, let the frosting rest for 10–15 minutes, then check again. This is especially true for colors like red, navy, and purple. By planning ahead, you avoid over-coloring and maintain the right consistency for decorating.
Optional pro tip: Use white food coloring to neutralize the yellow tone in butter or shortening-based frostings before adding your main color. This helps pastel shades appear cleaner and more vibrant.
Crafting the Unicorn Horn and Ears
The unicorn horn and ears are the stars of your magical cake—these details bring the fantasy to life. With the right materials and a little creativity, you can craft eye-catching decorations that wow your guests.
🦄 Shape the Horn with Fondant or Modeling Chocolate
Start by taking a piece of white fondant or modeling chocolate about the size of a small lemon. Roll it into a long, tapered rope. Then fold it in half and twist the two ends together gently to form a spiral. This twist creates the classic unicorn horn look.
To keep the horn sturdy, insert a wooden skewer or thick toothpick into the base before the fondant hardens. This will let you anchor it firmly into the top of the cake later. Let the horn dry upright in a cup or foam block for at least 12–24 hours, depending on humidity.
✨ Add a Sparkly Finish
Once the horn dries completely, brush it lightly with edible gold dust or luster dust. You can also spray it with edible glitter spray for an extra sparkle. If you want pastel colors, use pink, purple, or pearl shimmer dusts to match your theme.
Mix the dust with a tiny amount of clear alcohol or lemon extract to create a paint-like consistency for brushing.
👂 Make the Ears with Easy Templates
To make the ears, roll out white fondant and cut out two ear shapes using a knife or an ear-shaped cutter. Then cut smaller pink inner ears and press them onto the white pieces with a dab of water or edible glue.
Let the ears sit in slightly curved positions (like propped between spoons or in a folded napkin) to dry with a natural curve. Insert toothpicks or skewers in the base of each ear while still soft, then allow to dry upright for 6–12 hours.
Once the horn and ears are dry, insert them into the cake top just before decorating the mane. Position the horn in the center and place the ears slightly behind and off to the sides for the best whimsical look.
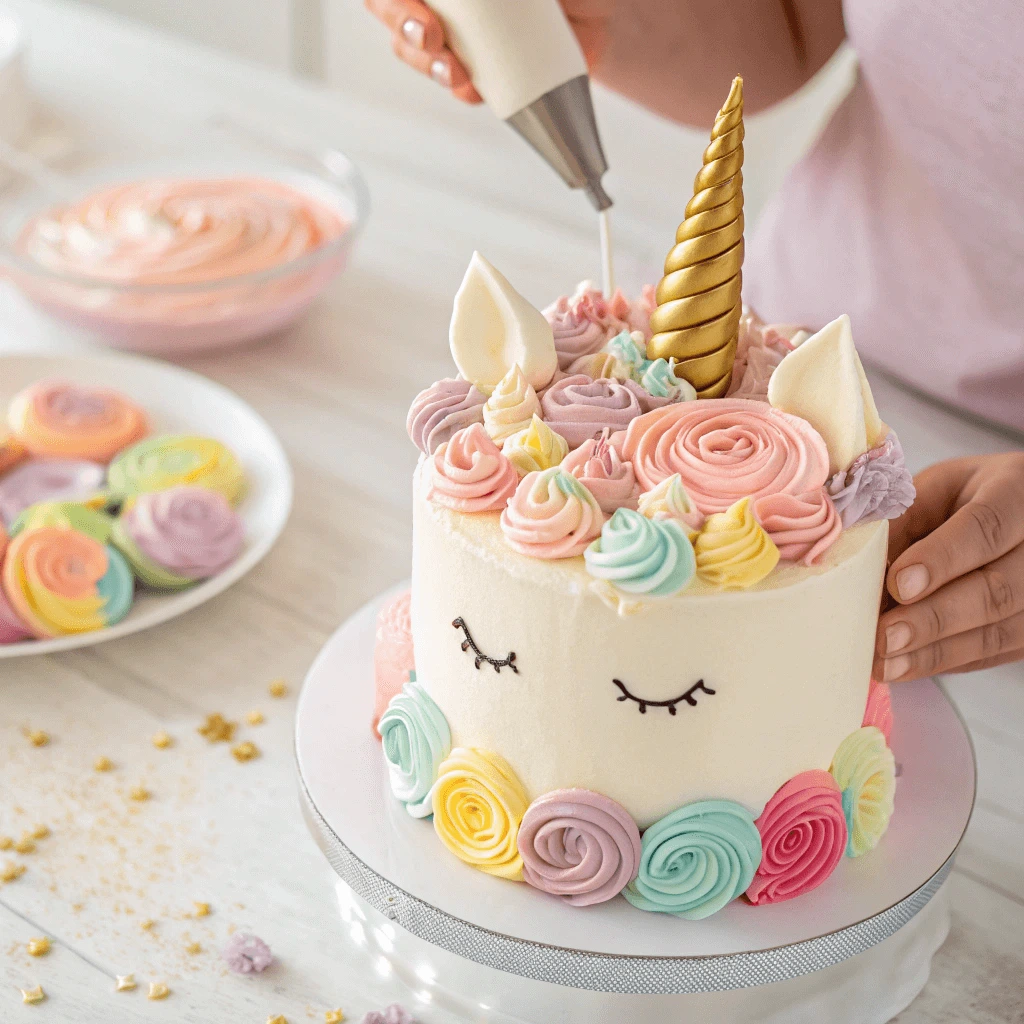
Piping the Unicorn Cake Mane with Precision
The unicorn’s mane is where you can let your creativity run wild. It’s the most colorful and playful part of your unicorn cake, and it adds personality and charm. By using different piping tips and buttercream colors, you can create a whimsical swirl of textures that brings your cake to life.
🧁 Choose Your Piping Tips
Start by gathering a variety of piping tips. Use open star tips like Wilton 1M or 2D to create large rosettes, and closed star tips like Wilton 2C or 6B for deep, rich swirls. Drop flower tips or French star tips can add even more dimension.
Fill several piping bags with your prepared buttercream, using couplers if you plan to switch tips easily. You can even add two to three colors in one piping bag to create a beautiful multi-colored effect when squeezed.
Pick Your Color Palette
Unicorn manes typically feature pastel tones, so consider using light pink, lavender, mint green, baby blue, and soft yellow. Divide your buttercream into small bowls and tint each batch using gel food coloring. Gel color provides intense color without watering down the frosting.
For extra flair, blend some shimmer dust or edible glitter into a few colors to make the mane sparkle under light.
🎨 Pipe with Purpose and Playfulness
Start piping from the base of the horn and work outward in waves to form the mane. Pipe large rosettes in key spots to anchor the design, then fill the gaps with stars, kisses, and ruffles. Layer the textures by piping smaller details on top of the larger ones.
Make sure to pipe around the ears and down one side of the cake for a cascading effect. If you want to take it further, pipe the mane around the back of the cake too, especially if it’ll be viewed from all sides.
As a finishing touch, add edible pearls, sugar flowers, or sprinkles between swirls to give the mane a little more sparkle and dimension.
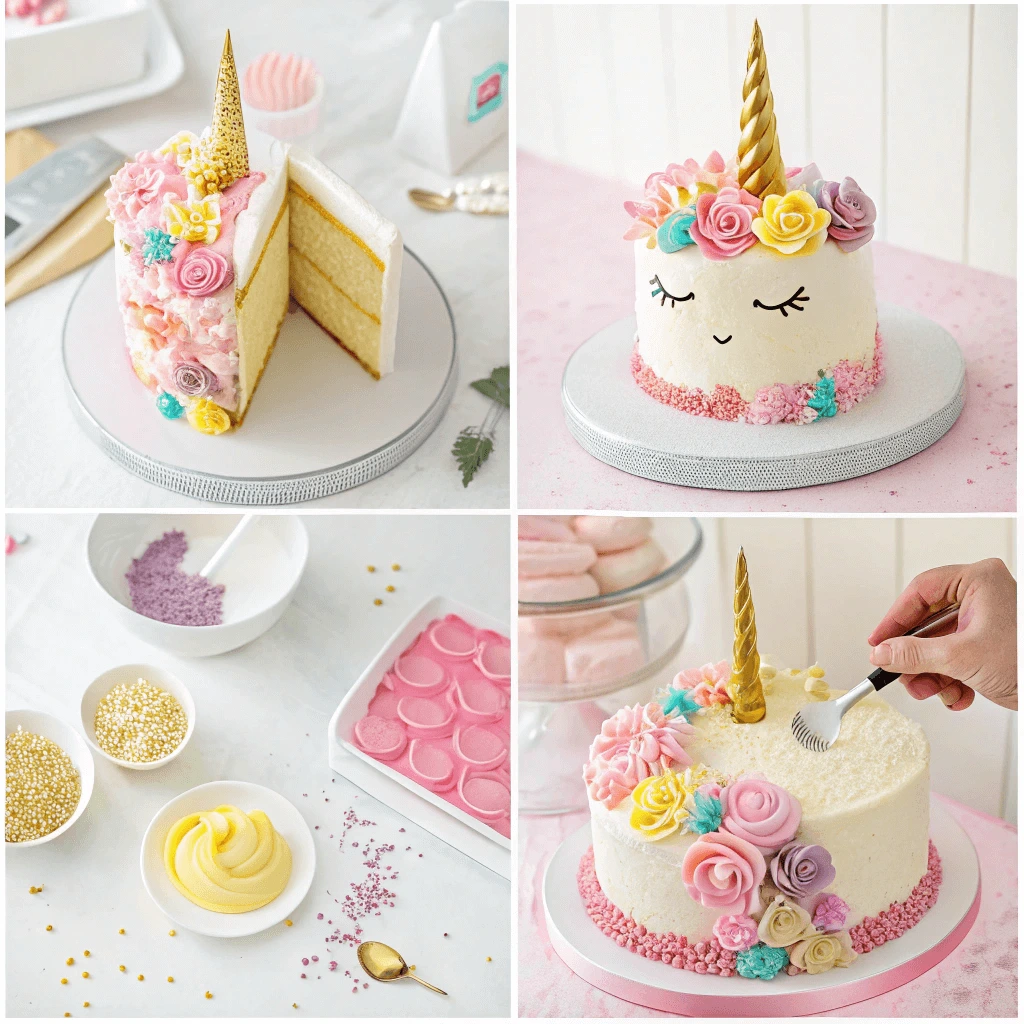
Assembling and Decorating the Cake
Layering and Filling the Cake
The process of layering and filling your unicorn cake is essential for achieving that perfect, professional look. Properly stacking the layers ensures both structure and flavor, while the filling adds moisture and taste. Here’s how to layer and fill your cake like a pro:
🍰 Level Your Cake Layers
Before you begin stacking, make sure your cake layers are level. When cakes bake, they often develop a domed top. To create an even foundation, use a serrated knife or a cake leveler to trim the domes off each layer. Doing this ensures that each layer sits evenly on top of the next, providing a stable base for your decorating.
🍯 Spread a Generous Layer of Filling
Once your cakes are leveled, it’s time to fill. Use a smooth offset spatula to spread an even layer of your chosen filling between each cake layer. You can go for classic buttercream frosting for a smooth, sweet flavor, or a fruit jam or curd for a tart contrast. Make sure the filling is spread evenly to avoid any bulging or gaps that could disrupt the cake’s appearance.
🧁 Stack with Care
Carefully place the second cake layer on top of the first one, ensuring it aligns with the edges. Apply gentle pressure to help it settle into the filling. Repeat this process for each additional layer, making sure each one is aligned and evenly spaced.
After stacking, use a turntable to rotate the cake while checking from all angles for evenness. This helps ensure that all layers align properly and that the overall structure remains stable.
🌟 Apply the Crumb Coat
A crumb coat is a thin layer of frosting applied over the entire cake to lock in crumbs and provide a smooth surface for the final coat of frosting. Start by applying a light layer of buttercream all over the cake, using your offset spatula to spread it evenly. Don’t worry about perfection at this stage—the goal is to seal in any loose crumbs. Once the cake is covered, refrigerate it for about 30 minutes to set the crumb coat.
This step is crucial for achieving a smooth, professional-looking finish with your final layer of frosting.
🎨 Check Alignment Before Decorating
Before you start decorating, take one final look at your cake’s alignment. Use a straight edge or ruler to measure the sides and ensure everything is even. Any small adjustments can be made by gently pressing in on the sides or edges, ensuring that each layer aligns perfectly.
Once you’re satisfied with the stacking and filling, you can move on to applying the final coat of frosting and beginning the decorating process.
Applying a Crumb Coat and Final Frosting
Applying a crumb coat and then a final layer of frosting is essential for a smooth, professional-looking finish on your unicorn cake. The crumb coat seals in any stray cake crumbs, creating a smooth base for your final, flawless layer of frosting. Here’s how to apply both layers correctly:
🧁 What is a Crumb Coat?
A crumb coat is a thin layer of frosting that helps lock in crumbs while creating a smooth surface for the final coat. This first layer acts like a protective barrier, preventing crumbs from mixing with your frosting, which could create an uneven appearance.
To start, use your offset spatula to spread a thin layer of frosting over the entire cake. It’s important not to overdo it—just cover the entire cake lightly, enough to seal in any loose crumbs. Once you’ve applied the crumb coat, use a bench scraper or your offset spatula to smooth it out. Refrigerate the cake for about 30 minutes to allow the crumb coat to set. This step makes it easier to apply the final frosting layer without disrupting the crumb layer underneath.
🍰 Apply the Final Layer of Frosting
After the crumb coat has set, it’s time for the final layer of frosting. This is the part where your unicorn cake really starts to shine!
Start by adding a generous amount of frosting to the top of the cake. Use your offset spatula to spread the frosting evenly from the center to the edges, working your way around the sides. If the frosting seems too thick, you can thin it slightly with a small amount of milk or cream. The key here is to cover the entire cake evenly, ensuring a smooth and consistent surface.
🎨 Smoothing the Frosting
Once you’ve applied the final coat of frosting, it’s time to smooth it out. This step is crucial for achieving a professional, clean look. Here’s how:
- Use a bench scraper: Hold the bench scraper at a slight angle to the sides of the cake and gently rotate the cake on a turntable. The scraper should lightly skim the surface, smoothing out any rough patches.
- Spatula smoothing: For areas that need extra attention, use your offset spatula to fill in any gaps or smooth out rough spots. You can dip your spatula in warm water to help smooth the frosting even further.
🧊 Chill to Set
Once you’re satisfied with the smoothness of your frosting, refrigerate the cake for another 30 minutes. Chilling the cake helps the frosting firm up and makes it easier to handle when adding the final decorative touches, such as piping and fondant details.
🌟 Final Check Before Decorating
Before you start decorating, step back and take a final look at your cake. Ensure that the frosting is smooth and even, with no visible crumbs or imperfections. If necessary, use your bench scraper or spatula to make any last-minute touch-ups. Once the frosting is perfect, your cake is ready to be decorated with that magical unicorn design!
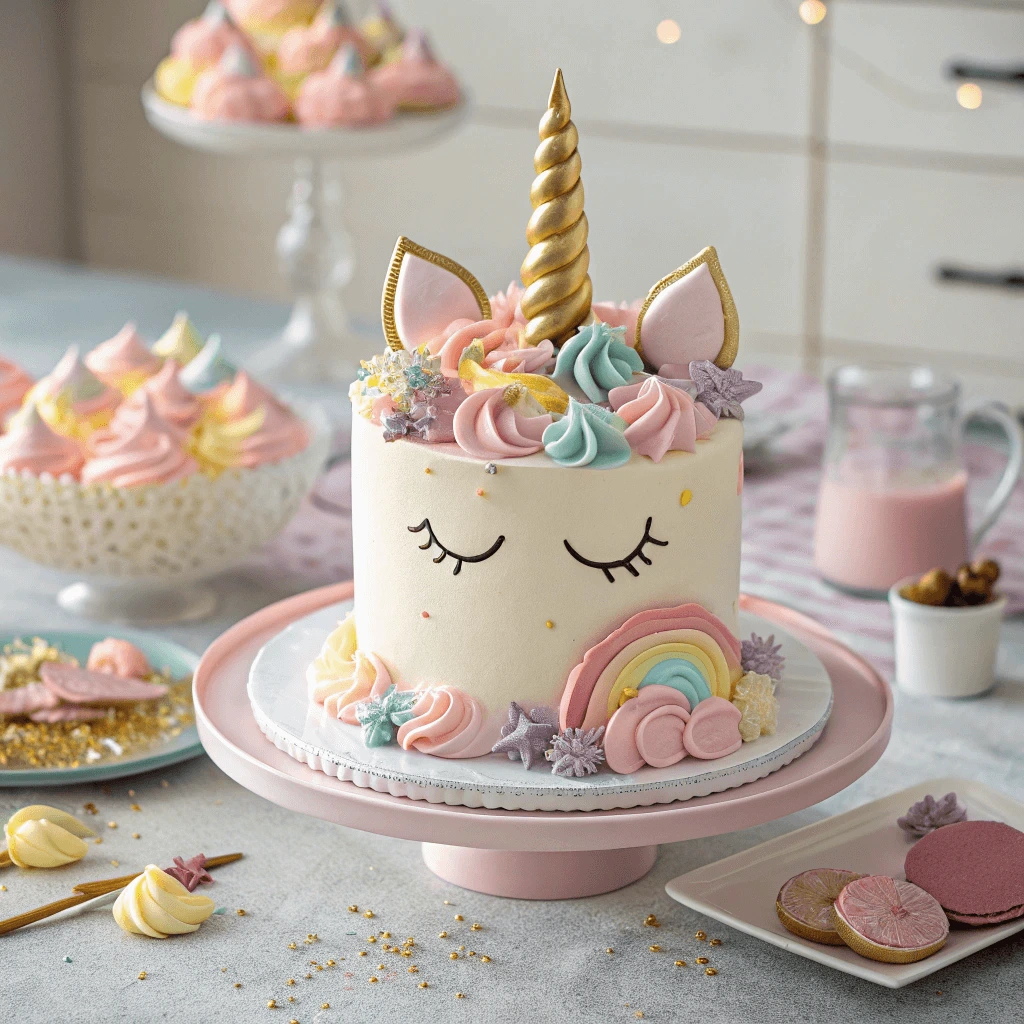
Final Unicorn Decorations
The final step to creating your magical unicorn cake is adding the decorative details that make it truly enchanting. From the horn to the ears, and finishing with the mane, these elements will bring your unicorn cake to life.
🦄 Unicorn Horn
Shape the horn from fondant or a sugar cone. Roll fondant into a cone, tapering to a point, and dust with gold glitter for a shimmering effect. Insert the horn into the top of the cake, using a skewer for extra stability.
👂 Unicorn Ears
Make the ears by rolling fondant into oval shapes, shaping the outer edges into points. Add a small ball of fondant for the inner ear and color it with pink edible gel. Attach the ears symmetrically on either side of the horn.
✨Mane and Tail
Use gel food coloring to tint buttercream in rainbow or pastel colors. Pipe the mane with different piping tips for a variety of textures—think swirls, rosettes, and stars. For extra magic, add a tail at the base of the cake using the same technique.
✨ Final Touches
Finish the unicorn cake with edible glitter, sparkling sugars, or edible gems. Dust the horn and ears with shimmering gold or sprinkle glitter over the mane for an extra magical look.
Tips and Tricks for a Flawless Finish
Avoiding Common Mistakes
Baking and decorating a unicorn cake can be an exciting yet challenging task. To help you achieve that perfect magical cake, here are some common mistakes to watch out for and how to avoid them.
1. Overmixing the Cake Batter
Overmixing the batter can lead to a dense cake with a tough texture. To avoid this, mix the ingredients just until combined. If you use an electric mixer, stop as soon as you see no dry flour left. Stirring by hand for the final few turns can help prevent overmixing and keep the batter light and airy.
2. Uneven Cake Layers
Uneven layers can make stacking the cake tricky and affect its appearance. To prevent this, always use a leveling tool or serrated knife to trim the tops of each layer. Ensure the cake layers are evenly baked by rotating the pans halfway through baking to promote uniform heat distribution. If your cake layers still end up domed, you can level them before frosting.
3. Messy Crumb Coat
A crumb coat is essential for creating a smooth final frosting layer, but it can easily become messy. To avoid this, apply the crumb coat lightly and evenly using a bench scraper or an offset spatula. Refrigerate the cake after applying the crumb coat for at least 30 minutes to allow it to set before applying the final frosting.
4. Buttercream Consistency Issues
If your buttercream is too stiff, it will be hard to pipe or spread smoothly. If it’s too runny, it won’t hold its shape. Achieving the right consistency is key for smooth frosting and perfect piping. If your buttercream is too thick, add a small amount of milk, one teaspoon at a time. If it’s too runny, add more powdered sugar to thicken it.
5. Not Allowing Enough Cooling Time
One of the most crucial steps is allowing each component of the cake to cool completely before stacking and frosting. If you try to frost a warm cake, the frosting will melt and slide off. After baking, let the cake layers cool on a wire rack for at least an hour. Additionally, chill the cake layers before applying frosting to help maintain their shape and prevent squishing.
6. Forgetting to Secure the Unicorn Horn
The unicorn horn is a delicate piece of your cake’s design, and you want it to stay securely in place. Be sure to use a skewer or a cake dowel to insert into the base of the horn and anchor it into the center of the cake. This will prevent the horn from toppling or shifting while the cake is transported or served.
7. Underestimating the Color Palette
Choosing the right color palette for your unicorn cake is essential to achieve the magical look. Overuse of bright colors can make the cake look too chaotic. Instead, use soft pastels or a rainbow gradient for a more cohesive design. When coloring your buttercream, start with a small amount of food coloring and gradually add more to achieve the desired shade.
8. Neglecting Cake Transport and Storage
Transporting your cake can be tricky, especially if it’s a large, multi-layered cake with decorations. To avoid any mishaps, always use a sturdy cake box or place the cake on a rigid cake board. If you need to store the cake before the party, refrigerate it in a cake dome or an airtight container to maintain freshness.
Time-Saving Prep Shortcuts
Making a unicorn cake can take a lot of time, but there are ways to speed up the process without sacrificing quality. Here are some simple shortcuts that can help you work more efficiently.
1. Use Pre-made Cake Mixes
Instead of baking your cake from scratch, consider using a pre-made cake mix. It cuts down on preparation time while still giving you a great base. You can add your own flavors or extras, like vanilla extract, for a personal touch.
2. Make Buttercream in Advance
Buttercream can be prepared in advance. Simply make a large batch and store it in the fridge for up to a week. You can also freeze it for longer storage. Just remember to bring it to room temperature and re-whip before using.
3. Buy Pre-made Fondant
If you need fondant for the unicorn horn and ears, buying pre-made fondant saves a lot of time. You can find it in many colors at most craft stores. This way, you can skip the time-consuming process of making it yourself.
4. Use Gel Food Coloring
Gel food coloring is more concentrated than liquid coloring, so you only need a small amount to get vibrant hues. This helps you avoid multiple layers of frosting and ensures that your buttercream stays thick and smooth.
5. Prepare Decorations the Day Before
Prepare decorations like the unicorn horn and ears ahead of time. You can store them in airtight containers overnight. This way, you won’t be rushed when it’s time to assemble the cake.
6. Use Disposable Piping Bags
Disposable piping bags are a great time-saver when decorating. Fill them with your frosting colors, and you won’t need to worry about cleaning them afterward.
7. Freeze Cake Layers
Freezing your cake layers makes them easier to handle. Frozen layers are less likely to crumble, and they’re much easier to stack and frost.
8. Use a Turntable
A turntable makes decorating much easier. It allows you to rotate the cake while decorating, helping you achieve smooth, even frosting without constantly repositioning the cake.
Customizing Your Unicorn Cake
Customizing your unicorn cake allows you to add a personal touch that reflects the theme of your party or the birthday person’s preferences. Here are some easy and fun ways to make your unicorn cake truly unique:
1. Play with Color Schemes
While pastels are a common choice, you can opt for bold, vibrant colors or even metallic shades like gold and silver for a more refined look. Create a rainbow effect or use your guest of honor’s favorite colors to make the cake extra special.
2. Add Edible Decorations
Enhance your cake with edible glitter, sprinkles, or mini unicorn figurines. You can also use edible flowers, stars, and candy to give the cake texture and visual interest. These small touches will elevate the overall appearance.
3. Try Different Flavors
Mix things up with a variety of cake flavors like lemon, strawberry, or almond. You can also add fun fillings, like fruit preserves or ganache, to surprise guests with unexpected flavors.
4. Use Fun Toppers
Add unicorn-shaped cake toppers or make your own fondant unicorn horn for a custom look. You can also create unique ears and eyes or use themed edible decorations for a playful vibe.
5. Incorporate a Theme
If your party is centered around a particular unicorn theme, incorporate that into your cake design. You can add a rainbow, stars, or clouds, and pair your cake with matching cupcakes or other treats to enhance the overall theme.
6. Personalize with a Message
Finish your unicorn cake with a special message, like a birthday wish or a fun phrase. Use piped buttercream or fondant letters to add that personal touch, making the cake even more meaningful.
Sharing and Storing Your Unicorn Creation
Proper Cake Storage Tips
Storing your unicorn cake properly ensures it stays fresh and maintains its beautiful appearance for as long as possible. Whether you’re making your cake ahead of time or need to store leftovers, following the right storage tips is essential. Here’s how to keep your cake in top condition:
1. Store in an Airtight Container
To preserve the moisture and freshness of your cake, store it in an airtight container. This prevents the cake from drying out and protects it from any external odors. If your cake is particularly large, you can place it in a cake box or wrap it in plastic wrap, ensuring that the cake is fully covered.
2. Refrigeration vs. Room Temperature
Deciding whether to refrigerate your cake or store it at room temperature depends on the ingredients used. If your cake is frosted with buttercream, it can typically be kept at room temperature for 1–2 days, as long as the room is cool and dry. However, if your cake contains perishable fillings (like cream cheese or fresh fruit) or is decorated with fondant, it’s best to store it in the fridge to prevent spoilage.
Make sure to bring your cake to room temperature for about 30 minutes before serving if you store it in the fridge. This will allow the frosting to soften and improve the cake’s texture.
3. Freezing for Longer Storage
If you need to store your unicorn cake for an extended period, freezing is a great option. To freeze your cake, start by slicing it into individual layers or keeping it whole, depending on your preference. Wrap each layer tightly in plastic wrap, followed by a layer of aluminum foil. This will help to protect the cake from freezer burn and preserve its taste. You can store it in the freezer for up to 3 months.
When you’re ready to serve the cake, thaw it overnight in the refrigerator. Once thawed, you can touch up any decorations that might have been affected by the freezing process.
4. Cover the Decorations
If your unicorn cake is decorated with delicate elements like fondant or intricate piping, you want to make sure they stay intact. To avoid smudging or damaging the decoration, store the cake in a large enough container or box where the decorations won’t touch anything. If necessary, use a piece of parchment paper to gently cover the frosting, preventing any accidental pressure from ruining the design.
5. Keep Cakes with Whipped Cream or Fresh Fruit Refrigerated
Cakes topped with whipped cream or fresh fruit require special care since they are highly perishable. These cakes should always be stored in the refrigerator and consumed within 1–2 days. Avoid leaving the cake out at room temperature for too long to prevent it from spoiling.
Transporting Your Cake Safely
Transporting your unicorn cake requires care to ensure it stays in perfect condition. Here are some key tips to help you deliver your cake safely to the party:
1. Use a Sturdy Cake Box
Choose a sturdy cake box that fits your cake snugly. If the cake is large or tiered, make sure the box has extra height to avoid touching the decorations.
2. Ensure a Flat Surface
Place your cake on a solid, flat surface, such as a cake board. A non-slip mat or a rigid base in the car will help keep it stable.
3. Secure the Cake Inside the Box
Fill any gaps in the box with padding like tissue paper or bubble wrap to prevent the cake from shifting. You can also secure the cake board to the box with double-sided tape.
4. Avoid Extreme Temperatures
Keep the cake cool on hot days by using coolers or ice packs. If it’s cold, ensure the cake is protected from drafty areas to avoid damage to the frosting.
5. Drive Carefully
Drive slowly and avoid sharp turns or sudden stops. A smooth ride will help prevent the cake from tipping or being damaged.
6. Cake Carrier for Smaller Cakes
For smaller cakes, use a portable cake carrier with secure latches to keep it safe during transport.
By following these steps, your unicorn cake will arrive safely and ready to impress your guests!
Capture and Share on Social Media
Once your unicorn cake is complete, it’s time to show it off! Sharing your creation on social media is a great way to inspire others and get feedback. Here’s how to do it right:
1. Lighting is Key
Natural light brings out the best in your cake. Take photos near a window to ensure your colors look true and bright. Avoid harsh, direct sunlight.
2. Focus on the Details
Zoom in on the details, such as the intricate mane or sparkling horn. Close-up shots highlight your hard work and add depth to the photo.
3. Use Creative Angles
Try different angles—top-down for a full view or side shots to show layers and height. Experiment to find the angle that best captures the magic of your cake.
4. Behind-the-Scenes Shots
Share a glimpse of the process, whether it’s mixing the frosting or shaping the horn. These shots can be as fun as the finished cake!
5. Hashtags and Tags
Use hashtags like #UnicornCake and #CakeDecorating to connect with others. Tag friends or family to make them part of the fun and increase your post’s visibility.
6. Engage with Followers
Encourage followers to share their own creations using a unique hashtag or tag you. Responding to comments helps build a community and inspire others.
Sharing your unicorn cake on social media is a great way to showcase your creativity and inspire fellow bakers.
In conclusion, creating a magical unicorn cake for your next party is a fun and rewarding experience. With the right tools, techniques, and a little creativity, you can craft a show-stopping cake that will delight your guests. Whether you’re a beginner or an experienced baker, following these steps will ensure your unicorn cake is both beautiful and delicious. Get ready to spread some magic and make your celebration unforgettable!