
Who can resist the buttery, flaky goodness of a freshly baked mini croissant? These bite-sized pastries are perfect for breakfast, brunch, or a delightful snack at any time of the day. While making croissants from scratch might seem intimidating, mini croissants are easier to handle and just as delicious.
In this guide, we’ll walk you through the essential tips and tricks for creating the perfect mini croissants at home. From mastering the dough to achieving those beautiful, crisp layers, you’ll learn everything you need to know. Plus, we’ll explore creative filling ideas and variations to suit both sweet and savory cravings. Whether you’re a beginner or an experienced baker, this post will help you bake mini croissants that are light, golden, and absolutely irresistible!
Essential Ingredients for Perfect Mini Croissants

Choosing the Right Flour
Selecting the right flour is crucial for achieving light, flaky, and tender mini croissants. The type of flour you use directly affects the dough’s elasticity, texture, and ability to develop those signature crisp layers. Here’s what you need to know when choosing the best flour for your mini croissants.
Best Flour Options for Mini Croissants
Not all flours are created equal, especially when it comes to laminated dough. The following options work best:
- All-Purpose Flour: This is a versatile choice that provides a balance between strength and tenderness. It contains a moderate protein content, usually around 10-12%, which allows for some gluten development without making the dough too tough.
- Bread Flour: With a higher protein content (12-14%), bread flour creates a stronger dough structure. This can be useful for achieving better layers but may require extra care to avoid making the croissants too dense.
- Pastry Flour: This lower-protein flour (8-10%) produces a more delicate, tender crumb. However, it may not provide enough structure for well-defined layers in croissants.
Why Protein Content Matters
The protein content in flour determines gluten development. Too much gluten can make the dough stiff and chewy, while too little can lead to weak, fragile layers. A medium-protein flour, such as all-purpose or a mix of bread and pastry flour, ensures the right balance of structure and tenderness.
Flour Handling Tips for Better Dough
To get the best results from your chosen flour, follow these simple tips:
- Sift the flour: This helps aerate it and remove any lumps, leading to a smoother dough.
- Measure accurately: Using a kitchen scale ensures precision, preventing dough that is too dry or too sticky.
- Avoid overworking the dough: Kneading too much can develop excess gluten, making it harder to roll and shape the croissants properly.
By selecting the right flour and handling it correctly, you’ll set the foundation for perfectly light, flaky, and delicious mini croissants.
Importance of Butter and Dairy-Free Alternatives
Butter plays a crucial role in creating the light, flaky layers that make mini croissants irresistible. It contributes to the texture, flavor, and overall quality of the pastry. However, for those following a dairy-free diet, excellent alternatives exist that can still deliver delicious results.
Why Butter Is Essential in Mini Croissants
The lamination process—where butter is folded into the dough—creates the signature flakiness of croissants. Here’s why butter is so important:
- Layer Development: When butter is folded between layers of dough, it creates pockets that expand during baking, forming the light and airy texture.
- Rich Flavor: Butter enhances the taste of croissants with its creamy, slightly nutty notes.
- Moisture Retention: The fat in butter helps maintain the croissant’s soft interior while ensuring a crisp, golden crust.
For the best results, European-style butter is ideal because it contains a higher butterfat percentage (82% or more), which enhances both texture and flavor.
Best Dairy-Free Butter Substitutes
If you’re avoiding dairy, you can still achieve flakiness and great taste by using alternatives. Some of the best dairy-free options include:
- Vegan Butter: Brands specifically designed for baking, such as Miyoko’s or Earth Balance, offer excellent substitutes with the right fat content.
- Coconut Oil (Solid Form): This works well when chilled, but it may add a slight coconut flavor to the croissants.
- Margarine (High-Fat Varieties): Look for margarine with a high fat percentage (at least 80%) to mimic the qualities of butter. Avoid margarine with too much water content, as it can make the dough too soft.
Tips for Using Butter and Dairy-Free Alternatives
Regardless of whether you use butter or a substitute, follow these tips for the best results:
- Keep It Cold: Cold fat is essential for successful lamination. Warm butter or substitutes will melt into the dough instead of creating separate layers.
- Use the Right Amount: Too much fat can cause greasy croissants, while too little can result in dry, dense pastries. Stick to the recommended amount in the recipe.
- Ensure Even Distribution: When layering butter or its alternative, spread it evenly to maintain consistent layers throughout the dough.
By choosing high-quality butter or a suitable dairy-free substitute, you can create mini croissants that are just as flaky, delicious, and satisfying.
Yeast and Proofing Techniques
Proper yeast selection and proofing techniques are essential for achieving light, airy, and perfectly textured mini croissants. Understanding how yeast works and how to proof your dough correctly will ensure a successful batch every time.
Choosing the Right Yeast
Yeast is the key ingredient that helps croissant dough rise and develop a soft, fluffy texture. There are two main types of yeast commonly used in croissant recipes:
- Active Dry Yeast: This yeast requires activation before use. You must dissolve it in warm water or milk (about 100–110°F or 37–43°C) with a bit of sugar and let it sit until it becomes foamy, which usually takes about 5–10 minutes.
- Instant Yeast (Rapid Rise Yeast): This type does not need to be dissolved beforehand and can be mixed directly into the dry ingredients. It activates quickly and shortens the proofing time slightly.
For mini croissants, both types of yeast work well, but instant yeast is preferred for its convenience and consistent results.
How to Properly Proof the Dough
Proofing allows the dough to ferment and rise, which is crucial for developing flavor and structure. Here’s how to proof mini croissant dough correctly:
- First Proofing (Bulk Fermentation):
- Once the dough is mixed and kneaded, place it in a greased bowl and cover it with a damp cloth or plastic wrap.
- Let it rise in a warm, draft-free environment (ideally 75–80°F or 24–27°C) for about 1.5 to 2 hours or until it doubles in size.
- If your kitchen is cold, place the dough inside an oven with the light on or near a warm surface to encourage rising.
- Chilling for Lamination:
- After the first proof, the dough must be chilled before incorporating butter (or a dairy-free alternative).
- Refrigerate it for at least 4 hours or overnight to allow the gluten to relax, making it easier to roll out and laminate.
- Final Proofing (After Shaping):
- Once the croissants are rolled and shaped, they need a second proofing before baking.
- Arrange them on a baking tray, cover them lightly, and let them rise at room temperature for 1.5 to 2 hours.
- They should become slightly puffy but not over-proofed—if they rise too much, they might collapse during baking.
Common Proofing Mistakes to Avoid
- Skipping the chilling step: Cold dough is essential for rolling and layering with butter. If the dough is too warm, the butter will melt, preventing flaky layers.
- Under-proofing: If the dough has not risen enough, the croissants will be dense instead of light and airy.
- Over-proofing: If left too long, the yeast may weaken, leading to deflated or overly soft croissants.
By carefully selecting the right yeast and mastering proofing techniques, you can create mini croissants with the perfect balance of texture and flavor.
Mastering the Croissant Dough
Preparing and Kneading the Dough
A well-prepared dough is the foundation of soft, flaky, and delicious mini croissants. The process involves mixing the right ingredients, kneading properly, and allowing the dough to develop elasticity for a smooth texture. Below, we’ll break down the steps to ensure your dough turns out perfectly every time.
Mixing the Ingredients
To start, gather all the necessary ingredients and ensure they are at the right temperature. Using high-quality flour, yeast, butter (or a dairy-free alternative), and liquid will directly impact the final texture of the croissants.
- Activate the Yeast – If using active dry yeast, dissolve it in lukewarm milk (or a plant-based substitute) with a pinch of sugar. Let it sit for 5–10 minutes until it becomes foamy. If using instant yeast, you can mix it directly into the dry ingredients.
- Combine Dry Ingredients – In a large mixing bowl, whisk together the flour, sugar, and salt. This ensures an even distribution of ingredients.
- Incorporate Wet Ingredients – Add the activated yeast mixture and melted butter (or its alternative) to the dry ingredients. Stir with a wooden spoon or dough hook until the dough begins to come together.
Kneading the Dough Properly
Kneading is an essential step, as it develops the gluten structure, which gives the dough elasticity and strength.
- Start Slowly – If using a stand mixer, set it to a low speed to prevent overmixing. If kneading by hand, turn the dough onto a lightly floured surface.
- Stretch and Fold – Push the dough forward with the heel of your hand, then fold it back toward you. Rotate slightly and repeat.
- Check for Elasticity – After 8–10 minutes, the dough should feel smooth and elastic. A properly kneaded dough should pass the windowpane test—stretch a small piece between your fingers; if it becomes thin and translucent without tearing, it’s ready.
- Avoid Over-Kneading – If the dough becomes too tight or starts resisting movement, it may be overworked. Rest it for a few minutes before continuing.
Letting the Dough Rest
After kneading, the dough needs time to relax before rolling and layering. Place it in a lightly greased bowl, cover it, and let it rest at room temperature for about 1.5 to 2 hours or until it doubles in size. This resting period allows the gluten to relax, making the next steps easier.
By following these steps carefully, you’ll create a smooth and elastic dough that forms the perfect base for buttery, flaky mini croissants.
Rolling and Laminating for Flaky Layers
Achieving the signature flakiness of mini croissants depends on the process of rolling and laminating the dough. This technique creates multiple layers of butter and dough, resulting in a crisp, golden exterior and a soft, airy interior. Below, we’ll go through the essential steps, tips, and common mistakes to avoid when rolling and laminating your croissant dough.
Chilling the Dough Before Rolling
Before you begin rolling, it’s crucial to chill the dough properly. Cold dough ensures that the butter remains solid during the lamination process, which prevents it from melting into the dough too soon.
- After the dough has rested and doubled in size, transfer it to a lightly floured surface.
- Gently press it down to release excess air, then shape it into a rough rectangle.
- Wrap the dough in plastic wrap and refrigerate it for at least 30 minutes before rolling.
Incorporating the Butter Block
Butter is the key ingredient in lamination, providing both flavor and texture. Properly incorporating it ensures even layers throughout the croissant.
- Prepare the Butter Block – Place the butter between two sheets of parchment paper and roll it into a thin, even rectangle, about half the size of your dough. If using a dairy-free alternative, choose one with a high fat content for the best results.
- Position the Butter – Roll the dough into a rectangle, then place the chilled butter in the center. Fold both sides of the dough over the butter, sealing the edges tightly.
Rolling and Folding (Lamination Process)
Lamination involves a series of rolling and folding steps to create multiple layers.
- First Roll and Fold
- Lightly flour your work surface and roll the dough into a long rectangle.
- Fold it into thirds, like a letter, then turn it 90 degrees before rolling again.
- Refrigerate the dough for 30 minutes to keep the butter cold.
- Repeat the Process
- Roll and fold the dough two more times, chilling it between each fold.
- By the end, you should have 27 layers (three folds create exponential layering).
- Keep the dough cold at all times to prevent the butter from melting.
Final Chill Before Shaping
Once the lamination is complete, refrigerate the dough for another 30–60 minutes before shaping the croissants. This final chill makes it easier to cut, roll, and maintain the layers during baking.
By carefully following these rolling and laminating steps, you’ll achieve beautifully flaky, bakery-style mini croissants with perfect layers in every bite.
Cutting and Shaping Mini Croissants
Once the dough has been properly laminated and chilled, the next crucial step is cutting and shaping the mini croissants. This process determines not only their final appearance but also how well they bake. Proper technique ensures even layers, a delicate texture, and a light, airy interior. Let’s go through the key steps and tips to perfect this stage.
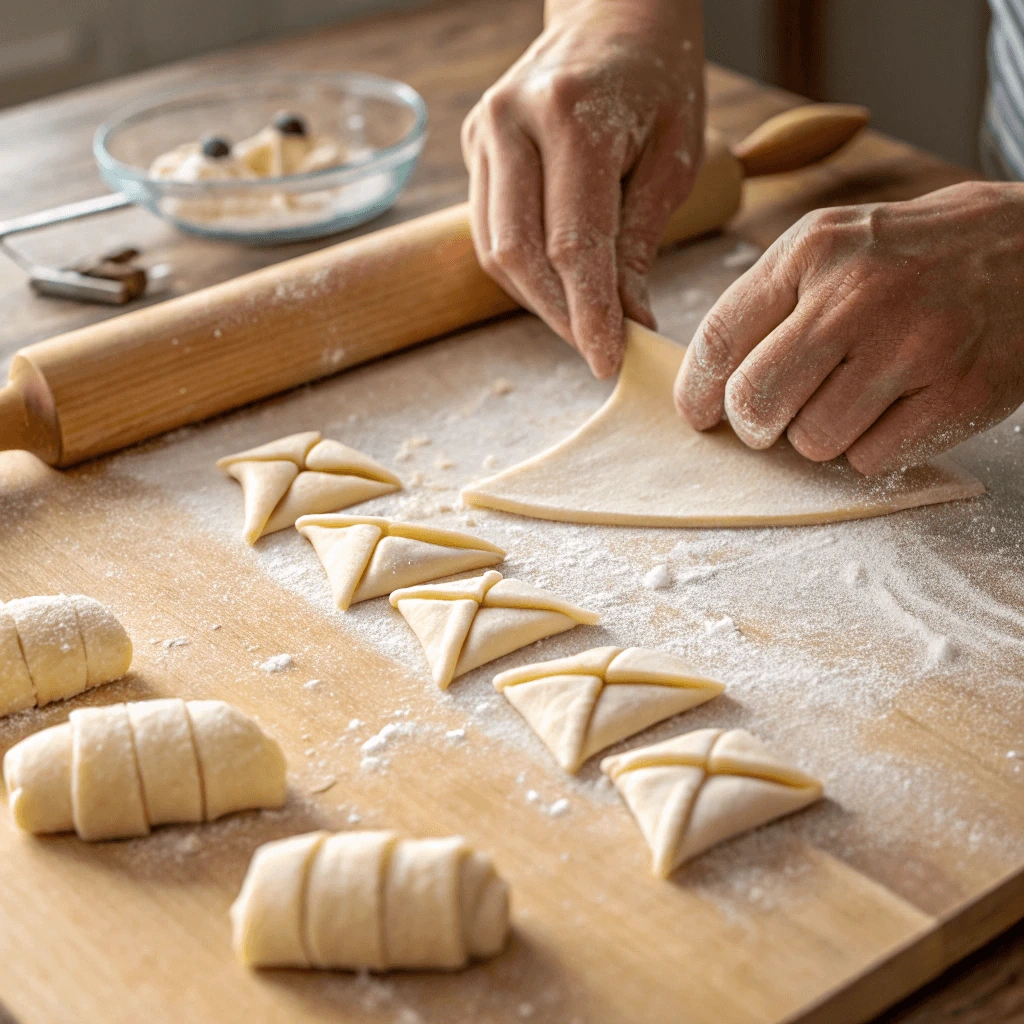
Cutting the Dough Into Triangles
To create classic croissant shapes, the dough must be cut into triangles of the right size and proportion.
- Roll Out the Dough – Lightly flour your work surface and roll the chilled dough into a large rectangle about ¼ inch thick. Keeping the thickness uniform ensures even baking.
- Measure and Mark – Use a ruler to measure base widths of about 2.5–3 inches and mark points along the top and bottom edges of the dough. This ensures consistent sizing.
- Cut Clean Triangles – Use a sharp knife or pizza cutter to cut straight lines between the marked points, forming isosceles triangles. A sharp tool prevents the edges from being crushed, preserving the delicate layers.
Creating the Perfect Croissant Shape
Shaping the croissants correctly helps achieve a well-balanced, fluffy interior and crispy exterior.
- Stretch the Dough Slightly – Gently elongate each triangle by pulling on the pointed end. This extra stretch creates more layers during rolling.
- Make a Small Notch – Cut a tiny notch (about ¼ inch) at the base of each triangle. This allows the dough to spread more evenly while rolling, creating a crescent shape.
- Roll Tightly Yet Gently – Start at the base and roll toward the pointed tip, applying gentle but firm pressure to secure the layers. Avoid pressing too hard, as this can squeeze out the butter.
- Position for Baking – Place each rolled croissant on a parchment-lined baking sheet with the pointed end tucked under. This prevents them from unrolling during baking.
Final Proofing Before Baking
Before baking, the shaped croissants need to proof again to develop their airy texture.
- Arrange with Space – Leave at least 1–2 inches between croissants on the tray to allow room for expansion.
- Cover and Rest – Lightly cover with a damp kitchen towel and let them proof at room temperature for 1–2 hours, until they become noticeably puffy.
- Avoid Over-Proofing – If the dough proofs for too long, the layers may collapse, affecting the flakiness.
By following these cutting and shaping techniques, your mini croissants will rise beautifully, bake evenly, and have a light, delicate texture with perfectly layered interiors.
Baking and Finishing Touches
Egg Wash for a Golden Crust
One of the key components to achieving a perfect, golden croissant crust is the egg wash. This simple but crucial step not only gives your mini croissants an inviting, shiny finish but also helps to enhance the texture and flavor. Let’s break down the importance of egg wash, how to apply it correctly, and alternatives for those who prefer to skip eggs.
What Is an Egg Wash?
An egg wash is a mixture of egg yolk and egg white (sometimes with a little water or milk added) that is brushed onto baked goods before baking. This gives pastries a glossy, deep-golden color and a smooth, shiny finish. For mini croissants, the egg wash serves as both an aesthetic element and a way to seal the dough edges, making them more secure during baking.
How to Prepare the Egg Wash
Creating an egg wash is easy and only requires a few ingredients:
- Eggs – You’ll need one large egg (or just the yolk for an even deeper color).
- Liquid (Optional) – Add 1 tablespoon of water or milk to thin out the egg wash slightly. This helps in creating a smooth coating that won’t clump.
- Whisk Together – In a small bowl, whisk the egg (and liquid) together until the mixture is smooth and fully combined.
How to Apply the Egg Wash
Proper application of the egg wash is essential to getting that beautiful golden crust.
- Brush, Don’t Drip – Use a pastry brush to gently apply the egg wash to each mini croissant. Be sure to coat the surface evenly but avoid over-saturating the dough. The goal is a thin layer of egg wash that will form a crisp, shiny crust when baked.
- Avoid the Edges – Take care not to get egg wash on the exposed edges where you rolled the dough. This ensures the layers of dough remain flaky and the edges crisp without becoming too firm.
- Apply Before Baking – It’s important to apply the egg wash just before baking, after the croissants have finished proofing. Applying it too early could lead to the wash drying out, which might prevent the crust from achieving its desired shine.
Alternatives to Egg Wash
For those who prefer a vegan or dairy-free option, there are several alternatives to using egg wash while still achieving a golden, glossy finish.
- Milk or Cream – A light brushing of milk or cream can help give the croissants a golden color. If you prefer dairy-free, opt for almond milk or soy milk.
- Maple Syrup – For a slightly sweet finish, maple syrup can work well, though it may not provide quite as much shine as egg wash.
- Oil – For a dairy-free and vegan-friendly option, vegetable oil or olive oil can be brushed onto the dough. It won’t give the same glossy sheen as egg wash, but it does create a nice, light golden crust.
Why Egg Wash Matters for Croissants
Egg wash is more than just for looks. The effect it has on the crust is essential to the texture and flavor of your mini croissants:
- Glossy Finish – The egg wash creates a smooth, glossy finish that makes the croissants look enticing.
- Crisp Texture – As the croissants bake, the egg wash helps form a crispy outer layer that contrasts perfectly with the light, airy inside.
- Flavor – The richness of the egg wash adds an additional layer of flavor to the pastry, enhancing its overall taste without overwhelming the delicate buttery notes.
With these tips and the right techniques, you’ll master the art of achieving a golden, perfectly textured crust on your mini croissants. Whether you use the traditional egg wash or a creative alternative, this step is essential in elevating your croissants to bakery-quality perfection.
Perfect Baking Temperature and Time
Baking mini croissants to perfection requires not only the right technique but also the ideal baking temperature and timing. With the correct settings, you can achieve that irresistible golden, flaky crust and a light, airy interior. Below, we’ll explore the best temperature and time for baking your mini croissants, along with tips to avoid common mistakes.
The Ideal Temperature for Mini Croissants
The temperature you bake your mini croissants at significantly affects how they turn out. For the best results, aim for a high temperature, typically around 375°F (190°C). This ensures that the croissants bake quickly, creating that crispy, golden exterior while keeping the inside tender and flaky.
- Preheat Your Oven – Before placing the croissants inside, ensure your oven is preheated to the correct temperature. Preheating allows the dough to start baking immediately when it enters the oven, ensuring the perfect rise and crispness.
- Avoid Overcrowding – When placing your mini croissants on the baking sheet, make sure there is enough space between each one. This will allow hot air to circulate and promote even cooking. Crowding the pan could lead to uneven results.
Baking Time for Mini Croissants
Mini croissants typically take around 15 to 20 minutes to bake, depending on the size of the croissants and the specifics of your oven. The key is to monitor them closely during the baking process.
- Watch for Color – The perfect mini croissant should have a golden-brown color on the outside. As the croissants near the end of their baking time, check for this color change to ensure they’re done. The croissants should also be slightly puffed up, with flaky layers visible along the edges.
- Check for Crispiness – To test if your croissants are fully baked, gently tap the top of one. It should sound slightly hollow, indicating that the interior is fully cooked and the croissant is crisp.
Troubleshooting Baking Issues
Even with the right temperature and baking time, there can be a few common issues that might affect the outcome of your mini croissants. Here’s how to address them:
- Underbaking – If your croissants are pale or too soft after the recommended baking time, they likely need more time in the oven. Simply return them to the oven for another 2-5 minutes and check again.
- Overbaking – If the croissants are too dark or overly crispy, they may have been in the oven too long. To prevent this in the future, keep a close eye on them during the last few minutes of baking. Every oven is different, so slight adjustments might be necessary.
- Uneven Baking – If the croissants are baking unevenly (one side is more golden than the other), rotate the baking sheet halfway through the baking time. This will ensure they bake uniformly.
Using a Convection Oven vs. a Conventional Oven
If you’re using a convection oven, the fan helps circulate the hot air, making the baking process faster and more even. This can reduce the baking time by about 5 minutes, so keep an eye on your mini croissants. You may also want to lower the temperature by 10-15 degrees Fahrenheit to avoid over-baking.
On the other hand, conventional ovens without a fan tend to bake more slowly, so the standard 375°F (190°C) temperature should work perfectly.
How to Avoid Common Mistakes
When baking mini croissants, it’s easy to make mistakes that could affect the final product. Here are a few tips to avoid them:
- Avoid Opening the Oven Door Too Often – While it might be tempting to check on your croissants regularly, opening the oven door too frequently can cause temperature fluctuations that may affect the rise and crispiness. Try to wait until you are near the end of the baking time to check.
- Don’t Skip the Egg Wash – If you skip the egg wash step, your croissants may not achieve that perfect golden-brown crust. A well-applied egg wash is key to that glossy finish.
Tips for Achieving the Perfect Mini Croissants
To summarize, achieving the ideal mini croissant involves a few essential steps:
- Preheat the oven to 375°F (190°C) to ensure even heat distribution.
- Bake the croissants for 15-20 minutes, watching closely for a golden-brown exterior.
- Rotate the baking sheet halfway through to promote even baking.
- Use an egg wash for a shiny, golden finish and perfect texture.
With these tips in mind, you’ll be on your way to creating delicious, perfectly baked mini croissants every time. Remember, patience is key—let the croissants bake fully before removing them from the oven, and you’ll enjoy a perfect flaky result.
Cooling and Storing Mini Croissants
Once your mini croissants are freshly baked, it’s essential to let them cool properly before storing them to ensure they retain their perfect texture and flavor. The cooling and storing process can make a significant difference in the quality of your croissants, especially if you plan to keep them for later. Below, we will walk through the steps you should follow to cool and store your mini croissants effectively, while also providing tips to preserve their freshness.
How to Cool Mini Croissants Properly
Proper cooling allows your croissants to finish the baking process and prevents them from becoming soggy or dense. After taking them out of the oven, follow these simple steps to cool your mini croissants:
- Place on a Cooling Rack – As soon as your croissants come out of the oven, transfer them to a cooling rack. A cooling rack allows air to circulate around all sides of the croissants, which helps prevent moisture from building up on the bottom. This keeps the croissants crispier for longer.
- Let Them Rest – Allow your mini croissants to cool on the rack for about 10-15 minutes before serving or storing them. This time gives the interior a chance to set, ensuring that the layers stay flaky and light. If you skip this step, the inside might remain too doughy or sticky.
- Avoid Covering Immediately – Do not cover the croissants right after baking, as doing so traps heat and moisture. This can lead to a soggy crust. Wait until they are adequately cooled before placing them in any storage containers.
Best Storage Practices for Mini Croissants
Once your mini croissants are cool, you can store them to keep them fresh for longer. Here are the best ways to store them depending on when you plan to eat them:
- Storing at Room Temperature
If you plan to eat your mini croissants within a day or two, it’s fine to store them at room temperature.- Use an Airtight Container: Place the croissants in an airtight container to keep air out and prevent them from becoming stale. A plastic or glass container with a tight-fitting lid is ideal for this purpose.
- Paper Towels: Lay a paper towel at the bottom of the container and another one on top of the croissants. This helps absorb excess moisture that could cause the croissants to become soggy. You can also place the croissants in a sealed bag if a container is not available.
- Store in a Cool, Dry Place: Keep the container in a cool, dry location, such as a pantry or countertop, out of direct sunlight. Avoid storing them in the fridge, as cold temperatures can alter the texture and flavor of croissants.
- Freezing Mini Croissants
For longer-term storage, freezing mini croissants is an excellent option. This preserves their flavor and flaky texture for up to a few months.- Flash Freeze First: To prevent the croissants from sticking together, place them on a baking sheet in a single layer and freeze them for 1-2 hours. This process is called “flash freezing” and ensures that each croissant freezes individually.
- Use Freezer Bags or Containers: After flash freezing, transfer the croissants into freezer-safe bags or airtight containers. Make sure to remove as much air as possible from the bags to prevent freezer burn.
- Label and Date: Always label the bags or containers with the date you froze the croissants. This will help you keep track of how long they have been in the freezer. Frozen mini croissants are best consumed within 2-3 months for optimal freshness.
- Thawing Frozen Croissants
If you’ve frozen your mini croissants and are ready to enjoy them, there are several ways to thaw and reheat them while maintaining their texture.- Room Temperature Thawing: To thaw your mini croissants, remove them from the freezer and allow them to sit at room temperature for about 1-2 hours. This will allow them to thaw evenly without losing too much moisture.
- Reheat in the Oven: To restore their flaky texture, you can reheat the thawed croissants in a preheated oven at 350°F (175°C) for 5-10 minutes. This will refresh them, making the exterior crispy again while keeping the interior soft and warm.
- Microwave Reheating (Less Ideal): While the microwave can quickly reheat croissants, it may not preserve the crispy layers as well as the oven. If you must use the microwave, place the croissants on a paper towel and heat them on medium for 15-20 seconds at a time.
Avoid Common Mistakes When Storing Mini Croissants
To preserve the quality of your mini croissants, avoid these common mistakes when storing them:
- Storing in the Fridge – The fridge can cause croissants to lose their flaky texture and become dry. Avoid refrigerating them unless you need to store them for an extended period.
- Sealing While Still Warm – Always wait until your croissants have fully cooled before sealing them in containers or bags. Sealing them while still warm traps steam, which can cause the croissants to lose their crispiness.
- Freezing Croissants Without Flash Freezing – If you skip the flash freezing step, the croissants may freeze together and become a clump of dough. Take the extra step to flash freeze before storing them in bags or containers.
By following these cooling and storing tips, your mini croissants can stay fresh and delicious, whether you enjoy them immediately or save them for later. The key is to allow them to cool properly, store them in the right conditions, and avoid common storage mistakes.
Creative Variations and Fillings
Sweet Fillings for a Treat
Mini croissants are incredibly versatile and can be filled with a variety of sweet fillings to transform them into decadent treats. Whether you’re craving something fruity, chocolaty, or creamy, the options for sweet fillings are nearly endless. Below, we will explore some of the most popular sweet fillings you can use to elevate your mini croissants, along with tips on how to prepare and incorporate them into your baking process.
1. Classic Chocolate Filling
Chocolate-filled croissants are a timeless favorite and an easy way to bring rich flavor to your mini croissants. Here’s how to incorporate chocolate into your croissants:
- Choose Your Chocolate: You can use milk chocolate, dark chocolate, or even white chocolate, depending on your preference. For a more luxurious touch, you might opt for chocolate ganache or chocolate hazelnut spread for a smoother filling.
- How to Fill: Simply break the chocolate into small pieces and place them in the center of the croissant dough. Be sure to leave a border around the edges to allow the dough to seal properly. This will help keep the filling inside as the croissants bake.
- Alternative Options: For a richer chocolate experience, consider adding a chocolate spread (like Nutella) along with chocolate chunks for extra gooeyness. This creates a delightful mix of smooth and chunky textures.
2. Fruit-Based Fillings
Fruit fillings offer a refreshing and naturally sweet alternative to traditional fillings. Fruits like berries, apples, and peaches can make your mini croissants feel lighter while adding a burst of flavor. Here are some fruit filling ideas:
- Berry Compote: Use a mixture of fresh or frozen berries such as raspberries, blueberries, and strawberries. Simmer them with sugar and a squeeze of lemon juice to create a thick compote. Once cooled, spoon the compote into your croissant dough for a sweet and tart filling.
- Apple Cinnamon Filling: Cook down peeled and diced apples with cinnamon and a touch of sugar until they soften and become syrupy. This warm, spiced filling will remind you of apple pie, and it pairs wonderfully with buttery croissants.
- Peach Jam or Preserves: A homemade or store-bought peach jam or preserves can provide a sweet, juicy filling. Simply spoon a little of the jam into the center of each croissant before baking.
3. Cream Cheese and Sweet Cream Fillings
Cream cheese fillings are a great choice for anyone who enjoys the rich, tangy taste of cream cheese paired with sweetness. These fillings often complement other ingredients like fruit or chocolate and provide a smooth, creamy texture.
- Basic Sweet Cream Cheese: Mix cream cheese with powdered sugar, a dash of vanilla extract, and a little lemon zest for a simple yet delightful filling. This base filling is both creamy and sweet, with a tangy kick from the cream cheese.
- Cream Cheese and Fruit Combination: Pair your sweet cream cheese filling with fruit for added flavor. For example, combining cream cheese with a spoonful of strawberry jam or blueberry compote inside the croissant creates a delicious and balanced treat.
- Chocolate Cream Cheese Filling: If you’re in the mood for chocolate and cream cheese, mix cream cheese with cocoa powder and sugar for a rich, chocolatey filling. This creamy, sweet, and slightly tangy combo is a perfect alternative to traditional chocolate croissants.
4. Cinnamon Sugar Filling
For a cozy, comforting option, consider filling your mini croissants with cinnamon sugar. This classic flavor combination is simple yet incredibly satisfying.
- How to Prepare: Mix cinnamon and sugar together in a small bowl. You can adjust the proportions to your taste, but a common ratio is 1 tablespoon of cinnamon for every 1/4 cup of sugar. Sprinkle the cinnamon sugar generously over the dough before rolling it up.
- Enhance the Flavor: For extra flavor, you can add a touch of vanilla extract to the dough or sprinkle a little more sugar over the croissants after they’re baked. This creates a sweet, crisp topping on your croissants.
5. Caramel and Nut Filling
If you’re a fan of nuts and caramel, this filling will elevate your mini croissants into something special. The combination of gooey caramel and crunchy nuts creates a delightful contrast of textures.
- Caramel Sauce: You can use store-bought caramel sauce or make your own by melting sugar in a pan and adding butter and cream. Once the caramel is ready, allow it to cool slightly before spooning it onto your croissant dough.
- Add Nuts: For texture, sprinkle some finely chopped pecans, walnuts, or almonds onto the caramel sauce before folding the dough. The nuts add crunch and flavor, making each bite more satisfying.
6. Nutella and Banana Filling
For a decadent and satisfying treat, consider filling your croissants with Nutella and banana slices. The combination of creamy Nutella and sweet banana creates a dreamy filling that pairs perfectly with the buttery croissant dough.
- How to Fill: Spread a layer of Nutella on the dough, then add thin banana slices on top. You can either fold the banana slices within the dough or layer them on top of the Nutella. Once rolled, bake the croissants to perfection.
- Optional Touches: Drizzle extra Nutella over the croissants once they come out of the oven for an added indulgence.
How to Seal Sweet Fillings into Mini Croissants
No matter what filling you choose, properly sealing your croissants is essential to prevent the filling from spilling out while baking.
- Avoid Overfilling: It’s tempting to pack your mini croissants with a generous amount of filling, but overfilling can cause the filling to leak out during baking. Use a spoon to carefully place a small amount of filling at the center of each croissant.
- Seal the Edges Well: Press the edges of the dough together to ensure that the filling stays inside. You can use a fork to crimp the edges, which will not only secure the filling but also add a decorative touch.
- Chill Before Baking: Once your croissants are shaped, refrigerate them for 10-15 minutes before baking. Chilling helps the dough set and prevents the filling from oozing out during the bake.
Savory Stuffed Mini Croissants
Savory mini croissants are a fantastic way to elevate this classic pastry into something more substantial and suited for a wide variety of occasions. Whether you’re preparing an appetizer, snack, or even a light meal, savory stuffed mini croissants are a delightful choice. They can be filled with a variety of ingredients, from cheese and vegetables to herbs and even plant-based proteins. The possibilities are endless, and with the right combination of flavors, these croissants can rival any traditional savory pastry.
1. Cheese and Herb Croissants
One of the most popular savory fillings for mini croissants is cheese and herbs. The richness of cheese, combined with the fresh aroma of herbs, makes for a comforting and delicious filling. You can opt for a variety of cheeses depending on your taste preferences, from melty cheeses like cheddar or mozzarella to sharper, more complex cheeses like Gruyère or Parmesan.
- Cheese Options: Choose cheeses that melt well, such as cheddar, cream cheese, mozzarella, or goat cheese. If you prefer a stronger flavor, blue cheese or brie can be a great option. A combination of different cheeses can offer a rich, layered flavor.
- Herb Additions: Fresh herbs like thyme, rosemary, and parsley complement the cheese perfectly. You can mix the herbs into the cheese filling, or sprinkle them on top of the croissants before baking for an aromatic finish.
- Preparation Tip: Roll the dough and add a spoonful of the cheese-herb mixture in the center. Don’t forget to pinch the edges well to seal the filling inside as it bakes.
2. Mushroom and Cheese Croissants
Mushrooms and cheese are an excellent combination for a savory stuffed mini croissant. The earthiness of the mushrooms pairs wonderfully with the creaminess of the cheese, creating a rich and satisfying filling.
- Mushrooms: Sauté button mushrooms, shiitake, or portobello mushrooms with garlic and onions to bring out their rich, savory flavor. Make sure to cook the mushrooms until they release their moisture and become tender, as excess moisture can cause the croissants to become soggy.
- Cheese Pairing: Use Swiss, cheddar, or mozzarella for a smooth melt, or opt for something more complex like Gruyère or goat cheese.
- Seasonings and Herbs: Season the mixture with garlic, thyme, or sage for extra flavor. You can also add a touch of nutmeg for depth.
- Assembly: Sauté the mushrooms and mix with the cheese, then spoon the mixture into the croissant dough. Be careful not to overfill, as this can cause the croissants to burst open during baking.
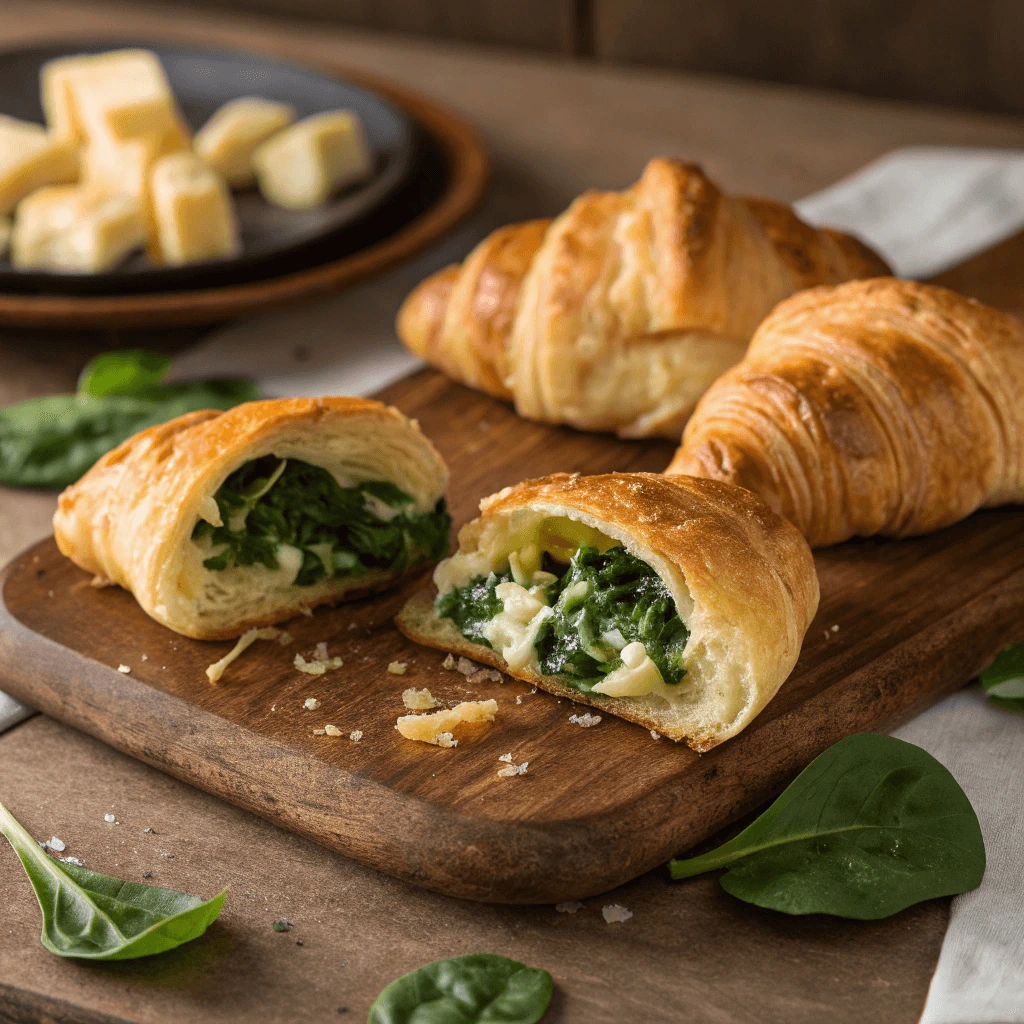
3. Spinach and Feta Croissants
For a lighter and more Mediterranean-inspired option, spinach and feta-filled croissants are a delicious savory treat. The combination of the earthy flavor of spinach and the tangy taste of feta cheese is an excellent choice for those who enjoy fresh, herbaceous fillings.
- Fresh Spinach: Use fresh spinach, either sautéed or wilted, to prevent excess moisture in the croissants. This method helps avoid soggy pastries. If you prefer, you can also use frozen spinach but make sure to thoroughly drain it before using it in the filling.
- Feta Cheese: Feta adds a sharp, salty contrast to the spinach. You can crumble it into smaller pieces for easy stuffing or use a block of feta for a chunkier filling. To add richness, mix the feta with a bit of cream cheese or ricotta for a creamier texture.
- Spices and Seasonings: Season with garlic, nutmeg, and black pepper to enhance the flavors. Fresh herbs like oregano or basil can also be added to bring out the Mediterranean vibes in the croissants.
- Assembly Tip: Sauté the spinach until it wilts and mix with the crumbled feta. Be sure to allow the filling to cool slightly before adding it to the croissant dough, preventing it from becoming too runny.
4. Chickpea and Pesto Croissants
For a hearty, plant-based filling, chickpeas and pesto create a flavorful and filling combination. The chickpeas add a satisfying texture, while the pesto provides a bold, herby kick.
- Chickpeas: You can use canned chickpeas or cook them from scratch. Mash the chickpeas slightly for a smooth texture or leave them whole for a more substantial bite.
- Pesto Sauce: Choose between basil pesto, sun-dried tomato pesto, or even spinach pesto to create a flavorful base. The rich oiliness of pesto will complement the buttery croissant dough.
- Assembly: Mix the mashed chickpeas with the pesto and spoon the mixture into your croissant dough. You can also add a sprinkle of Parmesan cheese for extra flavor.
5. Roasted Red Pepper and Hummus Croissants
A deliciously creamy and tangy filling, roasted red peppers and hummus bring together the savory flavors of the Mediterranean in a simple, yet satisfying way.
- Roasted Red Peppers: Roast fresh red peppers or use jarred roasted peppers to save time. Slice them thinly to make them easy to stuff inside the croissants.
- Hummus: Use plain hummus or a flavored version like lemon or garlic hummus for added complexity. The hummus helps bind the peppers together and adds creaminess to the filling.
- Herbs and Seasonings: Season with a bit of cumin or paprika to give the filling a smoky note. Fresh parsley or cilantro adds brightness.
- Assembly Tip: Spread a thin layer of hummus on the croissant dough, then layer with roasted red peppers. Roll the dough tightly to secure the filling.
6. Vegan Mediterranean Croissants
For a lighter yet flavorful option, a vegan Mediterranean-inspired filling is a great choice. This can include ingredients like olives, tomatoes, and cucumbers, with a rich, tangy vegan cream cheese or almond cheese base.
- Olives and Roasted Peppers: Chopped black olives and roasted red peppers lend a Mediterranean flair. Their natural saltiness pairs perfectly with the creamy cheese filling.
- Vegan Cheese Options: Vegan cream cheese or almond-based cheese can be used as a creamy base for this filling.
- Herbs and Seasonings: Use fresh oregano, parsley, and a touch of lemon zest to elevate the filling and bring out the bright flavors.
Tips for Making Savory Stuffed Mini Croissants
Add a finishing touch: After baking, consider brushing the croissants with a bit of olive oil or butter to enhance the golden color and add extra flavor.
Do not overfill: Like with sweet fillings, it’s important not to overstuff your mini croissants. Overfilling can cause the filling to leak out while baking, making a mess and preventing the croissants from fully cooking. Stick to small spoonfuls of filling.
Seal the edges well: Ensure the croissant dough is sealed properly to prevent the filling from escaping while baking. You can press the edges together using your fingers or a fork.
Vegan and Dairy-Free Croissant Options
When it comes to enjoying croissants without compromising dietary preferences or ethical choices, vegan and dairy-free croissants provide an excellent alternative. By substituting traditional ingredients like butter and cream with plant-based alternatives, these croissants retain all the flakiness and rich flavor that make them a beloved treat. In this section, we’ll explore the key substitutions and tips to make your vegan and dairy-free croissants just as delicious as their buttery counterparts.
1. Vegan Butter and Dairy-Free Fat Substitutes
The heart of a croissant’s flaky texture comes from the layers of butter that get incorporated into the dough. For a vegan or dairy-free version, you need to replace the butter with plant-based alternatives that provide similar consistency and flavor. Fortunately, there are several options:
- Vegan Butter: Vegan butter is the most straightforward substitution for traditional butter in croissant recipes. Made from oils like coconut oil, soybean oil, or palm oil, vegan butter offers the creamy texture and rich flavor needed to create flaky layers. Look for brands that are dairy-free and have no added preservatives for the best results.
- Coconut Oil: Coconut oil can serve as an excellent alternative for butter in croissants. It has a higher fat content, which helps to maintain the richness and tenderness of the dough. The slight coconut flavor is subtle and doesn’t overpower the other ingredients. Be sure to use refined coconut oil to avoid any strong coconut taste if you prefer a neutral flavor.
- Olive Oil: For a lighter option, olive oil can be used to replace butter in croissants. While olive oil will not provide quite the same flakiness as vegan butter or coconut oil, it can still produce a tender and flavorful pastry. It’s especially ideal if you’re aiming for a slightly savory flavor profile.
- Margarine: Certain types of margarine are vegan and dairy-free, making it another good option for croissant dough. Check labels to ensure the margarine is free from dairy and other animal products.
2. Dairy-Free Milk Substitutes for Liquid
Traditional croissant recipes often call for milk or heavy cream to add moisture and flavor to the dough. Fortunately, there are several dairy-free milk substitutes that provide the necessary richness without the use of dairy:
- Almond Milk: Almond milk is a popular choice for dairy-free baking. It has a light, neutral flavor that doesn’t overwhelm the other ingredients, and its slightly nutty undertones complement the buttery taste of the croissant.
- Oat Milk: Oat milk is another excellent alternative, known for its creamy texture and natural sweetness. It adds depth to the dough without overpowering the flavor, and it’s also a great option for those with nut allergies.
- Soy Milk: Soy milk is rich in protein, making it a good choice for creating structure in vegan croissant dough. It has a slightly thicker consistency, which helps achieve a more luxurious texture in the final product.
- Coconut Milk: If you want a richer and slightly coconut-flavored croissant, coconut milk can be a great addition. Use full-fat coconut milk for the creamiest result. It’s especially good for those looking for a more indulgent pastry.
3. Vegan Egg Substitutes for Egg Wash
In a traditional croissant recipe, an egg wash is often brushed over the dough to create a shiny, golden crust. For vegan croissants, you’ll need to use an alternative to eggs to achieve a similar effect. Here are some vegan-friendly egg substitutes:
- Almond Milk or Soy Milk: Brushing the dough with a thin layer of almond milk or soy milk will give the croissants a subtle golden color after baking. This option is simple and works well without affecting the flavor.
- Maple Syrup or Agave: For a touch of sweetness and shine, you can use a small amount of maple syrup or agave nectar. Mix with a little water to create a thin glaze that adds a beautiful finish to your croissants.
- Non-Dairy Milk and Turmeric: A combination of non-dairy milk and a pinch of turmeric gives the croissants a rich golden color, mimicking the look of an egg wash. Turmeric doesn’t affect the taste much but provides the perfect hue.
4. Flavor Enhancements and Fillings for Vegan Croissants
While the dough itself can be completely vegan, you can also experiment with vegan-friendly fillings to enhance the flavor of your croissants. Whether you prefer sweet or savory, here are some great options for fillings that are both plant-based and satisfying:
- Sweet Vegan Fillings:
- Vegan Chocolate: Fill your croissants with dairy-free chocolate for a deliciously indulgent treat. You can use chopped dark chocolate, which is naturally dairy-free, or find a vegan chocolate spread like Nutella that’s made without dairy.
- Fruit Preserves: Fruit jams or preserves made without any dairy or gelatin can be a great sweet filling for croissants. Apricot jam, strawberry preserves, or raspberry jam add a fruity twist to the classic pastry.
- Cinnamon and Sugar: A combination of cinnamon, sugar, and a vegan butter spread makes for a simple but delicious filling for your croissants, resulting in a sweet and comforting treat.
- Savory Vegan Fillings:
- Vegan Cheese: Vegan cheese made from nuts like cashews, soy, or coconut can add a cheesy, creamy texture to savory croissants. Brands like Violife and Daiya offer a variety of vegan cheese options, including mozzarella, cheddar, and cream cheese alternatives.
- Spinach and Tofu: A filling of spinach and tofu seasoned with garlic, onions, and nutritional yeast creates a savory, plant-based filling that mimics the richness of dairy-filled croissants.
- Mushroom and Vegan Cream Cheese: Sautéed mushrooms with vegan cream cheese create a savory and creamy filling that’s perfect for those who want a richer taste.
5. Tips for Making the Best Vegan Croissants
- Chill the Dough: Just as with traditional croissants, vegan croissant dough benefits from resting in the fridge. This helps the dough stay firm, making it easier to roll out and achieve the characteristic layers. Be sure to chill the dough between folds to maintain a flaky texture.
- Use Cold Ingredients: To achieve the best layers, it’s important that the vegan butter (or its alternative) and the dough remain as cold as possible during the laminating process. Cold butter will create the flakiness, so work quickly and efficiently.
- Don’t Skip the Resting Time: Allowing the dough to rest between each step is crucial for the texture. This resting time helps the dough relax and become easier to handle, while also ensuring the layers develop properly.
- Experiment with Fillings: Don’t be afraid to try different sweet or savory fillings. Vegan croissants are incredibly versatile, so experiment with fruits, nuts, or even savory options like avocado, sautéed vegetables, or dairy-free pesto.
Conclusion
Making the best mini croissants is a rewarding experience that allows you to perfect the art of pastry. Here are the key takeaways for achieving flaky, buttery croissants:
- Start with Quality Ingredients: Choose high-quality butter (or dairy-free alternatives) and flour to ensure your dough is smooth and easy to work with.
- Master the Laminating Process: Rolling and folding the dough multiple times creates the delicate layers that define a croissant’s signature flakiness.
- Precision in Shaping: When cutting and shaping the dough, maintain even layers and ensure a tight, secure roll to help them rise beautifully.
- Perfect the Baking: Keep an eye on your baking temperature and time. Bake at 375°F (190°C) for golden, crisp croissants.
- Experiment with Fillings: Mini croissants are versatile, and adding sweet or savory fillings can elevate your pastries to the next level.
Remember, baking is all about creativity. Don’t be afraid to try different fillings and techniques to make these mini croissants your own. Whether you’re filling them with vegan cheese, chocolate, or a fruit jam, the possibilities are endless!
We’d love to hear about your mini croissant baking adventures! Share your experiences, tips, and photos in the comments below. Happy baking!