
Wafer cookies are a popular treat known for their crisp texture and versatile flavors. You can enjoy them on their own or use them in various desserts. In The Ultimate Guide to Wafer Cookies: Flavors, Recipes, and Tips, we will explore different flavors, simple recipes, and helpful baking tips. From classic vanilla to indulgent chocolate, there is wafer cookie for every taste. We’ll provide easy-to-follow recipes and tips to help you create perfect wafer cookies at home. Whether you’re a beginner or an experienced baker, this guide will inspire you to experiment with new wafer cookie ideas. Let’s get started!
Exploring Wafer Cookie Flavors Around the World
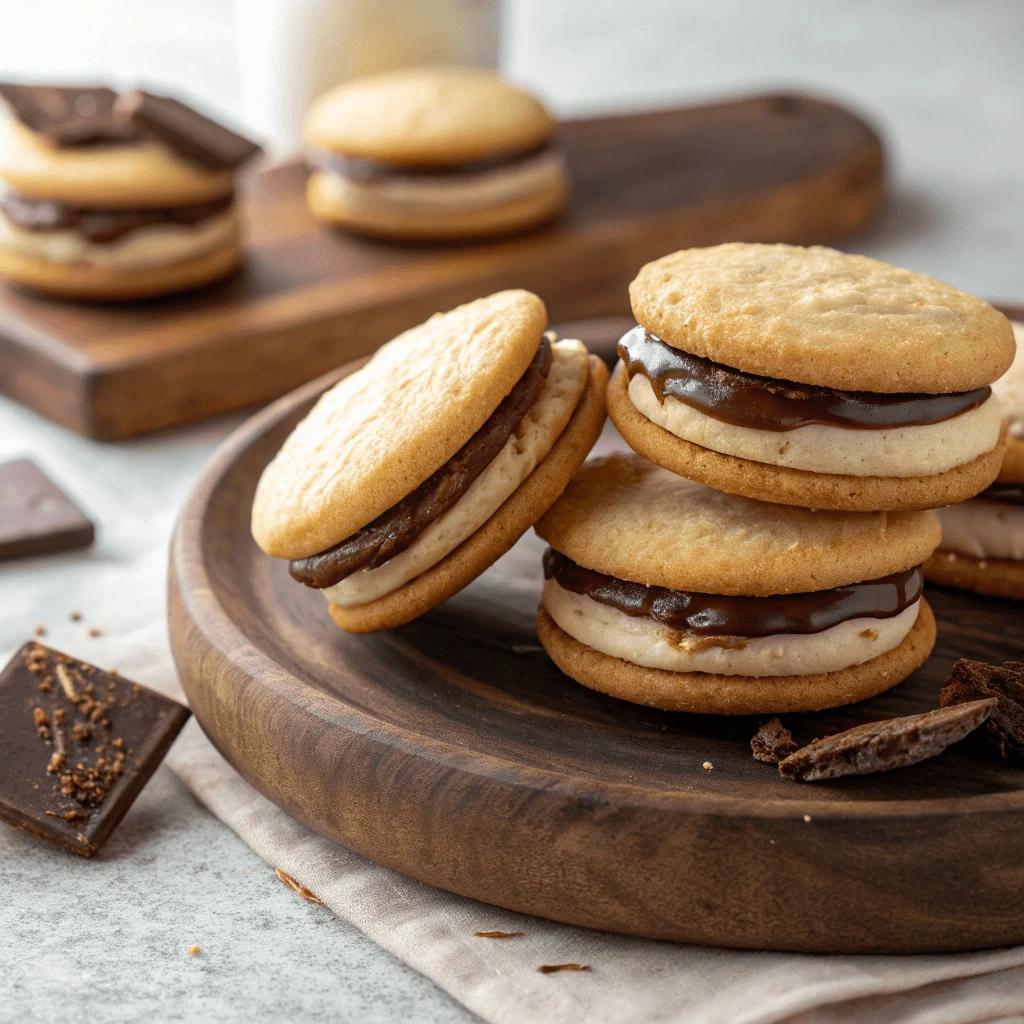
Classic Vanilla and Chocolate Wafer Cookies
Classic vanilla and chocolate wafer cookies are timeless favorites in wafer cookie recipes. Their light, crisp texture and balanced sweetness make them ideal for snacking, layering, or building into larger desserts. Whether you enjoy them with coffee or crumble them into a crust, these wafers bring flavor and versatility to your kitchen.
Vanilla Wafer Cookies: Light and Buttery
Vanilla wafers are known for their golden color, delicate flavor, and satisfying crunch. To make them at home, blend ingredients like all-purpose flour, sugar, unsalted butter, eggs, baking powder, and high-quality vanilla extract. Bake until lightly browned for the perfect snap. These cookies taste great on their own or in layered desserts like banana pudding.
Using real vanilla extract enhances the flavor, while chilling the dough before baking helps the cookies hold their shape.
Chocolate Wafer Cookies: Deep and Crisp
Chocolate wafer cookies offer a bold twist on the classic. Their dark cocoa flavor and firm texture make them ideal for recipes that call for structure, like icebox cakes or cookie crusts. The dough includes ingredients such as cocoa powder, sugar, flour, butter, and a pinch of salt to balance the richness.
For extra depth, add a hint of espresso powder or cinnamon to the batter. These cookies pair especially well with cream fillings or berry toppings.
Creative Ways to Serve
Try sandwiching two wafers with a layer of Nutella, peanut butter, or buttercream frosting for an easy treat. Crush them for a cheesecake base or layer them with whipped cream for a no-bake dessert. Vanilla and chocolate wafers also make excellent mix-ins for homemade ice cream.
To keep them crisp, store wafer cookies in an airtight container at room temperature. If they begin to soften, reheat them in the oven briefly to restore their crunch.
Ferrero-Inspired Hazelnut Wafer Balls
These Ferrero-inspired hazelnut wafer balls bring together all the indulgence of your favorite chocolate truffle with the fun of a homemade treat. With crisp wafer layers, rich chocolate, and crunchy hazelnuts, they make for an impressive addition to your collection of wafer cookie recipes.
Building the Crunchy Center
Start by creating the core: a toasted hazelnut encased in a creamy chocolate-hazelnut filling. You can use store-bought chocolate hazelnut spread (like Nutella) or make your own by blending roasted hazelnuts, cocoa powder, a touch of coconut oil, and sweetener. Scoop and chill small portions of this mixture, then press a whole hazelnut into the center of each ball.
Wrapping in Wafer Layers
To replicate the iconic crisp texture, roll each chilled center in crushed wafer cookies. Use plain vanilla wafer sheets or neutral-flavored wafer rolls, crushed finely by hand or in a food processor. This layer provides the satisfying crunch that makes these treats so addictive.
You can press the crushed wafers gently into the filling while shaping each ball, ensuring an even coating.
Dipping and Decorating
Next, melt dark or milk chocolate and coat each wafer-covered ball until fully enrobed. Use a fork to lift and tap off the excess chocolate. While the coating is still wet, roll the balls in chopped hazelnuts or sprinkle them on top for a classic Ferrero finish.
Let the finished treats set on a parchment-lined tray until the chocolate hardens. Store in an airtight container at room temperature or refrigerate if you prefer a firmer bite.
Perfect for Gifting or Celebrations
These homemade hazelnut wafer balls not only satisfy a sweet tooth but also make a beautiful homemade gift. Pack them in decorative boxes or jars, and you’ll have a dessert that looks gourmet but feels personal.
Polish Wafer Cake (Wuzetka Style)
Polish Wafer Cake, inspired by the classic Wuzetka dessert, is a no-bake treat that’s as rich and satisfying as it is easy to make. Instead of sponge cake, this version uses thin, crispy wafer sheets layered with a silky chocolate buttercream filling.
A Twist on a Polish Favorite
Wuzetka typically features sponge layers with whipped cream and ganache. This version, however, simplifies the process by using wafer sheets to mimic that layered look and feel—making it perfect for those who want the flavor without the baking.
Making the Filling
To create the chocolate cream, combine butter, cocoa powder, powdered sugar, and milk in a saucepan. Stir over low heat until smooth. Once slightly cooled, spread the mixture over a wafer sheet and top with another. Continue layering until you’ve built a solid cake with 4–5 wafer layers.
Chill, Slice, and Serve
After layering, press the cake lightly and chill it for at least an hour. This helps the cream bind the sheets together. When ready, slice into neat squares or rectangles. Serve with a drizzle of melted chocolate or a dusting of powdered sugar for a traditional touch.
Polish wafer cake is a must-try addition to your wafer cookie recipes. It’s simple, elegant, and makes a great dessert for holidays or casual get-togethers.
Homemade Wafer Cookie Recipes You Can Try
Simple Vanilla Wafer Cookie Recipe
If you’re looking for a classic treat that’s crisp, sweet, and full of nostalgic flavor, this vanilla wafer cookie recipe delivers every time. It’s perfect for snacking, dessert bases, or pairing with puddings and ice cream.
Ingredients You’ll Need
To make these homemade vanilla wafer cookies, gather a few pantry staples:
- All-purpose flour
- Unsalted butter
- Granulated sugar
- Eggs
- Pure vanilla extract
- Baking powder
- A pinch of salt
These basic ingredients create a dough that’s light, aromatic, and slightly chewy in the center while crisp on the edges.
Step-by-Step Instructions
Start by creaming the butter and sugar together until the mixture turns fluffy and pale. This step helps create a tender cookie texture. Next, beat in the eggs and vanilla extract. In a separate bowl, combine the dry ingredients and slowly incorporate them into the wet mixture.
Once the dough comes together, scoop small spoonfuls onto a parchment-lined baking sheet. Flatten them slightly with the back of a spoon or your fingers for even baking. Bake at 350°F (175°C) for 10–12 minutes or until the edges turn golden brown.
Let the cookies cool completely before serving or storing. They crisp up more as they cool, giving you that signature wafer-like crunch.
Tips for the Perfect Batch
Use room-temperature butter and eggs for a smoother dough. If you prefer an extra crispy cookie, bake for an extra minute or two. You can also dip one side in melted dark chocolate for a delicious twist.
These simple vanilla wafer cookies are easy to make and even easier to love. Try them once, and you’ll keep this recipe on repeat!
No-Bake Chocolate Wafer Bars with Nuts
If you’re looking for a quick, no-bake dessert, these chocolate wafer bars with nuts are the perfect solution. They’re easy to make, packed with flavor, and offer the perfect balance of crunch and sweetness.
Simple Ingredients
You’ll need:
- Chocolate chips (milk or dark)
- Butter
- Sugar
- Vanilla extract
- Salt
- Wafer cookies (vanilla or chocolate)
- Mixed nuts (walnuts, almonds, etc.)
Quick Instructions
Start by melting the butter and sugar together in a pan, then add the vanilla extract and a pinch of salt. In a separate bowl, melt the chocolate chips. Combine the chocolate mixture with the melted butter and sugar.
Break the wafers into bite-sized pieces, then fold them into the chocolate mixture along with the nuts. Press the mixture into a lined baking dish and refrigerate for 1-2 hours until firm.
Tips for Variations
Feel free to customize with different nuts, dried fruits, or drizzle extra melted chocolate on top. This easy, no-bake treat is perfect for satisfying your sweet tooth without turning on the oven!
Nutella-Filled Wafer Sandwiches
Nutella-filled wafer sandwiches combine the crispiness of wafer cookies with the smooth, rich taste of Nutella. These simple yet satisfying treats are perfect for when you need a quick dessert or snack. Here’s how to make them:
Ingredients
- Wafer cookies (vanilla or chocolate)
- Nutella spread
- Optional toppings: powdered sugar, crushed nuts, or sprinkles
Directions
- Prepare the Wafer Cookies
Select your wafer cookies. Vanilla or chocolate will both work, though chocolate wafers add an extra layer of flavor. Lay them flat on a surface. - Spread Nutella
Spread a generous layer of Nutella on one side of a wafer cookie. You can use as much or as little Nutella as you like. - Assemble the Sandwich
Place a second wafer cookie on top of the Nutella-coated cookie to form a sandwich. Press them together lightly to ensure the filling stays inside. - Optional Toppings
For extra flavor, dust the top of the sandwich with powdered sugar or add chopped nuts for crunch.
These wafer sandwiches are quick, customizable, and perfect for any time you need a sweet snack. They combine the crunch of the wafer with the creamy Nutella, creating a satisfying treat that’s both simple and delicious.
Healthier Wafer Cookie Options
Almond Flour Wafer Cookies
Almond flour wafer cookies offer a gluten-free alternative to classic wafer cookies. They are light, crispy, and packed with a nutty flavor that elevates the experience. These cookies are perfect for those following a gluten-free diet or anyone who enjoys a twist on traditional wafer treats.
Why Choose Almond Flour?
Almond flour is a nutritious option made from finely ground almonds. It’s gluten-free and provides extra protein, fiber, and healthy fats. This makes it a great choice for those with dietary restrictions or people looking to incorporate healthier ingredients into their baking. Despite its nutty taste, almond flour creates a light and crunchy wafer that remains satisfying.
Ingredients
- 2 cups almond flour
- 1/4 cup powdered sugar or erythritol (for a sugar-free option)
- 1/4 teaspoon salt
- 1 teaspoon vanilla extract
- 1/4 cup butter (or coconut oil for a dairy-free version)
- 1 egg
Instructions
- Mix Dry Ingredients: Combine almond flour, powdered sugar, and salt in a large bowl.
- Add Wet Ingredients: Add the egg and vanilla extract. Mix thoroughly. If using butter, melt it and add it to the mixture.
- Roll and Cut: Roll the dough between parchment paper to a thin layer. Cut into squares or your preferred shapes.
- Bake: Bake at 350°F (175°C) for 10-12 minutes, until the edges are golden brown.
- Cool: Let the wafers cool to become crispy before enjoying.
Customizing Almond Flour Wafers
These almond flour wafer cookies are versatile. Add spices like cinnamon or vanilla extract for extra flavor. You can also add chocolate chips or chopped nuts to enhance the texture. Experiment with fillings or dips to make them even more delicious.
These almond flour wafers provide a healthier, tasty alternative to regular cookies while still offering that perfect crispy texture. Whether you’re serving them at a gathering or enjoying them with a cup of tea, they’re sure to impress.
Sugar-Free Vanilla Wafer Cookie Treats
Sugar-free vanilla wafer treats are the perfect choice for anyone looking to indulge without the added sugar. These cookies offer a delicious alternative to traditional wafer cookies by using sugar substitutes, making them ideal for those following low-sugar, low-carb, or diabetic-friendly diets.
Why Opt for Sugar-Free Wafer Cookies?
Traditional wafer cookies are loaded with sugar, which adds unnecessary calories. By using sugar substitutes like erythritol or monk fruit, you can enjoy the same crispy, buttery texture without worrying about blood sugar spikes. These cookies are a great option for people with dietary restrictions or anyone aiming to reduce sugar intake. Plus, they are often gluten-free and can easily be made dairy-free or vegan, depending on your needs.
Ingredients You’ll Need
- Almond flour or gluten-free flour blend
- Erythritol or your favorite sugar substitute
- Vanilla extract
- Baking powder
- Coconut oil
- Egg (or flax egg for vegan option)
Simple Instructions
- Prepare the Dough: Start by mixing your dry ingredients—almond flour, erythritol, baking powder, and a pinch of salt. Add the wet ingredients—beaten egg, melted coconut oil, and vanilla extract—and combine everything into a dough.
- Shape the Cookies: Roll the dough between parchment paper and cut it into wafer shapes using a cookie cutter or knife.
- Bake: Place the cookies on a baking sheet and bake at 350°F for about 8-10 minutes or until golden brown around the edges.
- Cool: Let the cookies cool completely to crisp up before serving.
Tips for Success
- Experiment with sweeteners: Try stevia or monk fruit for different tastes.
- Make them dairy-free: Swap coconut oil for a vegan butter substitute.
- Add flavor: Enhance with a pinch of cinnamon or a dash of almond extract for extra richness.
These sugar-free vanilla wafer cookies are light, crispy, and perfect for satisfying your sweet cravings without the sugar!
Dairy-Free Chocolate Wafer Cookie Sandwiches
Dairy-free chocolate wafer sandwiches are a great way to enjoy a sweet treat without the use of dairy products. These sandwiches consist of crunchy wafer layers filled with a creamy, dairy-free chocolate spread, creating a perfect combination of textures and flavors. They are suitable for people with dietary restrictions like lactose intolerance or vegans, and they are incredibly easy to make at home.
Why Dairy-Free?
Choosing dairy-free options allows people who are lactose intolerant, vegan, or sensitive to dairy to enjoy treats that don’t disrupt their diet. Additionally, plant-based chocolate is often made with fewer ingredients and no artificial additives, offering a more natural and wholesome indulgence.
Ingredients You’ll Need
To make these wafer sandwiches, you’ll need:
- Dairy-Free Chocolate Chips: These are essential for the chocolate filling.
- Coconut Oil: This gives the filling a smooth texture.
- Sweetener: Maple syrup or agave nectar works best for sweetness without refined sugars.
- Vanilla Extract: For a touch of extra flavor.
- Wafer Sheets: The crispy, thin wafers form the sandwich layers.
How to Make Dairy-Free Chocolate Wafer Sandwiches
- Prepare the Filling: Melt the dairy-free chocolate chips with coconut oil. Once melted, stir in sweetener and vanilla extract. Let the mixture cool slightly.
- Assemble the Sandwiches: Spread the chocolate filling onto one wafer and top it with another wafer to create a sandwich.
- Chill: Place the sandwiches in the refrigerator for about 30 minutes to set the filling.
Tips for Perfect Wafer Sandwiches
- Experiment with Fillings: Add nut butter or even fruit preserves for added flavor.
- Texture Variations: Add crushed nuts or seeds for an extra crunch.
- Storage: Keep the sandwiches in an airtight container to maintain their freshness.
These dairy-free chocolate wafer sandwiches offer a delightful combination of crunchy and creamy, and they are sure to satisfy any sweet craving without any dairy.
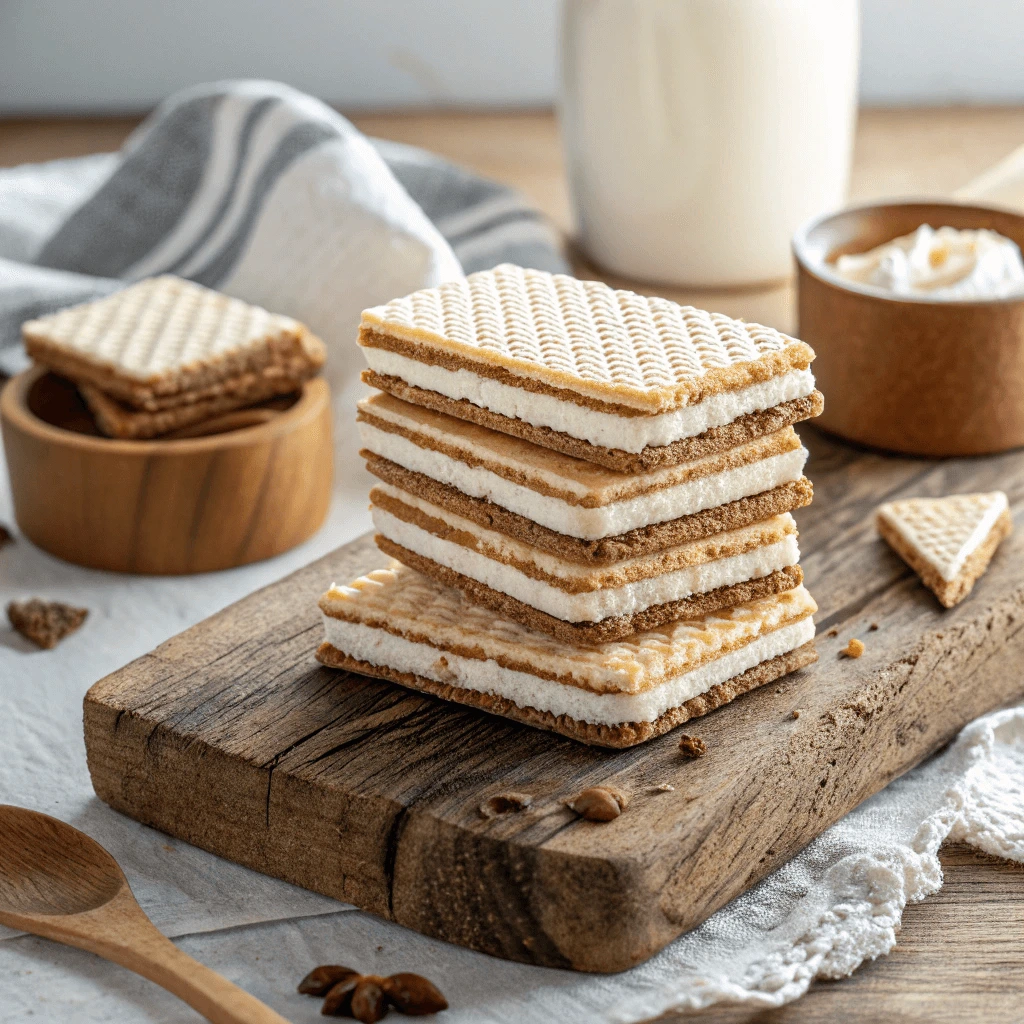
Pro Tips for Baking and Handling Wafer Cookies
How to Use Wafer Sheets Without Breaking Them
Wafer sheets are delicate, but with the right handling, you can keep them intact while creating delicious desserts. Here are a few tips to help you work with wafer sheets without breaking them.
1. Select the Right Wafer Sheets
Start by choosing wafer sheets that are known for their durability. Some brands offer thicker sheets, which are less prone to cracking, making them easier to work with in various recipes.
2. Let Wafer Sheets Reach Room Temperature
Cold wafer sheets are more brittle, so let them warm to room temperature before using. This softens them slightly, making them more flexible and less likely to break.
3. Handle with Care
When lifting or moving wafer sheets, support the entire sheet and avoid pressing on the edges or center. Use clean hands or a spatula to handle them gently.
4. Avoid Excess Moisture
Moisture is one of the biggest culprits in making wafer sheets soggy or soft. If using fillings like whipped cream or ganache, ensure they’re not too moist, or add a barrier like chocolate to prevent moisture from affecting the wafers.
5. Use Parchment Paper for Extra Support
Parchment paper can help keep wafer sheets intact when stacking or assembling desserts. It also makes it easier to remove and transport the sheets without breaking.
By following these steps, you can prevent wafer sheets from breaking and keep their delicate texture intact for your favorite recipes.
Must-Have Tools for Wafer Cookie Baking
Baking wafer cookies requires some essential tools to help you achieve perfectly crispy, delicate results. Here are the must-have tools you should have in your kitchen to make baking wafer cookies easier and more enjoyable.
1. Baking Sheet
A non-stick baking sheet is essential for baking wafer cookies. It ensures even heat distribution, which helps your cookies bake uniformly and crisp up perfectly without burning. A good non-stick sheet also prevents sticking, making it easier to remove your cookies after they’ve baked.
2. Rolling Pin
A rolling pin is vital for rolling out wafer dough. It helps you get the dough to the right thickness and consistency. A rolling pin with adjustable thickness rings is particularly useful for ensuring that your wafer dough is rolled evenly, resulting in a consistent texture for your cookies.
3. Sharp Knife or Pizza Cutter
A sharp knife or pizza cutter helps you cut wafer dough into precise shapes. Whether you prefer rectangular wafers or bite-sized pieces, using a sharp cutting tool ensures your cookies have clean, even edges without tearing or crumbling.
4. Silicone Baking Mat or Parchment Paper
Using a silicone baking mat or parchment paper is a game-changer for wafer cookie baking. These non-stick surfaces make it easy to remove cookies after baking without damaging them. They also promote even baking and prevent sticking, allowing you to bake multiple batches without worrying about cleanup.
5. Cooling Rack
Once your wafer cookies are baked, a cooling rack is essential for letting them cool properly. It prevents cookies from becoming soggy by allowing air to circulate around them. A cooling rack ensures that your cookies maintain their crispy texture and don’t lose their crunch.
6. Mixer (Stand or Hand)
While it’s possible to make wafer dough by hand, using a stand mixer or hand mixer can save you time and effort. These mixers help blend ingredients more thoroughly and quickly, ensuring the dough achieves the right texture for crisp, light wafer cookies.
With these tools in hand, you’ll be able to bake wafer cookies with ease, ensuring your treats are crisp, delicious, and perfectly formed.
Best Storage Tips to Keep Wafer Cookies Crisp
Keeping wafer cookies crisp after baking is essential for maintaining their delightful texture. Here are some simple tips for storing wafers and preserving their crunch:
1. Store in an Airtight Container
To prevent moisture from softening your wafers, store them in an airtight container. This keeps air and humidity out, which helps maintain their crispiness for a longer time.
2. Use Parchment or Wax Paper Between Layers
When stacking wafers, place parchment or wax paper between layers to avoid sticking. This also helps protect the delicate texture from moisture.
3. Keep in a Cool, Dry Place
Avoid storing your wafers in a warm or humid environment. A cool, dry pantry is the best place to preserve their crunch.
4. Freeze for Long-Term Storage
For long-term storage, freeze the wafers in an airtight container or bag. When you’re ready to eat them, let them thaw at room temperature to regain their crispness.
Creative Wafer Cookies Desserts and Ideas
Peanut Butter Wafer Cookies Stackers
Peanut butter wafer stackers are a quick, easy, and delicious treat that combines the crunch of wafers with the creamy goodness of peanut butter. These stackers are perfect for snack time, dessert, or even a fun activity with kids. Here’s how to make them and some tips for the best results.
Simple Ingredients, Big Flavor
For the best peanut butter wafer stackers, you’ll need just a few basic ingredients: wafer cookies and peanut butter. Choose creamy peanut butter for a smooth, spreadable texture, or crunchy peanut butter if you prefer more texture. Opt for light, crisp wafers that won’t overpower the peanut butter’s flavor.
Easy Assembly
Start by spreading a layer of peanut butter on one wafer. Make sure it’s even but not too thick. Place another wafer on top to create a sandwich. Repeat the process to stack a few wafers together. Typically, three to four layers of wafers with peanut butter in between works best for a snack-sized treat.
Adding Extra Flavor
To make your wafer stackers even better, add a few toppings! Drizzle melted chocolate over the top or sprinkle with a bit of sea salt for a sweet-and-salty combination. You can also roll the edges in crushed nuts or mini chocolate chips for extra texture and flavor.
Make It Your Own
Feel free to get creative with these wafer stackers. Swap out peanut butter for almond butter or Nutella for a different taste. You can even experiment with flavored wafers, such as chocolate or vanilla, to change things up.
Ideal for Any Occasion
These peanut butter wafer stackers are perfect for parties, snacks, or quick treats. They’re easy to make in bulk, and you can store them in an airtight container to keep them fresh.
DIY KitKat-Inspired Chocolate Wafer Cookies
KitKat-inspired chocolate-covered wafers are a delicious and easy homemade treat that mirrors the crisp, chocolatey snack we all love. With just a few ingredients, you can recreate the iconic wafer layers and smooth chocolate coating right in your kitchen.
Ingredients
- Wafer cookies: Light and crispy wafers, either vanilla or chocolate, serve as the base.
- Chocolate: Milk, dark, or white chocolate can be used depending on your taste preference.
- Optional toppings: For added crunch, consider adding crushed nuts or a sprinkle of sea salt.
Instructions
- Prepare the wafers: Arrange your wafers in a row, stacking them if needed.
- Melt the chocolate: Melt your choice of chocolate in the microwave or using a double boiler until smooth.
- Coat the wafers: Dip each wafer into the melted chocolate, fully covering the surface.
- Cool and set: Place the coated wafers on a baking sheet and let them cool in the fridge for 20-30 minutes.
Variations
- Mint flavor: Add peppermint extract to the chocolate for a minty twist.
- Peanut butter: Spread peanut butter between wafers before dipping in chocolate.
- Nutty: Roll the chocolate-covered wafers in crushed nuts for extra crunch.
Storage
Store the wafers in an airtight container at room temperature for up to a week, or refrigerate if you live in a warm climate.
These homemade KitKat-inspired wafers are a fun, customizable treat that delivers a satisfying crunch and rich chocolate flavor. Perfect for any occasion!
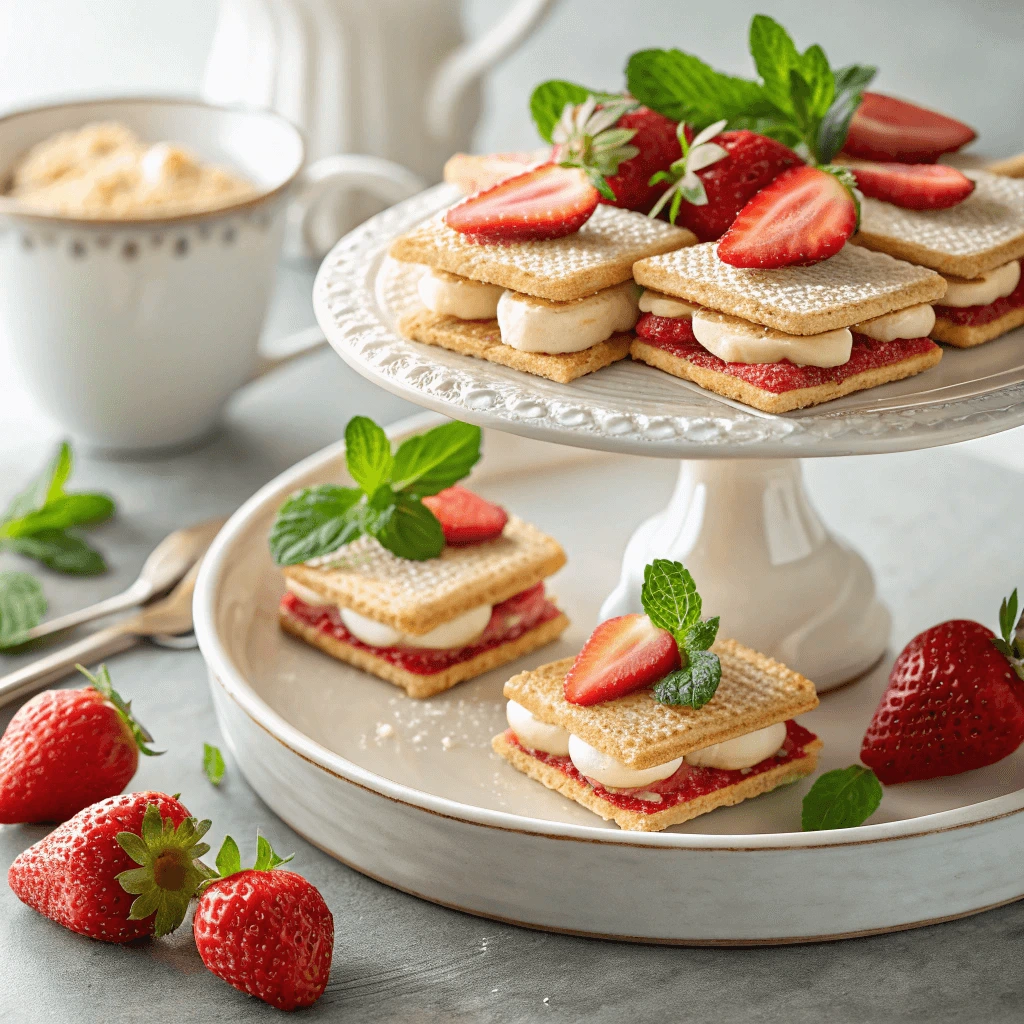
Strawberry Icebox Wafer Cookies Cake
Strawberry Icebox Wafer Cake is a no-bake dessert that’s both delicious and easy to prepare. The cake combines the light crunch of wafer cookies with the sweet, creamy layers of whipped cream and fresh strawberries, creating a treat that’s perfect for summer gatherings or any time you want a light, refreshing dessert.
Ingredients
- Wafer cookies: Use plain vanilla wafer cookies to create the base and layers.
- Whipped cream: Freshly whipped heavy cream or store-bought whipped topping works well.
- Strawberries: Fresh strawberries, thinly sliced, add a fruity sweetness.
- Sweetened condensed milk: This helps create a smooth, creamy filling.
- Vanilla extract: A touch of vanilla enhances the flavor.
Instructions
- Prepare the base: Start by arranging a layer of wafer cookies at the bottom of a baking dish or a loaf pan. The cookies will act as the foundation for the cake.
- Whip the cream: In a mixing bowl, whip the cream until stiff peaks form. For added sweetness, fold in a small amount of sweetened condensed milk and vanilla extract.
- Layering: Spread a layer of whipped cream over the wafer cookies, then top with fresh strawberry slices. Add another layer of wafer cookies and repeat until you’ve used all your ingredients.
- Chill: Refrigerate the cake for at least 4 hours, or overnight if you have time. The cold helps the flavors meld together and the wafer cookies soften into a cake-like texture.
- Serve: After chilling, slice and serve your strawberry icebox wafer cake. For an extra touch, garnish with more fresh strawberries on top.
Variations
- Mixed berries: Instead of just strawberries, you can use a mix of raspberries, blueberries, or blackberries.
- Chocolate drizzle: Drizzle melted chocolate over the top of the cake for a richer flavor.
- Lemon zest: Add lemon zest to the whipped cream for a citrusy twist that pairs beautifully with strawberries.
Tips
- For a thicker, richer filling, consider adding a small amount of cream cheese or mascarpone to the whipped cream mixture.
- You can use graham crackers instead of wafer cookies if you prefer a different texture, though wafer cookies provide the classic crunch that makes this dessert special.
This Strawberry Icebox Wafer Cake is the perfect dessert for anyone who loves fresh, fruity sweets with minimal prep time. The layers of creamy, fruity goodness combined with the crunch of wafers create an irresistible treat that everyone will love.
Conclusion
wafer cookies are a delightful treat with endless possibilities, from classic vanilla and chocolate to creative variations like Nutella-filled sandwiches or KitKat-inspired treats. With tips on using wafer sheets, essential tools for baking, and storage advice, you can easily create perfect wafers at home. Whether you’re seeking gluten-free options, healthy alternatives, or decadent desserts, wafer cookies are versatile enough to suit every craving. Try out these recipes and share your favorites to enjoy a delicious wafer experience that everyone will love!